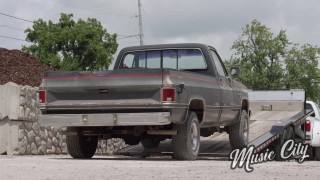
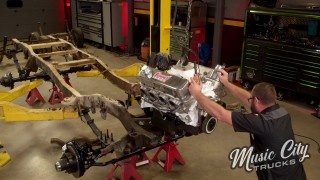
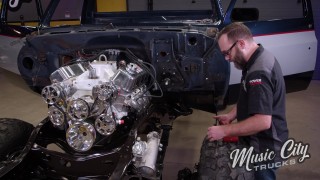
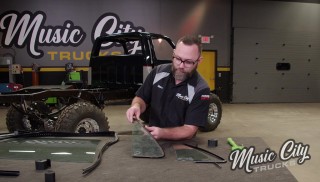
More Faux Guy K10 Square Body Truck Episodes

Music City Trucks Featured Projects

Music City Trucks Builds

Parts Used In This Episode

Summit Racing
KC HiLites Daylighters

Episode Transcript

(Marc)>> You're watching Powernation!

(Marc)>> Today on Music City Trucks we decorate the living room on our square body.

(Eric)>> And we take our K-10 back in time with a few touches straight out of the '80s.

(Marc)>> A real deal Hollywood icon shows up.

(Eric)>> And finally we take this square body out for its very first drive. This is the kind of truck that makes dreams come true. [ Music ]

(Marc)>> This has got to be the most iconic design. [ Music ] Welcome to Music City Trucks. I'm Marc Christ and you can see we've got a new face here in the shop, Eric Smart. He's the newest member of the Powernation family, and he's gonna be joining us here in the Music City Trucks shop to help us out. Eric, welcome aboard.

(Eric)>> Thanks Marc. It's great to be here and it is even better to look at this thing in person and see that it is almost done. We will be firing it up before the day is out, but we still have some really great surprises for you guys before we close the lid on this thing for good.

(Marc)>> You came just in time cause this thing's almost done. All the hard part's done. Now we're moving on to the easy stuff, like getting this interior installed. Now if you have a Chevy truck built between 1947 and 1998 TMI Products has everything you need to overhaul your interior. This is their Pro Series Sport-R kit. The door panels are completely custom. We picked the colors with that red, silver, and black plaid and the blue vinyl to match our paint scheme. They tied it all in with red stitching. It looks really nice, but they do have off the shelf options as well. We've got a dash pad to match here, a billet steering wheel, visors, but of course my favorite part has to be the 60-inch deluxe bench seat. I'm a sucker for a bench seat, and this one is at the top of the list. It's super comfortable, looks amazing, and it's got all kinds of cool features, like the backrest for the person sitting in the middle is actually an arm rest with a cup holder built in. Now what could be better than that on a long road trip? Of course, it does have an extra little pocket here for your map or registration. If you're gonna be on a long trip all this extra bolstering on the seat bottom and the seat back really helps keep you planted and it's also really comfortable. I can't wait to get this thing installed, but before we get this in we've got some other things we need to do to the interior first. I'm gonna start with the door panels. We're gonna start over here on the driver's side. We've got everything assembled inside this door, all the moving parts. Got our door mechanism all dialed, and our window regulator. So, it's time to put the panel on, and we don't have to worry about it anymore. I even got everything lubed up. Now TMI gives us this template because this new door panel goes all the way to the bottom of the door where our original door panel stopped right about here. So just need to put this up there, tape it in place and mark it, and drill some holes. I'm gonna make sure all this lines up. Then I'll mark and drill my holes. [ Music ] [ drill humming ]

(Marc)>> I really like the look of this panel. [ Music ] Some final touches. [ Music ] I like that we switched that to black, nice contrast. Last touch is this little die right here. Classic Industries had these.

(Eric)>> So with the rest of the interior looking as good as it does there's no way we're sticking this back in there. It's old, beat up, and it just wouldn't look right next to all that beautiful paneling we've got over there. So, we will be reusing our original gauge cluster and gauges, but it's a little bit dirty. So, we're gonna get that cleaned up before we actually put it together and get it in there. On top of that we got a brand new bezel and crystal clear gauge lens from Classic Industries. Now if you think that looks good then you've got to know they also send you this if you feel like dressing it up even more. But like I said, this stuff's just a little bit crusty. So, we're gonna get that cleaned up before we put it all together. To take these gauges out you're gonna use a quarter inch or a seven millimeter socket. I've noticed a lot of these trucks actually alternate between the two when it comes to these small dash bolts. So, make sure you have them both handy. Now we're gonna be reusing our original printed circuit because it's actually still in pretty good shape, but if you do need a replacement you can get one at Classic Industries. Before you put everything back together make sure you clean out the inside of the cluster and all the electrical contacts. Now that we've touched up our needles and cleaned the gauge faces it almost looks like a brand new cluster. So, we're gonna go ahead and put the speedometer in here, and that finishes up all the gauges, which means that all we have left to get this thing done is screw them all down, put the cover and the lens on here, and then we're ready to go put it in the truck. With the cluster restored and fully assembled we slide it back into place.

(Marc)>> You ready for this dash pad?

(Eric)>> Absolutely, this thing looks good!

(Marc)>> Cluster looks nice! I'll go get some screws.

(Eric)>> Time for the new bezel to go in. [ Music ]

(Marc)>> Let's take this protective coating off. Look how good that looks! Well, that dash is done. Now it's time to move on to getting this floor covered. This is heavier than it looks. Once we added the floor padding we made quick work of our vinyl flooring. We chose this option because this truck was originally equipped with one. Plus, they're super easy to keep clean.

(Eric)>> With the seatbelts installed it's time for the seat. We love the way this interior turned out.

(Marc)>> It may be a little loud for some, but we think it fits this build just right. Next, before we finalize we've got to accessorize our K-10 square body time machine.

(Marc)>> We're getting really close on our square body here, "The Faux Guy". We only have a few things left, but these are like key ingredients to make this truck what it should be. You might recognize this.

(Eric)>> And you've got these right here. Classic KC Daylighters!

(Marc)>> Doesn't get any more '80s than that. I'm gonna start with this antenna mount.

(Eric)>> And I'm gonna tackle the roll bar and spotlights that we found at Summit Racing.

(Marc)>> Actually drilling into the freshly painted truck's not my concern. Drilling into the freshly painted truck in the right location, that's my concern. [ drill buzzing ]

(Marc)>> How's everything going for you Eric?

(Eric)>> Not too bad up here. Definitely glad we put this bed liner in cause now I don't have to worry about damaging anything while I'm putting this roll bar in here.

(Marc)>> While Eric's working on the roll bar and lights I'm running the c-b antenna cable and getting the side moldings installed. Now the truck is fully accessorized and so am I.

(Eric)>> It's time to get the lights installed and give this truck a face. [ Music ]

(Marc)>> Woo!

(Eric)>> Five o'clock can not come fast enough today.

(Marc)>> This week, oh my gosh. Is it five o'clock yet? This week!

(Eric)>> Now it's time to get the headlights and turn signals installed so we can move on to putting in the new grille.

(Marc)>> Toward the end of the build I always say that 10 percent of the work takes 90 percent of the time. It doesn't really take that much but it sure feels like it. You're like, oh, we're almost there! Just a couple of little things. Just the grille, and the headlights, and the bumper, and the winch, and truck's done. Not quite that simple. With the outer molding installed the new grille can go in along with our brand new bowtie badge.

(Eric)>> To finish out this part of the truck we're gonna get the headlight bezels installed and peel off the protective film to reveal the chrome on our grille. Look at that shine.

(Marc)>> I'm really glad we went with this yellow finish on this bumper. We're just trying to protect this beautiful Advanced Plating chrome finish. Wow, that's chrome now.

(Eric)>> That is the shiniest thing I have ever seen in my life.

(Marc)>> Now it's time for our Fall Guy style winch mount. Things are getting real real fast. Well, this is absolutely a huge moment for this build, and what would an old school build be without an old school Warn winch. In case you don't recognize this, and you probably recognize it and you don't know what it's called, this is a Warn M-8274. This winch has been made for almost 50 years non-stop. Now they've done a few upgrades over the years, but pretty much this is the exact same winch that they launched in 1974. This is an upright winch with a six horsepower motor. It's got 10,000 pound pulling capacity. Plus, it just looks cool. You can see the cogs here on the outside. This is just amazing. I love these winches. It's gonna look awesome on our truck. One cool thing that this one has as an upgrade is the synthetic rope, which is pretty cool. So, it's a little modern touch. We just need to get this thing installed and it's getting close. [ Music ]

(Eric)>> Look at that! We can't call this finished without adding these KC's. Huge thanks to Summit Racing for this other set of KC Daylighters because this whole entire winch mount and brush guard wouldn't be complete without the KC's on there.

(Marc)>> Let's get the hood on there. Now you might remember at the beginning of this build when we first brought it back here to the shop we put a brand new Duralast battery in it, but we're gonna upgrade yet again because we wanted to go with this one that's got the top and side posts to help run all of our accessories, like our winch and our lights. Now these Duralast batteries go through rigorous testing, both cycle tests and extreme temperature tests. So, you know these things are in for the long haul. We just need to get this thing installed here and get this thing fired up. We got this Duralast battery from the AutoZone Pro website. Now this battery in particular has 810 cranking amps. More than enough for that big block. Alright, fire it off! [ engine starting ]

(Eric)>> Oh, listen to that! [ engine revving ]

(Eric)>> Are we done?

(Marc)>> I think so!

(Eric)>> We've got to check one more thing though. You think anybody still uses these?

(Marc)>> I do.

(Eric)>> Let's find out. Breaker, breaker, one-nine, anybody out there?

(Kevin)>> This is the fall guy here. I hear you loud and clear.

(Eric)>> Did you hear that? Up next, we found a winch mount from a Hollywood icon, and you won't believe what shows up.

(Marc)>> Look at that thing!

(Kevin)>> This is the fall guy here. I hear you loud and clear.

(Marc)>> Dude what was that? [ engine rumbling ]

(Eric)>> I don't know. Sounds good though. No way! [ Music ] No way!

(Marc)>> Look at that thing! It doesn't get any better than this does it? Obviously, we knew this truck was here because we ordered this special winch mount from this gentleman right here, Kevin Webb. Who not only reproduces Fall guy winch mounts, but he has a Fall Guy truck himself. Kevin thanks for being here.

(Kevin)>> Glad to be here.

(Marc)>> Now this is not a clone, right?

(Kevin)>> No sir, this is an actual truck that was used on the filming the Fall Guy. From about mid-season two to season five when they ended the show.

(Marc)>> How many of these trucks exist that were actually used on the show?

(Kevin)>> As of right now I can say there's at least two out there. There could be more but two for sure.

(Marc)>> Two including this truck.

(Kevin)>> Yes!

(Marc)>> So that's not a lot.

(Kevin)>> No, it's not a lot. These trucks weren't treated very well on the show.

(Marc)>> What is this truck, what year?

(Kevin)>> This one is titled as a '77 because of the cab. It's bearing the right front end on it, but this particular truck wore different front ends during the show depending on how much damage it had received. Whatever they had on hand they would put different front ends on it.

(Marc)>> Like a lot of t-v cars, they just grabbed something similar and painted it up to match and send it out there on the set. Can you open the hood?

(Kevin)>> Sure can.

(Marc)>> Oh wow!

(Eric)>> I think something's missing in here Kevin.

(Kevin)>> That's what makes it different from the other trucks. They relocated the engine underneath the cab of the truck for weight balance because this was the mid-engine stunt truck. It showed up mid-season two to the end of season five when they ended the show, and it saved a lot of trucks lives because they reused this one over and over.

(Marc)>> It's pretty obvious that we weren't trying to create that truck, but it is very refreshing to see how similar they really are next to each other here.

(Kevin)>> If 20th Century Fox hadn't picked the brown and gold as those colors that would have made a good looking Fall Guy truck too.

(Marc)>> Why don't we go out for a cruise.

(Kevin)>> Sounds good!

(Marc)>> Let's do it. [ Music ]

(Eric)>> So how'd you end up with this truck?

(Kevin)>> It found its way to me. It was up for sale on eBay. I had a friend message me one day, sent me a message with a link to the eBay ad. I hadn't seen it, and they said, you need this. I clicked on it and my jaw dropped. So, I went and the truck was in Jackson, Mississippi. So, I made a trip down there with my dually and my trailer, and looked the truck over, and it was what it was advertised to be. So, I bought it and brought it home. [ engine rumbling ]

(Eric)>> So you took this thing from being purpose built just to get jumped its whole life and you turned it into something that could be driven and appreciated every day. This has got to be one of the coolest things I've ever seen. Especially being a square body guy myself nothing is more iconic than the Fall Guy stunt truck.

(Kevin)>> Breaker, breaker one-nine, is anybody out there?

(Marc)>> Are you following us?

(Jeremy)>> Your c-b works, that's amazing!

(Marc)>> I guess our c-b radio works.

(Kevin)>> I'm following some guy. I think it's Lee Majors in front of me. I was trying to get him to stop so I could get his autograph.

(Marc)>> Well I'll give you my autograph but I'm not Lee Majors. I'm a little more minor than that. It's really refreshing to see you in my mirror.

(Kevin)>> I thought that might have been Heather Thomas there beside you.

(Jeremy)>> Hey, be pushing that button.

(Marc)>> His hair is gray, not blond.

(Kevin)>> It runs well. No overheating problems, and it drives like a regular truck for the most part.

(Eric)>> That's the most surprising part about it. You would assume dropping that weight all the way back to center it would affect the performance on the road, but it really doesn't at all. This is a dream come true for me. This is one of the coolest things I've ever gotten to do.

(Marc)>> Coming up, our K-10 square body that we call Faux Guy hits the open road.

[ Music ]

(Marc)>> Well special thanks to Kevin for bringing his truck out. That was really amazing, wasn't it?

(Eric)>> Oh yeah, I never thought I'd get a chance to see that thing in person.

(Marc)>> He's a cool guy, and he knows a lot about the Fall Guy stuff, which was an added bonus. Now I think it's time to shift our focus to just this truck and what it is on its own because it does stand on its own.

(Eric)>> This is by far one of the most beautiful square bodies I've ever seen, and I can't believe that we built this. This is the kind of truck that makes dreams come true. [ engine rumbling ]

(Marc)>> Square bodies are pretty near and dear to me because the first ever engine swap I did was in a square body Chevy. Kinda hits home for me to build this truck. If you look back at where it started it was a really solid truck to start, but it has come a long way from where we started. Let's take a look at the journey of the build of our '85 K-10 that we call The Faux Guy. [ Music ] We picked this truck up down in Fayetteville, Tennessee, and after some fun at Wooley's Off Road, we brought it back to the shop, tore it down to the bare frame, mocked up our new drivetrain, and sent the chassis off to be blasted. We painted the frame with some fresh black and started assembly with a 496 big block, 4-L-80-E transmission, Dana 60 one tons, six inch lift, and some 36-inch swampers. Meanwhile we worked the body over and sprayed it back to its original colors, and then it was time for the body to go back on, followed by all those finishing touches. Well, here it is all finished up, and I have to say if we had to do it all over again I wouldn't change a thing.

(Eric)>> This is the perfect square body. I don't care what anybody says. It does not get better than this thing.

(Marc)>> Well that says a lot coming from a square body guy. How many of those things you have?

(Eric)>> I have three right now.

(Marc)>> I know you haven't been here since the beginning of the build but thank you for everything that you've done since you've been on board. You really came in and dug in here at the end when things were really tough. Look at it!

(Eric)>> It's been my pleasure to get my hands on this thing. I still can't believe that I got to work on it.

(Marc)>> Not only did you get to work on it, but you get to drive it. Let's go! I've got to ride though cause you need a chaperone.

(Eric)>> You mean we can't go to Wooley's?

(Marc)>> Not this time. Well, what do you think?

(Eric)>> This is the nicest square body I have ever been in, let alone driven.

(Marc)>> I look at this truck and I say, that's my favorite square body ever. You mentioned this being a dream build. What's cool about it is if you're a square body guy, or even if you just like old school trucks like this, this is what you picture of the ultimate truck. What makes this truck an '80s build, or a period correct build? The rollbar I think is number one.

(Eric)>> Definitely, the KC lights on there, and on the front.

(Marc)>> Chrome wagon wheels.

(Eric)>> Then of course no replacement for displacement. We've got 496 cubic inches of Chevy awesomeness under the hood. That just screams '80s right there. [ engine revving ]

(Eric)>> There is nothing better than this. It's got the perfect lift, the right old school wheels and tires. [ engine revving ]

(Marc)>> Glad to have you on board. Glad you got to drive your dream truck here bud.

(Eric)>> What do you say we head back to the shop and start planning our next one.

(Marc)>> That's a good idea. We're probably out of gas by now.
Show Full Transcript