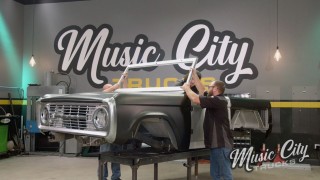
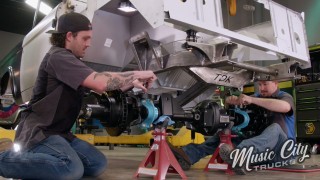
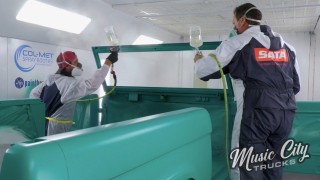
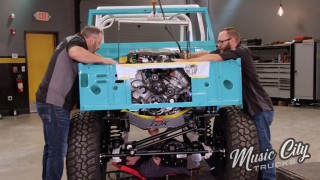
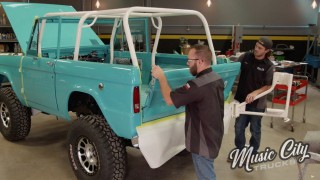
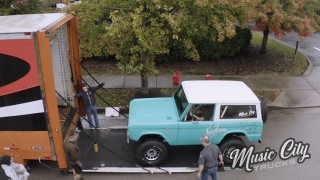
More Beach Cruiser Bronco Episodes

Music City Trucks Featured Projects

Music City Trucks Builds

Parts Used In This Episode

Summit Racing
Vintage Air Air Conditioning
Edelbrock
Supercharged Coyote Crate Engine
Matco Tools
MATCO Tools are the Official Tool Supplier to Music City Trucks
Power By The Hour
Belt Drive Kit
The Industrial Depot
Tools, Hardware, Shop Supplies

Episode Transcript

(Marc)>> You're watching Powernation.

(Brandon)>> Today on Music City Trucks.

(Marc)>> It's a huge mock up show starting with an upgraded belt drive assembly.

(Brandon)>> Then making that engine fit.

(Marc)>> Okay go ahead now.

(Brandon)>> Roll cage!

(Marc)>> Plus wiring, powder coating, bed lining.

(Brandon)>> And putting the truck back on the frame.

(Marc)>> Big show! ♪ [ engine revving ] ♪

(Marc)>> Hey everybody, welcome to Music City Trucks. I'm Marc Christ.

(Brandon)>> And I'm Brandon Burke, and on this episode we're gonna take our Seafoam Beach Cruiser Bronco and get it ready for body work, which means putting almost everything into the truck that needs to go in there like our Coyote, our 6-R-80, transfer case, and all the other goodies that go into a project like this.

(Marc)>> Speaking of a project like this this is a doozy of a build, and if you're just joining us we started with a brand new aftermarket chassis bare and built it up from there. We got this brand new body that we built from parts right here in the shop. We added all new suspension, crate axles, and it's looking like something but it's still a long ways off from where we're headed. We're excited to call this project The Beach Cruiser Bronco. It's gonna be the perfect blend of classic styling and modern technology that'll be able to cruise the beach, scream down the interstate, and everything in between. Well we obviously wanted to set the bar really high with a build like this and we're gonna do that with all of the components, and the engine is no exception. We went with Edelbrock's supercharged Coyote crate engine. This thing is 785 horsepower, 660 pound feet of torque. This thing is no joke, but it's not just a Coyote crate engine that they slapped the supercharger on. This is a fully built bottom end, forged crank, forged H-beam rods, forged pistons, and of course it's got the 26-50 t-v-s Edelbrock supercharger on top. It's got a full eight rib belt drive. So you don't have to worry about anything like belt slippage, and then it comes with all the other components that you need to get this thing installed. The controls, and the wiring, and everything like that. So you just hook up a few wires, add some fuel, and this thing is gonna make our Bronco scream but we're not stopping with just this engine.

(Brandon)>> Now like I said we went with a 6-R-80. Ford's been putting these behind Coyotes since 2011 and they're great transmissions but this one's a little special. This one's a level 10 bulletproof 1,000 horsepower transmission. So it's gonna be able to take all the power that our supercharged Coyote can give this. Alright we're gonna be installing the engine and trans, and we already got the Bronco moved over to the lift. All the sheet metal taken off so we don't have anything in our way. First thing to do is install these headers. [ drill humming ]

(Brandon)>> Snug them down.

(Marc)>> Well there's one more thing we want to get addressed on our engine here before we drop in between the frame rails of our Bronco and that is the belt drive. Now no Coyote comes with a power steering pump, even this Edelbrock crate engine, although it does have a really nice belt drive system on it, and we' need power steering and hydro boost on our truck here. So we have to add the power steering pump. The other thing we want to add is the a/c compressor. With such a nice truck like this it's got to have AC and we want to get all that stuff installed now during mock up so we don't have any clearance issues later. ♪ We're gonna start by disassembly the belt drive. This Edelbrock belt drive system uses an eight rib design. This increases the surface area of belt engagement on each pulley, which helps prevent belt slippage. This is particularly important on high horsepower applications like our supercharged Coyote. ♪ To make room for all of these accessories we have to remove some of the bosses on the timing cover. The key here is to take it slow cause you don't want to cut through that timing cover. ♪ [ drill humming ] ♪

(Marc)>> We got this new belt drive kit from Power by the Hour Performance, which is made explicitly for Edelbrock supercharged Coyotes with the eight rib setup. It puts the compressor and the alternator on the passenger with the inner belt... ♪ ...and it puts the power steering pump conveniently where the alternator used to be. [ drill humming ]

(Marc)>> And then finally the primary belt. Ready?

(Brandon)>> Yep. Like it was made for it.

(Marc)>> With the belts on now we can get this thing mocked up in the truck, make sure everything fits, and clearance where we need to.

(Brandon)>> Double fingers crossed.

(Marc)>> Let's see how much of the inner fenders we need to clearance. Watch the radiator support too with that alternator.

(Brandon)>> Well I'm gonna tell you right now if we have to go back any these headers aint.

(Marc)> Let's just go down a little bit and try it. See what happens.

That's gonna be a no go. Got about a half an inch now before I'm oil filter on the cross member. Let's make some marks of where we want to cut. Things we want to do.

(Brandon)>> Pull it out, fix them, and try again. alright so our first install didn't go so great. The headers and valve covers hit the wheel tub, and you can see right here the valve cover here, and then headers drug the wheel tube and also the firewall. So me and Marc took a few seconds, more like 15-20 minutes, to think about it and I think we have a solution. It's to cut the wheel tub on this top flange taking about three quarters of an inch out of it and making it bolt in. that kills a couple of birds with one stone by being able to put the engine in without the valve covers hitting the wheel tub, and we don't have to scratch that firewall because we can put the header in after the fact, and then just slide this piece in, bolt it in, call it good. This three quarter inch tape works perfect because it's the same width I want to take out of the wheel well and provides a straight edge for me to cut on. [ saw buzzing ]

(Marc)>> Okay go ahead now.

(Brandon)>> with the engine in place the header slides right in. Moment of truth! [ metal scraping ]

(Marc)>> Oh yeah with room to spare too. Everything else looks good. Why don't we go up and get the transmission on there?

(Brandon)>> Keep chugging.

(Marc)>> Obviously the flex plates's not on there but this is mock up,so! [ drill humming ]

(Brandon)>> Let's get the transfer case we bolt up. That way we can run a pattern and see.

(Marc)>> Okay for our cross member?

(Brandon)>> For our cross member. ♪ 25 and three-eighths?

(Marc)>> A quarter, alright, let's check the other side just to see. Five and a half. Alright just write your measurements in there. I think it's to scale too. Up next, I fit our steering column and a/c box.

(Brandon)>> And I get to build the roll cage. Burn it in Brandon's here to play.

(Marc)>> Power steering pump clears.

(Brandon)>> Valve covers don't touch.

(Marc)>> Headers are free and doesn't hit the firewall.

(Brandon)>> It's tight but if fits.

(Marc)>> If the hood closes we're good to go other than this throttle body, which we'll figure that out later. So it's time to move on to some other things that may require some trimming on the body like the hydro boost here and a couple of other things.

(Brandon)>> While you do that something just showed up and I'm gonna go grab that.

(Marc)>> Okay let's get that backing plate in there. I just want to make sure these are lined up cause this little plate has to be in there and we have to cut this out to match. [ saw buzzing ]

(Marc)>> This kids is why you do mock up. ♪ It's going in! Well I've got to say that looks pretty good. There are still some other things that we need to get mocked up. I think I'm gonna move on to the steering column next, Brandon. ♪ Ah!

(Brandon)>> Guess what we got, roll cage!

(Marc)>> Looks like the hard work's already been done. Well we've got this unpainted column right now but Flaming River is sending us a black powder coated version. This is just for mock up. The reason we want to fit the column is so we can get the steering shaft routed to make sure there are no clearance issues between the column and the box. ♪ Good to go! Well we're making some good headway. Everything seems to be going really smooth. I want to start working on the a/c. This is something I definitely want to get mocked up before we tear this thing apart. Now we went to vintage air for one of their '66 to '77 Bronco kits, which we have, but they also sent us this little dummy here for the evaporate heater case. It's just completely blank. It's super light. It's easy to use for mock up, something like this. It's got the exact brackets on it that we're gonna be using to mount the real one into our truck later after paint, and we went ahead and welded up all the holes on the firewall here on the passenger side before we put that inner fender in because there's so many holes here. There's the holes for the heater pipes to go through and all the mounting brackets for the factory case, which we knew we weren't gonna be using. So with all that smoothed out I can mark where these holes need to be, get this thing installed, and call it good. ♪ [ drill humming ]

(Marc)>> With the first hole drilled I can mark this other one. [ drill humming ] ♪

(Marc)>> It does line up. [ drill humming ]

(Marc)>> With the a/c box in place it's time to move on to the engine controls. We'll get the wiring harness routed and a few connectors plugged in. ♪ This is gonna go here. This is gonna live wherever that's gonna reach. So we just need to find a happy place for that. Thn we need to find a home for the e-c-u and the fuse box. We're better suited up here.

(Brandon)>> Alright so I'm working on our pre-bank cage for the Bronco, and this is specifically made for early Broncos, but it is a you weld it kit. So you have to do some measuring, trimming, and you can tell by the door bars that obviously it's a little long. So we're just gonna have to take some measurements and start cutting. I'm starting out with the mounting plates and main hoop getting it centered in the truck. ♪ Then I'm going to tack the plates in so they don't move while I measure for the rest of the tubes. ♪ ♪

(Marc)>> I've got the harness run through the firewall and settled on mounting positions for the fuse box and e-c-u. ♪ Test fit this battery tray just to make sure, and lastly the accelerator pedal. ♪ Very nice!

(Brandon)>> See if this works. Since no two Broncos are alike some of the tubes are left long so you can fit it how you want in your truck. ♪ [ welder crackling ]

(Brandon)>> The windshield's still kinda floppy. Same goes for the front door bars we've just got to cut them to fit. [ welder crackling ]

(Brandon)>> Alright now that I've got all the tubes tacked in place and everything where I want it I'm gonna let Marc finish weld this cause I've got other stuff to do.

(Marc)>> To final weld the cage I'm using the Forney 220 ac/dc tig welder. Tig welding something like this is ideal because these welds will be exposed, and we want them to not only be strong but also visually appealing. ♪

(Brandon)>> This is a pretty consistent gap. [ saw buzzing ] ♪

(Marc)>> I'm using the same machine to weld this filler panel in, which shows how versatile this Forney tig welder is. ♪ Down towards you.

(Brandon)>> Now that mock up's done we tear everything out. Is the floor or anything moving?

(Marc)>> Dude nothing moved. Just the whole thing went up. Dude this is a very big moment. Just think, this is the first time this body has ever been off of that frame.

(Brandon)>> I can't wait to get it over here in the prep booth, get it in some epoxy, and put some color on it.

(Marc)>> Well I've got to get back in there and get that frame stripped down. Got to get all those pretty suspension components all wrapped, don't scratch them, get that frame over to the powder coater. Up next, we'll take our Bronco frame to Blast from the Past and get it blasted and powder coated.

(Brandon)>> Alright got the Bronco body in the prep booth getting it all sanded down, ready for epoxy. I just can't wait to see this in paint, and I know this might not be the most exciting part of the process but maybe this is.

(Marc)>> We'll we've got our Bronco chassis here on the trailer, and all stripped down, and ready to look pretty, and we're at Blast from the Past in Lebanon, Tennessee, and they've got what we need. ♪ They've got two big blast booths here. In this one they've got a bunch of small parts they're working on and in this one over they've got a 1950 Chevy truck cab. Check this out! [ hissing ]

(Marc)>> Now that blasting process is great if you've got body panels that you want to remove all the paint, rust, and old body filler so you can prep for your new body work and paint, but roughing panels for body work and paint isn't the only reason that you would blast. For instance this is our Bronco frame right here and they've got that blasted up real nice using the little tiny glass beads, which makes it a really nice satin finish on there, and the reason they do that is cause that's a great place to start apply powder for powder coat. That's what we're getting ready to do now. ♪ [ hissing ]

(Marc)>> Powder coating is a lot different than painting because the part is electrostatically charged to attract the powder, which will later be baked on. Now for the powder we're using on our chassis here we decided to go with Prismatic Powders. They're known for having really high quality powder, and not only that they're really good at custom colors. In fact they've got over 6,500 custom colors in stock. Now we chose a pretty simple black on purpose for this but if we wanted to go with something crazy chances are they would already have that in stock, but if not you can always send them a sample and they can make you your own custom color, which is actually pretty cool. With the powder applied it goes in the oven. ♪ And when it comes out it's baked to perfection. Powder coating is great because it looks nice and it's stronger and more durable than paint. Yeah I'm happy with that color I picked I'll tell you that. Well that was a blast but I'm glad we're past it. We've got our chassis back here in the shop fully powder coated with a fresh coat of black, and I've got to say I love the way it looks, but even more than that on a build of this quality you have to have a powder coated chassis just to elevate the build to where you need it. Now this thing is ready for its next journey and that's gonna include getting the body mounted onto this thing for the final time.

(Brandon)>> I give our tub a nice coating of bed liner on the under side and then it's time to marry that body to the frame!

(Brandon)>> Alright our Bronco just made a huge transformation. It's now in full epoxy and it looks amazing. It's super straight, which is gonna be great for us during body work but our next step is to get this thing taped up and bed lined on the under side. That's gonna protect us from rocks, sound, heat, all the elements. Then once the bed liner's done we're gonna be putting it back on the frame that Marc just brought back and get this thing ready for body work. So let's get this thing bed lined. ♪ Masking up for bed liner is a tedious process because you don't want to get it where you don't want to get it. ♪

(Brandon)>> This sprayable bed liner is great because quite honestly it's hard to make a mistake. [ hissing ]

(Brandon)>> Alright well here's the finished product. It looks really good. Now this kit does a full size bed but apparently it also does the complete underside of a Bronco, which is really nice, and this material is gonna protect a vehicle like this just in case it goes off road from any rocks or damage, etcetera. Now one of the reasons why we did the undercoating before we made it to the frame is because if you know Broncos they move, and once this thing's in body work we don't want to take that off the frame again and misalign those panels, or after paint risk scratching this thing. Now that the Bronco's all in one color you can tell how straight it is, and with this epoxy on there it gives you that nice prevention and a really good foundation to build all you're body work on. So now the next step is just to get it on that frame. ♪ With the frame masked off so we don't get overspray on that new powder coat it's time to marry the body to the frame. ♪ Well our Bronco's married to the frame forever. It's never coming back off. We also got all the panels bolted up and our gaps pretty much roughed in where we want them.

(Marc)>> Yeah it looks like a Bronco now, and it makes me want to just throw all the axles, the suspension back under there, the drivetrain, and just like go take it for a spin, but we can't do that yet can we?

(Brandon)>> Not yet! Next time we work on this thing it's gonna be a big show. We've got some experts coming I helping with body work and we're gonna get this thing painted in a week.

(Marc)>> Yeah that's no joke, but for now I'm just gonna enjoy it the way it is.

(Brandon)>> I'm gonna take my break. If you want to know more about our Beach Cruiser Bronco go Powernation TV dot com and check out our project page.

(Marc)>> We have current build status, before and after pics, links to parts used, and all the episodes are right there on one page.
Show Full Transcript