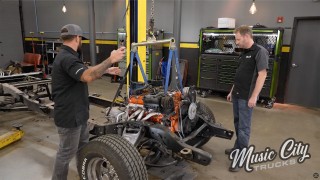
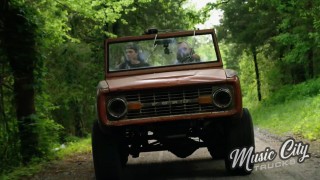
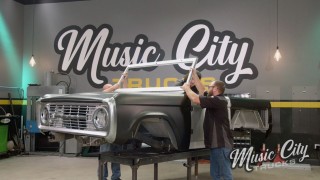
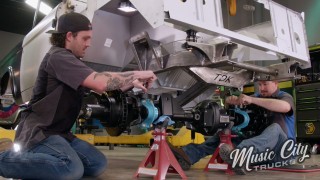
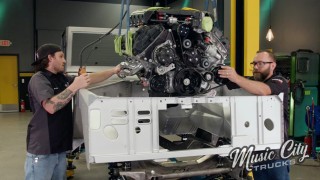
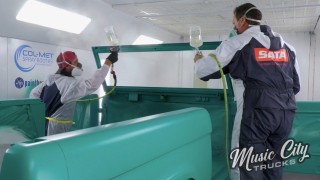
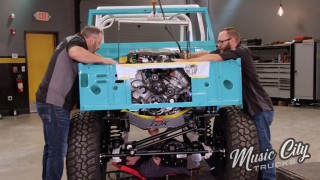
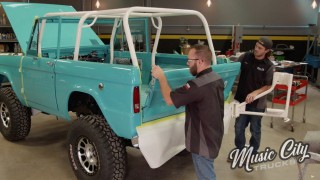
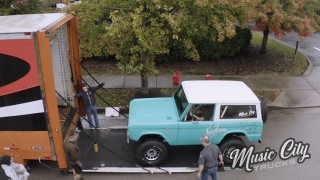
More Beach Cruiser Bronco Episodes

Music City Trucks Featured Projects

Music City Trucks Builds

Parts Used In This Episode

Summit Racing
DEI Exhaust Wrap Kit
Summit Racing
Earl's Performance Line Clamps
Summit Racing
Flowmaster Exhaust System
Summit Racing
Mr. Gasket Magnetic Fasteners
Summit Racing
TMI Products Interior
EBC Brakes
Yellow Stuff Brake Pads
The Industrial Depot
Tools, Hardware, Shop Supplies

Episode Transcript

(Marc)>> You're watching Powernation!

(Brandon)>> Today on Music City Trucks.

(Marc)>> We finish up our Seafoam Beach Cruiser Bronco with a little help from our friends.

(Brandon)>> We install the dash, paint some remaining pieces, and put in the windshield.

(Marc)>> Plus we finish the driveshafts, Jimmy builds us an exhaust...

(Brandon)>> ...and finally that beautiful interior.

(Marc)>> And at the end of it all we've got ourselves a Bronco.

(Brandon)>> And she is something to behold. [ MUSIC ] [ engine revving ] [ MUSIC ]

(Brandon)>> Welcome to Music City Trucks. I'm Brandon Burke...

(Marc)>> ...and I'm Marc Christ, and we're getting back on our 1974 Ford Bronco project. Now this has been a really huge build and we're really close with it, but we've got it covered up and we had it on the back burner for a while. It's time to break it out and finally get the finishing touches done on it.

(Brandon)>> Now there's a laundry list of things still left to do. So we brought in the guys from Carcass, Jeremy and Jimmy. Thanks for coming over and helping us with this last push.

(Jeremy)>> Not a problem. We know you guys have been working on this for a while, and you've got some stuff to get done on it and we're here to help.

(Marc)>> Well let's get it uncovered. Kinda see what we've got up against us here.

(Jeremy)>> It's still pretty!

(Brandon)>> Just the way we left her.

(Marc)>> It's like 90 percent done?

(Brandon)>> It's like 90 percent done.

(Jeremy)>> It looks really close though.

(Brandon)>> Like I said, there's a laundry list of things to do, a couple of things underneath the hood, obviously the interior, some things underneath. So I think we should just divide up and conquer.

(Marc)>> Yeah you mentioned under hood, I've got a bunch of things under the hood that I kinda did last time but I didn't finish up. I've got a bunch of hose clamps to put on, and some wiring, and some other things I need to do. So I'm gonna do that.

(Brandon)>> A project like this there's always pieces you forget to paint. So I'm gonna round up all the pieces and put some color it. I think that's what I'll do.

(Jeremy)>> And we had kinda talked a little bit. You guys have some steering and some plumbing stuff to do under the hood. So I can jump in there with you since we're up front.

(Jimmy)>> And there's a little bit of random fabrication, brackets and exhaust, that needs to be made. So I can do that.

(Marc)>> But before we dig in, since this is gonna be a mad thrash and we're gonna be working around the front here, just to save the panels let's just pull the front clip back off for now.

(Brandon)>> It's pretty easy to pull it off. Not risk chipping a fender or something.

(Marc)>> That'd be bad. Let me get the hood fender.

(Jeremy)>> Dropping the hood, that'd be...

(Marc)>> We didn't have a body stand ready for this.

(Brandon)>> That's alright, I'll take it.

(Marc)>> Let's go right over here.

(Brandon)>> Slow and steady, I think I said that before.

(Jeremy)>> Up here we're gonna start plumbing in the hydro boost. So we got a kit from Summit Racing and all this stuff basically goes together. So we've got to get from here down to the pump, pump to the box, and then we'll put a reservoir in it too. [ MUSIC ] Alright one more thing to add here on the power steering side of things is this reservoir, and then we can run the return lines and finish this thing up. [ MUSIC ] Alright the plumbing's basically wrapped up. Just add a couple of clamps here and move on to the next task.

(Brandon)>> Alright so I got all the parts rounded up. These are all sanded and ready for primer but I still need to drill some holes in these inner fender since we're gonna be bolting it in. So that's what I'm gonna do next. So while the guys are thrashing on getting things put on the truck I'm gonna take my time getting these last pieces buttoned up. [ drill buzzing ]

(Brandon)>> Man it's getting crowded in here. I'm just gonna mark the holes where the nut-serts need to go. Alright, get this thing I paint! After priming everything with finish sand I'm just gonna throw a few coats of base and clear on them. [ spray gun hissing ]

(Marc)>> With all the plumbing and wiring behind the dash complete we can finally install it along with the rest of the switches. Putting shiny stuff on is a good sign we're getting close.

(Jimmy)>> Alright guys, so I've got a little template here. I'm gonna be making a plate to cover the hole right there where there was originally a fresh air box. So what I'm gonna do here is make this one similar to a plate I already made. This one kinda covers up the front of the engine bay where the e-c-u lies. I'm gonna make this one similar. Do some kind of bead roll design in here, and what I have to start with is just take my template, tape it to my sheet of aluminum, and then center punch where holes need to be. And then I'll trace it out and stomp it on the shear. [ MUSIC ] [ drill buzzing ] [ MUSIC ]

(Marc)>> We're getting ready to install the column now that we've got the dash all buttoned up. We've got some things that we still need to connect under here but that's nothing that the dash needs to come out to do. One thing to keep in mind with these early Broncos is there's not an opening here for the column to go up into. It has to go through the dash, which is a bit of a pain but once we've got the dash all dialed in the way we have it I have no problem getting this column in. [ MUSIC ]

(Brandon)>> Hopefully my plan is pretty see through.

(Jeremy)>> You're the glass guy, not the glass guy. Wait did you just make a joke? I just totally missed that. Plan is pretty see through.

(Brandon)>> You got it?

(Jeremy)>> Yeah, I'm seeing a window of opportunity here to maybe help you out. [ MUSIC ]

(Marc)>> Up next, we put the Bronco on the lift for the final time and get her all buttoned up, nice!

(Pat)>> Installed!

(Marc)>> Well our Bronco still looks a little rough and undone but we've actually gotten a lot accomplished. The engine bay is pretty much done and the way it's gonna look what it's all finished, but that's not all we've accomplished.

(Brandon)>> We also got the dash assembled, steering, got all the doors finished, wipers are in it, and we got the windshield in it.

(Marc)>> And speaking of the windshield we finally got our checklist here taped to it, and we've got several things knocked off but there's still a lot left, and thankfully we've got some help here. Guys thanks for coming and helping with what you've done so far and moving forward.

(Jimmy)>> No problem! I've got little bits and tasks done here and there. So it's just been fun for us I think.

(Marc)>> Alright, so we're gonna get the truck over to the lift because a lot of what's left on these lists here are underneath the truck. So we've got to get the trucked moved, get it in the air, and knock those things off, and before you know it this thing's gonna be done. [ MUSIC ]

(Jeremy)>> Okay I think I'll tackle the brakes. There's a little plumbing to do yet. So like the trans cooler and stuff, but I'll probably start on the brake side of things. Well the guys had all the brakes and stuff mocked up, but the calipers need to be actually built out. Mark said it's a stock style caliper. So I have to pull the calipers off, drop a bunch of stuff on the ground, and put the pistons inside. So deep down inside here you've got the big piston. So there's a stainless steel piston that goes in there and some O-rings. So I've just got to build this out, install everything back up, and then I can run brake lines. [ MUSIC ] Really not too much to do in the back here. They've got mostly everything done. It's just installing a couple of brackets, and then hooking up some lines and stuff. So this is the easy part. Eventually you get up top, bench bleed the master, get some brakes in this thing. [ MUSIC ] Alright, tighten everything down, put the clip on, this side's done. Then over here on the truck Marc and Brandon have EBC brakes. So we'll slide those pads in. [ MUSIC ] Slid into place! [ metal tapping ]

(Jeremy)>> Bunch of love taps. Now just gotta get the hoses on the top, hook them up to the hard line.

(Marc)>> Just putting some of the finishing touches on the wiring system here. This is the body harness that goes to the rear. Just gonna get it into this loom, and I've got a cool way to get it clamped down too. [ MUSIC ] So what I'm using here to clamp the wiring harness to the frame are these little clamps right here. They're actually magnetic and they're made by Mister Gasket. Just need to loop them in... [ MUSIC ] ...snap them down, and adjust it as necessary. Nice and easy, and clean! Well we're making some great headway on the underside of our Bronco here. We've got a lot of hands in here helping out, which is great. Jeremy did a really nice job getting all of our brake lines all finished up and attached, but I do want to put a couple of clamps on here just in case. So that doesn't snagged on anything, or start to sag over time. Brandon did a nice job getting our fuel lines clamped a while back with this style of clamp that we got from Earl's. It's like a little clam shell. It's billet aluminum, and I want to install one of those here on the back. Now you would think you want to just mount it here in the center just because it would be maybe the most aesthetically pleasing, but I think that might be a little distracting. So I want to move it over here to the side. I think it's a better spot anyway because we've got a connection here and one over here. So this kind of splits the difference a little bit. So I'm gonna drill and tap into this brace here. This is just a brace for the back, like a tuss, for the axle. So I don't have to worry about drilling into the actual axle housing by doing this. So it'll be really nice. We do want to protect the powder coating. So we're gonna use some masking tape and then drill and tap the hole. I like it! Appreciate you guys coming. And this is where we found room for the battery.

(Pat)>> Special delivery, driveshafts, plural! Probably be the easiest thing to put in this thing.

(Marc)>> Don't speak too soon.

(Pat)>> Well I bet ya!

(Marc)>> I'll hold this end.

(Pat)>> This is the nicest, cleanest, craziest engineered Bronco stuff I've seen in a long time.

(Marc)>> It's not been an easy task.

(Pat)>> Anything like this that's special to do it's not gonna be conventional. Nothing's gonna bolt on, but when you get done you'll have something that no one else has.

(Marc)>> That's true!

Okay, that's it, nice!

(Pat)>> Installed!

(Marc)>> Thank you sir!

(Brandon)>> Up next, Jimmy builds us an exhaust and Jeremy joins him for the install.

[ MUSIC ] [ grinder buzzing ] [ MUSIC ]

(Jeremy)>> Just had a little tickle right through the machine. It wakes you up in the morning. Scary!

(Brandon)>> So Jimmy, who's our master fabricator here, jumped on building the exhaust, which is a universal stainless kit from Flowmaster.

(Jimmy)>> Alright, so the exhaust is pretty simple but also complicated at the same time. Already I have a Y-pipe tacked up here. I have a V-band on it because I'm gonna make the exhaust in sections. We have to have the exhaust come between the frame rail and the body. It'll come through here, muffler somewhere in here, and then it'll exit in front of the rear tire. We have to have this connection here to get the exhaust in it, but the hard part is making the crossover from the driver's side header into this "Y". That's gonna be a little more complicated. Lots of cuts and bends, but for right now I'm just gonna tack this V-band on here, make a 90, tack a V-band on it too. [ MUSIC ]

(Marc)>> So you've seen us build exhaust systems on here before, but on a nice build like this stainless is a must, and tig welding it together provides us the nicest finish.

Jimmy's a pro. So we trust him with anything fab related, and that includes the exhaust system on our Bronco. [ saw buzzing ]

(Marc)>> With our four-link suspension, the drivetrain, and narrow frame rails on this early Bronco there's not a lot of room for an exhaust system that will support the power that our supercharged Coyote will make, but Jimmy's got a great plan in mind. [ MUSIC ] [ saw buzzing ] [ MUSIC ]

(Jeremy)>> Like the bottom of the pan.

(Jimmy)>> Yeah, how much room is here?

(Jeremy)>> You just tell me, up, down. [ MUSIC ]

(Jimmy)>> Alright, that's the final piece of the exhaust. Every thing's hung now. So the only thing I have to do is just take everything out. I'm gonna take it down to my studio and weld this whole thing up. [ MUSIC ] Yes, that's it! [ welder hissing ] [ MUSIC ]

(Jimmy)>> Alright, we've got the exhaust all welded up now and it's ready to go in the truck, but before we do that I'm gonna wrap a section of it with this DEI heat wrap because this section right here goes between the floor and frame rail, and we want to keep the heat off the feet.

(Jeremy)>> That's nice!

(Jimmy)>> Alright let's do it.

(Jeremy)>> Heat off the feet, you're a comedian.

(Jimmy)>> I don't have much to say but when I do it matters right? [ MUSIC ] Let's get it installed.

(Jeremy)>> How nice it was of you to paint it black Jimmy. [ MUSIC ] There's actually quite a bit of room underneath here. At least put the exhaust in.

(Jimmy)>> Yeah it wasn't too, too terrible.

(Jeremy)>> Take a break for a minute. That's a tight squeeze. [ MUSIC ] Okay! [ ratchet clicking ]

(Jeremy)>> I think we're up on the floor.

(Jimmy)>> Oh shoot!

(Jeremy)>> Get that again.

(Jimmy)>> I just tighten the V-band down and that is an exhaust wrap.

(Jeremy)>> Woo, yes!

(Marc)>> You know cordless tools have come a long way over the years and Matco has really upped their game when it comes to their selection. One of my favorite tools in our box is this three-eighths stubby impact. What's cool about this is it's got the brushless motor and it's got 300 pound feet of breakaway torque, and for a three-eighths cordless that is a lot. It's got a five inch overall length. So it's great for getting down into those tight spots like the engine bay. Work on something like pulleys, or water pump, or something like that. Now this kit comes with the tool, two batteries, a charger, and this nice little soft case here in case you need to take it on the go.

(Marc)>> Up next, Tommy helps with the interior install.

(Brandon)>> And then the big reveal!

(Marc)>> Thanks to Summit Racing we got these wipers at the last minute, and it kicked off the final install of the interior. [ MUSIC ] Pretty nice huh?

(Tommy)>> Oh yeah!

(Brandon)>> Now when I say everyone put their hands on this build I mean everyone.

(Marc)>> And when it comes to fit and finish Tommy is as good as you can get, and even though he's busy working on his own SEMA build he took the time to come help us out. TMI Products really knocked it out of the park with this interior kit that they gave us.

(Brandon)>> The kit comes with everything but we opted not to run the carpet because we bed lined the interior, but we are gonna be using those beautiful floor mats. [ MUSIC ]

(Marc)>> Well it's done!

(Brandon)>> Done!

(Marc)>> Like for real! This has been what seemed to be an insurmountable build. Just from the beginning things didn't really go well.

(Brandon)>> We pretty much threw everything away.

(Marc)>> And regrouped, and look at the finished product.

(Brandon)>> This is the biggest and most intense build that I have ever done, and I don't think we could have done it without all the help we've had. You know, Jimmy, Jeremy, Tommy, everybody before them. I mean everybody who's put their hands on this has made my dream come true of building a dream Bronco, which is a Coyote early Bronco, and I know you've got your flavor in there too.

(Marc)>> Yeah, I took what you had already dreamed up and adopted it as my own you know? So I feel like this is my baby too, and like you said, all the help. Pat and Frankie came in and spent a 12 hour Saturday here with us. Just the things that have happened behind the scenes to make something like this happen has been incredible, and I'm really proud to see it go to SEMA and I can't wait to see it on the floor there and get unveiled.

(Brandon)>> And I think that's one thing you kinda don't get all the time is how much overtime, and all the work, and blood, sweat, and tears. I don't know how many cuts on my hands and arms that I've gotten from this truck, but looking at it now standing back it's all worth it.

(Marc)>> Yeah there was times when I wanted to, not quit, but not make it as nice as it could be, and as nice as it is now, and we didn't do that. We didn't let up. We stayed on the gas the whole time and it shows.

(Brandon)>> I think me and you just putting our minds together, saying what we wanted to show everybody what we could do. I think we hit it on the head.

(Marc)>> Well we've got a transport coming. So I think we should get it out there and get it loaded up, and head out to Vegas!

(Brandon)>> See it at SEMA. [ MUSIC ] This truck was born in our shop and now it makes its maiden voyage.

(Marc)>> It's really amazing to see it drive out under its own power and as a complete vehicle. [ MUSIC ]

(Brandon)>> And knowing that it's heading to SEMA it's a good feeling. [ MUSIC ]

(Marc)>> We'll see you there!
Show Full Transcript