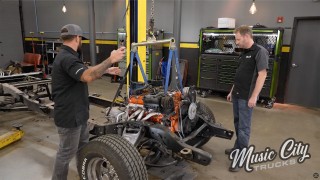
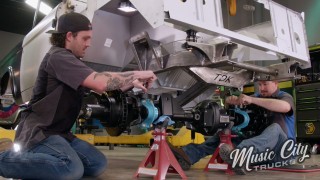
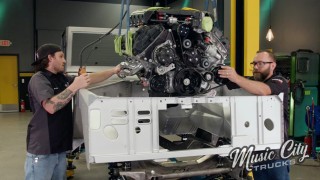
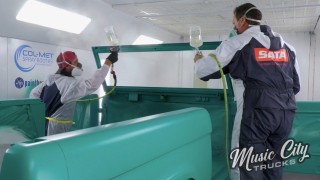
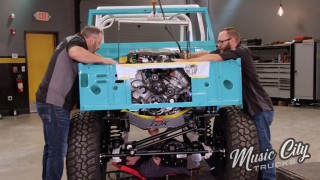
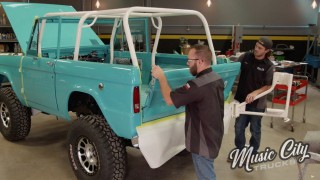
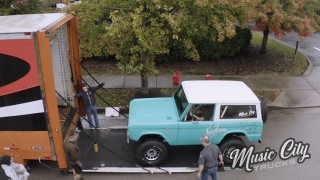
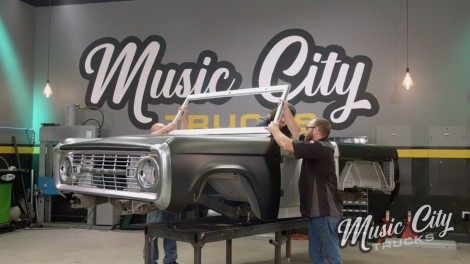
More Beach Cruiser Bronco Episodes

Music City Trucks Featured Projects

Music City Trucks Builds

Parts Used In This Episode

Dennis Carpenter
Bronco Body Parts
Matco Tools
MATCO Tools are the Official Tool Supplier to Music City Trucks
The Industrial Depot
Tools, Hardware, Shop Supplies

Episode Transcript

(Marc)>> You're watching Powernation.

(Brandon)>> Today on Music City Trucks.

(Marc)>> It's day one of building our new 1974 Bronco from the ground up and we are rocking it.

(Brandon)>> Smell that? It's a new car smell.

(Jeremy)>> That's a new car smell? ♪ ♪ [ engine revving ] ♪ ♪

(Brandon)>> Welcome to Music City Trucks. I'm Brandon Burke.

(Marc)>> And I'm Marc Christ, and we're very excited because we're getting back on our 1974 Bronco project. Now last time we made the difficult decision to just build this truck from the ground up, and we're gonna be doing that with this full custom chassis here, and of course all new sheet metal like you see here on the floor along with some other stuff that you don't even see yet.

(Brandon)>> Now if you missed our intro to the Bronco project here's what we're going for.

(Marc)>> We're excited to call this project the Beach Cruiser Bronco. It's gonna be the perfect blend of classic styling and modern technology that will be able to cruise the beach, scream down the interstate, and everything in between. Now to achieve the level of build quality that we need to on this project we need to up our game. Now we could just mig weld all of these components together but there's a better way, and to show us that better way is Chad here with Caroliner. Chad thanks for coming in.

(Chad)>> Thanks for having me Marc.

(Marc)>> Tell me about this machine you've got here.

(Chad)>> This is Caroliner's CTR-9 squeeze type spot resistance welder. It's capable of 16,000 amps. It's gonna give that factory appearance and make your life a lot easier on this build. It has the most squeeze pressure and the most amperage on the market currently, and the ergonomics is what really makes this machine stand out. Being able to support the weight of the gun on the telescopic arm. Getting in any position comfortably makes a world of difference. At the end of the day the technician's not worn out.

(Marc)>> We're literally building this Bronco from the ground up. How is this machine gonna help us accomplish our goal?

(Chad)>> Well this is gonna give you the rigid factory like spot weld appearance on all the welds. It's gonna make it a quality build, and it's gonna save a lot of time.

(Marc)>> You're speaking my language.

(Chad)>> So the machine starts with the calibration, and we'll go ahead and do that by squeezing the trigger. Once the calibration is finished it determines what arm is in place, and as we place different thicknesses in between it it will measure and apply time, current, and pressure based on what's needed for that weld. [ beep ]

(Chad)>> So there's one panel it measured. ♪ ♪ Two panels, as you can see the thickness goes up along with the pressure. Three panels, we can see that the weld is starting to get bigger in circumference. [ beep ]

(Chad)>> And actually taking longer to weld the panel.

(Marc)>> I was gonna say longer duration too, and it does that all on its own.

(Chad)>> All on its own. We can also do single side welding, which we might need to use on the floor. It's not really recommended for collision standards today with high strength steel but on this Bronco it was made with mild steel. We won't run into any problems there.

(Marc)>> So what do you mean single side?

(Chad)>> Just to where there's gonna be certain times you can't get around, you can't get an arm around deep enough into the panel. So we're thinking about the transmission tunnel here, the firewall. There's gonna be places that we're not gonna be able to get an arm around.

(Marc)>> Let's see what we've got as far as our truck goes and where we're starting, and then we'll work the machine in. Now in order to build an entire Bronco body from parts you need all the parts. Now we said before that we ordered a bunch of new sheet metal from Dennis Carpenter and we've got laid out here all the structural steel that we ordered before we did the blasting. Things that we thought we would need for sure, but we're obviously missing some things, but when you get ready to assemble a body there's a place you start, and that is the front floor here, which consists of the inner rockers, the three front floor pans, and then three floor braces, which we didn't have. So we gave Dennis Carpenter a call and they said we're gonna hook you up. So they sent us this entire front floor assembly. Now they don't sell this like this. This actually came out of their department where they build entire Bronco tubs, which you can buy from them as well, or you can just buy all the sheet metal parts from them and build it yourself. They sent us this just to save us some time. Now this is very important because four of the eight body mounts for the entire truck go through this assembly here. So once you get this bolted on make sure it's square, make sure it's level. Then you can build the rest of the truck. Now we've already done that and we're ready to start putting this thing together. This is exciting huh?

(Brandon)>> I'm stoked! After getting the front floor mounted we mount the rear brace to lay in the bed floor.

(Marc)>> So we just need to grind off this top coat here and we're ready to weld. Right on it!

(Brandon)>> Square. ♪ ♪ And then you just open it up like that.

(Marc)>> Well we're busy building a body for our '74 Bronco here and we've made some pretty good headway so far. As you can see we've got a little bit of extra help here. We've got two extra people. We've got Mark Coates from ABM Restorations and we've got Stephen Hamilton. He's a master fabricator, and both of those guys are from Kingsport, Tennessee. Now we put them work immediately, and of course we've got Brandon and Chad still plugging away on what they've got going on here, and we figured while we've got all this help we need to get as much accomplished as possible. These panels fit really nicely but there's always some trimming and grinding that needs to be done. Can you imagine replacing all of these pieces individually than just in the middle?

(Brandon)>> There's no way I would.

(Mark)>> Let's let it down and flush it out just to hold it in place.

(Brandon)>> With the floor pieces in place we can move on to the quarters.

(Marc)>> Are you still working on that?

(Mark)>> No we're good.

(Marc)>> Alright you can help me fit this tub again. Actually let's pull it out. [ saw buzzing ]

(Marc)>> Let's see what happens. Just looking at it side to side, and how the quarters fit and the wheel tubs just to see.

(Mark)>> Just eyeballing it.

(Marc)>> After eyeballing all the panels it's time to make sure they're square and prepped for more welding. Don't get!

(Brandon)>> Don't tempt me cause we'll build the whole back of this thing. [ saw buzzing ]

(Brandon)>> You guys ready for this? That fits so nice.

(Marc)>> It looks like a truck.

(Brandon)>> I can't believe we got this far in one day and we could not have done it without your guys help. So thank you.

(Marc)>> For us to start with a bare frame this morning. I mean this was one day. This is amazing and I really appreciate everybody's help. I know there was five of us. So that helps a lot and I know you guys have to go. So I guess it's time to send you guys off but we really appreciate your help, and we'll just pick it up from here. I feel like we've got a great start.

(Brandon)>> We've got a half a Bronco.

(Marc)>> Alright let's get out of here guys.

(Brandon)>> Coming up next.

(Marc)>> This really gives you an appreciation for how simple these trucks are.

(Brandon)>> Well we're back here in the shop. We've got the lights back on. It's a new day and we have Chad for a little longer. So let's put your skills to work with this amazing spot welder.

(Chad)>> Yeah we're getting ready to weld some pretty thick material here. So let's put this thing to the test and see how it works. ♪ ♪

(Brandon)>> This back corner has five panels that meet and the CTR-9 has no problem fusing them all together. Let's do that on the other side and get this flip side on.

(Marc)>> Yeah get the inner quarter and taillight. We want the build quality of our Bronco to be as nice as any early Bronco out there.

(Brandon)>> And we're well on our way. So we've been using the C-tongs to spot weld everything so far but there's some spots now that we can't get with the clamp. What do we do about that?

(Chad)>> So the Caroliner CTR-9 has a multi function gun kit that has a single side option. We'll set that up. [ beeping ]

(Marc)>> How much pressure are you applying Chad?

(Chad)>> Well this is why it's not recommended for o-e-m repair in a body shop because you can't give that adequate squeeze pressure. With mild steel we have different properties and characteristics. So we're able to use it on this. You just want to make sure that you're pushing against something that's solid. So you are applying a good bit of pressure and holding it still for a second until you get that instant of orange. That's what you're looking for is that instant of orange. Simulating what you would have with the C-tong.

(Marc)>> But the duration is pre-programmed?

(Chad)>> You can hold the trigger. Just because I'm holding the trigger it's not initiating another weld. It'll only do it one time. So there was one spot we couldn't get to because of a brace. So we can plug this in anywhere.

(Marc)>> So like in the floor, in the center of the floor where we couldn't reach in there?

(Chad)>> Just have to remember that you've got to press against something solid.

(Brandon)>> I'm gonna say that the back of this truck's solid now.

(Marc)>> I know that you've got to get going Chad. So I just want to say thank you for bringing the machine and showing us everything it'll do.

(Chad)>> I appreciate the opportunity to work with you guys and get to show you the Caroliner CTR-9. This will definitely let this build stand apart for structural integrity.

(Marc)>> That's what we're going for.

(Brandon)>> I'm not gonna lie, I think I'm getting the hang of this thing. Those look good?

(Marc)>> This really gives you an appreciation for how simple these trucks are. The guys at Dennis Carpenter really stepped up for us, and this Bronco is coming together incredibly well.

(Brandon)>> Oh yeah!

(Marc)>> Okay, that goes like that. So that just gets sandwiched and then we leave a gap there.

(Brandon)>> Oh yeah, I like that. Still a little flimsy.

(Marc)>> It'll get there. What do you want to do next?

(Brandon)>> Let's throw some measurements and make sure our door openings are correct. Should be 35 and seven-sixteenths.

(Marc)>> Right at 35 and a half.

(Brandon)>> We'll be able to scoot it closer. Yeah so this one's 35 and five-eighths. So that confirms that we need to go backwards with this.

(Marc)>> Up next, Brandon gets comfortable.

(Brandon)>> Now as you can see we got a bunch more panels clamped into place like the cowl and door, and that's because we got the quarter fully welded in and this is our starting point. So we've got our nice door gap that we want. Now we can build the rest of the truck forward. This where panel fitment comes into place. It's a bunch of two steps forward, three steps back, moving things by an eighth of an inch, sixteenth of an inch because if you take your time and get those panel gaps right, all those body lines, make sure everything's square you're gonna have a really nice product at the end.

(Marc)>> Speaking of which you'll notice the firewall pieces are not in right now because we tried to fit them and they did't fit exactly the way we wanted them to. So we fit the panels that we could, and that would be the cowl side pieces and the cowl upper, as well as the windshield mount here. So we've got those clamped in and that'll allow us to hang this other door as well. Then we can go back and fit the firewall pieces to the cowl, and then eventually weld everything up.

(Brandon)>> We also have Steven Hamilton back here in the shop. It's always a good idea to have an extra set of hands, and I think between the three of us we'll be able to knock this tub out.

(Marc)>> Yep we're gonna have us a Bronco. ♪ ♪ [ drill humming ] ♪ ♪

(Marc)>> Hold it right there Brandon. Alright you can get those over there.

(Brandon)>> Gonna fit first time watch.

(Marc)>> I don't know about that. Oh, not bad! Yeah the body line goes up hill from the rear to the front. So the hinges need to come down.

(Brandon)>> Well the bottom hinge needs to get kicked in cause you can see I've got almost three fingers before we get to this post. So kick the bottom in.

(Marc)>> And then we'll bring the whole cowl down. Go ahead and move it where you want it to be.

(Brandon)>> Did you see that side?

(Marc)>> It kicks it way out. When you push that one where it needs to be this one kicks out.

(Brandon)>> That's fine right there?

(Marc)>> Yeah. That's where it's happy.

(Brandon)>> That's pretty good right there.

(Marc)>> How does that body line look Steven?

(Steven)>> It's okay, it needs to come out.

(Brandon)>> Now we're running into the problem we're getting a lot of leverage on firewall.

(Marc)>> Well I'm pushing in here and pulling out here and I can feel it moving a lot.

(Steven)>> It's twisting the whole.

(Marc)>> Do we just need to stop here?

(Steven)>> Let's get that other side the same length, and then we can stick that firewall in there.

(Marc)>> Alright Steven what'd you end up doing with this firewall?

(Steven)>> Well I started out massaging the middle panels and started clicko'ing all the panels together where we can test fit it.

(Marc)>> Looks a lot better than it did when I tested it.

(Steven)>> I think we're ready to go to the Bronco.

(Marc)>> Yeah let's fit this thing.

(Brandon)>> Awesome, I got the doors kinda mocked in place.

(Marc)>> It looks pretty good over here.

(Steven)>> It's looking good here.

(Marc)>> Dang, this one's almost flush up against here.

(Brandon)>> Let's just self tap for the bottom. After Steven worked his magic on the firewall pieces we got it all clamped in so we could finalize the door fitment. That's not bad.

(Marc)>> We can just open that hole up if we need to on the fender cause the fender looks like it fits pretty nice. Alright what's the over/under on this?

(Brandon)>> Moment of truth?

(Marc)>> Let me get my fingers out of there.

(Brandon)>> Seems pretty solid. Oh yes, look at that.

(Marc)>> How's your gap?

(Brandon)>> That's a good three-sixteenths right there. Same as the other side.

(Marc)>> That body line down there is straight as an arrow.

(Brandon)>> Like right through here.

(Marc)>> Yep.

(Brandon)>> Alright. ♪ ♪

(Marc)>> I'm not hating it. Nice gap over here right now.

(Steven)>> My gap's great.

(Brandon)>> Somewhere in there?

(Marc)>> Yeah that's fine.

(Brandon)>> Look at this. Well now that we know that the panels are pretty close to fitting I say burn most of it in, get the windshield on it and get the top on it, and we'll have a complete truck.

(Marc)>> So tear down the bolt on stuff that we just did, do a bunch of welding, build it back up, I like it.

(Marc)>> Up next, with lots of help we finish round one.

(Jeremy)>> I can't believe you guys put a whole Bronco together.

(Marc)>> Well we've been busy doing a bunch of welding on our Bronco here. We've got the A-pillars welded in completely along with a bunch of other structural stuff. We don't have the firewall and cowl completely welded in yet but we can get to that later.

(Brandon)>> Yeah we have enough of the truck welded together that it's structurally sound. So while we still have Steven we're gonna hang all that new sheet metal including that top.

(Marc)>> Let's start with he doors.

(Brandon)>> Hopefully it goes as easy as the first time.

(Marc)>> You mean the 10th time?

(Brandon)>> I'm gonna go almost snug on two of them and we'll put it on the scribe line. Pick it up just a little bit. ♪ ♪ We're pros at this now. Next thing is get the other door hung and then these fenders.

(Marc)>> We'll repeat the same thing on the passenger side and make sure the door is hung properly and the body lines are nice.

(Brandon)>> Let's get these fenders on. ♪ ♪ All this sheet metal fits surprisingly well together.

(Marc)>> You go over there and fix that, yeah. Even though we don't need to bolt on the front clip right now it's important for ensuring all of our body lines are perfect before we final weld everything. Let's snug them cause otherwise it's gonna sag.

(Brandon)>> This is a good day. ♪ ♪ I need to get in there.

(Marc)>> It's very exciting. ♪ ♪ Looks good over here. A little tight against the grille here on this side. Probably just needs to be shimmed out.

(Brandon)>> That's not bad.

(Marc)>> It's fitting good.

(Brandon)>> Let's get a top on it. ♪ ♪ Before we put the top on we need to get that windshield frame installed. Then we can get the top side panel pieces clamped in.

(Marc)>> And just for aesthetics we're throwing the outer quarters on.

(Brandon)>> You like it?

(Marc)>> Yeah.

(Brandon)>> Is that gonna hold up?

(Marc)>> Oh yeah! Alright clamp it. ♪ ♪

(Brandon)>> I can smell the beach already. Be cruising right along.

(Marc)>> So what's next now?

(Brandon)>> The top.

(Marc)>> We recruited some help.

(Jeremy)>> Oh I'm here.

(Brandon)>> This is like the cherry on top.

(Jeremy)>> That's legitimate right?

(Brandon)>> Literally the cherry on top.

(Marc)>> That is by far the heaviest piece too.

(Brandon)>> Oh it's beefier than the factory one for sure.

(Jeremy)>> I still can't believe you guys put a whole Bronco together. This is craziness. [ metal clanging ]

(Brandon)>> You go forward.

(Marc)>> There it is.

(Jeremy)>> Oh that comes in, look at that. Dude you're sitting in it. You're sitting in it.

(Brandon)>> Smell that? It's a new car smell.

(Jeremy)>> That's a new car smell?

(Marc)>> When we started this and when we put the first piece of sheet metal on here I did not see us being this far this soon.

(Brandon)>> No and I have to thank Steven and all the help we had. This thing wouldn't have came together as fast as it did if we didn't have this awesome team.

(Marc)>> Yeah and that amazing machine, and the right sheet metal. Everything came together the way it's supposed to and just look at the finished product. It speaks for itself.

(Brandon)>> A brand new '74 Bronco with no rust.

(Marc)>> I didn't think we would be doing this but here we are.

(Brandon)>> Next time you see our Bronco we've got a bunch of cool stuff to show you including a brand new Edelbrock crate engine, some sweet kicks, a transmission, transfer case, axles, and a special guest to give us his opinion on our build. You don't want to miss it.

(Marc)>> If you can't get enough of our Bronco go to Powernation TV dot com and check our Beach Cruiser Bronco project page.

(Brandon)>> We have current build status, before and after pics, links to parts used, and all the episodes right there on one page.
Show Full Transcript