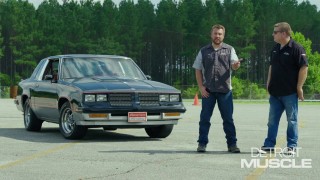
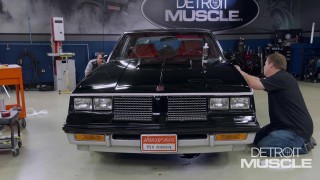
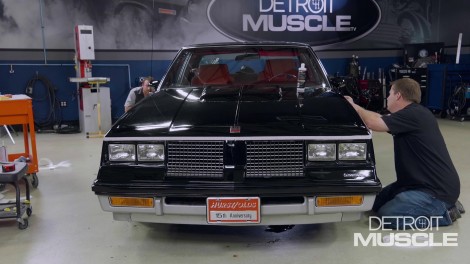
More Lightning Rod Hurst Olds Episodes

Detroit Muscle Featured Projects

Detroit Muscle Builds

Parts Used In This Episode

Phoenix Graphix
Decal Kit
The Industrial Depot
Tools, Hardware, Shop Supplies

Episode Transcript

(Tommy)>> You're watching Powernation!

(Joel)>> Today on Detroit Muscle we get by with a little help from our friends as we polish and shine this retro rocket back to a showroom finish.

(Tommy)>> Plus we slap on a new decal kit to help turn back the hands of time. [ Music ] [ engines revving ] [ Music ]

(Tommy)>> Have you ever heard the phrase, "She's a 20-footer"? That usually refers to from a distance everything looks pretty good, but whenever you get up close and personal those imperfections become quite obvious. To improve one's outward appearance and inner beauty isn't as hard as you might think.

(Joel)>> Usually it just takes a little bit of effort and some t-l-c to go a long way. We have a few techniques that can applied to enhance what the eye can see.

(Tommy)>> With black cars we've all heard it. They show everything, and there's so much upkeep. Well, I would say there's some truth to that, but I'd also say there's just something about that deep, dark black paint that when it's right there's not another color that can even get close to having that sinister and alluring look all at the same time. Our Olds has lived a sheltered life and is a nice car. The paint is all original, and from where you're sitting it don't look too bad. However, it needs some love. This Hurst Olds has a loud graphics package that GM used to make a statement. What it's saying right now is "old". The stripes and letters are starting to deteriorate and look kinda frayed. There's really no way to restore these. So, they need to be replaced. We're gonna strip off the stickers, polish the paint, and then reinstall a fresh set of decals to roll back the clock.

(Joel)>> Now before we put these old stripes to the floor, we need to map out their current placement so that we can be as close to original as possible when we go to put the new ones on. Now some of these decals were actually put on by hand from the factory. So, there's a good chance that no two cars are the same, and some of these might even be a little bit crooked, but we're going for perfection. Spending an extra few minutes now can help answer questions later. I like to use common reference points like body lines and door gaps to measure from because those don't change once you remove the decals. Now to the naked eye it appears that the bottom of this "T" and the top of this silver line, and the bottom of this "R" and the top of this silver line are the same distance, but there's a difference of .074 of an inch. So, you can tell these were definitely laid on by hand. [ Music ]

(Tommy)>> To get rid of the stripes off the side of Hurst Olds there's a few ways that a person could get the job done. I'm gonna refer to a chemical, thermal, or mechanical way. Now if you're looking to use some solution to take those off there's a couple of things that you should keep in mind. One is you want to make sure that the solvent isn't so strong that you'll actually will remove or soften the paint that you're trying to save. And it's a good idea to use some protective gear cause too much exposure can ruin your day. Now the other way you can do it is with the thermal direction. This little heat gun, you can apply some heat to it and then it'll soften up the adhesive that's on the back side of the vinyl, and usually it peels right off, but you get too hot with this you can melt the paint and damage it. Sometimes guys like to use razor blades. You can go to your parts store and pick up a plastic razor blade, and these are far more forgiving. Now the way I really and truthfully prefer is to use a decal eraser. With this you just simply put it in a drill and turn it at a low speed, and it will basically roll that decal right off the panel. All three of these are viable options. You just have to determine which one's best for you in your situation, or what your comfortable with. And you never know. You may end up trying all of them on the same job. [ drill humming ] Before you just grab one of these and get to spinning you need to know what you're dealing with. Older enamel paints are much softer than newer urethanes. So special care and a delicate touch can help prevent damage to the surface of the softer material. Woo-wee! With long continuous decals, putting the heat to it can be very efficient. Just pull and pre-heat as you go, and once you find your rhythm you may even start having fun. So, satisfying! [ Music ] [ heat gun hissing ] [ Music ]

(Tommy)>> Well Joel's finishing up taking off our final piece of pinstripe off of our Oldsmobile. The next step for this thing is gonna be a day at the spa. We're gonna be rejuvenating the paint to improve its reflection.

(Joel)>> Up next, our pals from Sonax stop by to help us get cut and buff.

(Tommy)>> Now with the stripes gone you can really start seeing the flaws in the paint. So, we got in touch with our buddies over at Sonax to help us bring this ride back to a showroom shine. We removed some of the personality off of our G-body in an effort to improve the reflection. Rob and Cole, what do you guys think about our Oldsmobile?

(Rob)>> Personally I'm super excited about this cause I had an '81 Cutlass Supreme. I'm excited to get this thing looking like I always wanted mine to look.

(Tommy)>> We've got an original paint car. It has several, I guess you'd say, paint blemishes on it. It's been washed a bunch of times, and it's real hazy, but black is a great color to make a transformation.

(Rob)>> Yeah, we'll do a quick test spot just to see what kind of paint we're working with to understand if it's a single stage or if it's clear coated. I think I've got a hunch, but we'll know exactly what we're working with after just a quick test.

(Tommy)>> I would assume it's gonna be a couple of steps to get this thing to perfection?

(Rob)>> If it's single stage I think we can possibly do it in one step, but we'll know more here in a few minutes.

(Tommy)>> What do you think?

(Cole)>> Personally I've never had one of these cars. So, I don't have the connection like Rob does, but I think the paint on here needs some good lovin' and I think it'll turn out great.

(Joel)>> Black is one of those colors that it shows everything. Every imperfection, every blemish, and if you can get it cleaned up and looking good it is one of the prettiest colors on the planet, and it's hard to beat. We trust your guys' expert opinion on that though.

(Rob)>> Nothing like a black car that's clean and shiny.

(Tommy)>> We know that the car's gonna have a few things that can't be repaired because it's an original paint car, and it's got chips and that kind of thing. We just know it being what it is and with the look that it has it's gonna be daylight and dark different when we're done.

(Rob)>> It's got a little gray hair.

(Tommy)>> Hey, hey, don't need to be poking at me. Well, what's the first step you guys want to get into?

(Rob)>> We'll test it. Probably clay disc it just to remove all the imperfections that are in it, and then we'll get to work making it shine.

(Tommy)>> You gonna need help?

(Rob)>> We're gonna need a lot of help.

(Tommy)>> Alright then.

(Rob)>> So the first thing we're gonna do is just do a very small test spot to see what kind of paint it is. See if there's clear coat. We're gonna take a compound, just a compound in our line. We're just gonna do a very small spot, and we're gonna do something very simple. We're just gonna do a little test spot, turn this over and there's some black paint on it. There is no clear coat on this. People just don't know if it's a single stage or it's been clear coated. Very simple way to find out really quick. [ buffer buzzing ]

(Joel)>> Upon further evaluation it was way worse than we anticipated. We had to take multiple steps to bring back the luster that was buried under all those scratches and contaminants. [ buffer humming ] [ Music ]

(Joel)>> When you have a difficult task like this the easiest way to cram more hours into the day is to throw more people at it. You can tell we're moving in the right direction because progress is being made. Cole, you do some good work my man.

(Cole)>> That's just with a clay bar too.

(Joel)>> You can clearly see there's a visual difference just on this side and that side alone.

(Cole)>> There is a little bit. It brings out some gloss. It also removes any paint contaminants or imperfections that are actually on the paint that after you wash it might still be there. So, I gave you a plastic bag, and you can actually feel it, but for the people at home I know you're not here to actually feel it but you can also hear it.

(Joel)>> Let's give the test.

(Cole)>> It kinda feels like sandpaper, sounds like sandpaper.

(Joel)>> You can definitely tell where the line is of kinda a sandy, grittiness, and then it just like orange. Just like a nice smooth surface. Very well done my friend! I'll get back out of your way so you can finish your work.

(Cole)>> Absolutely! [ Music ] [ buffer humming ] [ Music ]

(Joel)>> This Oldsmobile is getting rubbed in every nook, cranny, and crevice in an effort to turn back the clock to when this car rolled off the assembly line.

(Tommy)>> It's amazing what happens when you apply some t-l-c to what you perceive as a shiny car. It's not uncommon to find issues with black paint. [ Music ] These Sonax products make the job look effortless. Heck, we're not even breaking a sweat removing four decades of wear and tear off of our G-body. If you're looking for paint perfection the recipe is simple. A good game plan and Sonax. Coming up, we turn our Hurst Olds into a motorized mirror.

(Rob)>> While everybody else is finishing up on the car here I took the liberty to kind of show the two steps in this case of how we take the paint from original to cutting it, or buffing it, and then taking it to the final polished stage. So, what I've done is taped off three different segments here with our original paint here on the top. What we did is we left that as is, or stock. The second step down here is what we used in our cutting step, the cutting compound. So, what we did there is we used an aggressive wool pad with an aggressive compound and we cut that. So, cutting it will eliminate, cut out the scratches, the swirls, the holograms that are on our paint. Again, this is 40 year old paint. We're dealing with a lot of issues here on a single stage paint, and what we've done here is cut this, and as you can see, it still has a little bit of a haze. So that's the question we get a lot of times is what's the difference between the two. This section down here has been cut and polished. So, we've eliminated the scratches, the swirls, all of the imperfections that have been in that paint for over 40 years. Original paint, we've eliminated the scratches and brought the paint back with some gloss. Kind of a quick synopsis as far as how the steps are performed. Very easy, quick description on what the process is. [ buffer buzzing ]

(Tommy)>> To give you a rundown of what we've used to create this masterpiece includes clay disc, some glass cleaner, a few different pads, two compounds, and some microfiber cloth. Nothing out of the ordinary. Well almost! [ buffer buzzing ]

(Tommy)>> You know it makes sense to be cleaning that glass with that clay bar cause the contaminants don't just skip around the glass.

(Cole)>> Right, it's very similar to the paint. You want to get those particles, the imperfections, out of the glass just like you would with the paint. You obviously want to keep your glass a clean surface. You want to get rid of all those imperfections. That bumpy sandpaper feel we talked about earlier.

(Tommy)>> Do you have to scrub it very hard?

(Cole)>> The clay disc does it itself. All you do is just lightly agitate the glass, the paint. That gets rid of those imperfections and create that smooth surface we're looking for.

(Tommy)>> Now do you have to use any kind of special lubricant or anything for that?

(Cole)>> Our glass cleaner is actually our clay lubricant. So, when we do the clays on the paint we're using our glass cleaner, and we also use it on our glass, and it also is a two in one really for cleaning the glass and removing those imperfections in the paint.

(Tommy)>> So is that disc reusable?

(Cole)>> It is reusable. If you drop it on the ground all you have to do is spray it off with some water and you're good to go. It can last around 50 cars.

(Tommy)>> Man, that's a bunch of cars. I don't want to clean that many today though. Now what is the technique? Do you have to apply a bunch of pressure, circular as opposed to front and back?

(Cole)>> You want to try to work with the direction of the vehicle, the surface. So, on a hood you're gonna want to go back and forth. You're not gonna want to go sideways. You just want to try to keep those vertical motions and you want it to stay consistent with your hand motion.

(Tommy)>> How often should someone have to do that procedure?

(Cole)>> It really depends on the condition of the paint, of the vehicle itself. If you're gonna put on a long lasting protection I would do it no matter what just to get the most durable and the most clean a vehicle can be before you put on that durable protection.

(Tommy)>> Because what you're trying to do is remove those contaminants before you put that coating on top of it. To get it off the paint and not sandwich it in between, right?

(Cole)>> Correct, you are trying to get the paint, the glass as clean as you physically can. That protection is bonding to the paint, and if the vehicle's dirty, if those imperfections are still on the paint or on the vehicle it's gonna be bonding to those imperfections instead of the paint surface.

(Tommy)>> Can you use that pad on more surfaces other than paint and glass?

(Cole)>> Yeah, it's safe to use on the whole exterior of the vehicle. It's not gonna damage anything, and it's just gonna help get those imperfections out of the surface.

(Tommy)>> I've used those before. Not saying I shouldn't have done a better taping on the vehicle that I was painting, but that stuff helps to remove overspray on glass and painted surfaces.

(Cole)>> It does, and I will say the one nice thing about the clay disc as well is that it's a Velcro backing. So, you can attach it to a polisher, and you can knock out a car in 10 minutes.

(Tommy)>> Is that window gonna be way more clean than this window?

(Cole)>> This window's gonna be way more clean than this window. [ buffer humming ] [ paper scratching ]

(Tommy)>> Me and Joel definitely want to thank you guys for all your hard work. This thing has made one dramatic transformation.

(Rob)>> It really has. We're always up for a challenge, and this one certainly was a challenge.

(Tommy)>> This car kinda went from that silvery black to real black now.

(Rob)>> It is indeed a black car.

(Joel)>> Up next, we stick it where the sun will shine.

(Tommy)>> We've got our Hurst Olds all shined up, and it's easy to see that it has a good amount of glamor right now. We're finally to a point where we can add on a crucial component that gives this car its identity.

(Joel)>> And you know it's truly amazing how much a cool graphics package or some classy pinstriping can really boost the personality of a ride. Manufacturers have been using decals to dress up Detroit muscle for generations. Billboards, stripes, and engine sizes just to name a few.

(Tommy)>> What we have stretched out here across the table is a life-size decal kit similar to what you would find in a model car box that we picked up from Phoenix Graphics. Now a few of you guys may be squirming in your seat from all these pieces of vinyl that we're gonna have to stretch down the side of our Oldsmobile, but we've got a few tips and tricks that we're gonna show you to ease that strain. The first order of business though is getting that car clean. What we're looking to remove here is dust and debris because you don't want any of those particles to wind up under your decal. A couple of quick spritz and a wipe with a microfiber and you're ready to go. [ Music ]

(Joel)>> Another helpful tip if you're putting on a graphics package is to make sure you do this indoors and out of direct sunlight. [ Music ] Take your time, pay attention to the details, and follow that game plan. [ Music ]

(Tommy)>> Now whenever you apply your decal one thing that's wise to do is come in, kinda equally mash it to the car. If you was to take the spreader and just pull it across there sometimes what happens is it rolls all that excess vinyl here to one end and it causes it to bunch up, and that will create a little fold or imperfection into the decal. So, once you mash it to the surface then it's usually safe to come back and really rub it down. [ Music ]

(Joel)>> You know, when you're restoring a car like this it can be tempting to go out and try and find an n-o-s style decal kit just so you're as close to authentic as possible, but the problem with that is is that the adhesive is probably a little bit dried out and crusty, and it's probably a little bit discolored too. So, if you can find a nice reproduction decal kit like this from Phoenix Graphics I tell ya, the final product and longevity is worth its weight in gold. [ Music ]

(Tommy)>> You guys may have noticed that we've applied a liquid to the body and the back side of our decal before we stick them on. What that is is some application gel. This gives us the ability to kinda wiggle things around to that sweet spot before we stick it to the surface. [ Music ] Phoenix Graphics has decals for hundreds of makes and models. So, if you're doing a restoration or tribute, they've got you covered. [ Music ]

(Joel)>> Man oh man, talk about time well spent. And you know, for 40 years old this middle age muscle has a reflection that's reminiscent of its youth.

(Tommy)>> Now is it perfect? By no means is that a yes, but we knew with some t-l-c that it would make a dramatic improvement. Now if this project has also piqued your interest well the fun has just begun but we're done for the day.
Show Full Transcript