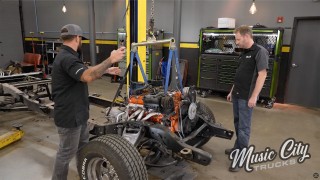
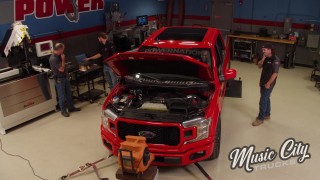
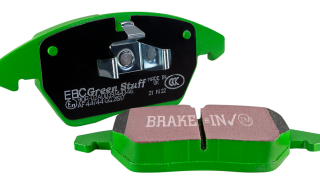
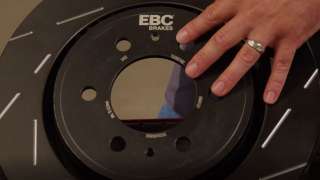
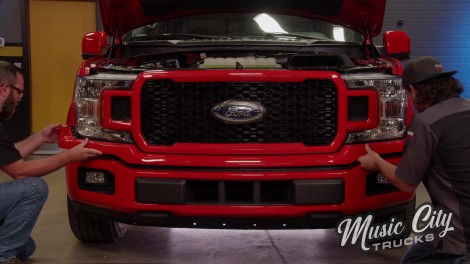
More EBC F150 Sport Truck Episodes

Music City Trucks Featured Projects

Music City Trucks Builds

Parts Used In This Episode

Summit Racing
Ford Performance Parts Tire Pressure Monitoring System Sensors
Rough Country Suspension Systems
Tonneau Cover
Sea Foam
Sea Foam Deep Creep
The Industrial Depot
Tools, Hardware, Shop Supplies

Episode Transcript

(Marc)>> You're watching Powernation!

(Brandon)>> Alright Marc, what's up with the F-150? I know we don't have all the performance parts in.

(Marc)>> Nope, but we did lower the truck.

(Brandon)>> I also picked up all the painted parts last week with the wheels and tires.

(Marc)>> We should do that. It's gonna change the look of the truck completely. We have everything for the bed.

(Brandon)>> That drawer system is nice!

(Marc)>> I know you don't want to hear this, but we're gonna be jazzing up that interior.

(Brandon)>> Alright, so that's what we'll do. Put all the painted parts on, get this truck looking good. Let's do it! Get my shirt on. Doing the real work! [ Music ] [ engine revving ] [ Music ]

(Brandon)>> Well guess that's the plan.

(Marc)>> Just need to get to work. Where do you want to start?

(Brandon)>> I think we need to get a "handle" on the situation.

(Marc)>> Door handles.

(Brandon)>> Seven or a Phillips?

(Marc)>> Seven-pound hammer.

(Brandon)>> Sounds like you're breaking it but you're not, but these plastic panels are actually easy to break if you don't take your time. [ drill humming ]

(Brandon)>> Two 8-millimeters. And make sure to find all the hidden fasteners. A little panel back. Like the ones behind this panel. There's two clips. There you go! Two more 8 mils. [ Music ] It's like the scariest thing, pulling door panels off. It just sounds like you're breaking everything, but you're not. This is the part you do blind. There's one! [ Music ] You've got one more bolt right here on this side. [ Music ] Just need to remove the cable and the handle's off. Now I'm not a chrome guy. So painted to match body panels is alright by me. It just looks better. Clip it in there. Since these are o-e-m parts we're using we're just putting it all back together the way it came apart. There we go! [ Music ]

There we go! [ Music ] That's it!

(Marc)>> Now for the mirror. I removed it from the truck so I could get the chrome cover off a little more easily. Alright well moving on to the mirror cap here I got the chrome piece that was on here off. I won't go into any details about how I did that. Let's just say I had to use a little bit of brute force. Even though these pieces that we're changing out are small they are making subtle changes to the vehicle that it's gonna help us accomplish the look that we're going for. Just get this thing installed here. [ plastic clips clicking ]

(Marc)>> I can tell you that goes on a lot easier than they come off. We're making some good headway on this thing.

(Brandon)>> Dude, this thing will not start.

(Marc)>> What are you doing?

(Brandon)>> You said work on the grill.

(Marc)>> Grille with an "E" at the end.

(Brandon)>> I'll admit that makes a lot more sense than cooking right now.

(Marc)>> Well I tell you what. Let's do this.

(Brandon)>> And then eat later. Yeah, that's a little bit better of a plan. This shouldn't be too bad though. Don't want to jinx us. [ Music ]

(Marc)>> There you go!

(Brandon)>> Four screws! [ drill humming ]

(Marc)>> I'm loose over here.

(Brandon)>> Just give her a little tug. [ Music ]

(Marc)>> Oh, weird!

(Brandon)>> We should do the bumper while this is out.

(Marc)>> Let's do it. It'd be a lot easier. [ bleep ]

(Marc)>> And with a few bolts the old bumper comes off. [ Music ]

(Brandon)>> Careful with that fresh paint.

(Marc)>> Don't drop it. And the new one can go on. [ Music ]

(Brandon)>> I like!

(Marc)>> Oh yeah, this was a good choice. [ Music ] It's amazing how such small pieces can totally change the attitude of your truck. [ Music ] I think that's just it. It just slides in there. [ Music ]

(Brandon)>> Now it looks good no chrome, all body color.

(Marc)>> Oh yeah, I love it, and I'm glad you misunderstood what I said about grille.

(Brandon)>> I'm a pretty good cook. So, I was really trying to show off for you.

(Marc)>> I can tell.

(Brandon)>> The truck turned out good. Burgers turned out good too.

(Marc)>> For sure they did.

(Brandon)>> I think we should move on to something else on the truck.

(Marc)>> Definitely!

(Brandon)>> Coming up, after I take a quick nap, I get decked out with a new storage install.

(Marc)>> Well we're making some pretty good headway on our F-150 sport truck here. We've got this thing all monochromed out. Then we finished it up with the tailgate handle and the rear bumper. Now it's time to move on to the bed. As you can see, this 10,000-mile truck was used for what trucks are normally used for. Somebody hauled some rock for their driveway here, but it's still in really good shape. It's got the factory spray in bed liner, looks really nice, but we've got some bigger plans for this bed.

(Brandon)>> And that plan includes this Decked drawer system. It's the perfect solution to add storage without sacrificing too much of your bed space, and that's because these drawers go underneath the platform, and then this deck actually provides a flat surface in the bed of your truck to keep that bed space while keeping everything safe, secure, and dry. So, the only thing left to do is put the pieces with the parts. First thing we need to install are these brackets for the tie downs in the front of the bed, and the stand offs for the bed system to sit on. See if we can figure out how these ammo cans go. You want the bolt head sticking on the rail side. Install this deck on top. Cool part about this drawer system is that it can hold up to 2,000 pounds on the deck. [ Music ] That way you don't lose the ability to load your bed full of stuff. Look at that, form fitted! Now to install the driver's side and bolt them together. [ Music ] What do I think about the Decked drawer system? It's nice platform to lay down on the job. Probably need to get the drawers installed. [ Music ] [ drill humming ]

(Brandon)>> Next step is to assemble the drawers and put the brackets in. Do those get a washer? Just kinda snug everything in there first. Oops, wrong hole, just kidding! Loosely put together first. [ Music ] [ drill humming ]

(Brandon)>> This drawer system's going together pretty nice. Just got to slide this drawer in and put the last wheels on it. Both drawers go in the same way. so, you just have to repeat the process, and the cool part is these drawers can hold up to 200 pounds. Now you're getting close to the end. Well, this is our last item to put in our Decked drawer system and let me tell you what. This system was super easy to install, and I like the fact that you keep most of your bed. Plus, you can't even see it with the tailgate shut. Up next, Marc and I get crafty with some sweet seat covers.

(Marc)>> Well we went ahead and wrapped up our bed upgrades with this tonneau cover that we got from Rough Country. Not only is it along with our Decked system gonna help keep our cargo nice, safe, and dry, but what's a sport truck without a tonneau cover. Besides, it looks good.

(Brandon)>> Now that we're done color matching our exterior, we're gonna tie that theme into the interior and we're gonna do that with some CoverCraft seat covers. Not only is it gonna match our exterior but it's gonna save our seats from wear and tear from some spirited driving.

(Marc)>> As we've said before about this interior, it's pretty nice, but this cloth upholstery shows everything, and it tends to feel a little rough compared to the leather or nice seat covers.

(Brandon)>> Plus the gray doesn't really fit too well with our red and black theme. So, we've got the perfect solution.

(Marc)>> These seat covers install the same as other CoverCraft seat covers you've seen us do here in the shop. The head rests have to come off and the seats have to be folded down, but I'm having some problems with this driver's side rear seat back.

(Brandon)>> That one has a clip right back there. Keeping going! [ Music ]

(Marc)>> Right here?

(Brandon)>> No. Might look like I'm doing nothing but I'm actually getting the head rest holes stuck through. The seat back covers just roll on and they're a tight fit. So, it takes a little bit of elbow grease to get them on. You know this reminds me of my punk rock days. A little bit of pleather.

(Marc)>> Oh yeah, I'm afraid to ask. The idea with these is they're supposed not look like a seat cover. It's supposed to look like seat upholstery. I'm at my wit's end with this Brando.

(Brandon)>> You want me to get that side?

(Marc)>> I would love for you to at least come and release it for me.

(Brandon)>> Let me go fix your side.

(Marc)>> I'll cover your head rest.

(Brandon)>> Thanks buddy!

(Marc)>> Ford didn't make this driver's side rear seat back easy to fold down. Is that it.

(Brandon)>> Boom! So, if you've never undone a back seat to a crew cab Ford this little bar.

(Marc)>> You just push up on that? I had my finger on that.

(Brandon)>> All you do is that.

(Marc)>> You made that look so easy dude! Here's the way I feel about upholstery. It takes a special kind of person, like engine builders. If you're an engine builder you don't build entire vehicles. That's what you do. You're an engine builder. Upholstery guys are the same way. What's different about these is these are built for the d-i-y person to install. You know how seat covers used to be.

(Brandon)>> You just throw a piece of canvas over the seat. Just throw the horse blanket on top.

(Marc)>> Call it good. Once you get the seat covers on you just have to work the edges into place and strap them down, and the finishing touch is this floormat. Look at that! That is really nice! This is a show truck now.

(Brandon)>> Moving on to the front, it's basically rinse and repeat.

(Marc)>> This is just an industrial trash back that we use here in the shop in our trash cans. Need to slide this over the seat. There's really no right or wrong way to do this. You just cover it up completely, and then you can take the seat cover. Because the trash back is kinda slippery foam just slides right over it. Get it lined up. [ Music ] It slides down on there. And then once you've done that trash back is easy to tear. So, you can reach in here and tear the trash bag into pieces and pull it out in sections so you don't have to leave it in there and it won't make a bunch of weird noise when you sit down in the seat. Pretty cool! Seat covers get a bad rap, but when you pick the right ones they're actually really nice.

(Brandon)>> Plus it's gonna save that interior from all the wear and tear of daily use. Up next, Marc upgrades our F-150 with some serious stopping power. Let's stop yacking and get it mounted. And I marry our 22-inch wheels with some brand new tires.

(Marc)>> Got it?

(Brandon)>> Yep! Now we're removing these steps from this truck because it's a lowered truck and it doesn't need them, and we're almost done with the look of this truck besides the graphics and wheels and tires, which I'm gonna go work on next.

(Marc)>> While Brandon's getting the tires mounted and balanced on those wheels I'm gonna be tackling the brakes. As you know, we're teaming up with EBC Brakes on this truck to be giving it away when we're all done. Well not only that but it's a sport truck. So, it needs some upgraded brakes to go along with the better handling and the more performance that we're adding. So, we're gonna be adding some pads and rotors. Just need to get this thing torn down. We're gonna use some Deep Creep Penetrating Lubricant here because these rotors like to rust to the hubs. Even on newer low mileage trucks like this one. [ Music ] Alright but because we have to compress the pistons back into the caliper, and this is a dual piston caliper, it's more difficult to compress the pistons with it off cause you try to compress one and the other one comes back out. Not to mention it's a little cumbersome once the caliper's off. So, what I like to do is just take a pry bar. Some people use a flathead screwdriver, stick it down in there, and get it inside the vent holes of the rotor, and then just pry gently, slowly. What that does is that allows that caliper to move outboard, and that pushes the pistons in, and it looks like they're fully compressed now. [ Music ] Here's one thing I like to do so this caliper doesn't tug on this brake hose while we've got it set aside is just got a little bit of tig filler rod here, eighth inch. Just kinda bent it up to an "S" shape. Just gonna hang this up here, and then I can set the caliper, hang it from it, and then that'll just keep it suspended and out of the way while we get the rest of the brake job done. [ Music ] [ drill humming ]

(Marc)>> I'm gonna keep that one a couple of threads in so the caliper bracket doesn't flop around while we're loosening this one. [ Music ]

Now when it comes time to pick the right EBC pads and rotors for your ride you can go to their website and that'll help you determine which ones you need. Now for us what we needed were these USR rotors. These are slotted, which actually helps you pull away the brake dust and gases that are created from the braking process. Also, they are geomet coated with this black coating. That's to keep them lasting longer. They're not gonna rust out, and what's great about these too is they're super heavy duty. A lot more heavy duty than an o-e-m rotor. So, it's gonna provide you, when in conjunction with the right pad, better braking and for a longer period of time. Now for those pads normally my go-to is the Yellowstuff, but for our truck here, since this is a pickup truck and it could see some light duty towing, and as well as high performance driving, we're gonna go with the Greenstuff pads. These are actually for lightweight sports cars on the small end, and then on the higher end, like with the trucks, heavy duty trucks and light towing, which is exactly what this truck's gonna do. I'm just gonna get these rotors installed and get the pads on there, and we'll be in business. When you set the rotor on there sometimes it likes to fall like that. What I like to do is put a lug nut on there and just run it down to keep that rotor from moving around. Then that'll allow you to put the caliper bracket on and the pads in without the rotor. [ metal clanging ] [ Music ]

(Marc)>> Put some fresh thread locker on those. It came with red. So that's what I put on there. [ drill humming ]

(Marc)>> Let me go grab a torque wrench for those. The torque spec on this 184. These are some pretty big brakes though. Oh, that's a loud click. Time for the pads. [ Music ] That's a good example of that rotor not moving, and those pads just kinda hanging out there. [ Music ]

And that is all there is to it. Ready for some wheels and tires.

(Brandon)>> Now we don't normally show mounting wheels and tires because let's be honest. Once you've seen one you've almost seen them all, but we had to show off our 22-inch Shelby wheels that we got from Holley, and we're gonna be wrapping them in Continental's Contact Sports 295/40-22's. This is an excellent tire, especially this wide, for the street and the track, and they're also quiet because they're full of this foam insulation they've got inside the tires. So, let's stop yacking and get it mounted. So, these tires aren't a directional tire. So, it doesn't matter which side of the vehicle it goes on, but there is an inside and an outside, and that says inside, and this one is the outside. You just want to make sure that the tire goes on the way it should. Give it a little bit of soap. Just like that! Now sometimes you have to use the machine on tires that are being a pain but come on tower. There you go! Had to think about it for a second. [ Music ] Now I know you guys have seen one of these. This is just a regular old valve stem, but since our truck's a newer vehicle it's literally got a sensor for everything inside and out. So, we had to go get o-e style tire pressure sensors from Summit Racing, and all this does is it relays the information of the tire pressure to the truck and tells it hey, you need air, or take some out. So, we have to get these installed into the wheel before we actually get the wheels installed on the truck. That way we keep all the lights off the dash and keep the truck happy. Marc, stop right there. Check this out.

(Marc)>> Now that looks good!

(Brandon)>> That's a nice wheel.

(Marc)>> That's a big wheel.

(Brandon)>> Well I'm gonna leave this with you cause I've got some business to take care of. I'd really like to stay.

(Marc)>> I got it!

(Brandon)>> It's just six bolts, or six nuts.

(Marc)>> That's the way a crew cab F-150 supposed to look. It's got the right stance, the right color, and before you know it this thing is gonna be out on the streets!
Show Full Transcript