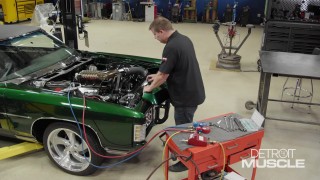
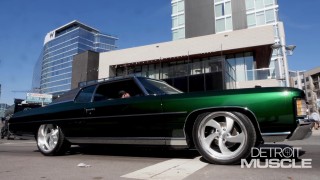
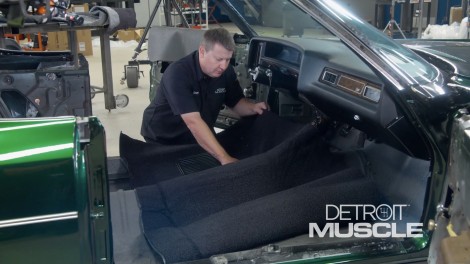
More Fat Stack Episodes

Detroit Muscle Featured Projects

Detroit Muscle Builds

Parts Used In This Episode

Summit Racing
ididit RetroFit Floor Shift Steering Column

Episode Transcript

(Tommy)>> You're watching Powernation!

(Joel)>> Today on Detroit Muscle we steer our Caprice closer to the finish and give you our recipe for some interior upgrades with a dash of carpet. [ Music ] [ engines revving ] [ Music ]

(Joel)>> Hey guys, welcome to Detroit Muscle. We got our '71 Caprice Fat Stack back in the shop looking like a million bucks. Now while you were gone we got a little more work done by installing the hood, deck lid, and a few chrome trinkets, but now it's time to address the soul of this beast, which would be the interior.

(Tommy)>> Most of the time when people think of that subject matter seats come to mind. Now we're nowhere near ready to drop these things in yet. We have some upgrades to do, and some beautification work. Now when it comes to the interior on Fat Stack we pretty much have a blank canvas because the only upholstery that's really in there is the headliner and the dashboard. Now if you'll remember back we made an upgrade on this car and converted it over to a six speed manual. So we're gonna have to do an upgrade on our steering column cause that factory one isn't gonna cut it. We've got a couple of issues with trying to reuse this old column, and what that would be is this big chrome shifter hanging off the side. With us now having that shifter in the middle we don't need this one obviously. Some people would knock the pin out and pull that shifter out but we don't want to do that because then that ugly little stub is still on there. We want to build something a bit nicer than that. So we're gonna have to go down the path of using something aftermarket. We went to Summit Racing and found this unit. It's made by IDid-It and it's designed to fit a '69 to '72 Chevelle. It's drastically similar. From here to here it's identical. However from here to here it's about two inches shorter. Now if you're looking to do a conversion like this there's a lot that goes on with it. You need to keep in mind the mount, upper and lower. These both have to be solid points. You don't want anything moving around and flexing. Next would be your electronics. Now this kit comes with some items that helps to make that transition a whole lot smoother. We're gonna transfer our old brackets off the column onto this new one. Another unique feature on these steering column brackets is these little things are designed to be a sheer point, meaning if the car is involved in an accident and the column starts to come back through these things pull out of this bracket and allow the column to move around instead of pushing back up on you. According to my research this will either do one of two things, work or not. Like a glove! Now we got this piece off and we managed to not tear it, which is cool, but it doesn't look the best, but what's cool about a piece of rubber is you can recondition this if you've got a sandblaster. Let me show you what I'm talking about. What we use in our media blaster is crushed glass. Now the technique to this is relatively simple. You just dial your pressure back to get started. You don't want to get all up close and personal with a nozzle to the piece that you're blasting. If you'll pull back from it a bit you can kinda fan it across it. That will slowly remove all that funkiness off that piece of rubber. Now if the pressure's too low, with it starting low you can always dial it up without damaging the component. Just get a feel for this and you should be able to come back with a pretty nice piece when you're all said and done. Well check that out. It made a dramatic improvement. Now I just need to blast and paint my other bracket so I can bolt this thing in. Then we can give that column a test fit. The next thing that we need to do is connect our steering column to the gear box. Now originally this was the thing that came out of our car, and it won't work with our new column being two inches shorter. So we're gonna have to go a little bit different route. Now with this thing we want to have a similar design for a couple of reasons. The design of this shaft is collapsible. How that is a benefit. If the vehicle is ever involved in an accident this thing will shorten up. If it was a solid piece like this it can't be compressed, and that will drive everything in that steering column back towards you, which is dangerous. The other thing that we're wanting to do is make sure that we install a rag joint. This helps to dampen the vibrations that comes through the suspension that can be transferred from the gearbox, through the shaft, through the steering wheel, and back to your hands. Now the first thing we're gonna do is assemble our little joint here onto the shaft, and this is the one that would connect to steering column. Now you want to always pay attention to how much of this is slid through your joint here. I like to have it basically flush with the top. That isn't mandatory but you want it really close. Once we get everything set the way we will we'll have to take it this apart and put dimples under there. [ Music ] Now this takes a little bit of finagling, kinda wiggling parts around. You just want to make sure that you keep in mind that you have enough spline or shaft slid up into each one of those joints. You don't ever want to have it too close to where it could possibly come out cause this is how you're gonna steer the car around. Once I get all these kinda dialed in I'm gonna make a mark around each shaft in the joint. Once you get it marked you just want to take everything all the way back apart. Now to make our notches I just used a round file and made a notch right here on top of the tube, and I did that also back here in the back. Now on another side of that I had to drill a hole in there so that this stud can go all the way through this tube. I'm gonna slap this thing in and see what it looks like. Man that dude's gonna have all kinds of jack. Now that we've got our steering column we can get onto that dash. Coming up, we do a bit of light reading.

(Tommy)>> Now the next thing that we're wanting to tackle on ole Fat Stack is addressing the dash. Luckily for us our gauge cluster and all is in pretty good shape. Now one unique feature with the '71s as opposed to the cars later in life is these cars have a black dash in them. Cars that came a little later they have usually a color matched piece, meaning if the dash green that piece over there is probably green as well. If you have one of these that doesn't have any flaws in it I have to say you've got one rare and hard to find piece. Now the next step that you can do is a very economical repair and that's the route that we're gonna take. If you're looking to paint or coat any of your interior components I can't stress to you enough to clean everything because normal coatings that you apply to bring back that shine and stuff on interior pieces, paint and them don't play well together. I'd also clean them both with a solvent and say a water based material. That gets rid of both of them and helps to ensure that the paint or the coating you're gonna be applying goes on a whole lot easier. A lot of paint guys use glass cleaner of some sort on their paint prep. Don't be afraid to use quite a bit either. Like if this stuff's running off it may even help to run that contaminant out of those joints. Dang also don't be afraid to use a lot of towels because if the towel's dirty all you're really doing is just moving all that junk around. If the rag is clean usually the surface is clean. What's that? You definitely ain't throwing that in the trash. Leave that in the car. Sitting here looking at all this green paint I kinda feel guilty covering it up. That is a lie, 100 percent! Ughh! [ Music ] That's what you're looking for, no dirt contaminants on top of your rag. Our solution to that ugly dash is this cover lay piece that we got from RockAuto. What's great about these is they make a dramatic improvement without a whole lot of effort. This is a hard plastic cover that simply lays right over top of your original component. They make these in several different colors, and we chose black but we're still gonna dye this thing because we want the sheens to match. Now to install this it comes with some silicone glue. You just put around all the perimeters and the openings, and then you lay it into place. Now I want to do a test run of this one on there because I want to make sure that existing green dash is all covered up. So we may have to paint around some of the edges. That's why I went ahead and prepped those earlier. [ Music ] Fits pretty nice, but it does leave a couple of edges here that you can see that are still green. So we'll have to paint all the way around there. So that's what we're gonna do. I'm gonna take this out, do some masking, then do some painting. [ paper crackling ] [ Music ] Whenever you cut this you don't want to apply a lot of pressure cause you don't want to mar the aluminum or scar it really. All you're trying to do is just cut through the tape. [ Music ]

Just like with any other painting process you're really not trying to cover everything in one coat. Put a few light coats on there it usually turns out way better. [ Music ] [ aerosol can hissing ] [ Music ] [ aerosol can hissing ]

(Tommy)>> Well I wound up changing my mind a bit guys. I went ahead and sprayed this thing but I went and sprayed it flat black instead of gloss black. I decided that the top surface need to be a little bit different. I'm gonna put this over here, apply my glue, and then we can stick it! [ Music ]

Now with the amount of money and labor we put forth on this thing we have definitely got a great return on our investment. Using these books to do this install isn't mandatory but I put a few of these on these big body Chevys, and it sure does help to make everything kinda lay out nice and even. [ Music ]

(Joel)>> Up next, we flashback and look at an oldsie but a goodsie!

(Joel)>> In my opinion one of the best features of almost any year of Caprice or Impala is the elevated interior, and that's kinda what these cars were built for, comfort and luxury, and going fast was a little bit of an afterthought. However GM's other platforms, including Buick, Oldsmobile, and Pontiac, wanted to try to walk that line of performance and style. So Buick came out with the Grand Sports, Pontiac had the GTO, and Oldsmobile had the 4-4-2. [ engine revving ] ( )>> A lot of people that see the car at a show or see it on the street think it's just a plain vanilla 4-4-2. They don't really know what lurks underneath the hood.

(Tommy)>> That's cause this '66 4-4-2 is equipped with the ultra rare ram-air package known as a W-30. Only 54 got the factory race setup that year. This is number 10.

(Joel)>> Your only clues from the outside are the scoops inside the front bumper. Looking like some crazy two headed shop vac, the scoops fed air through tubes directly into the air cleaner. The battery even had to moved to the trunk because the tubes got in the way.

(Tommy)>> As if that wasn't wild enough it's also outfitted with a one year only tri-carb system called the L-69. Utilizing the progressive mechanical linkage it eliminates the lag time of the outer two carb opening, which was common with vacuum assisted setups found on the GTO.

(Joel)>> The powerhouse of the W-30 was a specifically tuned 400 cubic inch V-8 with a hotter cam and high tension valve springs. In order to keep the exhaust heat out of the car there was as heat riser shut off valve on the intake.

(Tommy)>> The engine was blue printed on the bottom end with looser tolerances designed for drag racing. Rated at 360 horsepower, it likely generated north of 400.

(Joel)>> Boxed lower control arms, front and rear stabilizer bars, and stiffer springs gave the 4-4-2s a reputation as one of the best handling muscle cars ever.

(Tommy)>> The rest of the car is bare bones, built on the low level F-85 body style. It's got dog dish hub caps and a bench seat. To save weight there's no heater or radio.

(Joel)>> The only option available was the rocket rally pack gauges, which they made round instead of horizontal. The mandatory Hurst four speed pulled a set of 4.11 gears and it all rolled on skinny seven and a half by 14 red line tires.

(Tommy)>> The '66 models look pretty much like the '65s, except they got a hump in the rear quarters and fender vents behind the front tires. 4-4-2s had a unique mesh grille and taillight treatment.

(Joel)>> Introduced in '64 to compete with the GTO, the numbers originally meant four barrel, four on the floor, and two exhaust pipes. That kept changing as they added automatics and multi-carb setups. With that tri-carb it should have been called the 6-4-2.

(Tommy)>> The W-30 option wasn't advertised in '66. It wasn't even in the Olds brochure. So most folks still don't know it was offered that year. It was mainly targeted at racers as part of a win on Sunday, sell on Monday strategy.

(Joel)>> Well it worked. The Brainbeau Olds took the C-stock title in '66,and Olds sold almost 22,000 4-4-2s that year.

(Tommy)>> It doesn't matter how rare this car is. It was made to run hard, making 12 second quarters in stock condition. With performance like you'll wish this was your daddy's Oldsmobile. Coming up, we add some creature comforts to our Caprice.

(Tommy)>> Hey guys, we're continuing on ole Fat Stack, working on the upholstery work, and I'm actually referring to the carpet. We've shown you guys several times how to tailor fit one of these carpet kit. With our '69 Charger that we built we had to get a bit creative and call in a hired gun. After making a few templates we transferred to some flat stock carpet, cut those out, little bit of sewing, next thing you know we have a show piece. The end product looked custom and clean. We're gonna be reusing some of those techniques inside of this car and a few more. Now if you'll remember back we wound up installing a six speed into ole Fat Stack, and it required some transmission tunnel modifications. With our floor being so close to stock we believe that one of these stock factory replacement carpet kits will do us just fine. Now with them you do have options and they have their benefits. With working or ordering carpet you'll hear a term like mask backing, and what that refers to is this dark gray material on the back side of the carpet. It works really well to reduce temperature and vibrations inside of the car. However, if you're trying to do something custom like we are it's a bit more complicated to work with. What we're gonna be using is the basic stuff. It doesn't have any kind of backing on here, which will allow us to conform it to our application. Now you'll hear terms like stretching. When you're working with house carpet you're just meaning to stretch as tight from one end to the other. With ours we're gonna stretch it kinda around that big tunnel in there. [ Music ] When installing carpet I like to look for what I refer to as corners, and that would be the corner of the floorboard or the toe board, something like that. That is your location point. When you put the carpet in right on top of there that tells you that the rest of it should follow as it lays on. Know this thing has that white-ish backing on. We're gonna have to cut this section out right through here so that it'll lay down and it'll expose that backing. Now whenever you go to cut this stuff you can use a knife or a nice pair of scissors. I actually prefer the scissors. While you're trimming here make sure you're only cutting through this part, not the carpet itself. Now we're cutting this out as one big piece. That way we can come back and re-add it later instead of just tearing it out in the chunks. I would say this is similar to sheering a sheep but I have no idea what it's like to sheer a sheep. Now let's put this thing back in there and see what we got. [ Music ] Well it's laying in pretty good. Now we've got our hole cut for it so everything could fall into place, but what we did notice is it's a little bit higher here like we were anticipating but in all reality we could live with this. We're running a bench seat and all of that would be under it, but what we can't live with is this big ole protruding section up here. What happened is since this is higher it kinda kilted this down and it all bunched up. We're gonna take a heat gun, basically melt the backing on there, and then lay it back into place, and then squish it down. That'll tighten up all this weave and flatten that thing out. [ heat gun humming ]

(Tommy)>> Right now we're heating a broad area of this thing. So keep your heat gun moving around on you. This thing can literally melt a hole in that carpet. You can usually tell when it's starting to get right because one, it gets shiny, and two it gets a whole lot more limber. I just realized something right before I was about to screw up. Need to get some gloves on. Made that mistake once before. Now with my protective gloves on we'll get it done. [ heat gun humming ]

(Tommy)>> It's not all gonna be fixed all at once. It's gonna take a few times to get all that dialed in. What you're doing, you're holding it in place while it's squished up, and as it cools off it'll hold itself back. We'll repeat this process probably five, six times to get it exactly where we want it. Well that's way better than it was. Now if you wanted to continue these little odd bumps here and there you can use this same process. If you're wanting to stretch it to conform around something exactly the same. Well I promise you guys we're gonna be out terrorizing the neighborhood in Fat Stack before you even know it. We keep checking things off the list. Steering column's in it, gotta have a way to turn the wheel. The dash, it looks a whole lot better, and the carpet is well on its way.

(Joel)>> For us this is one of our favorite parts of the build. The finish line is in site and you can finally see that all your hard work is starting to pay off. You know what, all we lack is finishing up as Tommy likes to say.

(Tommy)>> With that you know getting some help would be kinda nice. Where you been?

(Joel)>> If I told you there'd be an a-p-b out on my name.
Show Full Transcript