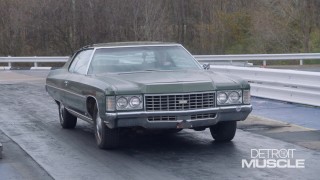
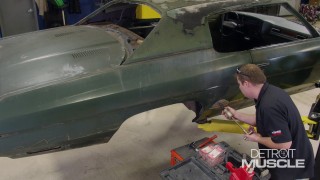
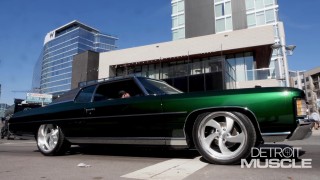
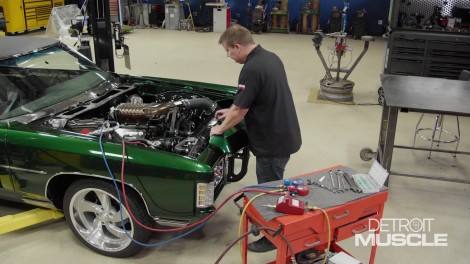
More Fat Stack Episodes

Detroit Muscle Featured Projects

Detroit Muscle Builds

Parts Used In This Episode

Summit Racing
Summit Racing Pro LS Conversion Radiators
Summit Racing
Vintage Air SuperFlow Horizontal Condenser

Episode Transcript

(Tommy)>> You're watching Powernation!

(Joel)>> Today on Detroit Muscle we share some cool tips on how you can fix up some old parts and install new components to add air conditioning to your classic ride. [ Music ] [ engines revving ] [ Music ]

(Tommy)>> We all spend a tremendous amount of time to build a cool car. We'll spend hours on end pulling wrenches, or even days sanding on a body to ensure that the paint work looks like a million bucks, and what for? We don't need this stuff. It's for the sheer enjoyment of sitting behind the wheel, bumping the key, can surely put a smile on your face. Thinking about those glory days can give you the sense of some time spent in heaven, but I'm here to tell you under the right circumstances it can feel more like a pit stop in hades. When you're planning a project there's certain things that you've got to do. Do you want it to make statement? You gotta have performance. You want to look cool driving it. With Road Burner I do believe we checked all those boxes. Riding around in this thing in the scorching summer heat makes you think you wished it was less bare bones and had a few pieces of some optional equipment. We want Fat Stack to be cool on the outside and the inside. So we're gonna be hooking up the a/c today.

(Joel)>> A little while back I refurbished that old heater box, and to show you how we did it gotta take a little trip back in time. [ tape rewind trilling ] [ Music ]

(Joel)>> We've mentioned before that we want every detail and aspect of our '71 Caprice to look sharp, but unfortunately for our old heater box it definitely stands out but I wouldn't say in a good way. Luckily rejuvenating one of these doesn't take a whole lot of time or money, and the end result can be pretty substantial. First thing you're gonna want to check is this fiberglass hull, and if it's got any broken, cracked, or missing chunks you're definitely gonna want to repair that pronto. This is a tedious part of a restoration that a lot of people don't look forward to, especially when it comes to working with fiberglass. Once you get your blower motor out it's a good idea to give it a couple of spins, just kinda listen for any weird noises, and if you hear any grinding or scratchy sounds you're probably gonna have to replace it or rebuild it. This one luckily quiet as a mouse. See what kind of critter's been making nests in this thing. Woo, I've found many mice nests, hornet's nests, and all kinds of things in these old heater boxes. [ Music ]

Now initial inspection of our evaporator core is that it's old for sure but does appear to be in working order. The best thing to do with these things is to hook a vacuum gauge up for about 30 minutes and see if you have any leaks, but if it does need replaced you might have to go with an aftermarket option because a factory replacement is kinda hard to come by. Now with everything cleaned up we're pretty much ready to go ahead and start prepping our fiberglass pieces for some paint. Now I like to use a red scuff pad because it's just coarse enough to shave off all those nasty fiberglass hairs but not so coarse to where it leaves any sand scratches. Using the scuff pad gives your surface some grit so when we lay down our clear coat it has something to bite down and hold on to. [ Music ] With everything prepped we're finally ready to spray on some paint. Now our fiberglass pieces will just get some aerosol clear coat, while our blower motor will get that semi-gloss black that's pretty similar to the factory style finish. [ Music ]

(Tommy)>> While Joel's busy fixing the heater box on the outside I'm gonna do my thing here on the backside of the firewall. I'm gonna swap in my new Duralast heater core that I picked up online from AutoZone Pro. Now what's great about this thing is it's just simply nuts and bolts, and it's a direct application. So it should go in with a breeze. Now with this thing it wasn't leaking before but whenever you have a car of this age and you've disturbed things as much as we have that's whenever they'll start giving you a fit. Doing this right now, with that front half already off most of the work's already done. So I've got a couple of bolts I need to take loose and then I can get that thing in.

(Joel)>> With the paint on our heater box still tacking off we're gonna go ahead and shift our focus towards sprucing up our old evaporator core. One of the easiest ways to complete this task is go to your local home supply store, pick up one of these indoor/outdoor coil unit cleaners. For the most part these formulas are non-acidic but there is still some of that old school stuff running around that will straight up melt the paint off the wall. In this case it's gonna put a nice, bright shine on this old aluminum. [ spray bottle hissing ] [ Music ]

(Joel)>> Well all that's really left to do is go ahead and spray on some of this cleaner a couple more times, and we'll rinse it off with some water, and ready to put it back in the box. In just a couple of hours our old heater box went from eyesore to fully restored. Up next, we make some racket and build new brackets to mount our a/c components.

(Tommy)>> If you've got an old car with a complete a/c unit in it and it just needs to be gased there are companies out there that offer what's referred to as a retro kit, and that's all the stuff that's needed to gas it up with the 134-A. But the issue with that is it will technically blow cool air out the vents but it's not as cold as it could be. That's because on a condenser your diameter of your tubes are much larger than on a 134-A unit. This allows it to work more efficiently, thus giving you a cooler charge coming out the vents. So we picked up this universal unit that we found at Summit Racing. It is gonna require some custom fab work, but that's just what we do. I'm just gonna set this thing in here to get myself a game plan. Yeah, it's gonna work kinda nice. I'm actually gonna offset it a little bit here to the driver's side cause I've got to make these hose connections over here, and that'll give me some added clearance. So I'm gonna put some masking tape up on here and start drawing this thing out. [ Music ]

(Tommy)>> Three and three quarter wide. That may seem like a little excessiveness but we're gonna be hauling the mail. Not too bad. It's a little long but whichever one you want, and then we'll just duplicate that on this one.

(Joel)>> As we said before, you don't have to get too elaborate when building custom bracketry. [ drill humming ]

(Joel)>> Beauty is always in the eye of the beholder. [ saw buzzing ]

(Joel)>> We're just going with some medium gauge aluminum and cutting a few ridges to give it some character. Just so it doesn't look like we pulled it out of the scrap bin. The main goal is that it's functional, and it needs to be able to endure a lot of wear and tear from running up and down the road. Now the next component that we're gonna address in Fat Stack's air conditioning system is the p-o-a, or Pilot Operated Absolute Valve. Now basically how it works is it has a thermostat that monitors line temperature, and once it gets too cold the expansion valve closes, allowing for system pressure to rebuild along with the temperature. And once it warms back up the valve reopens allowing for your refrigerant to start flowing again. In terms of appearance our new valve looks just like the old one. However, the internals have several updated benefits. Swapping it out only takes a few minutes. If you need to evacuate charged refrigerant from your air conditioning system be sure and check to verify that you are in compliance with the proper evacuation procedures. Stuff's kinda nasty! It's like petrified dinosaur poop or something. [ ratchet clicking ] [ Music ]

(Joel)>> Overall this stuff's fairly malleable. I can push it and bully it into any shape you want. Ideally you want a good, tight seal around your thermostat just so no extra air gets in there. Looks like these threads have a little bit of corrosion on them. So go ahead and clean these up. No point in putting rusty threads into a brand new valve. Probably throw on some anti-seize as well just for good measure. With this being a universal kit we've got some excess here on our copper line. So I'm using some pipe to add a coil so I can tuck it up and make it look nice and neat when we pop the good. Cool, I think we're ready to plumb some hoses. One of the most important components that could dictate the routing and plumbing of your a/c system is gonna be the final resting place of your filtered drier. Now basically how this little guy works is there is a desiccate material on the inside of here that filters out any kind of moisture or solid contaminants and keeps it out of your a/c system. This is one of those times where size actually does matter. Basically the larger size condenser that you're running the larger size of filter drier you're gonna need. If you attempt to run a large a/c condenser with a small filter drier you could run into a lot of restriction of your flow. Vice versa if you try to run a small condenser with a large filter drier the volume could overcompensate that pressure and your a/c system is just not gonna perform properly. Now from the factory our setup that came in our '71 Caprice is a little bit larger in comparison to a Chevelle or Camaro but it's understandable, but we've come a long way in 50 years and the technology on this stuff is a little bit more streamlined. Basically you can get big condenser performance in a much smaller package nowadays, and your filter drier is but one piece of the entire air conditioning puzzle. How you plumb it is gonna vary from project to project, but the overall concept remains the same across the board. Now I did have to build a couple more brackets to mount our filter drier but at this point it's just the nature of the beast. Now what's good about mounting it here is it's gonna be kinda tucked up and away. So once we get the grille on you won't even know it's there. [ Music ] Should do it!

(Tommy)>> Coming up, we revisit a time before to look at a '64 Thunderbolt.

(Joel)>> We've still got a few more components to put together to ensure our Fat Stack '71 Caprice has the air conditioning system that this build deserves. It's crazy to think that cars as early as the 1940s had the option to plumb in at least some sort of a/c to ensure everyone in the car had a nice, comfortable ride for those hot summer days. By 1969 air conditioning, ironically, had become quite the hot commodity, and almost half the vehicles in production came with it. Back then a lot of people really didn't care about modern conveniences, and they just wanted to straight up flat out go fast. The idea of a factory built race car appealed to a lot of hot rodders back in the day, and those things literally came out of the plant not only with no a/c but no heater, no radio, sometimes not even a rear seat. Popular models included the Z-11 Impala, the LO-23 Super Stock Dodge, and of course let's not forget the Ford Thunderbolt. Ford's lightning fast Thunderbolt put the blue oval on top of Super Stock, edging out the Max Wedge Mopars that had ruled the strip for so many years.

(Tommy)>> Ford teamed up with Dearborn Steel Tubing to transform its humble Fairlane 500 into a drag demon. Only 100 were built, and you had to be a diehard racer to get your hands on one.

(Joel)>> Steve took one look at the car in a magazine and was hooked, but the Ford dealer was reluctant to sell it to him because he was only 16. So he had to bring along all of his trophies and time slips to prove that he was the real deal, and it worked but they kept trying to sell him an automatic.

(Steve)>> And I'd say, no, automatics are for little old ladies and schoolteachers, and I'd like to have a four speed.

(Tommy)>> He finally got his wish in March of '64 and towed the car all the way home from Michigan to Alabama through a snowstorm. Once home he started blueprinting the motor with the help of the legendary Don Nicholson.

(Joel)>> The formula for the Thunderbolt was simple, big power in a little car. The monster 427 was shoehorned in and topped off with a high rise manifold and dual four barrel Holleys. Air was gulped in through tubes hooked to the headlight bezels. Rated at 425 horse, it made upwards of 600 in race tune.

(Tommy)>> To shave off weight fiberglass was used for the teardrop hood and fenders. The bumpers and grille were aluminum, and the windows were made of Plexi-glass.

(Joel)>> The inside was stripped down to the bare essentials. No heater, no radio, no carpet. Just some van seats, a four speed, and a tach. All told, it came in at just 20 pounds above the minimum Super Stock weight.

(Tommy)>> Underneath the suspension was beefed up with asymmetrical heavy duty leaf springs and two inch by three inch rectangular traction bars. You can see how the car hops up almost six inches on launch.

(Joel)>> Steve won his first time out and race the car for a year all over the southeast taking on guys like Billy Jacobs and Emmitt Austin.

(Steve)>> All of the stuff that I did I had to do on my own. No pit crew, no sponsors, and just kinda dog paddling to get by.

(Tommy)>> Must have been some pretty fast dog paddling. He won over 100 races. Every weekend he hit the drag strips, but during the week he was hitting the books at Auburn.

(Steve)>> I learned about weight transfer, leverage, and all of that, and every week I would polish my skills in school to go make my car run faster.

(Tommy)>> He wound up shaving off a second on his e-t, running 10.97 at 131 miles per hour.

(Joel)>> In '65 Steve went to work for Ford, where he got a drag Comet as his company car. He traded the Thunderbolt for a Mustang and $1,000 bucks, but the check bounced.

(Steve)>> When I tried to go to court to get my money I almost got eliminated, and I had to run for my life.

(Tommy)>> 40 years later the car is Steve's once again, and he also earned a spot in the Southeastern Drag Racers Hall of Fame.

(Joel)>> His racing days may be behind him but he still loves taking it to the track. ( )>> Any last words?

(Steve)>> This is a blast!

(Tommy)>> Up next, we show you how to make crimping look easy!

(Tommy)>> Now the next thing that we're gonna take care of on Fat Stack is our hoses for our air conditioning. Now one thing I'm gonna stress to you all if you've got a project that you're gonna do an engine swap like we are, and that is save all of your pieces that you take off cause you never know what you're gonna run into and gonna need later down the road. We're gonna have to reuse this part of the line because this big fitting is o-e-m only. It's a big number 12, and oftentimes on the aftermarket pieces they only go up to a number 10. So what we're gonna have to do is cut this piece off, cut a part of this fitting off, and weld them together. [ Music ] Now if you're looking to make some fittings like we are I'm gonna stress to you guys to make sure that you clean out all of that debris. I prefer to do it numerous times during the process. That helps to ensure they're as clean as possible once you're all said and done. Next thing I'm gonna do is mock these up on the car so that I know how to clock this fitting. If you'll notice, as I rotate it it drastically changes the angle. Once it's all set I'll draw a line across the two, and when I take it off and head over to the table to weld it up I'll know exactly where it needs to be. What we're gonna do is actually have to trim off a little more of our tube here on the bottom, and then we'll cut the top side of this thing off so that it will lay in there like so cause we need to make a hose connection that goes from here down into our compressor. [ welder crackling ]

(Tommy)>> Now I'm just using some more of that sandpaper we had to kinda pretty the rest of my hook up here. Then we'll be able to take it over to the car and start measuring out the hose. Now we've got a little adapter that we have to mount onto our compressor. Now I'm gonna suggest to you guys if you're gonna be running some hose always try to keep in mind the natural curvature that it has. It sure does lay a lot better using that in your favor. Sometimes when you try to make it go against that grain it bends kinda funny. Whenever you go to push your a/c line into here you need to make sure that you push it all the way up to this little lip. I like to put the hose right there at the end and then make a mark here on this side. Once you push it in there as long as this and this lines up you know you're in all the way. Another good idea is to make you a mark across these two on both sides. What that helps to do is allow you to make sure these are lined up whenever you crimp them. If you were to twist it well it would be clocked wrong and it can make it a bear whenever you go to install it. The next step with this hose would normally be you'd have to crimp it. That usually requires a big, fancy hydraulic press of some sort but luckily Summit Racing has a tool that you can get that'll allow you to do this at your own place. It will allow you to do six, eight, 10, and 12 diameter hoses. To get started all you need is a sturdy place to mount this thing. [ Music ]

Now before you crimp, like I mentioned earlier, make sure everything is all lined up cause once it's squished there ain't no backing up. [ Music ] [ ratchet clicking ] [ Music ]

(Tommy)>> With our hoses all tailored fit you're probably thinking it's time for us to gas this system up, but that's really not the case. We've got to verify that we don't have any leaks. You have a Schrader valve here on the inside and then you've got a couple of connections here on your filter drier. Just verify that everything's nice and tight, and then it's time to pull that vacuum. Now we'll make a couple of connections onto our car, and then we'll let this thing run. What that will do is create a vacuum on the system. We're gonna lock everything down, wait about 10 or 15 minutes to see if it will hold that number on a gauge. If everything checks out we'll let this thing run again for about 30 to 45 minutes. That helps to remove the contaminations that's inside the lines, and then we'll be ready for our next step. We're about 29 minutes in and it's still holding exactly where we were at. So now we need to go ahead and run the system a little bit longer under that vacuum so that it will remove any air and moisture out of the system. Well our system is all pulled down and the normal step right now would be to gas it up. We can't really gas it up because it's not running, and it has to be so that it can cycle to get the proper readings. Can't wait to be riding in there and flipping the switch with that cool air blowing on me.

(Joel)>> Any time you can add modern conveniences to the style and elegance of one of these old hot rods it makes a world of difference. We got a lot done today. That old heater box is refurbished, along with the new p-o-a valve, a/c condenser and filter drier installed, and all the plumbing to make it work. Technically none of these things are necessarily required for a build like this but it sure does make the experience of sitting behind that wheel a whole lot more enjoyable.
Show Full Transcript