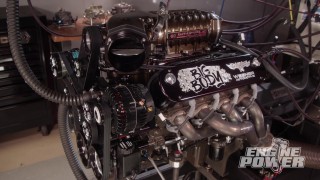
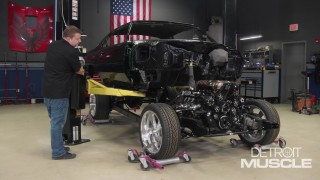
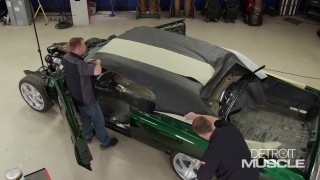
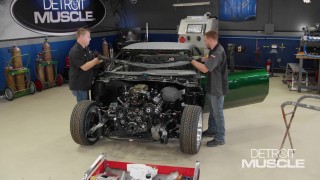
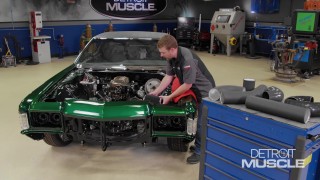
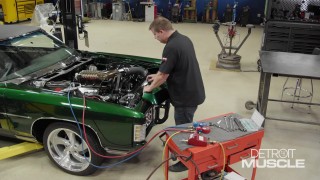
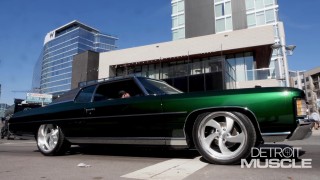
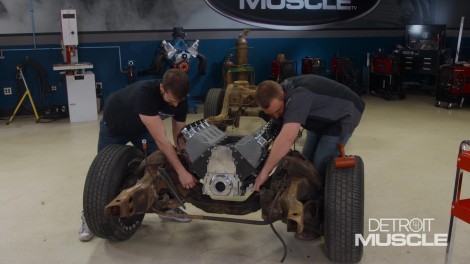
More Fat Stack Episodes

Detroit Muscle Featured Projects

Detroit Muscle Builds

Parts Used In This Episode

Summit Racing
Headman Husler Headers
Summit Racing
P-Ayr Products Replica Long Block Engine

Episode Transcript

(Tommy)>> You're watching Powernation!

(Tommy)>> Today on Detroit Muscle we unveil our new supercharged LS, and mock it before we try it.

(Joel)>> Plus we show you some tips on how to fab a new trans tunnel when surgery is a must. [ Music ] [ engines revving ] [ Music ]

(Tommy)>> Hey guys, we're back pulling wrenches on our '71 Caprice project that we've nicknamed Fat Stack. Now we've got some big plans for this thing, and they're drastically gonna alter what some could consider the capabilities, where others may call them limitations that this thing had whenever it rolled off the assembly line.

(Joel)>> By the time this curvy bowtie is done it's gonna have almost quadruple the power that it had originally from the factory, and we're not just stopping at pegging the needle on that speedometer. We also want to transform this old Caprice into a power shifting thrill ride.

(Tommy)>> Now we're gonna be using some late model power to achieve our goals, and to say an LS swap is a popular subject, that goes without saying.

(Joel)>> There's several operating systems a person can go into, from fuel, engine management, cooling, all that stuff, but we're not gonna get into that. We're getting back to basics and showing you guys the nuts and bolts of what it physically takes to put a modern power plant into your project. The small block 400 that came in our old Caprice is one of the most renown power plants of its time. Although it wasn't originally intended to be referred to as a high performance engine it still generated respectable torque numbers all the way to its discontinuation in 1980. And as cool and iconic as this SBC may be we've got something better planned for old Fat Stack. The cure for low horsepower is pure forced induction. We wanted our old big body to scream the tires right off the rear axle, and this supercharged LS is going to do just that. Not only is this beautiful piece of automotive artwork generating an exorbitant amount of pulse pounding ponies, that bronze powder coated finish guarantees a complete package of performance and good looks. And of course, with great power comes the need for great stability. Our buddies Pat and Frankie of Engine Power birthed this motorized masterpiece from a bare block, dropped in an internally balanced crank with gun drilled mains, hydraulic roller cam shaft, and forged alloy pistons. Then topped it off with a Gen-5 Whipple supercharged, billet throttle body, Holley Terminator-X engine management system, and a center shaft series accessory drive kit. And let's not forget those killer custom machined valve covers. The proof is in the pudding. So, we had to see the number. A rap sheet of 840 horses and 760-foot pounds of torque opens that possibility for a few participation awards from those boys in blue. But we've still got quite a bit of work to do before we're ready to set that crown jewel on top of our chassis. Now to kinda keep that out of harms way we're gonna go ahead and use this PAyr replica long block that we found at Summit Racing. If you guys are doing multiple engine swaps at home these things are pretty handy to have around. Since our old Chevy already has a small block, bolting in an LS is really not gonna be that big of a deal. And even though the Caprice is a B-body, if you're working on a Chevelle, Camaro, or even an old C-10 pickup the components are gonna be relatively the same, including the motor mounts, which now more than ever we've got a lot of options. This particular set is from Hooker Blackheart, and it's designed to be used with the clamshell style mount. So, if you've got a '73 through '76 GM big body this is the setup you're gonna need, but if you've got a '71 or a '72 like ole Fat Stack you're gonna want to go a different route. This setup uses the more common GM style mount with the two tabs that are two and three-eighths inches apart. It also gives you a couple of inches of adjustment with a universal mounting plate that has extra bolt holes. We're looking to drop our new engine as close as possible to the original location of our small block. A common point of reference will be the center line of the crankshaft. Now since we already separated the body from the chassis pulling this old small block should relatively be a breeze. We brought in our buddy Mike who's gonna help us unzip a few bolts. What do you think buddy, ready to get started?

(Mike)>> Let's do it!

(Joel)>> Alright! [ Music ] Come on big guy!

(Mike)>> Look what I found. [ metal clanging ]

(Mike)>> You want it hand tight or zippy tight?

(Joel)>> Initially hand and then zip. Crank her out of here. [ Music ] Oh yeah! Got enough clearance clarence?

(Mike)>> Yes sir!

(Joel)>> Let's head back. With that old, greasy small block out of the way we're just about ready to set out mockup motor in, but before we do that I want to show you guys one more common reference point that's gonna help get your new motor as close to factory original position as possible. The measurement you're going to want to make is from the front face of the bell housing to the rear tab on the engine mount. On our mockup motor it's about 14.5 inches. Our original setup measured in at about 14 and three-eights, which is pretty dang close. Now if you've got a larger spread between those two numbers you might need to move your mounts forwards or backwards until you get a little more dialed into that factory number, but from where we're sitting we're ready to drop this thing in.

(Mike)>> Ready?

(Joel)>> It's more awkward than heavy, like me. [ Music ] Cool, she's in!

(Tommy)>> Up next, we get ahead of ourselves as we mockup our new six speed setup.

(Joel)>> With that massive power plant we're gonna need a serious piece of equipment to sit behind it. Now our old Chevy originally came with a Turbo 350. Yeah, guys have been known to build those to hold up to significant horsepower, but at the end of the day they've only got a one-to-one ratio in high gear, meaning no overdrive. And having that extra gear really does make a difference. More gears usually means a lower ratio in first and a higher final drive, which we all know translates to smoother cruising down the highway. Something like a 4-L-70 would be a safe choice but we really wanted to do something different on our old big body. So, if you're thinking of a manual I like where your head's at. Many of us know that exhilarating feeling of dumping the clutch and keeping the pedal to the metal all the way down the block. Our buddies at American Powertrain heard our big body's power plant was in need of some serious backup. They answered the call with a Tremec Magnum T-56 six-speed. And to help ease installation they also provided us with a Pro Fit Kit that comes complete with bell housing, Hydromax hydraulic clutch system, flywheel and clutch plate assembly, as well as everything for the shifter linkage.

(Mike)>> Team lift! Nice and easy. [ Music ]

(Joel)>> Got one in! [ Music ]

(Mike)>> The bolts are a little long. [ Music ] [ ratchet clicking ]

(Mike)>> I think that just about does it.

(Tommy)>> Sometimes when mounting your transmission it requires some customizing or modifying to your crossmember. That's because more often than not these aftermarket or late model units are significantly longer than what the car came with from the factory. Now to install our crossmember isn't gonna be all that big of a deal at all. With our new transmission being a little bigger we had to move our old crossmember back just a bit. Luckily this modification only required drilling a couple of holes. [ drill humming ]

(Tommy)>> We lucked out with this big body Caprice because of this open C-channel in the frame. This much room, shoot, we could just about put a transfer case under here. From the factory our old Caprice had these little rubber pads that were mounted on the top and bottom of the crossmember. We're not gonna use them but they were designed to dampen the vibrations coming from the engine and transmission, and I'm pretty sure that these things, they're not gonna stand up to the capabilities of the power that that thing's gonna put out. So, these are just gonna hit the trash heap. I did have to take these little plates, cut the little bumps off of it if you will. Now we'll just slap them in, throw in some bolts, and we're ready to go. [ Music ] Sweet as pie! [ Music ] If you're looking to make one of these fancy upgrades like this six-speed that we got from American Powertrain there's one modification that's almost guaranteed that's gonna happen, and that would be modifying or altering your transmission hump or tunnel. That's because this unit is a completely different size and shape. Also, the shifter housing sets up rather tall. When you put them side by side it's plain as day. The new setup is longer and taller, but that's what it takes to get a few more of those gears in there and have the strength to handle all that power.

(Joel)>> Another hurdle you guys may run into when doing this style of conversion is gonna be your header selection. Now we were searching around the internet and couldn't really find a direct application for a '71 to '76 GM B-body LS swap, but what we did find is a couple of different styles. One is for a Chevrolet C-10 pickup and the other is for a GM A-body, kinda similar to a Chevelle. A lot of times with this stuff it's best to just do a little bit of trial and error. So, we're gonna bolt on both sets of headers and see which one's gonna work best for our application. [ Music ] Is it hitting over there?

(Mike)>> We are just touching.

(Joel)>> I'm touching on my side as well. I've got plenty of clearance on the starter. We can modify this if we have to. Let's try that other set! [ Music ] [ ratchet clicking ]

(Joel)>> How does it look on your side?

(Mike)>> It does have ample amounts of space between the crossmember and the steering shaft.

(Joel)>> The way it hugs the block can be a good thing and a bad thing cause on this side it's gonna be right up against that starter, and the way it runs up hill I think I know which direction we're gonna have to go.

(Mike)>> I think so too. [ ratchet clicking ]

(Joel)>> Well guys the jury has reached its verdict. This set of Hedman Hustler Headers that we found at Summit Racing is probably gonna be our best bet for this application and for a number of reasons. For one, this setup is gonna give us adequate spacing between the header, both sides of the bell housing, as well as the starter. And because of the way these are angled downhill we don't have to modify that rear crossmember. Coming up, we measure up, remove some metal, and reconnect a couple of old acquaintances.

(Tommy)>> Hey guy, we're calculating our incision point that we're gonna be making on Fat Stack in efforts to install that six-speed. Now you could do this a couple of ways. One, cut a giant hole or basically remove all the tunnel, and then slide your chassis in there and fill in the void. But with our style we want to be quite a bit more accurate than that. So, to do this you need a couple of common points that's on the body and the chassis to measure from. We're gonna start off using a straight edge and lay it across the two center body mounts. Center it up in the hole, and then we can take our measurement. From the forward side of our ruler to the back of the transmission is about 10.5. So, we want a little bit of clearance. So, we'll just make an incision at nine and a half. You calibrated your eyeball lately?

(Joel)>> It's been a minute. You on the front edge there?

(Tommy)> Yes sir! [ Music ] I know we've just got to be close. So that applies to floor pans, hand grenades, and horseshoes. [ Music ] [ drill humming ]

(Joel)>> Now when it comes to cutting out this transmission tunnel we're gonna try the least invasive technique as possible, meaning not cutting out more than we technically have to. Basically, we'll used our drilled hole as a center point of our outline, and the cut will run just on the inside edge of the hump towards the firewall. From there we'll have a few spot welds to drill out. Going this route has several advantages. For one, it significantly cuts down the amount of fabrication time, and doesn't require a break or bead roller to build your panels. Secondly, it gives us a better chance of being able to use a stock replacement carpet when we got to put the interior back in. I've seen guys get a little cut and fab happy on this conversion before, and they usually end up having to buy a custom tailor made carpet, which we all know only adds more headache and leaves less change in your pocket. But we'll want to keep a couple of those spot welds intact. That way it kinda folds up on itself as the transmission passes through it, and from there we've just got to build a couple of smaller panels on that bottom edge, which it's a lot easier than having to build a whole new trans tunnel.

(Mike)>> Now one thing you want to consider this kind of swap is where the shifter's gonna be in correlation to the seat. Now with our six speed we do have options, and we can move it forward if we have to. You may not run into any problems if you're a taller guy but for those shorter fellas they might have to adjust the seat. So, it is possible you may have to notch it. We'll find out when it all goes together.

(Joel)>> One of the first obstacles you have to overcome when drilling out these old spot welds is simply locating them. I like to use an angle grinder with a 36-grit roll lock disc to chew away that 50 year old undercoating. If you keep the disc flat while grinding those spot welds should reveal themselves as little dark circles. Then I'll mark them with a center punch to guide my spot weld cutter. You can use a drill bit here but just make sure you don't cut through both layers of sheet metal. [ drill humming ] [ Music ]

(Joel)>> Then just give it a few whacks with a hammer and a chisel to pry it apart. You don't want to swing for the fences here because you want to preserve as much of the original sheet metal as possible. Having a set of dolly skates makes realigning the body to the chassis a whole lot easier, but if you only have a couple of floor jacks that can also get the job done. [ Music ]

(Tommy)>> Got to go forward about a foot. Yep, that's probably pretty close.

(Mike)>> Yeah, it's right on top of it.

(Tommy)>> Kinda tall on the inside.

(Joel)>> Like a little mailbox sticking up here. Cowl induction floor!

(Tommy)>> Up next, we make a blueprint to trim some tin and to fab our transmission's forever home.

(Joel)>> Hey guys, while you were gone we went ahead and reinstalled our front seat just to check the final position of our shifter. Luckily, we're not even gonna have to notch it. Our next step is to go ahead and start building some filler panels for our trans tunnel. [ saw buzzing ] [ Music ]

(Joel)>> Now one of the first obstacles you're gonna run into when building this panel is the determining where to cut the hole for your shifter mount. Now the way I do it requires a little trick of the trade. Simply cut the head off a bolt with threading that's similar to your shifter mount. Then grind the tip to a point and thread it into your linkage and set your panel back on top of that point. From there you can take a little ball peen hammer, give it a quick smack, and that little sharpened bolt will work as a center punch, giving you the exact location of where you need to drill your pilot hole. Another thing you need to consider is the spacing between your panel and your transmission. The general rule of thumb is roughly three quarters of an inch. So, what you can do is take four or five of these paint sticks, wrap them together, and that'll get you pretty close, and just use that as a spacer between your panel and your transmission and you're good to go. For right now everything's looking pretty good. So, I'm gonna get to work making some templates and bending some metal. There are several reasons why it's a good idea to make templates when you're fabricating. In this particular case a template allows you to build an outline of the trans tunnel that you can use as a guide when you're cutting and shaping the metal. This can be especially helpful if you're not an experienced fabricator or if you're working with an odd shape transmission tunnel. And if you need to create multiple pieces a template allows you to replicate the process exactly each time. It can also help you avoid making unnecessary cuts or adjustments, saving you some time and materials. Overall making templates is a crucial step in the fabrication process that can really help ensure that your work is more accurate and precise. [ Music ] Now technically when you get to this point you could drill a bunch of holes and plug weld it all the way across. The problem with that is it doesn't look very good, and anywhere where that metal's overlapping is gonna be prone to corrosion. But we want this thing to last a long time and look good doing it. So, butt welds and metal finishing it is. [ welder crackling ]

(Joel)>> Now basically what I've done here is laid my piece over the top of the hole, and then zipped in a few spot welds. What that does is it helps kinda match the shape of the trans tunnel. Once I've got my shape dialed in I can make some cuts on the top and bottom part of these seams, and that'll shift it from a lap to a butt, and then we can do our final welding from there. Now this is one of those times where you really want to pay attention to the direction your sparks are flying. I've wrapped both the dash and the transmission in some deflection paper to avoid critically damaging the housing underneath. [ welder crackling ]

(Joel)>> Keeping an air blower close by can help control the heat while you're welding so you don't work the panel or catch the undercoating on fire. [ welder crackling ] Once you've got everything all welded up it's time to polish off all the ugly to give our trans tunnel a nice, clean look. [ grinder buzzing ] [ Music ]

(Joel)>> I don't know about you, but I'd say that trans tunnel looks pretty darn good.

(Tommy)>> Well there's always room for improvement, but that'll get the job done.

(Joel)>> You ought to be careful what you say about me. Everything I do is a reflection of you. Not to toot my own horn, but I'm gonna call this transmission accomplished!
Show Full Transcript