More Toyota Mini Episodes

Xtreme 4x4 Builds

Parts Used In This Episode

Chevrolet Performance
Engine belt pulley system; the same parts they use on their crate engines.
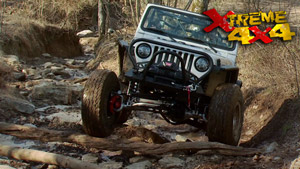
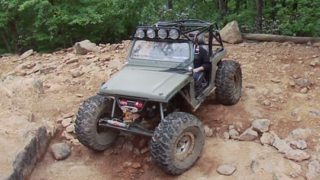
Mayhem Off-Road Park
A new off-road park in McMinnville, TN with 17 trails on 85 acres, a mud bog track / obstacle course, plus 23 acres to park any size truck or trailer. This place is full of nothing but rocks! <br><br> Contact Marvin Fults, Mayhem Off Road Park, 505 Thaxton Road, McMinnville, TN 37110 or email him at zukezilla@yahoo.com
Pertronix
Patriot Exhaust V8 S10 Swap Headers.
Ramsey
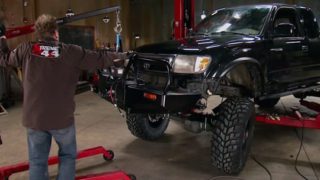
Patriot 9500 UT winch. Efficient 5.5 HP motor for increased pulling power. Semi-automatic clutch for fast, easy self recovery. 12 Volt Front Mount. Proven 3-stage planetary gear system design for fast line speed. Fully integrated solenoid assemblies. Motor and solenoids ground directly to battery. Automatic load breaking for strength and reliability. Wireless remote control.
Stak 4x4
Monster Box 3 Speed Transfer Case with optional gearing ratios of a high 1:1, a mid-range of 2.43:1, and a low of 4.33:1; passenger or drivers side front output, 32 spline heavy duty output shafts, your choice of available yokes, and a universal shifter.

Video Transcript

Today on Extreme, our team finishes up their Toyota mini by slamming in a 350 small block three speed transfer case and then slams her head first onto one of the toughest trails they could find.

How does she do?

Here's a hint.

Hey guys, welcome to Xtreme 4x4 and the finale for a Toyota mini truck. Later today, we'll be taking this truck out on another hardcore trail ride where you'll get to see all the modifications pay off in the dirt. That's right. So far he has already torn out this

and to perform a popular modification for this type of vehicle, a solid a

swap plus the entire drive train has been pulled to be replaced with this killer ran.

3 5700 are for transmission and three speed transfer case.

Now, the front axle has been completely rebuilt. Chrome Molly Shafts, a Detroit locker and 529 gears. And I'm just tearing into the rear axle to do the exact same thing.

And you've seen us do this about, I don't know,

86 times, I think

today is going to be a little different. The truck of course is going to get finished off with the drive train, wiring, steering and of course, new

tires.

But a lot of you guys been asking for some in depth information on certain projects. Well, today is your lucky day and it all starts with a favorite topic of

Johnson.

Now, we've all seen this before here at extreme. We have an empty housing, a locker and a new set of gears ready to go in. And when it's all done, we'll have a perfect gear tooth pattern.

That's the secret of TV.

What do you do if you don't have that perfect gear tooth pattern?

Well, gear tooth pattern is determined by the depth of the pin. You set the pin depth in the housing and it basically is moving the pin back and forth

across the ring gear. We want it exactly centered.

Now to set the pin depth, we can do it with P

depth checker to determine the thickness of the master shim.

Now that master shim goes between the P

bearing and the head itself and sets how deep it sits in the housing. But what if you don't have opinion depth checker? Those tools aren't cheap. You can still set your opinion depth. You just need to know the trick,

save the old bearing from the pinion

and open up the inner race using a di

grinder.

Now, the bearing will fit over the new pinion without having to use the press to put it on and take it off.

And you can usually get a very good tooth pattern by reusing the stock shim underneath your new bearing. But for this demonstration, I'm gonna go ahead and install this pinion with no shim and no crush leave.

And

because we've installed used bearings under our new pinion,

we're gonna set it up with a rotational load of 10 inch pounds and that will be our pinion bearing preload. Now, we can go ahead and temporarily install our carrier assembly

using a dial indicator. You have to set the backlash depending on what type of axle you'll have. It'll either be done with shims on the side bearings or adjuster nuts. The Toyota uses adjuster nuts, tighten the ring gear side nut until a perfect 7 to 5/1000 of an inch of backlash is measured on the ring gear,

then tighten the opposite adjuster nut until it is snug recheck your backlash. If it's changed, this nut is too tight.

Now you're ready to check your gear tooth pattern using the marking compound that comes in your master overhaul kit.

I like to apply a slight load onto the carrier to help make the marks even more evident as you can see with the wrong shim on the pinion that the gear is actually riding on the outside edge of the tooth. You don't want that, we want it exactly centered on the tooth but not too deep into the valley. If you have a gear tooth pattern that looks like this, you gotta rebuild it, start again,

tear down your differential

and changed opinion.

A good unit to work in is two thousands at a time until the correct pattern is found.

Now, you may have to try a few set ups to get the correct shim size.

But by opening up the pin bearing like we did earlier, you don't have to press the bearing on and off and risk damaging it

with a good tooth pattern centered on the ring. We can now assemble it for good.

Now, with a good gear tooth pattern, we can now move on to pinion bearing. Preload

the two bearings on the pinion carry what's called preload or a little bit of extra pressure when you first assemble them. That way, when they wear out as you drive a vehicle,

they don't become loose enough to cause damage inside the differential pinion bearing preload in the Toyota axle is done by what's called a crushed sleeve. You simply install this sleeve in between the two pinion bearings and then as you tighten up the nut, the sleeve actually crushes, we're looking for 18 inch pounds of rotational load on the pinion and then we have good preload. If you get too tight, you gotta take it apart and put on a new crush sleeves

later on extreme. There's a reason these rigs are running on 40 nines,

we'll hit an extreme trail to see how our Toyota performs. Stay tuned.

Welcome back to Xtreme 4x4. The Toyota mini truck is one step closer to hit the trail. Now, a lot of you guys are wondering what to do when the majority of your wire harness is not needed for your project.

Now, with the EF I V6 pulled out of this truck, there was a bunch of wiring that we just didn't need in here anymore. So we simply cut it where it exited the firewall and we isolated it. We're not going to hook it up, but obviously, we still need power to certain things like the wipers. We're gonna want to have those work when we're out on the trail. So to show you how we're gonna make all that stuff work, we're just gonna go ahead and use this wiper motor as an example of the process. It takes,

I've simply plugged the factory harness back into it and cut and stripped all the wires. I have a be

battery grounded to the motor and I'm just gonna apply voltage to the different wires. And you can see this blue one, it's gonna be our slow speed circuit.

The yellow one

is our high speed wipers and these two extra ones. Well, one of them probably ran the park feature when you turn it off and shut the wipers down and one of them probably is for intermittent that this truck doesn't have. Now, we could simply power these wires up with a simple toggle switch, but it's gonna be a lot cooler to reuse the factory switch on the column and to do that, I'm gonna show you how

inside the truck.

Now, you can use a wiring diagram to determine what color wire does what at a switch.

But if you don't have one, you can just as easily probe the wires using an 0 m to determine what does, what as you can see, I've disconnected the steering column at the base and I have the connector with all the wires that run up into the switches. And this is where we our wipers.

I simply place the switch into the selection that I want. In this case, high attach one lead to one terminal in the connector and that is work my way through touching every other terminal one at a time. Now, this does take a little bit of time because there's multiple combinations. But sooner or later, you'll find the terminal that has continuity when the switch is in position

and it goes away when the switch is off. Now, all I have to do is label these wires. I can simply apply power to one of them and take the other one and feed it back out and hook it up to the wiper motor and that's how the wipers are gonna work. Now, you got to do this for everything that you want to work inside your truck. You can do it with the heater motor, the ignition switch, the headlights. The list is endless. It's gonna take some time, but it'll be well worth it.

Now, an engine swap in a Toyota like this is not a new idea. Guys have been dropping V eights between the frame rails of these trucks for years.

But knowing what to look out for when you're doing your swap can make it a lot easier in the long run.

The first order of business will be the engine mount.

Now, this may seem simple enough, but you have to be careful. Now, if your engine too high and you're not gonna be able to close your hood too low and your front axle can get into your oil pan.

Now, everything that we're doing here obviously applies to any engine swap in any truck and with the engine height taken care of, you have three main things to keep an eye on. Number one obviously is the exhaust two would be the radiator position.

And then after that accessory drive belt location,

your first decision is going to be whether you're going to need a custom radiator or retrofit, a stock unit. Since the rad support will be staying in this truck,

it only makes sense to use a stock unit.

Now, obviously, that's a bunch of stuff to fit underneath the hood and that's why we're mocking everything in place and the motor mounts are only tacked into position. We gotta put all this on before we go any further. Like these Patriot exhaust V8 S 10 swap headers. We don't know if the steering is gonna clear through here until we actually bolt them onto the motor. Obviously, the same goes for all the accessory drives. And then of course, the last thing we'll put on will be the steering box.

Now, you don't have to have a plastic mock up block to do all this. You can either use your donor engine or simply an empty long block.

Our belt system is from GM performance. It's the same complete CP

belt system that comes on all of their crate engines.

Now, this is obviously the point where you get to check all your mock ups with the front sheet metal installed.

Obviously, if your accessories are into the radiator, you need to move the whole drive train back

that may require some modifications to the firewall on the floor with a big hammer. But for us, everything is in here, it's a little tight but it does fit. So now we can pull up all the mock up out and put the real deal in.

Um

hm,

enough clearance in there to fit a whole $5 bill sideways.

Now, if you remember, I found this bumper up a couple of weeks ago to show you guys what tools it takes to build certain things.

And now it's found a great home on the front of our tow, a mini truck project and it's the perfect mount for our Ramsey 9500 ut winch. Now, this is a great winch because it can pull 9500 pounds has 516 aircraft quality cable. But the really unique feature is how the clutch engages or disengages. You can simply flip this switch,

disengage the clutch to put it in free spool mode, run your cable out, hook it up, but you don't have to go back to the truck to begin pulling it out

using the wireless remote. As soon as you put power to the winch, it actually engages the clutch automatically and starts pulling it out for. You just makes life a lot easier when you get stuck on the trail

and that is one less headache

for this project. We have something pretty special plan for the transfer case.

This unit from ST

four by four is a three speed case. That's right. Three speeds,

you have your high 1 to 1 ratio and then you have your mid range of a 243 to 1 ratio. And then when you need those really low gears, you got the 433 to 1 way

plus with the built in indexing ring and 32 spine out put shafts both front and rear. This case is perfect for our Toyota.

So there you go guys. Hopefully we're able to slow this project down a little bit and really focus on some of the areas that you guys have really been asking about. Like the gear set up. Now, obviously, this truck isn't done. We still have this XO cage to do. We got some plumbing stuff. You gotta mount this transfer case, put on the wheels and tires may not sound like a lot, but

better get back to work. Well, don't worry because while you guys relax having your break, this truck is gonna get completely done

and to be out on the trail,

pick that up for me.

No, I'm joking.

It's

welcome back to Extreme. And the inaugural trail run of our Toyota mini truck.

This four by four has been bobbed and dovetailed and now sits on 37 inch pro

comp X terrains mounted on Allied Rock,

Aon bead locks

sitting between the frame rails is a stack, three speed transfer case connected to the axles with two new J reel, heavy duty drive shots.

Now, this grocery getting family truck turned hardcore wheeler is ready to hit the trail.

Marvin.

Hey, how you doing? Good. How you doing?

Well, we brought our latest creation out to Mayhem off Road Park. Give me an idea of what kind of trails we're gonna find when we're wheeling here. All the real easy trails with small rocks.

See, I know you're lying because I've been here before. Ok. Well, they're all pretty hard trails and I think you're gonna lie.

We just got beyond the trailhead and learned right away.

This would be no cakewalk.

The first thing you'll notice when running a leaf sprung truck like ours is you get a little bit more body roll when the axles are articulating over the rocks.

One bonus in our mini

is V8 power and low gear.

This allows us to draw on some serious torque when we need it?

Am I wedged in there or am I gonna make it?

I got an idea.

All that torque and a wedged in front tire can only mean one thing

I knew that would do it.

Big LEDs man.

And at this part of the show,

Ian decided he would get a big hammer and try to straighten his

joint out. But seeing how he's got real good with a saw and he's cut his yoke too much. We're gonna have to go to the shop and use the milling machine to cut him a new one out. But we'll be back to get this Toyota back on the trail right after this break.

We're back on the trail in no time with the New Yoke and the drive shop back in,

but still 37 against a 4 ft ledge

means

we're pulling cable

all in all a pretty good shakedown run.

And as you guys know, breaking on the trail is just part of four wheeling

body

and if you can get it fixed and drive it on your trailer at the end of the day, it's all good.

As you can see, we're back in the shop after a pretty serious shakedown run in the Toyota mini truck and as we've done before, we're going to go over the common issues and how to fix them.

Now, the front drive shaft in this truck is on a pretty severe angle. And as you saw when we were out on the trail, when the suspension fully drooped out, it got into a bind

and broke the front transfer case output even though we'd clearanced it to keep this from happening. But lucky for us, somebody was on the trail with enough spare parts to put it back together so we could keep wheeling

and we thought this may be an issue. So before we left the shop, I went ahead and welded this piece of chain onto the frame to act as an adjustable limiting strap. And when we got the temporary repair back in,

I went ahead and took a couple of

set of it to keep that suspension from drooping out all the way that obviously is short term repair, long term fix. Well, we have a couple of options. We could simply clock this transfer case down and lessen the angle on this front shaft downfall there as a transfer case is gonna be hanging down, could get in the way of trail obstacles. It's not the best choice. Other option would be to take the yoke completely remove it and put a flat flange and see if we can get a high angle drive shaft that might limit the binding. It's gonna cost a little bit of money, but it's definitely one good option.

Now, the most expensive, but probably the best option would be to add a secondary reduction box like a clue in between the stack case and the transmission. This Lenen our entire drive line giving us a better angle, more reduction and

another lever inside of our truck

like we need another one

considering that everyone else who was out wheeling with us was running on 44 to 49

and we just had a set of 37.

I got to say the tow

truck did pretty good. And that's a testament to how great these little trucks are

off road. But don't worry, this truck will be out on the trail soon enough and if all goes, well, we can take it back to that awesome mayhem off road park. It's

good.

Yes, it is.
Show Full Transcript