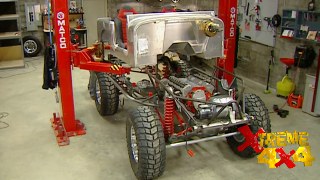
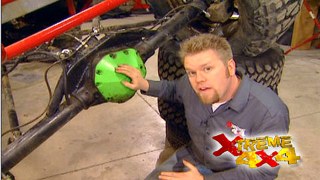
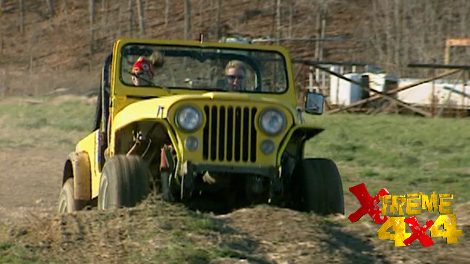
Parts Used In This Episode

Comp Cams
TCI-overhaul kit which includes gaskets, seals, o-rings, steels and clutches.
Comp Cams
TCI-Saturday Night Special torque converter.
JB Conversions
32 spline input and output conversions. Input gear, billet rotation plate and low max 4:1 gear set.
JET
Press.
Lokar
Kick down cable.
Matco Tools
Lift, gloves and tool cart.
Mr. Gasket
Hurst, Pro matic II automatic shifter.
Whaley Enterprises
Cable shifter assembly and shifter.

Video Transcript

Here it is in

the automatic transmission is a mystery to most but not for long. Ian and Jessi bring back the cheap Jeep for a little junkyard rebuild. Plus it's East versus West on this near impossible. Course, that and more today on Xtreme 4x4.

Hey, welcome to Xtreme 4x4. We got a little head start today by slipping the cheap Jeep up on the hoist. And once I get the standard transmission on the floor, we can get to work. When you last saw the old cheap Jeep. We had just returned from a trip to Tele

North Carolina.

We took both of our project, Jeeps out on a test run. Today. We're going to be fixing some of the bugs that we found.

One of the main things was that you have to have a third leg to drive a clutch and all the trails

out there were automatic and they were doing much better than I was since I sta

it out so many times,

we're going to replace the standard transmission with a brand new automatic. Well, it's not brand new. We got it from a junk yard, so we're going to have to rebuild it first. The only issue is with an automatic transmission, they have higher gear ratio. So you're going to lose some of that low end torque. But you can fix that by changing your gear ratio somewhere else in the drive line. And that's what we're going to do by rebuilding this Dana 300 changing it from a 2.6 to a low 4 to 1 gear ratio.

Now, the Jeep automatic transmission

is based on the torque flight 904 from Dodge,

the case is different and it's coded as a torque command 999.

But all the internals inside this thing are the exact same as the Dodge.

And we're gonna go through this thing step by step on the rebuild. And although everything we show you is gonna be pretty specific to this particular model. A lot of the tips and tricks we show you along the way you can apply to almost any automatic transmission overhaul.

One good tip is to buy an automatic transmission and the case at the same time that way, while you're rebuilding all your new stuff, you can still be driving your truck and it won't be down at any time. So once all this new stuff is rebuilt, you can just do the swap and then throw the old parts on the shelf for go ahead.

Rebuilding an automatic transmission is honestly no harder than rebuilding a carburetor.

It's just a series of steps and procedures and adjustments that need to be followed specifically

and the rebuild kits, they don't come with instructions. So you're gonna need a manual if you can find the original equipment manual. That's great. If you can't,

the A Ts

or automotive transmission service group has rebuild specific manuals for all domestic and import cars and trucks.

The only real thing that you gotta watch out for is if you rebuild a carburetor, put it on, it doesn't work. It's only four bolts to take it back off. You rebuild this, put it back in, it doesn't work. That's a big headache man.

With the pan off, we can remove the valve body. Some models have checked balls underneath, so be careful not to lose it

using a slide hammer and some bolts, we can pull the pump out of the house,

remove the front band by backing off the adjusting screw. Then the clutch housings and the band will come out the front.

The output show snap ring is next

and the shaft pulls out the back,

followed by the planetary gear sets,

low reverse band

and finally Spragg

or sometimes called roller clutch.

Couple of things to remember when you're rebuilding an automatic transmission. First, dirt is your number one enemy. So make sure that you're working on a nice clean work surface and clean it as you go wipe up any spills. Secondly, most technical manuals have great exploded views of the parts inside a transmission,

but most transmissions had updates or changes inside a model year. So the only way to make sure that you put it back together correctly is to take all the parts and lay them out in the order they come out of the transmission and try not to mix them up too much.

And once we get all these accumulator pistons

and then the band apply pistons out of this case, we can go ahead and start cleaning

and inspecting all the parts,

inspect all the planetary gears for damage on the teeth. If one of these is broken, the whole assembly will have to be replaced.

We disassemble the clutch housing and inspect all the friction and steel plates to see if any of them are burnt.

You can see here at this top clutch,

it looks burnt,

but the second clutches are obviously all the friction material

worn off. If we put this transmission in the truck without rebuilding it,

it wouldn't have worked at all,

rebuilding your own automatic transmission. A model like this should take around eight hours.

But the reality is you're gonna save well over $1000 by doing it yourself

with the transmission all apart. You can really get a good idea of how it works. If you understand what you're looking at

and knowing that some of the systems are very complex

and you need to watch what you're doing because a small mistake here can affect the transmission when it's all back together. Like this valve body, all these screws go in very specific spots. So if you take a digital picture of the valve body at each stage of disassembly, then all you have to do is reference the picture as you put it back together.

Now we're gonna go through a pretty quick version of how an automatic transmission works. But here it is in its simplest forms, it starts at the front of the transmission right here. This is the oil pump inside. Here, there's a geared pump that sends fluid throughout the entire transmission to lubricate it, but it's not only there to lubricate it, it's there to act as a hydraulic

system that goes into this particular item right here. The valve body also known as the brains of the transmission

inside. This valve body are fluid passages and valves that control when your transmission shifts into what gear. And I know it looks like a pile of spaghetti. But when you start to read hydraulic diagrams and spend a lot of time in here, you can

start to understand how this works. This, along with this pump, control your clutches and your bands to stop certain parts of your planetary gear set or spine, those parts onto the input or the output shaft. And the planetary gear set is where you get all your speeds inside your transmission. And it's a little complex, but we got it on the chalkboard for you.

The planetary gear set is simply three gears in a real compact package that are in constant mesh.

And the first gear, which is the smallest gear is the sun gear and then that wraps around the outside of it is the ring gear, which is the middle size gear. And then inside that is the carrier which carries the planets around the sun gear. Now, this little package can give a whole bunch of different gear ratios as well as a directional change. If I hold the carrier

and put the sun gear as the input, you can see that the ring gear actually turns in the opposite direction. That's how you get reverse. Now, you can do the same thing to get different gear ratios. If I mark the carrier

and the ring

and then go ahead and hold the

sun gear, turn the carrier, you can see that the ring gear turns faster or an overdrive output. If you think of this whole system as three individual gears, just like on a bicycle with a small gear driving and a big gear, it's easy to understand all the gear ratios. You can get out of this one package. When we get back after the break, we're gonna clean everything up and start putting our transmission back together.

Welcome back to extreme where you can see some of the best off road action anywhere this week. High drama at the world. Extreme nationals,

21 of this country's best super mod drivers came to Central Ohio for the first ever East West Grand National. This is the largest event in rock crab

period. It's a big deal. Drove 2000 some odd miles to get here to go toe to toe with the Eastern boys who we don't get to compete against. As often as we'd like. These men gave all they had in qualifying to earn one of six spots in

final big money shootout. Everybody wants to be in that top six. So it's dog eat dog today guys are going for the bigger lions the most craziest of things because the money's there since turning pro three years ago, one name has dominated extreme rock crawling competition. Randy. Tor

Randy Torres. Randy. He's the man. Yeah. Well, everybody is looking, you know, to beat us

this mild mannered family man from Sale Creek, Tennessee doesn't need tattoos or nose rings to be hardcore. Just four wheels and some nasty rocks.

You like, uh, extreme sports. And this is it in rock crawling. The driver, either hammers the course or the course. Hammers. The driver

Randy though, takes a more cerebral approach to get through an obstacle. We really study the door as best we can and we usually got a plan when we go in. It don't always work out. But, you know, we usually get,

he's just a hard guy to out think he, he picks a line

after he does it, you think? Well, why didn't I do that? That was the most amazing line.

He's so laid back and cool. It's like he's doing a quaalude while he's in the car with his unique axles. He was considered anything but cool. When he showed up in his first pro event, the axles are out of a tracker three years ago. We,

but mine side to try them. So we, we went to a junkyard and got them and, and

refurbished them and put them in and they've been working real good. We've had real good luck out of them. They are a little heavy. But if, if you're going to add weight, you add it at the wheels towards the traction is that he doesn't hear any tractor jokes. Now, don't underestimate

those tractor axles.

They seem to be the real deal

at Ohio

Torbett had a new secret weapon that helped him dominate the qualifier.

We've got a prototype transfer case that'll let us disengage or engage on the fly. Don't matter if we're spinning or not. And it's, and it's working real good. I'm really impressed about it. What we always try to do is if, uh,

if you're having a problem with something working on that problem

and a lot of the trans

cases are hard to get in and out. If you're in certain bind, it's almost impossible to get in and out.

You have to beat on the shifters and all that kind of stuff. That's why we come up with this idea.

And, uh, you know, because it's so easy with the final six trucks set for the shootout. Randy knows it's not gonna be easy. I

mean, there is pressure. We're gonna do the best we can

and just hope for the best. That's all we can do.

One obstacle littered with bonus lines and danger would decide the national championship

with the qualifying scores carrying over all. Torbett could do was watch as the five drivers ahead of him tried to knock him out

for the win. Randy didn't need bonus lines, just play it safe, cruise through the obstacle and he would be champion. We're not going to take a

chance. No

turn

over

pressure zone

in the fog of war trouble

his trademark cool

mel

end of disaster

just a few feet from the finish. Randy and his spotter tried to push it across the line.

Time ran out. You just missed the finish of lifetime on Randy Torvi.

He crashed just like 4 ft short of the end gate quick from

brother

for you

can't win them all. You just want to.

I mean, we all want to win. You know what I mean?

That's just part of it.

His pain was Jesse's

glory. I still can't believe that

we ended up national champion.

Extreme off roading requires an extreme transfer case. Jessi rebuilds a Dana 300. Next.

Welcome back to extreme where we're taking out our standard transmission and replacing it with an automatic transmission. In our cheap Jeep. And while he finishes rebuilding that automatic transmission,

I'm going to go ahead and get this transfer case ready for a set of new gears.

The process of rebuilding this automatic transmission is as simple as replacing all the old rings, gaskets and seals with new ones that come in your overhaul kit.

Our kit we got from TCI, it comes with all the gaskets, seals, old rings, steels and clutches that wear out under normal use except the clutch disks are made up of a different material. They're designed to handle higher heat and more aggressive shifting than a stock piece. Now, before you install these, you want to soak them in some tranny fluid,

we start with the sprag clutch, making sure to install it in the correct direction. We'll use Vaseline to hold the transmission parts, never any grease.

Then the low reverse band planetary gear sets

and the outputs are

install the snap ring and the thrust washer.

Then the clutches can be rebuilt after soaking the new frictions in some transmission fluid.

After assembly, the clearance should be checked

to be sure the seals are installed correctly. You need to air, check the clutch packs using some compressed air,

then put it all together.

Don't forget the gasket between the pump and the housing alignment of this part is critical.

All we have now

is the accumulator pistons, the band apply pins, adjust them according to the manual. And then we can drop the valve body in place. When you put the valve body together, just go ahead and use some Vaseline to hold the check balls in place. And the Vaseline will dissipate with the heat of the transmission fluid.

And then once that's all together, put the pan on, put it back in the truck. But because we're doing a swap, we need to add a few more things. We're obviously gonna need an automatic shifter. We went to hurst and got this pro Matic too because it has a nice long handle and good ratchet mechanism. We're gonna need a cooler. So we got this one from Hayden with a built in electric fan. And the last and most important piece is this kick down cable from low

car. This is gonna attach the carburetor to the throttle valve and the valve body and help tell the transmission when to change gears.

The data 300 really is one of the best factory transfer cases out there with its 2.62 low range, a wide variety of applications and its small size and basically take second to analyst to.

Now for our data, we're going to be using these parts that we got from JB conversions,

32 spine input and output shafts,

a billet rotation plate. So we can clock up the transfer case and have a flat belly underneath

and of course their signature low max 4 to 1 gear set.

Now building a transfer case isn't that difficult. It might only take about 2 to 4 hours out of your day.

But if you have one of these instruction manuals that we got with our gear set, you should have no problems

with the front and rear yokes pulled and the bottom cover off. We move the

ball and tap out the shafts

again. Keep all your parts organized to make reassembly easier,

remove the input bearing retainer. Come on,

these are really stuck in there

and we're having a little bit of a pain in the butt

and the rear output housing.

Normally you'd put the entire case into the press and remove the front output shaft. But as luck would have it

here, the bearing right off. Oh, hell, then press out the rear.

Now you have an empty tea case.

Not only are those low max gear stronger than the OEM gears because they're made of high strength steel, but they're also a lot thicker which gives us a greater contact area.

And the,

these shafts are typically gonna break right about here. Compare it to the new one. These bad boys. Oh, they're not gonna break at all.

Stay tuned because after the break it all goes back together,

I had to grind some of the case away right here for clearance for the new gears because they're so much bigger than the originals.

And with all these bearings pressed on,

I can go ahead and seal up our real housing and put it on.

Next is the front input gear and rotation plane

followed by the front output bearing retainer and shift rail assembly.

Assemble the roller bearings into the idler gear. Use a lot of grease to hold these in place,

remove the socket

and drop the idler into place.

Tap in the cross

act.

Now that everything's back together, I can go ahead and install this cable bracket.

That's right. I say cables, we're going to be using this cable shift or assembly that we got from way the enterprises

plus the shift that we go with it. We can not just about anywhere we want.

I went ahead and installed a flex plate on the back of the motor and we obviously can't use that clutch and fly wheel anymore. Now, we can install our transmission and transfer case, but don't think we're done with the cheap Jeep in a couple of weeks. We're gonna be putting the rest of the parts on this truck that we ordered.

Plus we gotta take it out and test

it

because it goes in that way, doesn't it? I was just gonna grab the whole thing.

Sorry, I'm like, I wanna help you because it's head

of.
Show Full Transcript