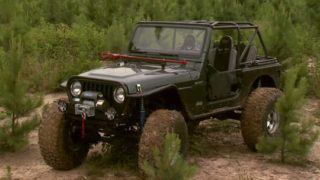
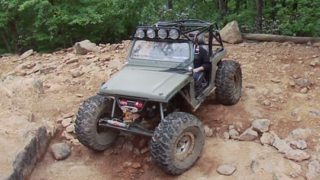
More Team Built TJ Episodes

Xtreme 4x4 Builds

Parts Used In This Episode

[none]
Driveshafts
ARB 4x4 Accessories
Air lockers
AutoZone
Brake Lines
Cortez Auto Service
Cortez Auto Service Mechanic: Jesse Cortez
Country Bargain Auto Sales & Repair
Country Bargain Auto Sales & Repair Mechanics: Rick Schoenleb & Ronnie Kidd
Daystar Products International, Inc.
Body Mount Kit
Dupli-Color
Bedliner
Hotwire Auto
Electrical System Work
Lawrence Glass
Axle Housings
Loctite
Threadlocker, Sealant
MetalCloak
Body Armor
Poison Spyder Customs
Hood Louvers
RCV Performance Products
Axle Shafts
The Industrial Depot
Industrial Depot - Fasteners, Hardware, and Shop Supplies

Video Transcript

We went to Jeremy

Weels house to take a look at the suspension on his lifted TJ. But when we saw the rusted up, busted up spots on his Jeep and the weak four cylinder engine under the hood, we decided to rebuild it from the frame up today on Xtreme 4x4. Our team built TJ gets air lockers, revamped electronics, new paint and more.

Once again, our crew of volunteer builders are all auto zone commercial customers. Ronnie and Rick from the country bargain Auto in Mooresville, North Carolina

Jessi from Cortez Auto Service in Los Angeles,

Chris Squire from Hotwire Auto at Amina Arkansas

and a familiar face, Eric Chewy Stanley from Anderson Classics and Customs.

Chewy back again.

Right on guys on the way in. You saw the Jeep, believe it or not. Two weeks ago that drove in the shop. It was a,

not a brand new, it was a 99 Jeep kind of wore out, didn't work very well. So we told him we're gonna fix it all up for him.

Now, so far we did a pile of work to it, stripped it down to a bare frame, put a long arm four inch Clayton off road suspension system

gives a little bit more clearance, but more important that completely redesigns the factory suspension.

So when he's off road, more articulation just works better.

All right. So we've done the motor swap in. It took the 2.54 cylinder out, replaced it with a 4 L straight six. That, that's why Chris is here from Hotwire Auto. He's gonna take care of all the electronics. Make sure this thing is 50 state legal passes emission, super reliable, basically acts like that motor was in there from the factory.

All right. Now the rest of us this week, we basically got to build a Jeep again.

The body's been painted. Chewy knocked out all the body work, Kevin from down on trucks painted at that nice silver. Gonna put the armor back on it, which is basically 3/16 plate goes all the way around the outside of the truck. It's all pre powder coated. It's been pre fit. We just got to install it,

got a couple of things to knock out on the frame and then we'll drop that body

right back on the frame. We'll have a Jeep probably by the end of the week.

Sounds good. Any questions? Sounds

like

fun.

That's roll man. Come on,

Rick and Ronnie jumped on installing our metal cloak body arm.

The entire package will protect our body tub from obstacles on the trail.

The nice thing about the metal cloak package is the fender flares themselves can be swapped out to wider ones if you live in an area

with tire coverage laws,

I

think they'll be very pleased with it.

You ain't got to worry about that baby breaking off when you step on it.

You that sorry.

Yep.

But before any of the work that's being done today could happen,

the Jeep,

well, it had to get painted.

That's when we called in our good friend Kevin Tates. He rolled it into the paint booth for a coat of Epoxy Sea.

This gives the Jeep a good even ground coat for our silver paint.

After 30 minutes of dry time,

Kevin began the wet on wet system

that doesn't need to be sanded before the base code is applied.

Kevin applied three coats of our silver base.

Now this is a factory color.

So if the tub ever gets scratched on the trail, Jeremy will be able to touch it up very easily.

After letting it dry for two hours, Kevin finished it off with three coats of clear.

All of our paint on the tub is not complete.

We still have to deal with the firewall

and after Chewy masks off the tub

and preps it,

he gives it a coat of duplicate

flat black paint.

Then the poisonous spider hood louvers are dropped onto the hood

and bolted up with the stainless steel Fastness

that looks pretty good

to get this engine running right. We called in Chris Squire from Hotwire Auto.

He's doing a job that a lot of people tend to shy away from.

If you get it wrong, you can fry computers. You, it can become an expensive ordeal.

Um, the way we do it, we have all the stuff to make it just like the OEM does and put it back the way it needs to be. So it'll run properly.

Much of the work is cleaning up and repairing any issues with the wiring.

Chris says it's best to stay true to the factory's intentions when upgrading an engine

and before you plan your swap, give them a call,

try to stick as close to what you have. Uh If you're going from a four cylinder to a six cylinder, try to stay in the same year and model

when people start trying to put Grand Cherokee Motors or Cherokee Motors into the Wranglers, um,

it can be more complicated, it can be done,

but we need to talk about it and, and make sure that you make the right choices.

All of the original steel brake lines on our Jeep were rusted through.

So we're going to replace them with some rolls of bulk line that we picked up from AutoZone.

Jessi runs them along the frame rail and attaches them to the factory location

for the flux lines. They need to be secured tight to both the axle and the frame

so they don't get damaged when we're on the trail

I learned a lot from what, from what he was telling me initially, I figured since it's gonna be moving, maybe you want the brakes a little bit loose. So that, so, so they'll move along with it. But he corrected me on that. He said no, you want it nice and tight. You just want a little bit of play in the middle. So when I tr these women up and down, uh nothing's gonna snap. You ain't gonna run over a border or root or something that's gonna rip out those, those brake lines.

Now, one thing that I recently learned, I've never learned about it until just a few years ago.

Even when you're done making these flares, you got to see them.

So when you tighten this into that line,

tighten it down all the way until it stops, crack it loose a quarter of a turn and then tighten it again. You'll actually be able to do that two or three times and it'll squish that new flare

and tight.

Yeah,

with all the lines flared and the tube nuts installed. Jessi finishes out our hard line replacement

up next, rugged gears for our axles and heavy duty shafts for the drive line

just like the firewall inside our Jeep tub is still the worn out factory color.

So after prepping the floor and masking off the silver

Chewy and Rick applied a good coat of duplicate

spray on bed lining.

Then the cage dropped into the Jeep for the final time.

Let me get them.

I wish this is my take home

or you can take it.

You can pick one from out there if you want.

No, I'm totally lying. You can't pick one from out there

with all the body work done. We're gonna jump on both the front, rear axle before we put the body back on the frame. It's just gonna be easier to get access to everything.

Now, for this truck, we have a day in a 44 in the front and a Ford nine inch in the rear. And when you're dealing with a Jeep like this where it's dual purpose, the whole goal is to basically build something with no weak links. We want to be able to eliminate anything that can possibly break when it's on the trail because he's gonna drive it home. He's not gonna put on a trailer and trailer home. He's gonna take it, wheel it hopefully wheel it really hard

and then drive it home at the end of the day.

So we do things a little bit differently on the back. We have a fabricated nine inch housing from a company called Spider tracks, heavy duty unit bearings. And we'll have 35 flying chrome moly

axle shafts in the rear.

The front end is gonna get these shafts. These are called R CV performance shaft. So these are a 35 spine inner. Whereas from the factory, this is like a 27 spline, the more spines you can get on an axle just the stronger it's gonna get. And you've probably seen four wheel drive axle shafts. They have a U joint in them that allows the wheels to turn. Well, instead of a U joint on these, we actually use a heavy duty CV. Bell.

Now that CV, Bell can handle a lot more abuse than a standard U joint. And best of all these axles,

they have a 100% no questions asked. You break it, they replace it guaranteed. Even if you're running 37 inch tall tires and you call them up and say I was climbing, the craziest trail

blew the axle shaft up as long as you've got a good story to go with why it broke. They'll make you a new one and send it out. Now, when we deal with short wheelbase rigs like a Jeep,

every off-road rig is gonna have a locker in it,

there's a couple of different kinds. There's some that are automatic. When you just, when it senses wheel speed, it'll lock it up.

But in a Jeep, you don't want that, you want to be able to turn them on and off. So when you drive on the street,

it just acts like a normal differential.

So this is a mock up from a RB and that's what's going on this Jeep, front rear.

You can see when you're driving down the street. It's just like a regular differential. It's like a normally be, go around the corner tires, turn at different speeds, but there'll be two switches on the dash, one front, one rear. When he goes off road, he'll just hit the switch

and a little Coler will engage

and it'll basically lock the two shafts together.

It's just like a spool. 100% power to both rear wheels, 100% power to both front wheels and it'll crawl over anything that's in its way.

Our

volunteers are broken up into groups to tackle both the front and rear axle.

Chuy and Ronnie jump on the nine inch center section for the rear

first installing the locker

and then the side adjusters

and finally dropping an opinion support to complete the assembly.

Rick and Jessi tackle our front Dana 44

where the procedure is basically the same as a factory ring and pinion install.

After installing the ring onto the A RB

and installing the side bearings,

it'll be put into our front house.

Coming up. The sweet sound of success.

Hi,

we are back on extreme with a crew of volunteers building a Jeep for a viewer who wants to become a hardcore off Roader.

Now, after assembling the custom nine inch center section

with 488 gears and A RB air lockers

is ready to slide into our slider tracks house,

the front end takes a little bit more work.

Shims are installed on the ring gear side of the diff.

And after a few different setups,

we can go ahead and check the backlash.

And the only thing that that backlash is doing is

it giving

the ring gear room to expand, which is important.

But it also,

yeah, but it also

makes sure that there is room in between the ring gear and the pinion for oil.

So if you, if you set up your backlash too tight,

it basically pushes out all the oil.

That's good. Ok. Now we need the yellow paint and little paint brush.

All right, you can see how it's

squared across the tooth. It's not in real deep, it's not out too far.

And that's what you want. If it squished the paint all the way down into the valley of that tooth, like it was like basically pushing the paint out, that means they're way too close together. We got a real problem or if it was falling off the inside of the tooth or falling off the outside of the tooth, you will end up with gear noise and you could break that ring gear.

The part that is really bad is on this axle. What changes that gear tooth pattern

is that first set of shims that you put in with that very first bearing race. So if this is off, the whole thing comes back apart and you start from scratch, so I

did a good

job. You did a perfect job.

All right. So now we just loop the locker line over, we'll put a fitting in

and then we can put the cover on.

Then the axle shafts are installed

and the outers are assembled for good.

I thought it would be like we would be doing all the work and he just kinda

like when it aired and he'd be the one putting in the last bolt and taking all the credit for it. But it doesn't seem to be that way. I mean, he's been right there with us working.

I mean, it's just been on. Even the camera guys has come over and they help us turn bolts and show us where tools are and

everybody just gets along with each other and cuts and carries on and

it's pretty awesome.

The final part of our drive train are the drive shafts from J Ere.

Now

they specialize in heavy duty off road shafts

and our setup has 1310 CV S at the transfer case, a 1350 U joint in the rear and at 1330 up front,

once everything's hooked up, we can run the airlines for our A RB lockers.

It's pretty sweet. My boy should be happy. If he does have as much as the Jeep will do, then I'm sure he'll be, he'll be totally satisfied.

The body is on the frame and the fenders are in place, but it's not a Jeep until that classic grill drops in

with all the work completed on our drive train. It's time to drop this Jeep body back onto the frame

with the tub up in the air. We'll roll the chassis underneath it,

lower it down and bolt it in place using a day star body mount kit.

The arched metal cloak tube fender does a lot more than just look cool.

The high arch design actually allows for more articulation on the front axle. As the tire moves up, it moves into the opening in the tube bender giving this Jeep a high line capability without having to cut the

with a new radiator bolted into the grill shell.

It's slid in place and the two vendors are bolted up.

Finally, we'll drop on our freshly painted hood.

But before everyone heads home for the week, there's one thing that we definitely have to do

that's turned the key and hear our new motor roar to life.

Nice. Yeah,

I like that sound.

Sounds good with that little muffler at Short

Tail

Street and Eagle gonna pass the missions. Get a daily driver. Yeah, there's no lights on the dock. It's all good. Did a great job. This week. I

started with a bear frame and a body.

Thank you for having us in and ended up with AJ JJ.

Now we're almost done with Jeremy's Jeep.

Next week, you'll see us button this rig up, take care of all the odds and ends and then surprise Jeremy with his first hardcore trail. Ride,

go

over this spot,

go

back,

nothing to it.

For details on any of the products seen in today's episode. Head on over to Power Block tv.com.
Show Full Transcript