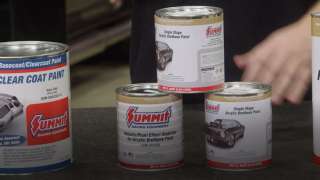
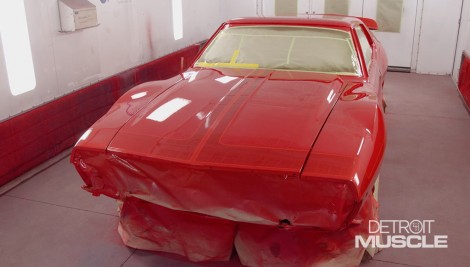
Detroit Muscle Featured Projects

Detroit Muscle Builds

Parts Used In This Episode

Summit Racing
Cragar S/S Super Sport Wheels
Summit Racing
Lakewood Traction Bars
Summit Racing
Mickey Thompson Sportsman Pro Tires
Summit Racing
Monroe Max Air Shocks
Matco Tools
MATCO Tools are the Official Tool Supplier to PowerNation
The Industrial Depot
Tools, Hardware, Shop Supplies

Episode Transcript

(Tommy)>> You're watching Powernation.

(Tommy)>> Today on Detroit Muscle our 1973 AMC Javelin goes from boring to bodacious, splashing on layers and layers of color to create one retro style paint job that lifts some spirits. [ MUSIC ] [ engines revving ] [ MUSIC ]

(Tommy)>> Hey guys, welcome to Detroit Muscle. We're in the middle of the reflection rejuvenation on our AMC Javelin. After all the pain staking body work was over it was ready for a quick rub down and a bit of some quality time with an air hose to get it cleaned up. Then we pushed it into the booth, taped her up, and it was finally ready for a coat of sealer. [ MUSIC ] For painting products we went to Summit Racing for a full setup and we also brought ourselves in a trigger man, Ted Swann, master painter extraordinaire. Man you ready for this big day?

(Ted)>> I'm ready for this, and today on our Javelin project we're gonna use the entire Summit Racing line. Everything from the cleaners and degreasers up to and including the clear coat. Unlike some of the projects that we've done in the past Tom and I have quite a few more products laid out color selection wise. Do you want to tell them a little about that?

(Tommy)>> Sure, now Summit offers 30 colors that are available in base clear and single stage but they've upped their game. Now available is some pearls, some candies, and even an intermixing clear. This allows you to be plenty creative, and that's exactly what we did with that test panel.

(Ted)>> And that was so much more than a test panel.

(Tommy)>> Doing something like this is always a really good idea because it gives you an opportunity to transfer what's in your head to a canvas, and just doing that sometimes can be a bit complicated.

(Ted)>> And it's a lot more complicated than what we've done in the past. We have Cherry Bomb Blast, which is slightly translucent on top of three other colors here. We also taped this off so that we could demonstrate to ourselves do we actually like each individual color. Sometimes you'll do this. Think of it it's like a feasibility thing, not just a test panel, where this really worked but I didn't like this part of it at all, and that prevents you from getting committed on the real job. We can change our minds at this point.

(Tommy)>> Well with that said we've got our road map down and we're trying to get to a destination. You ready to start pulling the trigger?

(Ted)>> Ready to start pulling the trigger and we know where we're going. Let's go! [ MUSIC ]

(Tommy)>> To give you the inside scoop on Ted he's a master automotive refinishing specialist for Summit with his forte in spraying techniques and finding solutions for painting complications. This fella has sprayed well over 2,000 vehicles in his time. He's also worked in the industry for over 37 years and got his start painting custom bikes with his old man. He sure does make painting look easy. [ MUSIC ] Well we're finally ready to start spraying our graphics. Our red is on. It's plenty dry enough to start taping. Now with our artwork we're not gonna get all kind of elaborate with it. We're gonna run a stripe down the middle. It's gonna "T" off and then come down the side. Now over these big bulbous fender flares it is gonna get a tiny bit fatter, but that's gonna add a bit of style to it, and to do it we just the tape, some razor blades, and a paint paddle to use for a measuring tool. It's time to get started. [ MUSIC ] When it comes to masking tape there's pretty much two different types. You have the vinyl and then you have paper tape. I prefer to use a fine line vinyl for laying out your hard lines, and then the paper for the fill in. Right there. A paint paddle is handy to use as a measuring tool, and it's cheap insurance. If you're using a tape measure and accidentally bump the retract button you could cause yourself some heartache. This gentle stick can work just the same. With my graphics I prefer letting the car tell me what it wants. Working with the factory body lines and accentuating its curves and its features. [ MUSIC ] When you start laying your stripes out a lot of times you'll have to lap over the tape, and here's a little trick for you using the razor blade. Using the dull side of the razor blade you can lay it right on that edge, mash that tape nice and tight against the other piece. If you don't do this the paint will actually blow up under it and you'll see it whenever you unmask it. The other thing is use your blade to lay right on your edge and pull your tape at kind of a 45. It cuts it nice and clean. [ MUSIC ] Then you have to use a razor blade to cut it. You've got to be real easy just to cut through the tape and not the paint. [ MUSIC ] With our design dialed in, stretching across the hood, and all the way to the back bumper we're ready to mask off our graphics. [ MUSIC ] Then the gold can be laid down. Ted's applying three coats and I can't wait to see this thing transform with our final candy color. [ MUSIC ] If you've ever had the craving to create something with sweet candy we'll give you the recipe for this bad apple next on Detroit Muscle.

(Ted)>> Before going in the booth and spraying it's very important to have your spray gun set at the correct pressure. This can be found on your product data sheets, and it varies from product to product. For today's demonstration I'm gonna put some water in here, put some air to my spray gun. [ compressed air hissing ]

(Ted)>> And you can see a pattern coming out. Now that's at full wide open. What I'm gonna ask you folks to pay attention to. I'm now gonna narrow the pattern down. That's typically the top knob, and you're gonna see my pressure go up. Now the reason that's doing that is because there's no air going to the horns once the pattern's narrowed down. They make these so that you can spray a variety of objects from something the size of a car to something small like a tubular structure and not have this 11 inch wide pattern. When it's narrowed down if you were spraying something small you'd turn the pressure down until it's back to normal, and you'll also turn the fluid in. What this is doing is not letting as much material come out so that you could do something like shading, or creating a shadow, or just a small touch up. Either way that you adjust it's always good to have the spray gun adjusted before you go in there and work on your pride and joy. So be sure to adjust the gun, put it on some masking paper and spray a pattern out, and that's how you do that.

(Tommy)>> Man that's a really nice gold.

(Ted)>> I do like it.

(Tommy)>> Now Ted's got our stripe color all laid out and we're pretty much ready to start unmasking so that he can spray on that sweet candy.

(Ted)>> Now if you see what I did here I'm taking the masking paper off. The fine line's gonna stay on there because that is the outline of the design.

(Tommy)>> What he's referring to is on our graphics layout we're using the fine line to create a viper red outline strip. So that tape needs to stay for now. [ MUSIC ]

(Ted)>> You may notice while I'm untaping that I have the jambs masked off. What that's doing is preventing the overspray that goes in here on these edges from exiting out of the jamb and contaminating the rest of the panel. I hope this tip helps because this is a very good practice to do whenever custom painting going from panel to panel. [ MUSIC ]

(Tommy)>> Yeah I know that red and that gold is very strong to look at. You may be second guessing our decision making skills but trust me this thing's gonna be killer when we're done. [ MUSIC ] Well we got it all untaped and I have to say my mouth is watering just thinking about that candy. You ready to get some mixed up?

(Ted)>> You can't wait to get a taste of that can you?

(Tommy)>> It's gonna be sweet! The appearance of our car currently versus this hood may be a bit confusing to a few of you guys, and you may be wondering how to go from that in the booth to this. The magic happens in the mid-coat or the candy coat. We actually sprayed two different colors here on these stripes, silver and gold. We did this because we weren't exactly sure what our colors would turn out like under that cherry bomb metallic. On the center graphics is where we painted the gold rush. If the light hits the color just right it's a breath taking ruby red. The narrower stripes on each side is where we sprayed the bright silver, and it reacted quite a bit different. It has a much brighter appearance and the flop of the color is very impressive. Turns out Ted and I both prefer the gold more than the silver, and that's why we sprayed it on to the AMC. Now this next step is really gonna transform our Javelin into a true stunning piece of Detroit muscle. For the effect we're going for we're gonna lay down three coats. Spraying candy can be a difficult task. Running the length of the car and some cross coats helps to ensure equal coverage when applying translucent color. After Ted's handy work we can reveal our final colors. There's a lot more to unmasking this car than just pulling off this tape. You spend all this time and effort doing artwork if you will and pulling this off incorrectly can cost you all that labor. You don't want to pull the tape off perpendicular to the panel because you're risking a chance of the material peeling off of the surface. It's always a good idea to more or less pull the tape back upon itself. That drastically reduces the chances of delamination. [ MUSIC ] With that satisfying process out of the way it's time to pour on the clear. This first coat of clear confirms our paint choices were a success. Just look at that color! Hell yeah! [ spray gun hissing ]

(Tommy)>> I don't know about you but I'm digging what we've created. Brother I believe we knocked it out of the park.

(Ted)>> You know I really think we did. I mean it's a perfect combination of the car and the color scheme with the right graphics on it cause they fit the shape of this car, and this thing certainly is an hour glass of a car with a couple of creases in it.

(Tommy)>> Now I know AMC's have some shape to them but that compliments this color. With that said this type of paint scheme shouldn't be on every car.

(Ted)>> It shouldn't be. If we had a car like that Hemi car we knew about you'd want to leave that alone. Maybe do a restoration but this, this was a nice clean car and a great starter point.

(Tommy)>> Well you worked pretty hard. Let's go grab you a beer or two.

(Ted)>> Let's go get some. Yeah that'd be a great idea.

(Tommy)>> What color would you call that?

(Ted)>> I don't know yet.

(Tommy)>> What about bad apple?

(Ted)>> I like it!

(Daniel)>> Up next, how to put that shine back into your old trim with a little hand jobbing.

(Tommy)>> Well we got our AMC out of the booth, unmasked, and we can finally step back and admire all of our fancy handiwork. What do you think about this thing?

(Daniel)>> Man I like this thing. With all this fancy paint work done we're ready to start reassembly. Now this is the part that I really like because with each piece that gets us one step closer to completing this retro masterpiece.

(Tommy)>> Often times following new paint is all new components going on it. You know with that shiny new surface you'd want a grille, taillights, trim, and bumpers to match, and if this was a Chevelle, Mustang, or Charger right now it'd be Christmas time. We'd be ripping boxes open, packaging going everywhere, all excited about our new pieces going on our shinny car, but where we're at with that odd duck AMC there's not a whole lot of aftermarket support. So that's gonna require us to do some refurbishing.

(Daniel)>> Now everyone loves chrome but not all shinny things are created equal. If you're looking to brighten up your exterior trim and the parts are stainless all you're gonna need are a couple of tools and some patience. The first thing you want to do is inspect the part. You're looking for dents, dings, and scratches. With the lock cylinders they always have scars from using keys. By the looks of things someone may have sanded across it at some point or another, but we can fix that. Another common issue is paint on the surface. Now to remove this there's a right way and a wrong way. You don't want to scrape this off with your trusty old timer because you're risking costing yourself more work. Just let it soak in some paint thinner for a few minutes, and it normally wipes right off. [ MUSIC ] Now that it's all cleaned up it's time to repair these blemishes. It's gonna take some sanding. Depending on how deep the scratches are determines the grit of paper you should start with. We have some gnarly grooves. So we are starting with 400. Then we will move finer as we smooth things out, and the finer you finish it with paper the less time you spend on the polisher. It's time to add back the shine, and that's gonna require a high speed polisher. With a little dab of compound on the wheel and some patience who we mentioned earlier this thing will look like new again. It's a good idea to wear gloves for safety, and just keep the part on the wheel with a small amount of pressure. [ MUSIC ] It takes a few wipe downs to check your work but with some quality time you will have perfection. [ MUSIC ] Man that has to be the best looking lock cylinder I've worked on today.

(Tommy)>> Let me see that thing. Dude!

(Daniel)>> It looks pretty good don't it?

(Tommy)>> That ain't too bad, and you're so good at it I got you some homework.

(Daniel)>> Really?

(Tommy)>> Hey.

(Daniel)>> Man I should have never said anything about polishing stainless.

(Tommy)>> Coming up, chrome slabber bars, Mag wheels, and air shocks. Trust me, you want to see this.

(Daniel)>> Hey guys welcome back. We're continuing down the path of our '70's themed Javelin. We've given this thing a retro paint job to help compliment this aggressive body style, and we've been working on brightening up our trim to help compliment this fresh paint. Now parts for these old AMC's are extremely hard to find. So restoring what we had was our best choice. Now I've had about all the trim work I can stand. So we're gonna go back here and start working on this rear suspension. [ mechanical humming ]

(Daniel)>> Now the first thing we're gonna do is change out these old air shocks. What's unique about these things is the fact that they one function like a normal shock, but two they're adjustable with air pressure. These are fed by two air lines that are connected to a common Schrader valve. These can be used to raise and lower the car, and can be aired up to roughly 100 p-s-i. Now these are essential to building a proper '70's themed street machine but they're not without their fair share of problems, like this one here. Road debris and good ole fashion dry rot are the leading causes in the failure of an air shock. What happens is the car goes up and down going down the highway. It'll eventually develop a crack from the dry rot and turn into a hole like you see here. Then it won't hold any air. The good news is that replacing these things is about as easy as it gets. It's what I like to call a six pack job. It takes the first three to come up with the idea and the second three to get them on the car. [ drill humming ]

(Daniel)>> Just a couple of nuts and bolts and she's free.

(Tommy)>> For replacements Summit took care of us with these Monroe Max Air shocks. These will definitely give our AMC's back side an altitude change. [ MUSIC ] This kit includes new air lines and it's wise to swap out these fatigued tubes from yesteryear. [ MUSIC ] Drop this thing down and see how our upgrade went. [ MUSIC ] That will get the job done. Now if you're a fan of '70's era muscle you've probably seen a set of these. Traction bars, slapper bars, torque bars, whatever you want to call them, and these things serve a bigger purpose than just looking plain right cool. What they're actually designed to do is limit axle wrap. When you stomp on the gas pedal the engine applies torque through the rear end causing the differential to rotate in the opposite direction of the wheels. This causes the leaf spring to flex upward in the front and downward in the rear. If this action is too excessive it can cause wheel hop and the loss of traction. By installing traction bars these limit the amount of flex cause by the rear during heavy acceleration. To install a set of Lakewood traction bars it doesn't get easier than this. You've got a couple of U-bolts. You just cinch them down and you're pretty much ready for a night on the town. When tightening those U-bolts you want to make sure that you don't tighten one side too much cause you'll actually pull it off to one side and that isn't what you're looking for. [ drill humming ] [ MUSIC ]

(Tommy)>> As the old saying goes, out with the old and in with the new. These Crager SS' wrapped with some sticky Mickey Thompsons will surely give us plenty of attention and a period correct look. We wanted this AMC to turn some heads. So it had to go under a heck of a transformation. That mainly happened inside the booth with a few stripes, some candy paint, and a few coats of red we believe we hit the nail on the head. The next time you see this bad apple it will be time to add some serious motivation.
Show Full Transcript