
In This Episode
- 0:01 Introduction to the Project
- 1:02 Starting a New Project
- 2:14 Working with Glass
- 4:29 Engine and Performance Upgrades
- 6:24 Transmission and Driveline Modifications
- 8:33 Body and Chassis Work
- 9:25 Wheels and Tires
- 10:31 Painting the Car
- 13:04 Installing the Vinyl Top
- 14:45 Final Touches and Exhaust Installation
- 17:32 Test Drive and Review
Video Transcript
You're watching Power Nation.
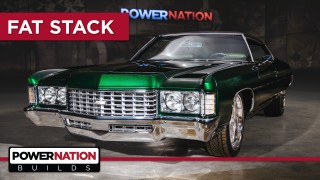
I'm Natalie Stovall and welcome to Power Nation Builds, where today you're gonna see the dramatic transformation of this 1971 Chevy Caprice from start to finish, all in the next 30 minutes.
Here's Detroit Muscle.
So let us introduce
our latest project.
It's a 1971 Chevrolet Caprice that we've christened as Fat Stack.
A while back we had the opportunity to help one of you guys out with a driveway rescue.
The owner of this jewel had been tinkering on it in his spare time.
Just having it back to a reliable condition was his main goal.
Then one day we got the call.
He was ready to pass it on and asked if we were interested.
How could we say no?
You know,
guys, when you're starting a new project, it's real easy to get caught up in the moment and to start ripping this stuff apart.
I think we've all been there.
Get tools, trim pieces,
hardware,
body panels all strewn about like a tornado just ripped through your shop.
In all reality though,
this truly is the time to slow down and take care of the parts and pieces that you're pulling off.
Come on, baby,
and I'm not just talking about the traditional tagging bag that'll keep everything organized and save you a significant headache down the road.
You also need to consider that replacing broken or missing parts lost during disassembly can hurt both your sanity
and your wallet.
For example, the tail light housing on our 71 Caprice.
This particular setup has a somewhat sturdy hardened plastic shell as opposed to its later model counterparts such as a 75 or 76 that were constructed from a flimsier fiberglass material.
Although one is technically stronger and more durable,
the approach is still the same. You never want to risk any unnecessary damage to your restoration components during disassembly because as you guys know this stuff is becoming harder and harder to come by.
The subject of working with glass normally scares people. It's easy to say that the main concern is breaking what you're trying to remove sacrificing your glass normally isn't the goal,
but if you slow down,
pay attention,
it's really not that intimidating and it's pretty basic.
If you have one of these,
take a hammer and hit the handle of your screwdriver.
This does a couple of things.
One, it sets the tip of the screwdriver in the head of the screw.
Also, it shocks the threads, which in turn helps to loosen things up.
Next up for removal is our top and our side windshield trim,
and these are held in place with a little clip that have to be pried up with a specialty tool.
What you want to do is slide the hook end up underneath the trim on top of the glass.
Use the hook to find the clip, and once it's set,
rotate your wrist to pry the clip off the trim to free it up.
A little wiggling and pulling and the piece should pop off.
Now you just gotta do that with the rest of the clips on the trim piece.
Once it's all out of the way,
time to tackle the glass itself.
Now what we're gonna do is Joe's gonna pull that through there
and then I'm gonna hand him a bolt.
I'm gonna use a bolt on my side
and we'll actually wrap this around there
and then we can pull it back and forth.
I wouldn't recommend just taking this wire and wrap it around your fingers when you go to pulling on this,
you're probably gonna cut yourself.
For our side I can
choke it down this way.
And you wanna pull it in the direction whichever way we're cutting.
I'm gonna try to lay it around this glass corner.
Makes some cool noises, don't it?
There it is.
The small block 400 that came in our old Caprice is one of the most renowned power plants of its time.
Although it wasn't originally intended to be referred to as a high performance engine,
it still generated respectable torque numbers all the way to its discontinuation in 1980.
And as cool and iconic as this SPC may be,
we've got something better planned for old fat stacks.
The cure for low horsepower is pure forced induction.
We wanted our old big body to scream the tires right off the rear axle,
and this supercharged LS is going to do just that.
Not only is this beautiful piece of automotive artwork generating the exorbitant amount of pulse pounding ponies,
that bronze powder coated finish guarantees a complete package of performance and good looks, a rap sheet of 840 horses and 760 ft pounds of torque,
and who opens that possibility for a few participation awards from those boys of blue.
You want a hand tight or a zippy tight?
Initially,
initially hand and then zip.
Cran her out of here.
Oh yeah.
She's greasy.
Coming up,
we mock up our drive line for that.
It's nice and easy.
Now one
With our new transmission being a little bigger, we had to move our old crossmember back just a bit.
Luckily,
this modification only required drilling a couple of holes.
We lucked out with this big body Caprice because of this open C channel in the frame. This much room,
shoot, we could just about put a transfer case under here.
Sweet as pie.
Come on.
If you're looking to make one of these fancy upgrades like this 6 speed that we got from American Powertrain,
there's one modification that's almost guaranteed that's gonna happen,
and that would be modifying or altering your transmission hump of tunnel.
That's because this unit is a completely different size and shape.
Also,
the shifter housing sets up rather tall.
Now when it comes to cutting out this transmission tunnel, we're going to try the least invasive technique as possible,
meaning not cutting out more than we technically have to.
Basically, we'll use our drilled hole as a center point of our outline, and the cut will run just on the inside edge of the hump towards the firewall.
From there we'll have a few spot welds to drill out.
Going this route has several advantages.
For one,
it significantly cuts down the amount of.
Fabrication time and doesn't require a brake or bead roller to build your panels.
Secondly, it gives us a better chance of being able to use a stock replacement carpet when we go to put the interior back in.
I've seen guys get a little cut and fab happy on this conversion before, and they usually end up having to buy a custom tailor-made carpet, which we all know only adds more headache
and leaves less change in your pocket.
Having a set of dolly skates makes realigning the body to the chassis a whole lot easier.
But if you only have a couple of floor jacks,
that can also get the job done.
Gotta go forward about 1 ft.
Yep,
that's probably pretty close.
Yeah, it's right on top of it.
Who
kind of tall on the inside,
kind of like a little mailbox sticking up there and so here it is, a complete transformation from dirty and crusty to fresh and classy.
The semi-gloss chassis black was a safe choice
and yeah,
we could have went with something a bit more exotic,
but trust me,
when we're all said and done, it's gonna be
real nice.
A big body delivering big power undoubtedly deserves big wheels.
Now to some of you old school hot roddy guys,
I know that anything. Larger than 15 inches on a 5 spoke wheel is straight up cringy.
However, if you take a step back and consider the sheer physical size of that car,
a larger diameter rim like these Desperados we got from US Max is not only gonna complement the grace, elegance, and style that these cars were known for in their heyday,
it's gonna give them one heck of a facelift.
We'll also be wrapping them in these continental Extreme Contact DWS 06 plus tires.
These are ultra high performance
and specifically designed for sport coupes and sedans just like old fat stack.
With all the pieces in place,
that stack is looking large and in charge.
A Mosier M9 rear and QA1 suspension sitting on US mag wheels wrapped in continental tires sets the tone for the attitude we're going for.
Combine that with an American powertrain 6 speed tied to 800 plus horses,
that's what I call pure Detroit muscle.
Coming up,
the biggest transformation for our Caprice yet
paint.
Well guys,
after a few 100 hours of rubbing and massaging on fat stack, we finally have it in the booth ready to start spraying on some of that candy color.
So we got Tommy in there laying down that first coat of that awesome KBCO9 organic green that we got from the boys at House of Color.
What's the importance of the foundation underneath not just this paint job but any paint job in general?
So every paint job has to have a foundation, as you said, and we'd like to look at it as like a house,
you know, you want something sturdy underneath that that's going to retain and hold that whatever you're building color on top of it.
Yeah, and we use the jet black as our base color now.
How much does it affect it to use maybe like a silver or yellow or red as your base color,
so it affects it tremendously as you can see how dark it is on the black right now.
But if you look on the paper,
see how light green that is over the white.
So imagine that transition if you had a yellow underneath or
a red underneath,
right,
so you can really create and build your own hues and colors how you want.
Once you start a fancy paint job like this,
you need to pay attention to your dry times.
At some point you can stop
while others,
uh, it means you're working late into the night
all alone just grinding it out.
And all that hard work and sacrifice
will pay off.
When we first got a hold of our old big body,
its factory top was a little worse for wear.
It was cracked,
ripped,
and almost completely dried out from close to 5 decades of baking in the sun.
Luckily,
the sheet metal underneath was solid,
so we sealed it off with some epoxy primer,
black base coat,
and a few coats of clear to ensure our new vinyl top would have protection for years to come.
To install a vinyl top, you're gonna need a few tools. Nothing crazy or elaborate, but they are necessary.
First thing you want to do is find the center line of your roof measuring from a pillar to a pillar.
From there you can start spraying your glue from the center out.
Some people right now are thinking
we just screwed up, Jo.
That's right, we'll let them think that.
It's not a tremendous amount of pressure.
You don't wanna pull them crazy tight.
Well we got our top stretched out and glued on and it looks really nice.
Now we're at the tedious point and that is trimming off all this excess. You don't pay attention now,
all that hard work is out the window
on the front and back window you have these little tea studs that hold molding clips that hold the molding of the windshield in the place.
Now you wanna make sure when you lay this vinyl around there that you trim out around them because if you wait till the windshield's in,
oh, it's a bear.
Don't ask me how I know.
You know, Joe,
I think that was actually easier than putting windows in sometimes.
It's definitely easier than a headliner,
at least this one's on top,
yeah,
not having to work upside down.
The viny tops already changed the entire look of the car if you ask me.
Yeah, it kind of to me with it just being a shiny painted top car,
it almost looked cheap now it kinda.
Just
I don't know. I don't wanna say elegant, that's not the word either,
but
I'll take elegant.
Think you might have gave me the heavy side.
Don't stead it yet.
It's a lot better than just polishing it.
You know,
Joe, I'm always amazed at how much better a project or build looks with new glass in it.
One thing I like on these old caprices is this little emblem up front.
You know,
if you see that in your rearview mirror,
guy behind you means business.
Still good.
Yeah.
Well, we got our fuel tank installed, and now it's time to check off another milestone on our 71 Caprice spat stag project by installing the rear bumper.
That's another straightforward process,
very similar to the front, only a little bit lighter.
How you look
like a new back bumper.
Months and months and months of labor.
Hundreds of hours.
And we are dangerously close to the finish line.
Next, we fully weld our exhaust,
but first we'll do a second pass of heavy tacks to secure everything in those tight spaces under fat stack.
Well, we're finally ready to install our exhaust tips.
Now we left these things a little bit loose so that we could get it down on the ground to dial them into perfection.
And to put this one in place,
we'll be ready to get it where it needs to be.
Well,
Tommy, you ready to fire this old girl up?
I'm gonna let you do the honors if you think you can fit well now you're speaking my language.
You think it's gonna sound aggressive?
Oh, I think it's gonna sound really aggressive.
Well, don't be afraid of it. It's hard to tame 840 horsepower.
Got good rumble to it.
Oh.
I think that's what they call crisp.
It definitely has a good snap to it.
This is where I tell him this is the close that he's gonna get into driving it.
Coming up,
finally it is time for Fat Stack's debut on the street.
Always want a bad boy they make me feel.
Months and months of sweat and grit
bleak and profound,
well that's an understatement.
Our playground is the pavement
and it's time to roll.
Well, Peyton,
today is the day.
All of our hard work
has paid off.
What do you do danger is my middle name.
That ain't the word I would say.
So car rides pretty good.
Sets pretty comfy.
It's definitely like having a lazy boy in here,
probably kind of wet on your side.
Truly puts a smile on my face
with all the grins and points and thumbs up we've got today,
you know, we're the only ones that have seen it for the past however many months and now we're getting to share it.
You digging the sound of this big body yet?
You will.
You get the snap crackle of pot.
Yeah,
you just gave me a flashback at Ricky Bobby's wife.
I swearing Ricky Bobby's wife is in this car somewhere.
Yeah.
$22.2 million.
So what makes bat stack so great?
A lot.
I mean the big wheels,
big motor,
loud paint job, loud exhaust.
Um,
spacious truck.
It's pretty good on the old fuel mileage as long as you keep your foot out of it.
Well,
that means,
that means it does pretty bad on fuel.
Yeah,
I mean, you know,
good thing about it though is the fuel for is relatively cheap and the tank is.
Huge.
Another reason why we call it fat stacks. You need that just to right around a lot.
I tried.
Yeah this is super nice there.
Wow.
No matter where we went,
that stack grabbed attention.
Numerous street lights,
thumbs up from cars on the road,
heck,
even pumping gas.
Feels good showing off all the long hours spent at the shop.
And her drawing the crowd
confirms
we did good.
What kind of goodies you get us?
I replaced your peanut M&Ms. I ate the other day.
Today is a great day for a car ride, bro.
Car building is similar to creating art.
You start with a canvas
and a vision
with a steady hand.
Splash of some color and a watchful eye paying attention to detail,
the next thing you know,
have yourself a masterpiece
all created from what once
was nothing.
So,
would you call this a success?
I'd say absolutely.
I'm ready for some fine eating.
Wow.
Fat stack was an awesome build.
Now remember, you can see all of our other cool projects on our website.
I'm Natalie Stovall.
I'll see y'all next time.
Show Full Transcript
I'm Natalie Stovall and welcome to Power Nation Builds, where today you're gonna see the dramatic transformation of this 1971 Chevy Caprice from start to finish, all in the next 30 minutes.
Here's Detroit Muscle.
So let us introduce
our latest project.
It's a 1971 Chevrolet Caprice that we've christened as Fat Stack.
A while back we had the opportunity to help one of you guys out with a driveway rescue.
The owner of this jewel had been tinkering on it in his spare time.
Just having it back to a reliable condition was his main goal.
Then one day we got the call.
He was ready to pass it on and asked if we were interested.
How could we say no?
You know,
guys, when you're starting a new project, it's real easy to get caught up in the moment and to start ripping this stuff apart.
I think we've all been there.
Get tools, trim pieces,
hardware,
body panels all strewn about like a tornado just ripped through your shop.
In all reality though,
this truly is the time to slow down and take care of the parts and pieces that you're pulling off.
Come on, baby,
and I'm not just talking about the traditional tagging bag that'll keep everything organized and save you a significant headache down the road.
You also need to consider that replacing broken or missing parts lost during disassembly can hurt both your sanity
and your wallet.
For example, the tail light housing on our 71 Caprice.
This particular setup has a somewhat sturdy hardened plastic shell as opposed to its later model counterparts such as a 75 or 76 that were constructed from a flimsier fiberglass material.
Although one is technically stronger and more durable,
the approach is still the same. You never want to risk any unnecessary damage to your restoration components during disassembly because as you guys know this stuff is becoming harder and harder to come by.
The subject of working with glass normally scares people. It's easy to say that the main concern is breaking what you're trying to remove sacrificing your glass normally isn't the goal,
but if you slow down,
pay attention,
it's really not that intimidating and it's pretty basic.
If you have one of these,
take a hammer and hit the handle of your screwdriver.
This does a couple of things.
One, it sets the tip of the screwdriver in the head of the screw.
Also, it shocks the threads, which in turn helps to loosen things up.
Next up for removal is our top and our side windshield trim,
and these are held in place with a little clip that have to be pried up with a specialty tool.
What you want to do is slide the hook end up underneath the trim on top of the glass.
Use the hook to find the clip, and once it's set,
rotate your wrist to pry the clip off the trim to free it up.
A little wiggling and pulling and the piece should pop off.
Now you just gotta do that with the rest of the clips on the trim piece.
Once it's all out of the way,
time to tackle the glass itself.
Now what we're gonna do is Joe's gonna pull that through there
and then I'm gonna hand him a bolt.
I'm gonna use a bolt on my side
and we'll actually wrap this around there
and then we can pull it back and forth.
I wouldn't recommend just taking this wire and wrap it around your fingers when you go to pulling on this,
you're probably gonna cut yourself.
For our side I can
choke it down this way.
And you wanna pull it in the direction whichever way we're cutting.
I'm gonna try to lay it around this glass corner.
Makes some cool noises, don't it?
There it is.
The small block 400 that came in our old Caprice is one of the most renowned power plants of its time.
Although it wasn't originally intended to be referred to as a high performance engine,
it still generated respectable torque numbers all the way to its discontinuation in 1980.
And as cool and iconic as this SPC may be,
we've got something better planned for old fat stacks.
The cure for low horsepower is pure forced induction.
We wanted our old big body to scream the tires right off the rear axle,
and this supercharged LS is going to do just that.
Not only is this beautiful piece of automotive artwork generating the exorbitant amount of pulse pounding ponies,
that bronze powder coated finish guarantees a complete package of performance and good looks, a rap sheet of 840 horses and 760 ft pounds of torque,
and who opens that possibility for a few participation awards from those boys of blue.
You want a hand tight or a zippy tight?
Initially,
initially hand and then zip.
Cran her out of here.
Oh yeah.
She's greasy.
Coming up,
we mock up our drive line for that.
It's nice and easy.
Now one
With our new transmission being a little bigger, we had to move our old crossmember back just a bit.
Luckily,
this modification only required drilling a couple of holes.
We lucked out with this big body Caprice because of this open C channel in the frame. This much room,
shoot, we could just about put a transfer case under here.
Sweet as pie.
Come on.
If you're looking to make one of these fancy upgrades like this 6 speed that we got from American Powertrain,
there's one modification that's almost guaranteed that's gonna happen,
and that would be modifying or altering your transmission hump of tunnel.
That's because this unit is a completely different size and shape.
Also,
the shifter housing sets up rather tall.
Now when it comes to cutting out this transmission tunnel, we're going to try the least invasive technique as possible,
meaning not cutting out more than we technically have to.
Basically, we'll use our drilled hole as a center point of our outline, and the cut will run just on the inside edge of the hump towards the firewall.
From there we'll have a few spot welds to drill out.
Going this route has several advantages.
For one,
it significantly cuts down the amount of.
Fabrication time and doesn't require a brake or bead roller to build your panels.
Secondly, it gives us a better chance of being able to use a stock replacement carpet when we go to put the interior back in.
I've seen guys get a little cut and fab happy on this conversion before, and they usually end up having to buy a custom tailor-made carpet, which we all know only adds more headache
and leaves less change in your pocket.
Having a set of dolly skates makes realigning the body to the chassis a whole lot easier.
But if you only have a couple of floor jacks,
that can also get the job done.
Gotta go forward about 1 ft.
Yep,
that's probably pretty close.
Yeah, it's right on top of it.
Who
kind of tall on the inside,
kind of like a little mailbox sticking up there and so here it is, a complete transformation from dirty and crusty to fresh and classy.
The semi-gloss chassis black was a safe choice
and yeah,
we could have went with something a bit more exotic,
but trust me,
when we're all said and done, it's gonna be
real nice.
A big body delivering big power undoubtedly deserves big wheels.
Now to some of you old school hot roddy guys,
I know that anything. Larger than 15 inches on a 5 spoke wheel is straight up cringy.
However, if you take a step back and consider the sheer physical size of that car,
a larger diameter rim like these Desperados we got from US Max is not only gonna complement the grace, elegance, and style that these cars were known for in their heyday,
it's gonna give them one heck of a facelift.
We'll also be wrapping them in these continental Extreme Contact DWS 06 plus tires.
These are ultra high performance
and specifically designed for sport coupes and sedans just like old fat stack.
With all the pieces in place,
that stack is looking large and in charge.
A Mosier M9 rear and QA1 suspension sitting on US mag wheels wrapped in continental tires sets the tone for the attitude we're going for.
Combine that with an American powertrain 6 speed tied to 800 plus horses,
that's what I call pure Detroit muscle.
Coming up,
the biggest transformation for our Caprice yet
paint.
Well guys,
after a few 100 hours of rubbing and massaging on fat stack, we finally have it in the booth ready to start spraying on some of that candy color.
So we got Tommy in there laying down that first coat of that awesome KBCO9 organic green that we got from the boys at House of Color.
What's the importance of the foundation underneath not just this paint job but any paint job in general?
So every paint job has to have a foundation, as you said, and we'd like to look at it as like a house,
you know, you want something sturdy underneath that that's going to retain and hold that whatever you're building color on top of it.
Yeah, and we use the jet black as our base color now.
How much does it affect it to use maybe like a silver or yellow or red as your base color,
so it affects it tremendously as you can see how dark it is on the black right now.
But if you look on the paper,
see how light green that is over the white.
So imagine that transition if you had a yellow underneath or
a red underneath,
right,
so you can really create and build your own hues and colors how you want.
Once you start a fancy paint job like this,
you need to pay attention to your dry times.
At some point you can stop
while others,
uh, it means you're working late into the night
all alone just grinding it out.
And all that hard work and sacrifice
will pay off.
When we first got a hold of our old big body,
its factory top was a little worse for wear.
It was cracked,
ripped,
and almost completely dried out from close to 5 decades of baking in the sun.
Luckily,
the sheet metal underneath was solid,
so we sealed it off with some epoxy primer,
black base coat,
and a few coats of clear to ensure our new vinyl top would have protection for years to come.
To install a vinyl top, you're gonna need a few tools. Nothing crazy or elaborate, but they are necessary.
First thing you want to do is find the center line of your roof measuring from a pillar to a pillar.
From there you can start spraying your glue from the center out.
Some people right now are thinking
we just screwed up, Jo.
That's right, we'll let them think that.
It's not a tremendous amount of pressure.
You don't wanna pull them crazy tight.
Well we got our top stretched out and glued on and it looks really nice.
Now we're at the tedious point and that is trimming off all this excess. You don't pay attention now,
all that hard work is out the window
on the front and back window you have these little tea studs that hold molding clips that hold the molding of the windshield in the place.
Now you wanna make sure when you lay this vinyl around there that you trim out around them because if you wait till the windshield's in,
oh, it's a bear.
Don't ask me how I know.
You know, Joe,
I think that was actually easier than putting windows in sometimes.
It's definitely easier than a headliner,
at least this one's on top,
yeah,
not having to work upside down.
The viny tops already changed the entire look of the car if you ask me.
Yeah, it kind of to me with it just being a shiny painted top car,
it almost looked cheap now it kinda.
Just
I don't know. I don't wanna say elegant, that's not the word either,
but
I'll take elegant.
Think you might have gave me the heavy side.
Don't stead it yet.
It's a lot better than just polishing it.
You know,
Joe, I'm always amazed at how much better a project or build looks with new glass in it.
One thing I like on these old caprices is this little emblem up front.
You know,
if you see that in your rearview mirror,
guy behind you means business.
Still good.
Yeah.
Well, we got our fuel tank installed, and now it's time to check off another milestone on our 71 Caprice spat stag project by installing the rear bumper.
That's another straightforward process,
very similar to the front, only a little bit lighter.
How you look
like a new back bumper.
Months and months and months of labor.
Hundreds of hours.
And we are dangerously close to the finish line.
Next, we fully weld our exhaust,
but first we'll do a second pass of heavy tacks to secure everything in those tight spaces under fat stack.
Well, we're finally ready to install our exhaust tips.
Now we left these things a little bit loose so that we could get it down on the ground to dial them into perfection.
And to put this one in place,
we'll be ready to get it where it needs to be.
Well,
Tommy, you ready to fire this old girl up?
I'm gonna let you do the honors if you think you can fit well now you're speaking my language.
You think it's gonna sound aggressive?
Oh, I think it's gonna sound really aggressive.
Well, don't be afraid of it. It's hard to tame 840 horsepower.
Got good rumble to it.
Oh.
I think that's what they call crisp.
It definitely has a good snap to it.
This is where I tell him this is the close that he's gonna get into driving it.
Coming up,
finally it is time for Fat Stack's debut on the street.
Always want a bad boy they make me feel.
Months and months of sweat and grit
bleak and profound,
well that's an understatement.
Our playground is the pavement
and it's time to roll.
Well, Peyton,
today is the day.
All of our hard work
has paid off.
What do you do danger is my middle name.
That ain't the word I would say.
So car rides pretty good.
Sets pretty comfy.
It's definitely like having a lazy boy in here,
probably kind of wet on your side.
Truly puts a smile on my face
with all the grins and points and thumbs up we've got today,
you know, we're the only ones that have seen it for the past however many months and now we're getting to share it.
You digging the sound of this big body yet?
You will.
You get the snap crackle of pot.
Yeah,
you just gave me a flashback at Ricky Bobby's wife.
I swearing Ricky Bobby's wife is in this car somewhere.
Yeah.
$22.2 million.
So what makes bat stack so great?
A lot.
I mean the big wheels,
big motor,
loud paint job, loud exhaust.
Um,
spacious truck.
It's pretty good on the old fuel mileage as long as you keep your foot out of it.
Well,
that means,
that means it does pretty bad on fuel.
Yeah,
I mean, you know,
good thing about it though is the fuel for is relatively cheap and the tank is.
Huge.
Another reason why we call it fat stacks. You need that just to right around a lot.
I tried.
Yeah this is super nice there.
Wow.
No matter where we went,
that stack grabbed attention.
Numerous street lights,
thumbs up from cars on the road,
heck,
even pumping gas.
Feels good showing off all the long hours spent at the shop.
And her drawing the crowd
confirms
we did good.
What kind of goodies you get us?
I replaced your peanut M&Ms. I ate the other day.
Today is a great day for a car ride, bro.
Car building is similar to creating art.
You start with a canvas
and a vision
with a steady hand.
Splash of some color and a watchful eye paying attention to detail,
the next thing you know,
have yourself a masterpiece
all created from what once
was nothing.
So,
would you call this a success?
I'd say absolutely.
I'm ready for some fine eating.
Wow.
Fat stack was an awesome build.
Now remember, you can see all of our other cool projects on our website.
I'm Natalie Stovall.
I'll see y'all next time.



