
In This Episode
- 0:01 Introduction to Power Nation Builds
- 0:31 Overview of the 1974 Dodge Dart Sport
- 2:04 Project Business Time: Naming and Goals
- 2:23 Interior Removal and Discoveries
- 2:44 Headliner and Floorboard Condition
- 3:22 Torsion Bar Removal and K-Member Upgrade
- 4:24 Installation of Tubular Control Arms and Shocks
- 4:53 Steering and Brake Upgrades
- 5:37 Wheel Well Modifications and New Hemi Engine
- 8:00 Transmission Tunnel Modifications
- 9:01 Hood Replacement and Engine Preparation
- 10:18 Exhaust System Installation
- 11:19 Painting the Dodge Dart
- 15:25 Final Preparations and First Drive
Video Transcript
You're watching Power Nation.
Welcome to Power Nation Builds your chance to see one of our projects from start to finish in just 30 minutes.
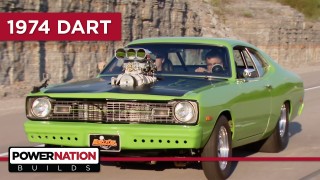
I'm Natalie Stovall, and today muscle car transforms a 1974 Dodge Dart sport.
We're on a way to check out a 1974 Dodge Dart Sport just like it's cousin, the Plymouth Duster,
they're basically Mopar's entry level cars.
That means they're small and lightweight,
so it'll be perfect for what we have playing.
The Dodge Dart was conceived following the 1958 economic recession as a low price compact vehicle that could compete head to head with a VW Beetle,
Ford Falcon,
and AMC Rambler.
It's got a 30/360 in it,
uh, Dakota fast speed.
And the body looks pretty solid.
360 30 over
hemi would be tight squeeze in there, huh.
Yeah,
just means you need a bigger shoehorn,
yeah.
All the seam sealer
across here is all intact.
I mean, seriously, this is a solid car.
You can see all the, the edges on the trunk lid are all solid all the way around here. This whole channel in here, you can feel,
it's all nice and solid.
Yeah,
I didn't get into anything under here.
The frame rails under here are really clean.
There's no buckling or anything up in here. I mean,
from what I can tell,
this thing's never been hit.
Yeah, I mean, the rockers are all clean.
I think I just found our next project.
This car is gonna be pretty simple. It's gonna look good, but it's not gonna be some trailer queen frame off restored type of thing.
The paint will be simple but functional,
all business if you will,
and that's why we're gonna name this one
Project Business Time.
Need to handle that? I got it.
One of the fun things about pulling interiors out is that you can find all kinds of stuff lose change, baseball cards, the possibilities are endless.
Our Dodge here, on the other hand,
it's been picked pretty clean.
About the coolest thing I found was 23 cents.
Obviously, this headline here has seen better days,
but you still wanna be careful with it
because as bad as it looks,
it can always be recovered.
You can clean that off,
put some new material on it.
And call it good.
Even if you can't use this,
still be good for a pattern as long as you keep it in one piece.
Got it.
We're way ahead of the game in regards to the floors. Now we know that we're gonna have to modify the tranny tunnel quite a bit so it doesn't have to be perfect.
The floorboards are in good enough shape to make a decent start,
and the back end is all right,
but we're gonna cut it out anyway.
The torsion bars can be a real pain to get out since replacements are available in the aftermarket,
we're gonna go ahead and just torch these out.
We knew we needed to upgrade our K member in front suspension because we're planning on throwing enough power at this old mo part to dang near send it to the moon,
so we gave Riley Motorsports a call and they had exactly what we needed
in order to make room for the new K member,
we've got to get rid of the factory bump stops.
Drilling out these spot welds helped keep down the amount of torching I'll have to do.
That reduces the amount of torch damage you could end up with and have to go back and fix.
Make sure you do fill any holes.
A coat of dupa color edge primer and some semigloss black will protect it and make it look real nice.
And then we can plug in our new shiny K member.
Now we're also gonna be using Riley's tubular control arms. Now these things aren't just adapted from some other vehicle to work on this.
These are specifically designed and built for this kit.
We're using a dab of blue lock tight on all the threads to keep everything in place.
Now this grid is also gonna allow us to back some of these out if we ever need to in the future.
Riley also sent us the shocks.
Now these are fully adjustable lap codes all wrapped up in QA1 coils.
OK,
that's benchmark up.
Now this kid will let us get rid of that old steering box and put a rack and pinion in its place, and that'll also give us a lot better turning radius.
We're gonna upgrade the brakes for a set that we got from Willwood.
Don't forget when you put on your new front brakes that you gotta pack the bearings with grease,
otherwise you'll chew the spindle right off the front of your car.
These hubs and calipers are made out of aluminum, which will save us about 20 pounds on each side over what the stock brakes would have been.
We would also hook this up with a set of their pads. These have a very high coefficient of friction and at the end of the day that means more stopping power.
But there's no amount of pushing and shoving that's gonna get this tire
through that wheel well. So that means
we're gonna have to get rid of some more of that Dodge sheet metal.
Coming up, the guys drop in the new school 426 hemi into business time.
A lot of times when people are building a car like ours, they resort to a 9 inch setup for the rear end.
Fact of the matter is we wanna keep ours as much dodge as possible, and there are a few options out there that can withstand that type of abuse.
So we gave Moser Engineering a call and they sent us this one of their M60 built to order rear end packages.
Now we already know that we wanna.
Keep the interior in this thing as stock as possible. So that means that we're going to keep the stock floor pan from here forward. That way the original seat, carpet,
everything will just go right back in.
From here back on the other hand,
well, that stuff is all getting gone.
I'm gonna cut it right up over the top. That way we have a nice platform here to attach our tin work on to and we do all the tubs.
Now this can be one of the scary parts of this kind of a build.
If it makes you uncomfortable to do this for the first time with a rare or expensive car,
yeah,
there's nothing at all wrong with finding something cheap to race.
Shoot, you could even buy a rusted out piece of junk from your local salvage yard.
There it is,
and cut that thing up into oblivion.
We cut out the floor and plugged in a back half kit
along with a burly rear end.
Then we got after it with a roll cage.
And we tubbed everything from the front seat to the back to make room for some gigantic street slicks all in preparation for a new school 426 hemi.
You're looking at 690 horsepower and 655 ft pound of torque.
A little bit more time and I'll start cranking it, OK.
Take her straight down a couple inches, Tom.
OK,
good, good, good.
Go ahead,
go down a little bit.
OK.
Yeah, we're good.
Hey, hold it,
hold it,
hold on,
this car had a late model transmission in it when it came here,
so it's already been modified a little bit.
We're gonna get rid of that piece and start making room for that big 4 LED transmission.
A body saw is always a good choice for tranny tunnel clearancing because it cuts quickly and there are no sparks flying or being blasted into our nice shiny parts.
Yeah
We'll hold up the tail shaft with a jack and get to work on our motor mounts.
Normally this Riley Motorsports K member would come with the motor mounts already attached,
but we didn't know what kind of motor we were gonna be running,
so we asked them to send the mounts.
Unattached.
Built a cross member,
put the blower back on and built a set of plates to help keep the engine right where it needs to be.
Now we're gonna get started with putting the hood back on our old Dodge. You guys may remember Steven's performance down in Alabama.
We took a ride down there and picked up a couple bucket seats and some bumpers for our old Dodge,
and our first hood that we had on it was kind of jacked up.
They helped us out with this one,
so now we get to start with a clean slate.
I'm gonna take a couple of these and put them on top of the carburetors to keep any of those metal shavings from falling inside of our motor since all this trimming is gonna be making a bunch of them.
Didn't quite like that sound.
Yeah, we're way off.
Yeah,
we gotta make that a little bigger.
Actually, for our first cut, that's not bad.
We just got to make a few cuts here and go out slowly to get our gap for our belt because of the angle,
and we should be good to go.
To hang our mufflers under our car,
we opted for a 3 inch Magnaflow hot rod stainless steel pipe kit.
It's got a variety of building blocks that we can use to customize our system
like manual bent J's, use LS,
straights, and a whole mess of hangers and flanges.
Yeah,
it looks like we've got plenty of room for the coal over and around the rear.
Looks pretty good, so we're in good shape.
We took one of the brackets to come in the kit and cut it down so we can make us a removable hanger bracket.
With our big street slickstubbed and dual Magnaflows hung, this blown hemi is getting closer to some pro street action.
Up next,
our Dodge Dart gets its new colors.
Our 74 Pro Street dart project Business time is in the middle of a makeover.
Our buddy Jason Anderson with Anderson Customs out of Claremore, Oklahoma lent us a hand with smoothing out the gnarly spots on the body.
After some initial mud work, it got primed and blocked out several times.
I got to get in on the action as well working the bumper and smoothing out the body alongside Jason.
We try to always blow off the car while it's still in the prep station so that the dust gets captured by our booth instead of our lungs.
A piece of clean paper towel will help unseed any dust that's stuck on there and gets our service nice and clean.
With it blown off, we're ready to start wiping old business time down.
Our project for today is to get it dressed up in its new suit.
First, on top of that rust Defender primer, we're gonna spray on a coat of white epoxy sealer.
The sealer comes in a few different types. They got acrylic,
I got your thing,
and there are a few others.
Epoxy sealer is a great all around type that allows you to put a variety of top coats over it, and you also have a larger window of time to cover it up with sealers, if you let the window expire, you have to come back and scuff it before you spray paint,
and sometimes you even have to reapply it. As for the color he's using,
white,
that's going to increase the vibrance of the willow green which is going to be sprayed over top of it.
While our sealer's on,
that means it's time for the DART to undergo its big transformation.
I've mixed the green with some 885ucer and I'd like to get into the particulars of that here in a few seconds, but first, let's paint the car.
I'll start with the jam so I can close the doors and spray down the side of the car without doing it in pieces.
You'll notice that on the edges of the spray pattern, the color actually looks yellow where the paint is thinner.
I'm overlapping about 50%.
That's a pretty standard amount to make sure that I get good coverage.
Got a little tip for you whenever you're doing a two-tone or something like that,
tape your jam seams off.
What that does, if you just took a piece of paper and mask over that,
the overspray is still gonna get back on top of your new surface.
But if you tape off that jam.
It can't come out of it.
Now we can lay out the hemi graphic with the vinyl stickers,
being careful to make sure it's nice and straight.
A quick scuff job on the surfaces that will get painted
and we can break out the black.
I'm spraying on a standard pure black,
no blues, purples, or any other toners to be found.
Some flex and flat clear diluted down by about 10% with regular glossy clear will give us just the right amount of flatness.
Then we can reveal our masterpiece to the world.
Woo!
This is the part of the paint job where you wanna go slowly and carefully.
Getting too excited here is a good way to set yourself back a few days.
Looks like all that patience has paid off.
The combination of those bigs and littles.
That stance.
And I really think we're on to something here.
While we've checked,
double checked and triple checked all of our fluids and we're confident we haven't left anything unaddressed,
but there's one more thing we need before we fire this motor up for the first time,
and it's one of these babies right here. You can't be too careful.
OK.
I kept these last two gauges out
so that I would have the clearance needed to get the pot into place.
Once the gauges are in,
we can then plug the steering column in as well.
Here you go, brother.
Thank you.
I'm sure I called in without it, but
I was afraid I might hurt somebody,
including me.
Well, they say when you get, you know,
older, you my age, I know.
Turn to the right,
just a hair man.
My, uh, getting into the neighborhood to,
like you mean change the angle?
Yeah, go.
So
For our steering column,
we went with an identic unit
that we also got from SummitRacing.
And we're replacing the dash pad with this new one we got from Classic Industries.
This is one of those seldom addressed details that does a whole lot for the look of your car.
Coming up,
our dart hits the street and the track.
18.5 inch Mickey Thompson's around weld racing forged aluminum wheels,
an 871 YN blower,
a modified and refurbished bumper and grille.
Four point harnesses from Summit Racing,
custom hemi graphics on the hood,
along with refurbished tail lights and rear deck lips.
And I did it column connected to a Riley Motorsports front suspension setup.
Underneath an Arrington Racing 426 hey built by Horsepower TV
that pushes right around 700 ponies,
a Willow green PPG paint scheme,
an S&W back half kit,
along with piles of other odds and ends, and a whole mountain of man hours.
We've been waiting a long time for this.
How hard is it to see over top of that blower?
As long as I don't have to look too far to the right when I'm making a left hand turn, it's not bad.
We're over here riding around this cool little neighborhood
it's slushing around.
You know what we're doing right now, Steve
Tommy, we're planting seeds if you will.
There's some little kid on his bicycle that's watching us drive by going.
I remember I was that kid one time they're like.
I'll tell you what though, for the first time out, I'm looking at all the gauges and stuff. This thing is actually not performing too bad considering we've got like 4 miles on it.
Yeah, we're staying right at 190, 195.
We got 60,
60 pounds of oil pressure.
It's, it's not bad.
Maiden voyage out.
On the way back to the shop, we can annoy a few people,
but there's no need to get silly.
We need to recheck every nut, bolt and fluid on here
then.
We can hit the highway.
You wouldn't believe how well this thing drives on the highway if we told you
of course it has a responsive throttle.
This
thing goes straight as an arrow
and it's comfortable while it doesn't.
We blow out the cobwebs on the way to the drag strip.
And this is just quarter throttle,
holy moly.
799 on the first try and she went straight.
The tires are a little hard,
so I'll deflate them
and give it a run again.
Yeah.
No, I guess the guy that was, uh,
calmly waiting gets to go 2nd.
She launched hard enough to knock off our POV camera
and Mk almost caught my better run.
Well time we got what we wanted all in one day.
We got street and strip. We drove it down here,
drove it to lunch. After lunch, we drove it over here to the track,
made a few passes.
Yeah,
I know, and we really wasn't even pushing that hard and got some 6 70s out of it.
So hey, a little more fine tuning. I think we can get mid to high fives out of her.
That
was an impressive and fun rap on our Dodge Dart.
Remember you can catch all of our other cool builds on our website.
I'm Natalie Stovall. I'll see y'all at the track.
Show Full Transcript
Welcome to Power Nation Builds your chance to see one of our projects from start to finish in just 30 minutes.
I'm Natalie Stovall, and today muscle car transforms a 1974 Dodge Dart sport.
We're on a way to check out a 1974 Dodge Dart Sport just like it's cousin, the Plymouth Duster,
they're basically Mopar's entry level cars.
That means they're small and lightweight,
so it'll be perfect for what we have playing.
The Dodge Dart was conceived following the 1958 economic recession as a low price compact vehicle that could compete head to head with a VW Beetle,
Ford Falcon,
and AMC Rambler.
It's got a 30/360 in it,
uh, Dakota fast speed.
And the body looks pretty solid.
360 30 over
hemi would be tight squeeze in there, huh.
Yeah,
just means you need a bigger shoehorn,
yeah.
All the seam sealer
across here is all intact.
I mean, seriously, this is a solid car.
You can see all the, the edges on the trunk lid are all solid all the way around here. This whole channel in here, you can feel,
it's all nice and solid.
Yeah,
I didn't get into anything under here.
The frame rails under here are really clean.
There's no buckling or anything up in here. I mean,
from what I can tell,
this thing's never been hit.
Yeah, I mean, the rockers are all clean.
I think I just found our next project.
This car is gonna be pretty simple. It's gonna look good, but it's not gonna be some trailer queen frame off restored type of thing.
The paint will be simple but functional,
all business if you will,
and that's why we're gonna name this one
Project Business Time.
Need to handle that? I got it.
One of the fun things about pulling interiors out is that you can find all kinds of stuff lose change, baseball cards, the possibilities are endless.
Our Dodge here, on the other hand,
it's been picked pretty clean.
About the coolest thing I found was 23 cents.
Obviously, this headline here has seen better days,
but you still wanna be careful with it
because as bad as it looks,
it can always be recovered.
You can clean that off,
put some new material on it.
And call it good.
Even if you can't use this,
still be good for a pattern as long as you keep it in one piece.
Got it.
We're way ahead of the game in regards to the floors. Now we know that we're gonna have to modify the tranny tunnel quite a bit so it doesn't have to be perfect.
The floorboards are in good enough shape to make a decent start,
and the back end is all right,
but we're gonna cut it out anyway.
The torsion bars can be a real pain to get out since replacements are available in the aftermarket,
we're gonna go ahead and just torch these out.
We knew we needed to upgrade our K member in front suspension because we're planning on throwing enough power at this old mo part to dang near send it to the moon,
so we gave Riley Motorsports a call and they had exactly what we needed
in order to make room for the new K member,
we've got to get rid of the factory bump stops.
Drilling out these spot welds helped keep down the amount of torching I'll have to do.
That reduces the amount of torch damage you could end up with and have to go back and fix.
Make sure you do fill any holes.
A coat of dupa color edge primer and some semigloss black will protect it and make it look real nice.
And then we can plug in our new shiny K member.
Now we're also gonna be using Riley's tubular control arms. Now these things aren't just adapted from some other vehicle to work on this.
These are specifically designed and built for this kit.
We're using a dab of blue lock tight on all the threads to keep everything in place.
Now this grid is also gonna allow us to back some of these out if we ever need to in the future.
Riley also sent us the shocks.
Now these are fully adjustable lap codes all wrapped up in QA1 coils.
OK,
that's benchmark up.
Now this kid will let us get rid of that old steering box and put a rack and pinion in its place, and that'll also give us a lot better turning radius.
We're gonna upgrade the brakes for a set that we got from Willwood.
Don't forget when you put on your new front brakes that you gotta pack the bearings with grease,
otherwise you'll chew the spindle right off the front of your car.
These hubs and calipers are made out of aluminum, which will save us about 20 pounds on each side over what the stock brakes would have been.
We would also hook this up with a set of their pads. These have a very high coefficient of friction and at the end of the day that means more stopping power.
But there's no amount of pushing and shoving that's gonna get this tire
through that wheel well. So that means
we're gonna have to get rid of some more of that Dodge sheet metal.
Coming up, the guys drop in the new school 426 hemi into business time.
A lot of times when people are building a car like ours, they resort to a 9 inch setup for the rear end.
Fact of the matter is we wanna keep ours as much dodge as possible, and there are a few options out there that can withstand that type of abuse.
So we gave Moser Engineering a call and they sent us this one of their M60 built to order rear end packages.
Now we already know that we wanna.
Keep the interior in this thing as stock as possible. So that means that we're going to keep the stock floor pan from here forward. That way the original seat, carpet,
everything will just go right back in.
From here back on the other hand,
well, that stuff is all getting gone.
I'm gonna cut it right up over the top. That way we have a nice platform here to attach our tin work on to and we do all the tubs.
Now this can be one of the scary parts of this kind of a build.
If it makes you uncomfortable to do this for the first time with a rare or expensive car,
yeah,
there's nothing at all wrong with finding something cheap to race.
Shoot, you could even buy a rusted out piece of junk from your local salvage yard.
There it is,
and cut that thing up into oblivion.
We cut out the floor and plugged in a back half kit
along with a burly rear end.
Then we got after it with a roll cage.
And we tubbed everything from the front seat to the back to make room for some gigantic street slicks all in preparation for a new school 426 hemi.
You're looking at 690 horsepower and 655 ft pound of torque.
A little bit more time and I'll start cranking it, OK.
Take her straight down a couple inches, Tom.
OK,
good, good, good.
Go ahead,
go down a little bit.
OK.
Yeah, we're good.
Hey, hold it,
hold it,
hold on,
this car had a late model transmission in it when it came here,
so it's already been modified a little bit.
We're gonna get rid of that piece and start making room for that big 4 LED transmission.
A body saw is always a good choice for tranny tunnel clearancing because it cuts quickly and there are no sparks flying or being blasted into our nice shiny parts.
Yeah
We'll hold up the tail shaft with a jack and get to work on our motor mounts.
Normally this Riley Motorsports K member would come with the motor mounts already attached,
but we didn't know what kind of motor we were gonna be running,
so we asked them to send the mounts.
Unattached.
Built a cross member,
put the blower back on and built a set of plates to help keep the engine right where it needs to be.
Now we're gonna get started with putting the hood back on our old Dodge. You guys may remember Steven's performance down in Alabama.
We took a ride down there and picked up a couple bucket seats and some bumpers for our old Dodge,
and our first hood that we had on it was kind of jacked up.
They helped us out with this one,
so now we get to start with a clean slate.
I'm gonna take a couple of these and put them on top of the carburetors to keep any of those metal shavings from falling inside of our motor since all this trimming is gonna be making a bunch of them.
Didn't quite like that sound.
Yeah, we're way off.
Yeah,
we gotta make that a little bigger.
Actually, for our first cut, that's not bad.
We just got to make a few cuts here and go out slowly to get our gap for our belt because of the angle,
and we should be good to go.
To hang our mufflers under our car,
we opted for a 3 inch Magnaflow hot rod stainless steel pipe kit.
It's got a variety of building blocks that we can use to customize our system
like manual bent J's, use LS,
straights, and a whole mess of hangers and flanges.
Yeah,
it looks like we've got plenty of room for the coal over and around the rear.
Looks pretty good, so we're in good shape.
We took one of the brackets to come in the kit and cut it down so we can make us a removable hanger bracket.
With our big street slickstubbed and dual Magnaflows hung, this blown hemi is getting closer to some pro street action.
Up next,
our Dodge Dart gets its new colors.
Our 74 Pro Street dart project Business time is in the middle of a makeover.
Our buddy Jason Anderson with Anderson Customs out of Claremore, Oklahoma lent us a hand with smoothing out the gnarly spots on the body.
After some initial mud work, it got primed and blocked out several times.
I got to get in on the action as well working the bumper and smoothing out the body alongside Jason.
We try to always blow off the car while it's still in the prep station so that the dust gets captured by our booth instead of our lungs.
A piece of clean paper towel will help unseed any dust that's stuck on there and gets our service nice and clean.
With it blown off, we're ready to start wiping old business time down.
Our project for today is to get it dressed up in its new suit.
First, on top of that rust Defender primer, we're gonna spray on a coat of white epoxy sealer.
The sealer comes in a few different types. They got acrylic,
I got your thing,
and there are a few others.
Epoxy sealer is a great all around type that allows you to put a variety of top coats over it, and you also have a larger window of time to cover it up with sealers, if you let the window expire, you have to come back and scuff it before you spray paint,
and sometimes you even have to reapply it. As for the color he's using,
white,
that's going to increase the vibrance of the willow green which is going to be sprayed over top of it.
While our sealer's on,
that means it's time for the DART to undergo its big transformation.
I've mixed the green with some 885ucer and I'd like to get into the particulars of that here in a few seconds, but first, let's paint the car.
I'll start with the jam so I can close the doors and spray down the side of the car without doing it in pieces.
You'll notice that on the edges of the spray pattern, the color actually looks yellow where the paint is thinner.
I'm overlapping about 50%.
That's a pretty standard amount to make sure that I get good coverage.
Got a little tip for you whenever you're doing a two-tone or something like that,
tape your jam seams off.
What that does, if you just took a piece of paper and mask over that,
the overspray is still gonna get back on top of your new surface.
But if you tape off that jam.
It can't come out of it.
Now we can lay out the hemi graphic with the vinyl stickers,
being careful to make sure it's nice and straight.
A quick scuff job on the surfaces that will get painted
and we can break out the black.
I'm spraying on a standard pure black,
no blues, purples, or any other toners to be found.
Some flex and flat clear diluted down by about 10% with regular glossy clear will give us just the right amount of flatness.
Then we can reveal our masterpiece to the world.
Woo!
This is the part of the paint job where you wanna go slowly and carefully.
Getting too excited here is a good way to set yourself back a few days.
Looks like all that patience has paid off.
The combination of those bigs and littles.
That stance.
And I really think we're on to something here.
While we've checked,
double checked and triple checked all of our fluids and we're confident we haven't left anything unaddressed,
but there's one more thing we need before we fire this motor up for the first time,
and it's one of these babies right here. You can't be too careful.
OK.
I kept these last two gauges out
so that I would have the clearance needed to get the pot into place.
Once the gauges are in,
we can then plug the steering column in as well.
Here you go, brother.
Thank you.
I'm sure I called in without it, but
I was afraid I might hurt somebody,
including me.
Well, they say when you get, you know,
older, you my age, I know.
Turn to the right,
just a hair man.
My, uh, getting into the neighborhood to,
like you mean change the angle?
Yeah, go.
So
For our steering column,
we went with an identic unit
that we also got from SummitRacing.
And we're replacing the dash pad with this new one we got from Classic Industries.
This is one of those seldom addressed details that does a whole lot for the look of your car.
Coming up,
our dart hits the street and the track.
18.5 inch Mickey Thompson's around weld racing forged aluminum wheels,
an 871 YN blower,
a modified and refurbished bumper and grille.
Four point harnesses from Summit Racing,
custom hemi graphics on the hood,
along with refurbished tail lights and rear deck lips.
And I did it column connected to a Riley Motorsports front suspension setup.
Underneath an Arrington Racing 426 hey built by Horsepower TV
that pushes right around 700 ponies,
a Willow green PPG paint scheme,
an S&W back half kit,
along with piles of other odds and ends, and a whole mountain of man hours.
We've been waiting a long time for this.
How hard is it to see over top of that blower?
As long as I don't have to look too far to the right when I'm making a left hand turn, it's not bad.
We're over here riding around this cool little neighborhood
it's slushing around.
You know what we're doing right now, Steve
Tommy, we're planting seeds if you will.
There's some little kid on his bicycle that's watching us drive by going.
I remember I was that kid one time they're like.
I'll tell you what though, for the first time out, I'm looking at all the gauges and stuff. This thing is actually not performing too bad considering we've got like 4 miles on it.
Yeah, we're staying right at 190, 195.
We got 60,
60 pounds of oil pressure.
It's, it's not bad.
Maiden voyage out.
On the way back to the shop, we can annoy a few people,
but there's no need to get silly.
We need to recheck every nut, bolt and fluid on here
then.
We can hit the highway.
You wouldn't believe how well this thing drives on the highway if we told you
of course it has a responsive throttle.
This
thing goes straight as an arrow
and it's comfortable while it doesn't.
We blow out the cobwebs on the way to the drag strip.
And this is just quarter throttle,
holy moly.
799 on the first try and she went straight.
The tires are a little hard,
so I'll deflate them
and give it a run again.
Yeah.
No, I guess the guy that was, uh,
calmly waiting gets to go 2nd.
She launched hard enough to knock off our POV camera
and Mk almost caught my better run.
Well time we got what we wanted all in one day.
We got street and strip. We drove it down here,
drove it to lunch. After lunch, we drove it over here to the track,
made a few passes.
Yeah,
I know, and we really wasn't even pushing that hard and got some 6 70s out of it.
So hey, a little more fine tuning. I think we can get mid to high fives out of her.
That
was an impressive and fun rap on our Dodge Dart.
Remember you can catch all of our other cool builds on our website.
I'm Natalie Stovall. I'll see y'all at the track.



