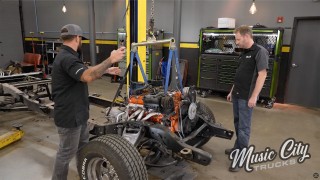
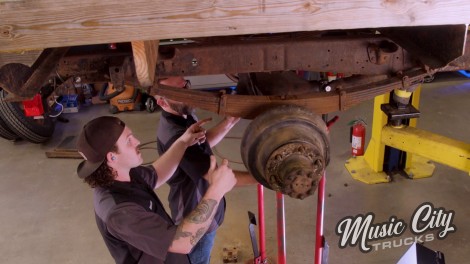
Music City Trucks Featured Projects

Music City Trucks Builds

Parts Used In This Episode

The Industrial Depot
Tools, Hardware, Shop Supplies

Episode Transcript

(Marc)>> You're watching Powernation!

(Brandon)>> Today on Music City Trucks our flatbed is back.

(Marc)>> We'll show you a traditional way to lower a truck. Plus, welding tips from Forney's Gabby Nieto.

(Brandon)>> Then we test drive our F-350 with that sweet turbocharger. [ Music ] [ engine revving ] [ Music ] [ engine starting and idling ] [ Music ]

(Marc)>> Welcome to Music City Trucks, and I have to say I am very excited to have our 1964 F-350 flatbed back in the shop. Well, this thing has led a couple of lives previously, but then we got our hands on it.

(Brandon)>> I found this old truck in a field where it had sat for six years untouched. We went through the old dually's mechanicals to see if it was fit to start, and we ended up having to repair the car right there in the field. It eventually started up and drove, on to the trailer at least.

(Marc)>> And then we dropped in a turbocharged Ford 300 and took it next door to Engine Power's chassis dyno, and it rattled, and shook, and smoked.

(Brandon)>> Stock it made a whopping 77 horsepower. Now it made 373 horsepower!

(Marc)>> Well I've got to say, I love this old flatbed truck. It's this old county truck, turned farm truck, turned shop truck. It's just really cool. It was cool getting it running and driving, cruising around town, but it was even cooler to get the 300 turbo under the hood. But you know how we are around here. We can't leave well enough alone.

(Brandon)>> Now I like to imagine this truck sitting in my driveway cause it's got the perfect amount of crust that I like in all my vehicles, but I think there's a problem with the attitude and that's the altitude, and I think we need to drop this truck in the dirt. Maybe bob the bed, put an exhaust system on it, put the hood back on it, and pretty much that's a daily driver.

(Marc)>> I don't know about daily driver, nor getting it in the dirt, but I think lowering it and changing the attitude's doable on this thing. My biggest concern is this front axle.

(Brandon)>> Now the problem with these old straight axles is when you go to lower these things, you're gonna usually do what they call a flip kit, which is putting the axle on top of the leaf, but these cast iron axles actually have the pedestals cast into them. So, we're gonna have to make a cradle that goes on the bottom. Once we get it on top of this leaf so the axle doesn't rotate around on us, and then it should be fine.

(Marc)>> I'll go get the Deep Creep.

(Brandon)>> With the suspension bolts rusted on for 58 years we gave them a shot of Seafoam Deep Creep to loosen them up. [ impact driver humming ]

(Marc)>> A little bit of nature's thread locker on there. [ drill humming ]

(Marc)>> As we move around the front suspension everything is starting to get more difficult to remove, requiring more persuasion.

(Brandon)>> And the rust dust is flying.

(Marc)>> Might need the heat for this one. [ banging metal ] [ Music ]

(Brandon)>> Got it?

(Marc)>> Yep! [ Music ] [ metal banging ] [ air chisel humming ] [ Music ]

(Marc)>> Alright!

(Brandon)>> The axle is hanging free now. [ Music ]

(Marc)>> Now we start putting the front suspension back in using the original hardware. [ Music ]

(Brandon)>> What a cool design! No shackles, just rubber roller.

(Marc)>> So simple!

(Brandon)>> Now that the axle's on top of the leaf we're just gonna take these universal axle perches and stick them right there on the center pin, and then we're gonna lower it down so it's centered, and then as you can see there's nothing holding this axle from rotating back and forth. So, we're gonna have to make a little pedestal, and then just put the U-bolts in and this thing should be done. There's really no rule book on how to lower these old trucks, and the best thing to do is try to keep safety in mind. So, this is the old bump stop, which actually kept the U-bolts in line with the leaf and the axle. So, we're just gonna go ahead and use that at the bottom like that, but we're just gonna take the bump stop off, and that way the U-bolt stays straight and we don't spit a spring out or roll an axle. And it's a good idea to always use new U-bolts. [ Music ] Let's see! [ ratchet clicking ]

(Marc)>> The new hardware goes on, and everything gets tightened down as we keep checking for level.

(Brandon)>> Well this is what I came up with. Tight fit! [ welder crackling ]

(Brandon)>> Coming up, a traditional solution to lowering a truck. How low can you go!

(Brandon)>> Now that we're done with the front suspension, we're gonna be moving on to the rear, and we're gonna be doing something a little simpler than doing a flip kit. We're actually just gonna be pulling leaves out of the leaf pack. Now that's gonna lower the spring rate and soften the ride, which let's be honest, probably not gonna tow anything with this truck in this configuration. So, first thing we need to do is get these mud flaps off. [ drill humming ] [ Music ]

(Marc)>> With a 58 year old truck like this one some of the parts that have never been off don't want to come off. Woo, three quarter impact isn't touching it. [ impact driver humming ]

(Brandon)>> Want to give it some heat? [ impact driver humming ]

(Brandon)>> With a stuck bolt like this a little heat persuasion can do the trick. [ impact driver humming ] [ Music ]

(Brandon)>> You want to try that? [ impact driver humming ]

(Marc)>> Work on this one, those two?

(Brandon)>> And the other side needs some help as well. [ impact driver humming ]

(Brandon)>> Careful with that one.

(Marc)>> That was a little warm!

(Brandon)>> That's a hot tamale! [ impact driver humming ] [ Music ]

(Marc)>> I have a feeling those U-bolts might be a little warm.

(Brandon)>> Not too bad.

(Marc)>> Just the tip. [ Music ]

(Brandon)>> Take these overload springs out. Ain't gonna need them.

(Marc)>> Check that out.

(Brandon)>> A broken leaf! Look at that, broken leaf spring.

(Marc)>> It's part of the overload.

(Brandon)>> That's when you know it's had a load on it. If you've got a broken leaf on your overload, you had some weight in the back. What we need to do is take the axle away from the leaves, unload them, C-clamp the leaves, pull out the center pin, and then open up the C-clamp and take what we need out. So, the leaves we're thinking about keeping are the main leaf and these two longest leaves, right? We might keep the four, but I think taking the rest of the short ones out will one, lower it two inches just in the thickness, but also soften everything up and hopefully lower it another inch and a half or so.

(Marc)>> Get some weight transfer. You know it!

(Brandon)>> That one's gonna drop.

(Marc)>> Yeah, I was gonna pull my clamp off. [ Music ]

(Brandon)>> Ready?

(Marc)>> Yep. [ Music ] So, the question is do we want to just keep the three, or do we want to add the fourth?

(Brandon)>> I say we start with the three and see what happens, but I'm pretty sure we're probably gonna have to put the fourth one back in.

(Marc)>> You think it's gonna be too low?

(Brandon)>> I think it might be too soft.

(Marc)>> I think it's worth trying.

(Brandon)>> It's worth trying. [ impact driver humming ] [ Music ]

(Brandon)>> How low can you go! [ Music ] We'll find out. [ Music ] [ impact driver humming ]

(Marc)>> Alright, moment of truth. You ready for this Brando?

(Brandon)>> I'm ready! Make sure it don't touch nothing. [ air hissing ]

(Marc)>> Is that it?

(Brandon)>> Dude we're golden. [ Music ]

(Marc)>> That looks good.

(Brandon)>> It's still pretty stiff.

(Marc)>> Don't even need any shocks. It looks really, really good. We can get away without bobbing that bed.

(Brandon)>> But why not?

(Marc)>> You want to just cut it?

(Brandon)>> I want to get the sawz-all out.

(Marc)>> Let's do it! Well let's take a look at what exactly we're gonna accomplish here. The leaf perch is really gonna be our limiting factor here. It ends about right here, and we don't want to move the axle forward. So, let's see about how much of that we're gonna be able to cut off. About 10 inches. So, the next thing we have to consider is this board here needs to get out of the way cause all that did was hold the mud flaps, and then we can move this I-beam further forward in front of where we're gonna cut the bed off. So, we'll get this thing off, go up in the air, and get that I-beam out of there. [ Music ] [ drill humming ] [ saw buzzing ]

(Brandon)>> Alright, so we don't want to go past the hanger.

I'll go right there. Well with the beam where we want it I'm just gonna tack it in place. That way when we're cutting everything it doesn't move. [ welder crackling ]

(Marc)>> Coming up, welding tips from Forney's Gabby Nieto.

(Marc)>> Well we're getting dangerously close to bobbing the bed on our flatbed shop truck here.

(Brandon)>> And here to help us out we've got Gabby from Forney Industries. Not only is she gonna help us with working on the truck but she also brought us a new toy. Gabby, thanks for being here.

(Gabby)>> Oh course, thank you guys so much for having me. So, I know you already have your 20-P plasma cutter, but today I brought you a 40-P plasma. So, this machine is actually a 40-amp plasma cutter. It will clean cut through half inch mild steel and sever cut through three quarters. So even though this machine may look really small it actually packs a really big punch. Another cool thing is that this machine is dual voltage. So, it will run off of 240 volts or 120.

(Brandon)>> Sweet, let's plug this thing in and start cutting this truck up.

(Gabby)>> Sounds good!

(Brandon)>> Just need to grind a clean spot off for the ground. [ Music ]

(Gabby)>> So with the plasma cutter you want to make contact with the tip to the material you're cutting. Also, you want to pull the torch towards you so that you can see the area that you are getting ready to cut, and you can also kinda determine the speed and how far you want to go so you have a better start and end point. You also want to always make sure that your consumables are fresh. If they start to get worn and the electrode starts to pit you want to make sure that you replace those. [ torch hissing ]

(Marc)>> Gabby made quick work of the second frame rail. Then using the Forney flap disc she ground up the ends for a smooth surface.

(Brandon)>> Well Gabby said she's better at working with metal than wood. So, I'm gonna give carpentry a try. [ Music ] [ saw buzzing ] [ Music ] [ saw buzzing ] [ Music ] [ saw buzzing ]

(Brandon)>> Oops, we need a new taillight. [ drill humming ]

(Marc)>> Wow Brandon, you're a regular ole Bob Villa.

(Brandon)>> I have no clue who that is.

(Marc)>> Norm Abrahams.

(Brandon)>> Nope!

(Marc)>> Okay, well it must have been before your time. It looks really good though.

(Brandon)>> A couple of self tappers. This thing's pretty much done back here.

(Marc)>> What do you think Gabby?

(Gabby)>> I think it looks good, but these cuts looks like you could take a couple of lessons from mine cause they look a little better.

(Brandon)>> The shade!

(Marc)>> She just served that right up. Well, if you're gonna keep that up, if you have time to hang out, we've got one more project.

(Gabby)>> Sure, let's check it out.

(Marc)>> It's up front. Alright Gabby, here's what we've got going on. As you can see, we've got a lot of plumbing going on here with our Turbo 300. Don't look at the welds too closely. Those are mine, but we don't have a hood, and we can't put a hood on it yet because we've got the hater pipe.

(Brandon)>> The hater pipe's kinda getting a lot of hate. So, we probably should take the turn up and turn down.

(Marc)>> We want to run just more of a traditional exhaust system. It doesn't have to go all the way to the back of the truck. Back of the cab would be fine, but maybe we put a muffler in there, something like that.

(Brandon)>> And since Marc does all the tig welding and I'm not that great at tig welding, and since you're an instructor maybe you can teach me some things on tig welding.

(Gabby)>> Alright, I'll give you some pointers. Let's weld it up.

(Brandon)>> Let's go get some pipe.

(Gabby)>> Alright, you know the basics. You can melt some metal together, so that works. What we'll do first, this material is pretty clean. We just have a little bit of soot from where that mig weld is from. If we have any grease or anything we just kinda want to clean that up. So, you just take a Brillo pad, or you could take a little disc. Anything really that you can just scrub that surface up a little bit. So, as I'm welding I kinda just talk to myself. As soon as I get the puddle to melt then I'm going to add my filler in there, and then every time I add I'm just gonna move forward with my torch. [ welder humming ]

(Brandon)>> Is everyone's technique a little bit different?

(Gabby)>> With welding it's really very dependent on the welder and how they're gonna go about it. Also the job. Every job calls for different things. So, it's really just dependent on what you're doing. Obviously, something like this. Most people, if they're tig welding it, they're not gonna really put a whole lot of motion in their torch and they're just gonna kinda dab that filler rod in. Some people also like lay wire techniques. So sometimes instead of coming through and adding that filler rod by dabbing it in there they'll just lay it down and kinda run over the top of it.

(Brandon)>> Now we're starting the process of fabbing up our own custom exhaust. First, we measure. Something like that.

(Gabby)>> Looks good to me!

(Brandon)>> Then we cut. [ saw buzzing ]

(Brandon)>> Measure again, cut another... [ saw buzzing ]

(Brandon)>> ...tack that in. Well rinse and repeat. Will it make it? Hold on.

(Gabby)>> We're stuck!

(Brandon)>> This looks perfect. Then Gabby lays down some more tig welds. [ Music ] Now my turn! Let's see if I learned anything. I admit I'm not that great at tig, but like anything practice makes a difference, and a mentor like Gabby is a huge plus.

(Marc)>> Coming up, payoff time with our flatbed!

(Marc)>> Welcome back to Music City Trucks, and we are on the road with our 1964 F-350 flatbed.

(Brandon)>> Well I finished up and installed the exhaust. Thanks to Gabby for her help, but now it's time for us to enjoy our Turbo 300 swapped flatbed shop truck. [ engine revving ] [ Music ]

(Brandon)>> This thing is awesome! [ engine revving ]

(Brandon)>> It takes so long for it to build that boost up.

(Marc)>> When it does!

(Brandon)>> It just goes!

(Marc)>> And then it's there. This is awesome!

(Brandon)>> That steering is just like.

(Marc)>> And as soon as you let off it darts over.

(Brandon)>> Funny thing is it still sounds and smells like a farm truck.

(Marc)>> Doesn't feel like it though. [ engine revving ]

(Brandon)>> This thing is as rowdy and more scarier than Trashawk.

(Marc)>> Way more scary. I'm trying to find fourth. I don't want to accidentally throw it into second. [ engine revving ]

(Marc)>> Way scarier than Trashawk, and not nearly as fast.

(Brandon)>> It's just rowdy.

(Marc)>> Solid at the wheel. So, let's talk about what we've done to this thing so far.

(Brandon)>> Went and found a truck sitting in a dude's field right by his barn. Left for dead literally. We got it running out the field, and then put brakes on it, got it driving, went around town. That was fun! We couldn't leave it alone. So, we came back and threw the Turbo 300 in it, put a trans in it, put it on the dyno. It ran five times as much power as it used to have. Lowered it, bobbed the bed, and actually made it drivable, per se. This is the best iteration for me so far.

(Marc)>> If you asked me to tell you what I would do differently I would definitely do something different with the gearing cause 2,500 r-p-m is where it's happy. So, it's a 40 mile an hour truck really. It's a cool truck to take to Cars and Coffee, or to a local cruise in to show it off.

(Brandon)>> This just shows you you can have a lot of fun without going overboard. Really what did we do? We got the brakes working. We put new tires on it. Sure, we put a turbo 300 in it.

(Marc)>> You don't have to do that.

(Brandon)>> You can just put a turbo on a 300, or just leave the 300 in it. A little bit upgraded trans from the older one. Easier to get parts, but overall we really didn't spend a crazy amount of money to have a crazy fun truck.

(Marc)>> And people can take what we did and modify it to fit their budget.

(Brandon)>> We love it, and we still have more plans for this old truck. So, you'll see it again.

(Marc)>> You can find the parts we used and check out the build page on our website, but for now on to our next project.
Show Full Transcript