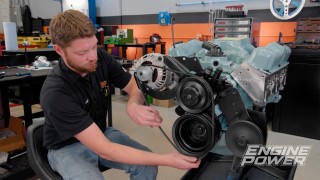
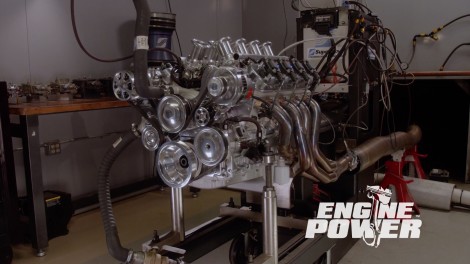
Engine Power Featured Projects

Engine Power Builds

Parts Used In This Episode

Summit Racing
ATI Performance Products Harmonic Balancer
Summit Racing
Billet Specialties Tru Trac Serpentine System
Summit Racing
Cometic MLS Head Gasket
Summit Racing
COMP Cams Evolution Series Hydraulic Roller Lifters
Summit Racing
COMP Cams Valvetrain Assembly Spray
Summit Racing
ICT Billet Camshaft Position Sensor Delete Plugs
Summit Racing
Speedmaster Downdraft EFI Stack Intake Manifold
Summit Racing
Summit Racing Billet Steel Timing Set
Summit Racing
Summit Racing Cast Aluminum Timing Cover
Summit Racing
Summit Racing LS Oil Galley Barbell Plug Kit
Summit Racing
Summit Racing Oil Pump
Summit Racing
Summit Racing Pro LS Automotive Camshaft
Summit Racing
Summit Racing Pro LS Cast Aluminum Oil Pan
Summit Racing
Summit Racing Pro LS Upgraded Rocker Arms
Summit Racing
Summit Racing Pro LS Valve Covers
Summit Racing
Trick Flow Chromoly Pushrods
Summit Racing
Trick Flow Engine Steam Line Plumbing Kit
Summit Racing
Trick Flow GenX 255 Cylinder Heads
Goodson Shop Supplies
Straight Edge Tool

Episode Transcript

(Pat)>> You're watching Powernation.

(Pat)>> Today on Engine Power we build a six liter LS into a stroker street rod.

(Frankie)>> This thing will shine on the engine stand and in the dyno cell. [ Music ]

(Pat)>> Hey everyone, welcome to Engine Power. Today is going to be a great day because we are continuing on the buildup of our 410 cubic inch LQ-9 LS build. It may look a little bit different from the last time you saw it. We got a little bit of paint on it, but the plan for today is to get this thing all finished up, bolted together, and get it on our Superflow Powermark dyno and get to making some horsepower. So to get it to the point where it looks now you have to check this out. We started with a clean remanufactured block, and honed the bores to a final size of 4.0427. Then we balanced the Summit Pro LS rotating assembly to better than eighth ounce inch on the right and left side, which drastically reduces the force on the center of the crank. The piston rings were filed to 23 thousandths on the top and the second rings were gapped to 25 thousandths. The crankshaft, rods, and pistons are fully forged and ready to handle the horsepower we plan to make. [ Music ]

(Frankie)>> Now that we have that Summit Pro LS rotating assembly in our engine we have a rock solid foundation for our 410 cubic inch pump gas cruiser. The next thing we're gonna do is button up the front end. So we had to get a cam shaft. We went right to the Summit Racing catalog to pick out one of their Pro LS camshafts for this application. It actually has similar specs to ones we've used in the past with similar combinations. It has durations at 50 thousandths lift of 234 degrees on the intake and 248 degrees on the exhaust. The lobes are set on a 114-degree lobe separation angle with three and a half degrees of advance ground in. Lift at the valve with these Summit upgraded Pro LS rockers is gonna be 625 thousandths on the intake and 605 thousandths on the exhaust, and to turn that camshaft we're gonna be using one of Summit's double roller timing sets. These are billet gears, and the top gear has a single tooth reluctor built into it with a Torrington bearing on the back. The crank gear has nine keyway positions so we can adjust the cam timing for where we want in this engine. It also comes with the oil pump drive, the chain, and these nifty spacers to space out the oil pump because of that double roller design. Speaking of oil pump we're using a new one for this build, a new Summit Racing oil pump, to make sure we have adequate oil flow to the engine. Now that's a ton of great parts on this table but they don't do us any good there. So let's get them in our engine. You ready?

(Pat)>> What, oop, yeah, let's go! [ Music ] [ torque wrench clicking ]

(Frankie)>> These ARP cam bolts are temporarily installed so we can degree our camshaft. Because this is a street show car engine we'll advance the cam to move the power band lower in the r-p-m range. We'll set the intake centerline at 107 and a quarter, which is six and three quarter degrees advanced. Then the ARP bolts are torqued to 25-pound feet. [ Music ] The new oil pump is installed and aligned with one and a half thousandths feeler gauges before being torqued to 30-pound feet. [ Music ] The next step is installing the factory windage tray with 130 thousandths thick shims so it clears our longer four inch stroke. After pre-lubing the oil pump we'll install this Summit Racing pick up that came as part of the oil pan swap kit. For this build we're going for a very particular look, polished and machined aluminum throughout the engine, and we wanted fasteners that we're gonna live up to that look. That's why we're using ARP stainless steel fasteners throughout this build. We could use these stock original fasteners but they don't look very good, and you could paint them. We've all been there wire wheeling the heads of bolts, putting them through a piece of cardboard, and spraying them, but eventually corrosion is gonna make its way through that paint, it's gonna bubble up, and you're gonna have rusty bolts as well. You could even use a grade eight bolt. These come with a gold zinc coating to prevent rust from happening but there's two problems with that. One, the gold doesn't really look that great, and also when the fastener is installed if that zinc coating is broke it's gonna allow corrosion to get in there and rust the head of the fastener. We don't have that problem when we use ARP stainless steel bolts because they're made entirely of stainless steel. So they won't rust and they won't corrode, but they're also extremely strong. They have a tensile strength between 170,000 and 190,000 p-s-i, which is still way stronger than a grade eight fastener, and all of the ARP stainless fasteners have that strength. To make them really pop ARP even polishes every single stainless fastener before it leaves, and they offer them in bulk fasteners or engine specific kits. And we have a bunch of these here that are specific to our LQ-9, and we're gonna be using them throughout the build to make sure that our fasteners don't let down that polished look.

(Pat)>> Using this timing cover alignment tool we can bolt down the Summit two piece polished timing cover. [ Music ]

(Frankie)>> From the factory these LS' come with a plastic bar bell that helps connect some of the oil passages, but the plastic can get brittle over time and break and they're very hard to remove. So we're gonna be replacing it with a Summit Racing billet aluminum one that has a threaded hole for easy removal. [ Music ]

(Pat)>> Even the bolts that you can't see, like these rear cover bolts, are being replaced with quality ARP stainless fasteners. Finally the rest of the Summit pan kit is installed using the Goodson straight edge to align the rear of the pan with the bell housing.

(Frankie)>> Coming up, a unique induction system and self learning e-f-i setup deliver the goods on the engine dyno.

(Frankie)>> When assembling a valvetrain you'll often hear us use the term pre-load or lifter pre-load, and in today's Summit Tech Tip we wanted to take a second to explain what that means. There are two types of lifters. Solid, which has a solid steel body and no give to it and hydraulic, and hydraulic lifters have an internal piston that rides over top of an oil cavity, and that oil cavity gives a hydraulic cushion to the valvetrain. O-e's developed this mostly for quieter valvetrain and easier maintenance. Usually there is a spring underneath this piston but the spring is not what provides that cushion. It is the oil cavity underneath the spring simply keep the piston at the top of its travel when there's no oil in the system like when the engine is sitting. In order to make this work correctly the piston has to be pre-loaded a certain amount into its travel to make sure that it can operate correctly when the engine is running, and there's two ways that we can set that pre-load. If we have an adjustable rocker like this stud mount one here we can use the adjustor nut to set the correct amount of pre-load, which is generally between 50 and 100 thousandths, but if we have a bolt down rocker like this LS one here then we have to do that with pushrod length. That's why it's really critical that when we're measuring pushrod length we incorporate the amount of pre-load that we need in the lifter to make sure we're getting the correct pushrod length for the application. If you have any questions on how hydraulic lifters work, what parts you need, or how to get the correct pre-load you can always reach out to the experts at Summit Racing Equipment and they'll get you sorted out.

(Pat)>> The Pro LS build continues with a set of Comp Evolution hydraulic roller lifters. These have an internal serviceable hydraulic cartridge for increased stability under load. The trays are torqued in place to 106-pound inches. A Cometic m-l-s head gasket with a 4.060 bore and a 27 thousandths compressed thickness gives us a measured compression ratio of 11.13 to 1. They are sealing up these Trick Flow Gen-X 255 LS-3 cylinder heads. The ARP head bolts are torqued in three stages to a final value of 90-pound feet. The eight millimeter bolts are torqued to 25 pound feet.

(Frankie)>> The Trick Flow 7-700 long pushrods are treated with extreme pressure lube and slid into place. This Trick Flow rocker stand is included and is specific to the Gen-X 255 cylinder head. The ARP rocker studs receive sealer because they thread into the intake sports. The Summit Racing rocker arms come with upgraded trunnions for more travel and durability. They're installed in the firing order of the engine and torqued to 25-pound feet. A healthy coating of Comp Cams' valvetrain assembly spray comes next, followed by a set of polished Summit Racing valve covers. So we have our stock valley cover plate laid in place here, and if you've noticed we've actually plugged the rear cam sensor hole. We're gonna be converting this engine to a front cam sensor. So we're just plugging this hole with an ICT billet cam sensor plug from Summit Racing Equipment, and the reason we're doing that is because it actually won't clear this cover for the valley cover that came with the SpeedMaster ITB kit. And this not only looks good and is polished to cover up the stock cover, but also it will run the throttle linkage for our ITB setup. So it not only matches the polished look of the engine but serves a purpose. [ Music ] To connect the steam ports of the engine we'll use this Trick Flow kit, which uses full a-n fittings. [ Music ] The party piece of this powerplant is the SpeedMaster electronic stack injection system. It's designed for LS-3 style heads, and it will perform as good as it looks. [ Music ]

(Pat)>> Fancy! Up next, our LS gets a fantastic front drive and an easy standalone e-f-i system.

(Frankie)>> Since we pulled our six liter out of the junkyard there's really no telling how old the sensors that came with it are, and that means we're not gonna take a chance on those. We're gonna be replacing them with ones from Duralast, and we chose the Duralast brand because they have a commitment to making high quality sensors for vehicles. They do that by going in and actually making changes to the sensor to make sure that they can fix o-e problems, and then they extensively test them to make sure those problems are fixed for good, and they do that by testing them in the same stress environments that you would see in a vehicle. High vibration, extreme heat, and extreme cold. The three things that kill sensors most commonly, and they do that to make sure that they're going to survive under the hood of your car. Speaking of vehicles they offer a ton of different sensors for a bunch of different applications. So they have over 750 different electronic part types, and over 100,000 part numbers. So the chances are they have the sensor or part that you're looking for. Now for our engine we're gonna be using Duralast crank and cam sensors, but Duralast also offers a gold line, and that is what we're gonna be using for our coolant temp sensor. The great thing about the gold line is it comes with that same high quality sensor but it also comes with a pigtail with the correct connector and a splice kit. So if that connector is damaged, broken, or burnt in the vehicle you don't have to hunt one down and try and re-pin it. You simply splice a new connector onto it. This is gonna be perfect for our engine because now we have some high quality sensors for our high performance bullet. Now is a great time to install these sensors while they're easy to get to on the engine stand.

(Pat)>> We'll dyno this engine with a full accessory drive that we got from Summit Racing, and the heart of it is this ATI harmonic damper. It's a Billet Specialties kit that includes this Edelbrock cartridge style water pump and fully polished bracketry. In fact almost everything is fully polished, which makes this front drive perfect for our engine. [ Music ] With this thing looking like a dime it's ready for dyno time.

(Frankie)>> Because our stack injection is electronic fuel injected we're going to need an aftermarket standalone e-c-u to run the engine. So we're gonna be using this FiTech Ultimate LS Kit. This comes with everything you need to swap an LS into a vehicle. It comes with a complete main harness that's fully terminated and labeled. So it's really easy to install, an oxygen to go into the exhaust so we can monitor the a-f-rs, a three bar map sensor for forced induction applications, and a precise and easy to follow instruction manual. So it just makes it really simple to get this kit installed on your engine. It comes with a handheld controller that you can do all of the setup and tuning with. If you're not that familiar with e-f-i that's awesome, makes it really easy. We're gonna be complimenting this kit with a set of their 55 pound an hour injectors, which is enough fuel for about 700 horsepower and a set of their Smart Coils, which look awesome and have great spark energy. So we'll get all this installed in our engine and we'll be one step closer to starting it.

(Pat)>> The FiTech coils bolt on using an LS-3 design, which matches our valve covers. These polished fuel rails came with the SpeedMaster ITB setup. All it takes is a few simple connections and our FiTech system is installed. To light the air/fuel mixture coming into the cylinder we contacted our friends at E-3 and picked up a set of their DiamondFire performance spark plug wires and a set of spark plugs. The spark plug wires are made right here in the USA out of premium components. They exceed OEM specifications, have a three part core, and a three part insulation that makes them extra heavy duty and very low resistance, and less resistance means more energy to the spark plugs. Speaking of spark plugs, we picked up a set of their diamond fire spark plugs as well. DiamondFire technology has been out a long time and it is a proven performer, and it was easy for us to find the heat range that we needed for our application. So if you have something that takes a spark plug chances are E-3 has a part number for you. So from their wires, to their plugs, to anything else go check out E-3.

(Frankie)>> Up next, we see what our polished power plant produces in the dyno cell.

(Pat)>> It is finally time for some dynoing, and this is our favorite time. It was very easy to get our 410 lit. The FiTech was very intuitive with the handheld. Just a few parameters and it fired right up. The first thing we're gonna do is make a keep its guts pull. It's more like a make sure everything is okay pull, but I like to say keep its guts because that's what we're trying to do. It's gonna tell us a few things. Make sure our air/fuel ratio is right, make sure our timing is close, and make sure our pulley setup is all tracking true. So everything looks good. I think it's ready, light it!

(Frankie)>> I like how it looks awesome but it also sounds awesome, runs great. We're gonna see what this thing can do here in a second. So we're gonna go 2,500 to 5,500 at 600 r-p-m per second just to make sure everything's good, and it should be okay.

(Pat)>> With the ITB, I haven't done one quite like this one. Very easy to set up. Everything was relatively simple. I love dynoing with a full accessory system.

(Frankie)>> It's like a true number. We could dyno it with an electric water pump but this gives us an actual number. This thing is ready to go in the car. So this is what it'll make when it gets in the car. Yeah, that stack injection looks awesome. I've never done an e-f-i one. This is all pretty new, but so far it's very smooth, runs great. So let's see what it does.

(Pat)>> Go easy on her! No hiccups. [ engine revving ]

(Frankie)>> That's smooth!

(Pat)>> Look at that right there.

(Frankie)>> So 518 for torque and 538 for power. We're stopping at 5,500. So that power's still trending up. Oil pressure is going up, 70 p-s-i at the top of the pull. So that looks great. Air/fuels look good side to side, and they're holding pretty steady all the way through. I feel good about that. You want to make a real pull?

(Pat)>> Let's do a real pull. Normally I like something like this at 3,000. With how far the cam is advanced on this one 6,500 for the top end.

(Frankie)>> That's what I was thinking cause this thing's not gonna turn a bunch of r-p-m cause it's a street engine. So we jacked the cam pretty far forward, keep the power at a manageable low r-p-m range. So 3,000 to 6,500 at 300 per second. Loads right in! [ engine revving ]

(Pat)>> That's decent right there.

(Frankie)>> 572.1 right at 6,400. Right there under that.

(Pat)>> 520 for torque.

(Frankie)>> That's a nice torque curve too. Over 450-pound feet everywhere on the graph.

(Pat)>> 520 at 5,100.

(Frankie)>> That's a great street engine curve right there.

(Pat)>> No weird holes in it or anything like that.

(Frankie)>> That's really solid, and we're pretty safe on the tune-up still. Do you want to make some adjustments and see if we can tweak a little more?

(Pat)>> Why stop there if we have a dyno. Let's make a couple of fuzzes on it and see what we can get.

(Frankie)>> Over the course of several dyno runs we used FiTech's self learning unit to make precise changes to the engine so it runs at peak performance. And our final tune-up now is 28 degrees of timing at a target air/fuel ratio of 12.8 to 1. That's what we decided where to stop where this engine kinda peaked over, and there's no point in pushing it any harder.

(Pat)>> This isn't a race engine, it's a street rod engine that looks kinda racy and runs racy.

(Frankie)>> Looks good, makes good power. Let's see what we can squeeze out of this thing here. [ engine revving ]

(Frankie)>> Oh baby! [ engine revving ]

(Pat)>> That's pretty mean right there. 590 horse, 523-pound feet.

(Frankie)>> That is a hydraulic roller street engine with a relatively small hydraulic roller. That's pretty good power. Nice, smooth, no dips, nothing weird in it.

(Pat)>> 230s at 50, hydraulic roller. Form always follows function. So we love everything looking good but this one was a little bit to a different level because of all the shiny polishing stuff.

(Frankie)>> And it looks cool with the FiTech coils. You can see them flashing the whole time. That's just an added bonus.

(Pat)>> Hat's off to FiTech. Everything went smooth.

(Frankie)>> I cannot wait to see this in something.

(Pat)>> This is gonna look good in the engine bay of something.

(Frankie)>> Good job!

(Pat)>> For more information about this build or any of our other cool builds please check out Powernation.
Show Full Transcript