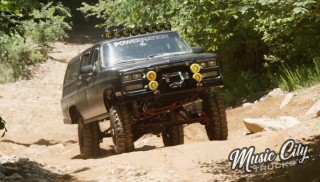
More Unbreakable Suburban Episodes

Music City Trucks Featured Projects

Music City Trucks Builds

Parts Used In This Episode

Summit Racing
Flowmaster U-Fit Dual Pipe Kits
Summit Racing
Summit Racing Steering Column
Summit Racing
Summit Racing Water Pump
Summit Racing
VIAIR Dual Performance Air Systems
Summit Racing
Wildwood Disc Brakes
Covercraft
Marathon Seat Covers
Gearstar Performance Transmissions
4L80E Transmission
Holley
Anvil Line: Snatch Straps, D-Links, Weight Damper
Holley
Anvil Winch
Holley
Frostbite Radiator
Matco Tools
MATCO Tools are the Official Tool Supplier to Music City Trucks
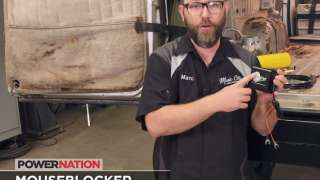
The Industrial Depot
Tools, Hardware, Shop Supplies

Episode Transcript

(Marc)>> You're watching Powernation.

(Marc)>> Today on Music City Trucks. (Brandon) >> We're getting Unbreakable ready for the mountain, with some interior work, new steering, some unique shifters. Plus a new exhaust and recovery gear.

(Marc)>> And then We're ready for one big payoff. ♪ ♪ [engine revving] ♪ ♪

(Marc)>> And so like the pavilions just overlook the water. It's really a nice campground.

(Brandon)>> Super family friendly?

(Marc)>> Yeah! Welcome to Music City Trucks. I'm Marc Christ.

(Brandon)>> And I'm Brandon Burke. And this time we're back on project Unbreakable.

(Marc)>>Now this '91 Suburban has come a long way from where it started and although it looks like a complete truck, it's not running and it's not driving and those are the things that We're going to tackle today.

(Brandon)>> We're going to take the grill and hood back off the truck to make it a little easier to work on. [drill humming] ♪ ♪

(Marc)>> Hand this to you under here. Now We're going to be working on the front accessories starting with the water pump. If you hold it, I'll get up and start it. There you go, maybe you should be able to get it from there.

(Marc)>> We got this kit from Summit Racing.

(Marc)>> It's a nice simple, serpentine setup. ♪ ♪

(Brandon)>> You've got another bracket?

(Marc)>> Yep!

(Brandon)>> Which one? Most outer? OK right here.

(Brandon)>> This is the outer bracket for the alternator.

(Brandon)>> Next the water pump pulley. ♪ ♪

(Brandon)>> Followed by the crank pulley.

(Marc)>> I've got to go get that power steering pump ready.

(Brandon)>> Alright! Could use power tools but feel more connected to the truck this way.

(Marc)>> This is your bolt for the adjustor, which goes in that hole right there. ♪ ♪ Leave it close to tight. Oh this is the pulley for the power steering pump. The last piece.

(Brandon)>> Get the keyway, or the woodruff key. ♪ ♪ [ drill humming ]

(Brandon)>> With our belts on order we're moving on.

(Marc)>> One of the things on this build we haven't really addressed is the brakes. Now we did upgrade to one ton axles, and we converted the rear to disc brakes. So we were already gonna have to upgrade our braking system. The master cylinder that was on this truck originally was an inch and a half in diameter. So we switched to this Wilwood system that's an inch and an eighth diameter piston. That's actually gonna give you more braking power with less effort. We got this from Summit Racing. This kit's cool! It comes with the proportioning valve, which is adjustable for the rear. Normally this mounts on the other side and the ports point down, but because of our clearance issues here with our coil overs I had to flip it around. That way the ports point up. That might be a little difficult when it comes time to bleed the brakes. Might get a little air trapped up in here, but it's worth the hassle just to have a nice master like this with plenty of braking power. [ ratchet clicking ]

(Marc)>> Here you go! Bigger radiator, electric fan.

(Brandon)>> That's a nice looking radiator too.

(Marc)>> Where do you want? ♪ ♪

(Brandon)>> You've got to give me props for my brackets.

(Marc)>> I was just about to say. You didn't even give me a chance, nice! [ drill humming ]

(Marc)>> Can I leave this with you?

(Brandon)>> I've got the rest of it. We got this Frostbite radiator from Holley. Hand tools are always so much more fun. And the hoses are o-e-m replacement. The cooling system's pretty much wrapped up besides this bottom radiator hose. So all that's really left is a little bit of electrical, power steering lines, and bleeding the brakes. So I'm calling all the under hood stuff done. Up next, bye bye interior!

(Brandon)>> Now it's time to tackle one of the most disgusting interiors in the world. Not only does it smell gross, there's a bunch of stuff broken on it like this old steering column and radio, this seat with a little bit too much lumbar adjustment, and everything overall is just disgusting. So let's rip all this stuff out and give it a new look. Oh, cricket! Oh no! ♪ ♪ There we go! Call that the country lean dude. Just chillin! ♪ ♪ Carpet and trim is cool and all but a bare floor is gonna serve our purpose much better in this rig. ♪ ♪ Let's see what stories this truck's got. [ drill humming ]

(Brandon)>> This one makes a clunk, clunk! ♪ ♪ Since this carpet is 50 shades of trash we're gonna do the interior upgrade of deleting it. ♪ ♪

(Marc)>> Well I'm gonna start working on the onboard air. We got this kit right here from Summit Racing. It's got two compressors and a two gallon tank. That's gonna be plenty for what we need on this rig. The main thing we need this for is gonna be for our air locker in our rear, but then we also want to have onboard air to air up our tires after we aired them down for our off roading excursions. Now we're gonna accomplish that with this plate right here. Check it out! You'll probably remember this big hole where we cut the spare tire well out when we installed our rear bumper extensions. [ drill humming ]

(Marc)>> This plate we're installing using the factory bolt holes in the floor is gonna serve two purposes. It's a block off plate for that hole we cut and it's a mounting plate for all that onboard air equipment. ♪ ♪ With the panel fit and painted we can bolt it back in. Alright well that's pretty much it for our onboard air. We do need to wire up the pumps and the gauge, and install some fittings and do the plumbing. Other than that this is ready to go.

(Brandon)>> Well our front seats are obviously trash. So I went on the internet and found this bench seat for no particular reason besides me and Marc thought it was cool. So I figure throw it in the truck, put some Covercraft seat covers on it.

(Marc)>> The only problem is you're sitting in my seat.

(Brandon)>> You've gotta wrestle me for it.

(Marc)>> We're using Marathon seat covers by Covercraft. These just slip on over our existing upholstery. They're made of 100 percent cordura nylon. They're completely waterproof, durable, and made for high traffic environments like our interior. Oh yeah! We should probably put the front bolts in too. Now our Suburban was, let's just say neglected when we got it. There's a lot of things that get neglected on 30 year old vehicles, even ones that are well kept. One of those in particular is the rubber. So we went to Steele Rubber for a bunch of new stuff. They specialize in this. This is what they do. So their quality is really high. The fitment is good, longevity, all the things you want and you can just make one stop with them. They've got a bunch of other stuff on our rig that we didn't get but what we chose were some run channels. We got new window felts. We got a new windshield seal in case we decide to put new glass in ours, and then of course all the door seals. These probably get abused the most just from getting in and out of the rig. Here you go bud!

(Brandon)>> Almost ready.

This is exactly what Marc was talking about. Look how smashed and rotten this seal is. This one's gonna be around for a long time.

(Marc)>> Well we're working on wrapping up the onboard air system with this nylon hose and the wiring, and the problem with those two things is rodents like to chew on them, specially mice, and with a rig like this you're not gonna be able to park it in a regular garage. So it'll end up in the barn or out under a lean to. So you need something like this. This is the Mouse Blocker Pro. This is what we're using. It wires right into the vehicle's 12 volt system. Just anywhere you see battery voltage, and it recognizes the battery voltage. So you don't have to worry about it running the battery down. If it sees below 11 volts it's just gonna automatically shut off. If it sees above 13 volts it'll automatically shut off as well because it knows that you fired up the vehicle. So there's really no maintenance when it comes to this. It's got three different settings. The highest one is 105 decibels of super sonic sound that comes out of here, and then it's got some flashing l-e-d's too to help deter those mice. Just need to get this thing wired in and get it setup.

(Brandon)>> Last thing we're gonna do to this interior is get this old broken steering column. You can tell it's kinda worn out. I got everything else disconnected beside this last nut. So all I've got to do is disconnect that and pull this thing out. ♪ ♪ Our steering column is junk but the one we got from Summit Racing is universal and fits our truck with a couple of brackets. ♪ ♪ There we go! ♪ ♪ Since the hub's already installed we went ahead and got a new steering wheel too. ♪ ♪ Coming up, we shift into high and low gear.

(Brandon)>> Now we're back underneath the truck finishing up the drivetrain. We've already talked about our 383 stroker. So I'm not gonna go into anymore detail on that, but what we haven't talked about is our transmission and transfer case setup. We were gonna run the 700-R-4 but our buddies down at Gearstar said you've gotta run our 4-L-80-E with a stage four kit. Now they actually custom built this. It's a two wheel drive case with a four wheel drive adapter on the back, which means we keep our speed sensor in the transmission since we got rid of ours on the transfer case. Now it being a stage four it's gonna handle all the heat we're gonna put into this thing off road, and with the overdrive it's gonna handle great on the highway. Moving on from there we're gonna talk about our transfer case. This is actually a 203 with an off road design adapter plate. This is actually a range box. What a range box is a high neutral low with no two outputs for the front or rear. It's just got one output on the back. Now after our adapter is our NP-205. This is our actual transfer case. So it has a rear and a front output for our driveshafts. Now this one also has a high neutral low, and with both of these setup you essentially double your gear reduction, and one question you might be asking is why would we need that? Well here's why. For low range, trans in first it has a 2.48 to one ratio. The NP-203 range box has a two to one ratio. The NP-205 has a similar ratio at 1.96 to one, and our axle ratio is 4.56 to one, which gives us a final drive of 44.33 to one. What does that mean? It means for every 44.33 turns of the engine the tire will make one revolution. Now for high range. Overdrive is .75 to one with both the range box and the T-case being a one to one. Our axle ratio stays the same at 4.56 giving us a final drive of 3.42 to one. That's 3.42 turns of the engine to every one tire rotation. With those two numbers and our tire size of 38.5 inches that means in low, low, low at five miles an hour we're running 1,934 r-p-m, and in high at 70 miles an hour it's 2,089 r-p-m.

(Marc)>> So what that's gonna allow us to do is cruise this thing down the interstate comfortably and then we get to the off road park shift everything into low and then crawl over pretty much whatever we want, within reason of course. The next thing we need to do to start getting this stuff buttoned up is gonna be our shifters.

(Brandon)>> Three of them. This is putting on the first bracket for the triple stick, and we've got to take these bolts out of the front output to get the bracket on. ♪ ♪ This is the bracket that crosses over for the rear engagement of high, neutral, low. ♪ ♪ Now you might be wondering what a triple stick setup is. To start off it has three shifters, which will allow us to have more control over our four wheel drive. ♪ ♪ One shifter controls the front output, high, neutral, low. One shifter controls the rear output, high, neutral, low, and a third controls the range box output, high, neutral, low. The advantage of this setup is that you can control your front and rear outputs independently, meaning you can have rear wheel drive, four wheel drive, or front wheel drive, high or low depending on your scenario. The only trick is to get all these links to work together without binding. Well alright this is where the shifter's gonna lay. So let's drop the truck and cut the floor out. [ drill humming ]

(Brandon)>> No turning back now. We're about to air saw this floor! [ saw buzzing ]

(Brandon)>> Now Marc can hand me the shifter and we can test fit these linkages. ♪ ♪

(Marc)>> Anything to help a brother out. This middle one is lined up almost perfectly.

(Brandon)>> So we've just got to shorten the outer ones?

(Marc)>> Yeah!

(Brandon)>> Alright because I got T-rex arms we put the shifters pretty far back on the floorboard and they actually hit the bench seat. So all we've got to do is bend the shifters a little bit forward, put a little "S" in them, and it should work pretty good. [ torch hissing ]

(Brandon)>> Oh that's hot right there. [ torch hissing ]

(Brandon)>> Oh man, that's a good feeling. Man I'm good! That's awesome! Well with the transfer case setup complete and the shifters installed they actually work really nice. Drivetrain's done. All we've got to do is the driveshaft so next step is to get this project buttoned up.

(Marc)>> Next we finish the exhaust and get ready for the mountain.

(Marc)>> Let's see what we got.

(Brandon)>> As far as the test fit.

(Marc)>> Oh that's close!

(Brandon)>> Put like a 15 degree cut in it.

(Marc)>> We're jumping on our exhaust system on our Suburban. Just like that.

(Brandon)>> Perfection!

(Marc)>> We're gonna use a Flowmaster three inch universal kit. We decided to run it as a true dual setup to keep nice and simple.

(Brandon)>> We decided to cross the passenger side over to the drivers side to avoid the transfer case and front driveshaft.

(Marc)>> If you cut the other side to that length.

(Brandon)>> That's money! We want to tuck it up as high as possible so its not the first point of contact with any obstacle.

(Marc)>> This is a little chaotic because we're using a universal kit and just figuring it out as we go. We might need to put some heat shield on some of this. But what really matters is the end result.

(Brandon)>> Speaking of end results Marc wanted tailpipes, but while he's welding hangers I'm putting together an idea of my own.

(Marc)>> I got the front hanger all in there.

(Brandon)>> You mean the only hanger! I got all of the exhaust figured out.

(Marc)>> Alright.

(Brandon)>> These bad boys right here.

(Marc)>> I like it believe it or not. It actually looks really cool but you know it's gonna be loud right?

(Brandon)>> Hey we're here to party.

(Marc)>> If you really wanted to party you'd point them at each other or up. I like it, let's do it. And just like that our exhaust is all tacked in. Well we're gonna switch gears again and start working on our recovery gear. You may remember our spare tire carrier here. We made it a while back. It's only tacked together for now because we knew were gonna be coming back here and adding some stuff to it. That's why we left it long. We got a bunch of stuff from Holley from their Anvil line. One of the things is this five gallon jerry can here. We're actually gonna mount this right here. I made this bracket out of 11 gauge. I'm just gonna weld it to the spare tire carrier. Right there, that'll be plenty strong enough, and then we still haven't made a latch for our spare tire carrier there but we've got this one right here. Just need to get that installed and then we'll move on to the rest. I made this mounting plate from 11 gauge steel, and now we can move on to our latch. Since our bumper and carrier are made of .120 wall they're thick enough to drill and tap for some fine thread bolts. ♪ ♪ That's nice!

Well I mentioned recovery gear a little while ago from Anvil and this is the stuff I was talking about. Just the basics to get you going. A couple of blocks, a couple of snatch straps, some clevices or D-links, and a weighted damper for our winch cable. Now we scrounged up this weatherproof box here that was laying around the shop. We can put all that stuff in there along with some other things we might need like some hand tools and things like that, and then we're just gonna strap this thing in back here where the third row seat could have gone. We'll be done back here.

(Brandon)>> Now all that gear that Marc just mentioned is pretty cool but here's the icing on the cake, the winch. This is a 17,000 pound Anvil winch that we used to build the bumper, but I just went back on their website and they came out with a synthetic version. This thing is lighter, stronger, and safer. So of course we're gonna use this one.

(Marc)>> That was a nice winch-ro you did there.

(Brandon)>> After installing the aluminum fairlead we'll pull that synthetic rope through and attach our hook. Now time for the control box. ♪ ♪ We just need to run some wires and this winch is ready for wheeling.

(Marc)>> Dude I love how this thing turned out with the lights, and the winch, and the bumper all painted up. It just completes the look.

(Brandon)>> Yeah it's got that ultimate park ranger rescue truck vibe.

(Marc)>> Yeah it's like Walker Texas Ranger's daddy. We wanted to fire this thing up for you guys today and unfortunately we ran out of time with all the wiring but we did get a lot done. I mean it was a huge show.

(Brandon)>> We got the triple stick shifter installed, and probably my favorite is the doubler underneath this truck.

(Marc)>> And that allowed us to get our driveshafts on order. So those are coming and we got a lot of other stuff done like all the recovery gear in the back, our onboard air. We spruced up the interior and tackled a bunch of stuff under the hood. Cooling, belt drive, brakes, steering, even the exhaust.

(Brandon)>> So the next time you see this you're not only gonna hear it run but we're taking back to AOP to show you guys what this monster can really do.

(Marc)>> Unbreakable's hitting the mountain!

(Brandon)>> If you can't get enough of our Suburban go to Powernation TV dot com and check Unbreakable's project page.

(Marc)>> We have current build status, before and after pics, links to parts used, and all the episodes are right there on one page.
Show Full Transcript