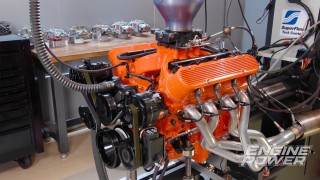
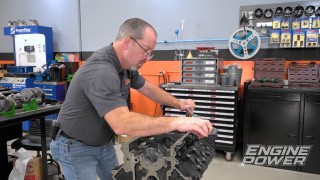
Engine Power Featured Projects

Engine Power Builds

Parts Used In This Episode

Summit Racing
COMP Cams Camshaft
Summit Racing
Total Seal Assembly Lube
ARP
Bolts & Fasteners
ARP
Digital Rod Bolt Stretch Gauge
ARP
Ultra Torque Fastener Lubricant
Goodson Shop Supplies
Goodson Ring Filer
Shacklett Automotive Machine
Sunnen Products Company
Sunnen SV-15 Honing Machine
The Industrial Depot
Tools, Hardware, Shop Supplies

Episode Transcript

(Pat)>> You're watching Powernation!

(Frankie)>> The 4.3-liter V-6 Chevy shares a lot of its design with its big brother, the 350 small block V-8.

(Pat)>> Today on Engine Power we build our V-6 showing you in depth information along the way. [ MUSIC ]

(Pat)>> Hey everyone, welcome to Engine Power. A while back we showed you some tips and tricks that you could do yourself at home to not only make your engine go together easier but run a little spicier, and the engine that we used was something we had in stock, a Chevrolet 4.3 liter V-6. Now that engine has some commonality with its V-8 counterpart, and if you have not see what we have done to it so far check this out. We measured the deck clearance at t-d-c, which was 39.5 thousandths in the hole. Not great for building compression.

(Frankie)>> With the engine down to a bare block we chased all the threads to remove any debris. We re-installed the main caps, torqued them to spec, and checked the main housing bore size. Ours were well within spec, so we moved on to the cylinder bores, which came in 20 thousandths over. We deburred the engine to remove sharp edges and chamfered the bolt holes to protect the top of the threads.

(Pat)>> Next, we tapped the front oil galleries to accept a threaded plug. This is more secure than a press fit one. We took some material off the rear main cap and the block to remove any sharp edges that could produce turbulence and decrease oil flow. Using a light touch and going slow is crucial. You do not want to remove excess material.

(Frankie)>> The more air the cylinder heads flow the more power we can make. We tested our stock Chevy heads on the flow bench and got to work. We cleaned up the ports, smoothing out any sharp transitions and rough spots. We used a cartridge roll for final finishing. Then it was back to the flow bench. On both the intake and exhaust we got an average gain of 13.3 c-f-m. Finally, we used the Sunnen SV-15 to hone the cylinders to a precisely straight and round 4.030 bore. Now when we chose this engine it was simply to show some universal tech that can be applied to any internal combustion engine, but because we got so much great feedback we're gonna go ahead and build it just for fun. Now there's no project attached to this. So we're just gonna do a mild build. Something that you guys could replicate at home. Now there's not a lot of parts available per se but there's some great off the shelf items that we can still use like cam shafts, timing components, valve springs, a full line of ARP products, induction, and ignition systems. For the slightly harder to find parts we'll turn to ones that are compatible from its big V-8 brother, the 350. Things like a harmonic balancer, a forged piston, and some nice roller rockers. Just because the assembly process is gonna start though doesn't mean the tech is gonna stop. Along the way we're gonna show you all the important steps that go into building an engine.

(Pat)>> We'll start by measuring main bearing vertical oil clearance. After thoroughly cleaning the block, we slip the bearings into place. [ MUSIC ] We'll prep the ARP main bolt kit just like we would during final assembly. Ultra Torque assembly lube goes under the bolt head and onto the threads. [ MUSIC ] [ hammer tapping ]

(Frankie)>> Just as important as having the back of the bearings and the saddles clean is the mating surfaces on the cap and the block. We want to make sure that there's no oil or debris, especially here in the corner. That's a place that gets missed a lot and anything left over can separate the cap from the block, basically giving you an inaccurate oil clearance. Let's just make sure that everything is clean and dry, and then when you bolt your caps on you'll get an accurate measurement. We're gonna go ahead and torque our main cap fasteners down in three equal steps following ARP's instructions. It's important to do this to make sure that the cap and the fasteners are loaded evenly. You don't want it cocked to one side or the other. So, we'll torque our bolts in equal increments starting with 30, 50, and then finishing with 70 pound feet. After setting the micrometer to the main journal size we'll use it to zero out our dial bore gauge. This ensures you get the actual clearance measurement on each journal. [ MUSIC ]

(Pat)>> Now that Frankie has all of the main bearing clearances checked and set it's time to put in a set of cam bearings. Now the first question you might have is why aren't cam bearings already in it? This is a finished block that was ready to go together. Well, there's a couple of different reasons. One, we took the cam bearings out because when we were grinding on the block and doing our oiling mods we didn't want any material to get behind a cam bearing that was installed. Two, if anything has to be adjusted on the main bores, and that can happen sometimes when your clearances don't work out right on setting your main bearing clearance. So, if that has to be adjusted that means the caps have to be cut and the block has to be align honed, and that again will put material down the oil hole and behind the cam bearing. So, we just removed them, did all of our stuff, and now that we know everything is correct it's time to put in a new set of bearings. The bearings themselves have the same i-d but a different o-d by the way the block is machined. So, on the box there's a little road map that tells what position the bearing goes on. On the bearing itself there is a number stamped in it, and that corresponds with the number on the box. So, we always know where the bearing goes.

(Pat)>> Coming up, the 4.3 gets lightweight forged pistons and weight balanced rods.

(Frankie)>> Plus NHRA top fuel world champion Antron Brown tells us what it's like to race over 10,000 horsepower down the strip.

(Pat)>> With our engine block all prepped and ready to go it's time to talk about the rest of the components we will be using. Now like I said before, this is not an over-the-top build. This is gonna make nice power with off the shelf parts, and we will be reusing some parts as well, namely the rods and crank shaft. We could get custom componentry for this, but it would add to the cost and time of the build, and for our power level it is not necessary. The stock stuff will work just fine, and that starts with a connecting rod. This rod looks familiar because it looks just like its V-8 counterpart. It has the same center to center length at 5.700. Where it does differ, where we couldn't use a stock 350 V-8 rod, is the dimensions of the rod itself on the width and its housing bore. The crankshaft has a larger journal diameter. So that takes a special bore size on the connecting rod, and that's okay because we went ahead and resized our stock connecting rods and added ARP rod bolts for extra insurance.

(Frankie)>> Even though we're gonna be using the stock connecting rod we're still gonna be able to upgrade the piston because it's one of the components that are interchangeable from a 350. These are Wiseco forged pistons that we got from Summit Racing Equipment. Now besides being forged, which means they're gonna take a good amount of abuse, there's also several other benefits to them. Namely they are almost 100 grams lighter than the stock piston. That's gonna lower our reciprocating weight, which is always good. The rings are one sixteenth, one sixteenth, three-sixteenths, which are an upgrade over the five-sixty-fourths that are on the stock pistons. Most importantly though the piston has a flat top design with 7cc valve reliefs. This is gonna up our compression ratio but also keep it manageable in case we decide to put a power adder on it later on.

(Pat)>> What was that?

(Frankie)>> Nothing! Now this is all able to work because our compression height is the same at 1.560 and the pin diameter is the same at 927. These benefits are great, but it does add a little bit of work.

(Pat)>> Which means we had to get the crankshaft rebalanced, and for high precision work like that there is only one place we will take our stuff, and that is Shacklett Automotive Machine here in Nashville. We took and made a bob weight card weighing all of our components, and took the entire assembly up, and John spun it up on his new Fentec balancer. The crankshaft required a bunch of weight taken out of the counterweights because of how light the new piston was. So, they took over 80 grams out of the front and back of the crankshaft. This particular crank is internally balanced on the front, meaning nothing that attaches to it on the front side affects its total balance, but the back is externally balanced, meaning whatever is attached to it, whether it be a flywheel or a flex plate, need to be on for it to be balanced correctly. Now that the crankshaft is done, we will actually weight match our rods. When we made the bob weight card we weighed the small and big end of the rod, found the lightest one, and then made the bob weight card. Now that that is done, we have to weight match the rest of the rods to that light one. To remove weight from both the big and small ends of the rods we'll use our belt grinder, taking material off slowly and reweighing constantly as we go. Remember it's easy to take material off but much harder to add it back.

(Frankie)>> The dial bore gauge is once again zeroed out to each journal size, and the rods are thoroughly cleaned. The rod bolts are torqued and checked for stretch with the ARP digital rod bolt stretch gauge. We check every bolt and write down the torque and stretch values on each of them. Then we'll check the oil clearance. [ MUSIC ]

(Pat)>> With a Goodson ring filer we'll get the Wiseco rings to 24 thousandths on the top and 26 thousandths for the second ring according to Wiseco's specifications for our application. [ MUSIC ] Hanging the pistons on our press fit rods takes specialty equipment, such as our Goodson propane rod heater. This can be done by most engine shops for a small fee. Great success!

(Frankie)>> The main bearings get another cleaning and are coated in assembly lube. [ MUSIC ] Using ARP main bolts the caps are snugged down in preparation for torquing. An important step to installing a crankshaft is setting the thrust bearings. Now when the thrust bearing is integral to one of the main bearings you have to put it into alignment. So the way we'll do that is actually tap the crank backwards and then tap it forwards, and then we'll pre-load the crankshaft in the forward direction to align the rear thrust bearings. Now we go forwards because in a car a torque converter or a clutch setup is going to pre-load the crank forward. So those are the most important to have flat and in alignment. The main bolts are torqued to spec in three stages to a final value of 70-pound feet. [ torque wrench clicking ]

(Pat)>> Very nice! Up next, Antron Brown gives us the inside scoop on his Top Fuel dragster and shares his wisdom with the next generation of automotive technicians.

(Antron)>> Around the people and the things that I truly want to do.

[ MUSIC ]

(Pat)>> Three-time NHRA Top Fuel world champion Antron Brown is a busy man. In addition to powering his more than 10,000 horsepower dragster down the strip he serves as an inspiration to anyone who loves drag racing, high performance vehicles, and simply working on their projects at home. Antron visited Nashville to speak with the students at Lincoln Tech about their opportunities in the motorsports field. While he was in town he stopped by our shop and gave us a behind the scenes look at his Top Fuel dragster.

(Antron)>> I always like to show this part of it right here, especially what people never get to see. If I open these butterflies up this much like that, that's the burnout.

(Pat)>> That's unbelievable!

(Antron)>> It opens up three-sixteenths of an inch, does a burnout. All these bays that you see here, they're all evenly distributed, and what people never realize is that we have crossmembers in the middle of them that actually stop the car from snaking like this cause back when I first started racing they used to have a diagonal that went, chute, chute, chute like that in the chassis. Well, the cars, when you hit bumps, they used to snake like this, the front end did. Then some people didn't have them in at all and said they wanted looser so they could have more traction, so they'd think the car was flexing. Well it never let the car flex more, it just made the car do this more, and we found out that that was bad, and the over the years our team's one of the first ones to ever have it that we actually put an X-member in each bay and it actually made the car stay stabilized where it's more straight, and I say it gave you that nice, stiff sports car ride.

(Pat)>> It's more steerable!

(Antron)>> Exactly, not the loose floaty ride.

(Pat)>> I don't imagine what that would feel like at over 300 miles an hour. It's probably frightening.

(Antron)>> It's not a ride you want to do. Trust me, you get past half track and you get those transitions from the concrete to asphalt on the tracks. You used to go like this, and the car would do this the whole way. And let me tell you something, you're like this. What should I do now? I'm like, just hold on, this is the way it's supposed to be. You just snake it along, and now it's more like straight and rigid up, tracking straight and right.

(Pat)>> You've been associated with Matco since 2008, and probably three or four years before that with the bikes. Tell me the importance of Matco as a partner to you.

(Antron)>> When you get part of a company that makes you feel at home and you're a family, and the thing about it is you're not selling a gimmick product. You get what I mean? You're out there making people's lives better by giving them right tools for the right job, and we all know in the mechanic world cause we work on this race car, we tear these engines down and put them back together and have this car ready to run in 25 minutes. A complete engine overhaul, and when we can show the mechanic at home that we can do that they're like, we want those tools for the job.

(Pat)>> You are very proactive on working with people, and like riding on their trucks, and who wouldn't want to have Antron Brown? I want AB on my truck if I'm driving around.

(Frankie)>> If I had a truck yeah, you can come all week.

(Pat)>> Here's my buddy Antron. The involvement with that on that level that's really neat because that shows your commitment, and you believe it because you actually have these tools at home too. So what's your favorite thing to do at home? What's your favorite tools to use at the house?

(Antron)>> You know, my favorite tools, I have fallen in love. I used to be an air guy, air impact gun guy, air ratchet guy, but I have fell in love with the electric infinium line. Those guns are amazing! I mean amazing like my favorite one I use; I use a small one. I use a little quarter inch impact because you've got to remember I work on my kid's junior draggers all the time. People will be like, AB you got a chuck slave? Man, we've got five minutes to you lane! It ain't no problem, buzzing, bo-boom, take the clutch off, make a change, put it back on, and they're just so successful and those little guns got so much power, even all the way up to the big impact. I changed my trailer tires when I had a flat on my trailer. I took out my big 20-volt impact gun. Brup, brup, brup, knocked it right off and put it back on. I went and got my torque wrench and only had to do a quarter turn of the torque wrench to torque it back complete. So that tells you how powerful the electric tools are. Trust me, I use them all and you can see the wear and tear on them, and they haven't failed yet, and the coolest part is the batteries charge up so quick and efficiently.

(Frankie)>> Matco also has another side where they back up their distributors, and I think you have seen that firsthand as you have a lot of good relationships with them, and you get to travel with them a lot.

(Antron)>> Well for sure. Well one thing about it is that Matco always backs them up by having what they need. You get what that means? People don't realize it's not just the distributor showing up at the shop. That distributor has a district sales manager or a regional sales manager, but besides that he has other families of Matco distributors that's around the area but they're not in competition with each other, but they lean on one another. It sets everybody else up so they can lean on one another so they can be the best they can be. When they say Matco's got your back they've got your back.

(Frankie)>> Matco understands that the students of today will become the automotive technicians of tomorrow. There's a fully stocked Matco store on the Lincoln Tech campus offering deep discounts on the tools and equipment students need to succeed as an automotive tech. Visits from industry leaders such as Antron Brown inspire the next generation of motorsports professionals.

(Antron)>> Appreciate you man! It's just putting myself around the people and the things that I truly want to do, and when you do that the opportunity will come but when it comes you've got to be ready.

(Frankie)>> Up next, the V-6 gets a bigger cam shaft for some extra ponies on the dyno.

(Pat)>> The next step in our 4.3-liter V-6 Chevy build is installing the balance shaft. This helps counteract secondary imbalance in the rotating assembly. [ MUSIC ] The front bearing is press fit. So, it needs to be tapped into place. [ MUSIC ] It's retaining plate is held down by ARP bolts, which are torqued to 25-pound feet. [ MUSIC ] The drive gear is torqued to 45-pound feet. [ MUSIC ] Before installing the cam shaft and gears we'll screw pipe plugs into our threaded oil galleries. [ MUSIC ]

(Frankie)>> Keeping with our mild street build we did not go overboard on the cam shaft like we normally would. At 50 thousandths lift this Comp off the shelf grind hydraulic roller has 215 degrees of duration on the intake and 220 degrees of duration on the exhaust. It has a 114-degree lobe separation angle, and with our 1.6 ratio roller rockers it will have 534 thousandths lift on the intake and 547 thousandths lift on the exhaust. [ MUSIC ] Like the balance shaft, the cam shaft also receives a balance shaft gear. Those gears are lined up using the timing marks. Finally, the new timing set goes on. [ MUSIC ]

(Pat)>> In preparation for cam degreeing we have to install the number one rod and piston assembly. It's easier to degree a cam with just the number one piston installed because it takes less effort to rotate the crankshaft than if all six piston assemblies are in. This also allows you to be more accurate during the degreeing process. The cam's intake center line comes in at 106 degrees, which is eight degrees advanced. We'll leave it there for our street engine. Now the rest of the piston assemblies are lubed and installed. We'll use total seal assembly lube on the rings making sure to work it into the lands by rotating the rings. [ MUSIC ]

(Frankie)>> If you want to make the job easier you can get one of these piston installation hammers from Summit Racing Equipment. It's a non-marring dead blow with an extended end that reaches down into the bores. It's critical when installing the piston assemblies to pay attention and not force the pistons into the bores. The rings will have some resistance as you tap them in but should never stop dead. If that happens it typically means the ring has popped outside of the ring compressing tool and won't go into the bore. It's also nice to have an extra set of hands to guide the rod onto the crank journal. With the rod bolts loose we'll zero out the rod bolt stretch gauge, and after torquing we'll verify that rod bolt stretch is correct. [ MUSIC ]

(Pat)>> What are you thinking?

(Frankie)>> Not bad, right around 18.

(Pat)>> That's pretty good for a stock ring pack. We have made outstanding progress on our 4.3-liter V-6 build, and with the short block together it's looking pretty good but we have smooth ran out of time but there's still plenty to do.

(Frankie)>> Yeah this is a great stopping point. Next time we'll be putting on our ported cylinder heads, the rest of our valvetrain, our induction which is pretty cool, and all of our ancillary parts like the timing cover and oil pan, but if you liked any of the tech you saw today or you want to learn some more you can go to Powernation TV dot com.
Show Full Transcript