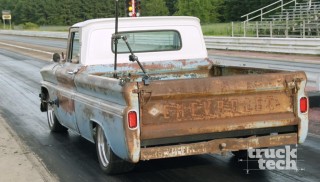
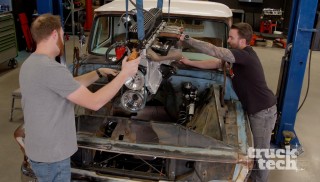
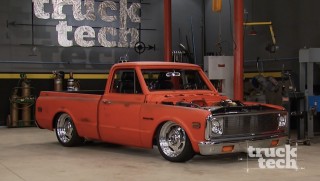
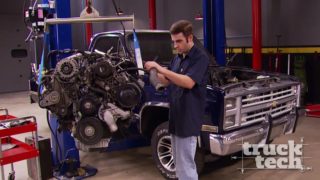
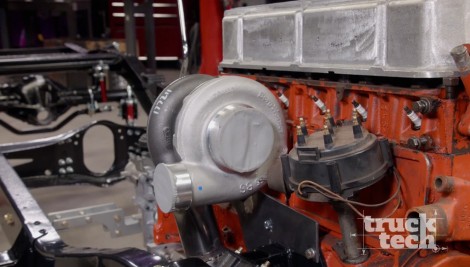
More Lo 'N Slow Episodes

Truck Tech Builds

Parts Used In This Episode

Summit Racing
BorgWarner AirWerks Turbocharger
Summit Racing
Offenhauser Single-Quad Intake Manifold
Matco Tools
Matco Tools are the Official Tool Supplier to Truck Tech
The Industrial Depot
Tools, Hardware, and Shop Supplies

Episode Transcript

(Narrator)>> How do you add go to an industrial straight six? Turbo size it! Today on Truck Tech Lo 'n Slo gets this power adder. Plus is that Austin ruining a fine patina finish? The man with a plan will spill the beans.

(Austin)>> How about you get out of here and let me prep this.

(LT)>> Today on Truck Tech we're gonna be spending some long overdue time on our 1965 patina'ed C-10 that we nicknamed Lo 'n Slo.

(Austin)>> Now it has been a minute since we worked on this project and I'm excited to get back jumping in it, but I'm beginning to get just a little wee bit concerned about this name Lo 'n Slo.

(LT)>> What's wrong with the name?

(Austin)>> Well low I totally dig. This new suspension's gonna drop that stance down right where we like to see it but slow? I mean have you been breathing in too many diesel fumes or something? You need a doctor because I'm staring at an inline 292 right here.

(LT)>> Okay well a couple of things. The nickname is sort of intentionally misleading because you should know me by now. Even though I do get a couple of diesel fumes now and then, you should know that I don't like to go slow. Number two, yeah this engine, it'll never make 1,000 horsepower but I do have a couple of tricks up the sleeve which will really boost up the output of this engine. Make the truck scoot down the road in a hurry.

(Austin)>> I guess I'll have to trust you on this one, and I'm excited to see what you've got up these tiny little sleeves. Now this project has come a long way since we first started but it's got a long way to go. We bought this truck sight unseen and we've very pleased to find out how nice of a patina it had on its surface. It came to us from Marshall, Texas, where the sun is always shinning. So the elements have plenty of time to work their magic on the paint without completely rotting away the metal.

(LT)>> And this truck would actually run and drive. And let me tell you, it was an experience. The manual shift on the column was a throwback for sure, which made this truck an absolute blast. Even though the suspension was completely shot, the engine had a slight miss, and the bench seat was like riding on a horse drawn wagon.

(Austin)>> Feel the bump. So we didn't waste any time on Lo 'n Slo. We got right to work on tearing her down. We're not gonna be touch much of anything on the exterior but we did want to address the frame. So the first thing was to remove that bed and cab off the chassis. Once it was all stripped down we sent it off to get a new coat of semi-gloss black powder coat, and then built out the frame with an all-new suspension, which was sitting nice and low to the ground and greatly improved the handling of this 55 year old pickup.

(LT)>> Finally we paired a GM 292 straight six with a Tremec five speed from American Powertrain, which will give this truck truly a unique driving experience.

(Austin)>> First produced in 1963, this engine can be found all the way through the mid '80's, even produced in foreign markets. Now you wouldn't typically find it in your average everyday pickup, but more likely that light duty commercial application. That'd be delivery vans, cargo trucks of the like, and that's for good reason. It's solid reliable horsepower and also fuel efficient. We chose it for two additional reasons. One, in '65 it was actually an option from GM. And two, well it's just vastly different from that normal LS swap you're used to seeing on these classic trucks. Coming in at 153 horse, 292 foot pound of torque, well it could only get better from there.

(LT)>> That's right. We can always add a whole lot more power. And if you guys are not used to seeing a Chevy straight six the cylinder head might look just a little different from what you're used to seeing on modern engines, and that's because the exhaust and intake ports are on the same side of the cylinder head and the manifold's sort of intertwined. Now to add power we need to get more air into and out of this engine, and the stock manifolds just aren't gonna cut it. With the manifolds laid out on the table you can see the interesting way that they stack these together. The intake sits on top and the intake ports are sort of staggered in the middle, and the exhaust manifold sits below and fills in the spaces in between. Now this engine was designed to be very fuel efficient, not make a whole lot of horsepower, and as such everything is really small and restrictive. It has a single intake port, and on top of which sits a single barrel carburetor, and on bottom you have a single two inch exhaust port. Now this whole setup is very restrictive and it's not gonna move a whole lot of air. So instead we went to 12 Bolt dot com and picked up one of their split exhaust manifold kits. The runners are much bigger cross sectional area. So they'll move more air, and each exhaust port is two and a half inches. For the induction we went to Summit Racing and picked up an Offenhauser aluminum four barrel intake. Again it's all about bigger ports and moving a great volume of air. Now there is one more important part of the puzzle that's gonna finish up our horsepower build. I've just got to get it.

(Narrator)>> Next LT's the man with the V-band plan.

(LT)>> There are a lot of different ways we could pump up the output of our 292, and my power adder of choice has always been the turbo. So I went to Summit Racing and did some shopping. Now this is a Borg-Warner S-366 turbo, and it's a great charger that's affordable and durable. So it'll work perfect for our application. Here's some of the specs. It has a 66 millimeter inducer on the compressor wheel, a 73 millimeter exducer on the turbine wheel, a TFour undivided turbine housing with an .088 AR ratio. Now this thing will ultimately support a lot more power than we're gonna be making with that 292, but it'll be right in its peak efficiency zone somewhere between 400 and 500 horsepower, which is our ultimate goal. Now the exhaust manifolds that we ordered, they come with this doughnut style of gasket. Now that works great in a naturally aspirated application and gives a nice leak free seal. However when you're turbocharging there's a lot of heat and pressure that's gonna be in the exhaust, and these doughnuts, they'll just blow out. So Summit also sent me a couple of two and a half inch stainless steel VBands. Now this manifold is actually made from ductile iron, which means I can weld to it. So my first order of business is to chop off this two bolt flange and weld on some VBands.

(Austin)>> So I know we told you guys that we weren't gonna touch the exterior of this truck. After all this patina is what makes this project so cool in the first place, but we kicked it around and after some thought and consideration we changed our minds. We decided let's add a little pizazz in one specific spot, and that's that rusty old roof. We're gonna paint it, and we're gonna drape it all the way down the back side of this body and end up somewhere right on this body line. And as you all know with a good paint job comes a lot of good prep work.

Got her.

The truck wants to come with it.

(LT)>> Back at the welding table our 292 manifolds are going under the knife. The two bolt flanges are being cut off to make way for a VBand. [ metal grinding ]

(LT)>> Basically just trying to get this flange to sit and flat on the manifold with as few gaps as possible. I think we're there. So all I'm gonna do is clean up the outside just a little bit so it welds on nice and clean. We're good to go. Once the surface is flat and clean... [ metal grinding ]

(LT)>> ...I can start by tack welding the VBand ring to the manifold. I'm using our Forney 220 A/CD/C tig set at 120 amps for the thicker material, and since I'm joining cast to stainless I'm using a 309 filler material. I'm also running my go to number 12 cup and gas lens, which will keep the weld area properly shielded with argon, and my post flow is set to seven seconds. Alright with just a little bit of effort we have ourselves a manifold that'll have a nice leak from seal. Now if you've never seen how a VBand clamp works they're actually kind of cool. The sealing surface is made up of these two flat areas that just sort of index together, and there's a clamp that holds the whole thing together. Now on this particular style of VBand there's a small ridge around the inside that indexes both halves together so they can't wiggle around. But like I said, a little bit of effort, a little bit of work, this thing will last a lifetime and it's guaranteed to never leak.

(Narrator)>> Next goodbye rusty jones.

(Austin)>> We like showing off our new equipment here at Powernation. This is the DB-500 mobile blasting system from Dustless Blasting. It features a 49 horsepower turbocharged diesel engine that provides 185 c-f-m of air flow at high pressure. Now what makes this system different is the media is actually mixed with water, which has multiple benefits. Let's get it fired up. We're gonna blast the rust off the roof of this C-10. The sand and water combination gives Dustless Blasting its name. The man in the mask. It's less messy than traditional systems. I can actually see what I'm doing since the water keeps the particles on the protective plastic below and now floating in the air. And as a result I can work in my street clothes and don't need to cover up with any additional gear. [ air hose hissing ]

(Austin)>> Now you can clearly see this machine has no problem stripping away all this rust. I mean this is nice, clean bare metal compared to all that rusty pitted side over there. A few different options we could have done. We could be all day in the prep with that DA sander, ripping through sand paper left and right and putting up a bunch of dust and rust in the air. Having to have a mask on and we'd be covered. I'm really not that wet and I'm not that dirty. As long as my eyes and hands are protected well it's easy. [ air hose hissing ]

(Austin)>> You can use all sorts of blasting media. We're using crushed glass, which has the consistency of sand but you can also dry blast and soda blast because of the unit's air cooler and moisture separator. Another nice feature are the auxiliary air ports so you can run any air tools you might need. Now can everyone afford one of these units? Probably not, but if you own your own body shop and tired of hiring out all these blasting chores why not bring it in house and reap the profits yourself? You're an average guy or gal, want to start your own mobile blasting business? This is the idea setup, and Dustless Blasting will set you up with all the materials you need to get you on your way to becoming your own boss.

(LT)>> So what's the story man? I thought you blasted this thing. The hood's still all rusty.

(Austin)>> I did a half of a job.

(LT)>> I see that.

(Austin)>> I've got to say this starboard side engine has a lot more power than that port side huh?

(LT)>> What are you on a boat? So all kidding aside I have to say it looks like that Dustless Blaster cleaned off the roof in a hurry. You know I'm always nervous when we blast something. You guys at home know the risks. Whenever you're stripping paint you never know what's underneath. Luckily we have a metal roof and not just a big block of Swiss cheese.

(Austin)>> Yeah there was more than enough material there that stayed to where this thing is totally salvageable. A few minor points here and there where we've got a few pin holes, but nothing we can't fix with simple metal working techniques.

(LT)>> Yeah, I mean it looks like the worst of it is kind of right along this edge where the drip rail meets the roof skin. There's a couple of small holes but like he said. A mig welder will take care of that in a hurry.

(Austin)>> That's it, and these drop rails are not broken to the point where they're hanging down or anything. So we're not gonna touch them. You start fixing that there's no telling where you'll stop.

(LT)>> Well speaking of stopping I see you stopped your sand blasting kind of half way down the back, and you've stripped the roof as well. So help me get inside your head and kind of understand your theory there because this is a patina truck and you're obviously gonna be painting on the roof.

(Austin)>> Yeah definitely. We bought this for its charm and its natural character right, but we're still gonna class it up just a little bit with new bright work, custom touches here and there. So why not blast off all this patina on the roof? I know you haters out there are gonna hate, but we're gonna add our little flare, brand new paint.

(LT)>> Well that's where I think you're wrong actually because you said patina on the roof. This was just rust. To me patina is paint and rust that have kind of intermingled. Up here it was just a solid block of brown rust. So I don't see anything wrong with blasting it off and put a nice shiny cap on this thing, and could really set it apart from the crowd.

(Austin)>> I obviously agree. So how about you get out of here and let me prep this so I can get some primer on it so it doesn't rust again.

(LT)>> Well I have some cool work to do with the turbo building, and I'll let you take care of this boring body work.

(Austin)>> I'll sort it out.

(Narrator)>> Next protecting that bare metal.

(Austin)>> Welcome back to Truck Tech. I'm laying down two coats of epoxy primer on our cab's newly blasted surface. This will prevent that flash rust until we have time to paint it. I'll bet you're wondering why we chose to use a white primer. You guessed it. We're gonna be painting this thing a super light color I just can't tell you what it is yet.

(LT)>> When it comes to building or fabricating components to an exhaust system I like to think of it as a game of connecting the dots. Now the first job is just figuring out where the dots are gonna be. The first two are easy. Those are the VBands that we welded on the exhaust manifolds earlier. Now the next stop, that's the turbocharger. So we need to find a place to mount it. Now the first space we could go, well there's a lot of room right here between the engine block and the frame rail. We could easily plumb the exhaust in but the challenge becomes getting the air into and out of the turbocharger. Now the next option we could use is do a low remote style mount of the turbo system. Now there's plenty of space down here between the transmission and the frame rail and a couple of different ways you could clock the turbocharger, but the challenge is you have a much longer run into and out of the turbo for the air, and that's gonna lead to a little bit more lag. Not only that you have an oiling system you need to consider. The pressurized oil needs to make it all the way to the turbo, and then we need to run a scavenge pump to get it back to the engine. That's just a lot more complication than we really need. So I'm gonna show you a third option and that's the one that we're gonna do. Since the intake and exhaust manifolds are both on the driver's side of a Chevy straight six I figured the passenger side is the best place to mount our turbo since it's pretty much wide open. So I went ahead and mocked up a bracket that's gonna bolt onto the side of the block right where the motor mounts go, and this is gonna provide a nice sturdy place to mount the turbocharger. Now it's up high, it's out of the way, and there's plenty of space to run a charge pipe out the front, a crossover underneath, and the exhaust out the back. Plus the oil drain is a straight shot to the pan. So the only thing I need to do is build a crossover.

To get the exhaust gases from your vehicle's cylinder head to the rear bumper the standard material for a long time has been steel tubing. It has a high resistance to heat and it's pretty inexpensive to manufacture, and it can be stainless steel, mild, or even aluminized. Now in order to minimize the amount of leaks that are possible manufacturers try to keep their exhaust systems in as long of pieces as possible, but in the real world you have to be able to service your vehicle. So large chunks have to be able to be removed, which means there are some connections. So today we're gonna go over the most basic flanges and connectors that you find in a standard or an aftermarket exhaust system. The exhaust manifold connection is the first place that needs to be removed, and the standard for a long time was this graphite composite doughnut. Now it's a fairly soft material that has a high resistance to heat. Now this is part of the cast exhaust manifold, and this flange will go over a flare on the exhaust pipe. A couple of bolts hold it together and that's a nice leak free seal that can easily be removed. A ball and socket type connection is popular in most aftermarket exhaust systems. Now there's actually no sealing material. It's just one pipe has a flare in it and one pipe has a ball. Now these are nice because there's a little bit of flexibility in the connection, and again two bolts hold it nice and tight and you've got a leak free seal. When you buy an aftermarket exhaust system, like a cat back, it often comes to you in many smaller pieces because it has to fit inside a shipping box. Now this is a representation of the most common type of connection that you find on just about any cat back. It has a couple of slots on the end of the pipe and a flare at the end. So one pipe just simply slides inside the other. Now there's two different ways you can seal up that connection, and they're both called a band clamp. You have a narrow style with a single nut and a little bit wider style. Now these generally seal just a little bit better but they cost a little bit more. Now you also have another alternative, and that's welding, cause like I said earlier these exhaust systems, they can kind of move around a little bit. So if you have your own welder just take a couple of minutes and weld that joint up, and that way you're guaranteed not to have any leaks. A VBand clamp is very common in higher end aftermarket exhaust systems, and there are three parts. The two rings that you weld onto either end of the pipe and the clamp that holds the whole thing together. Now this particular style of clamp has a quick release mechanism that's built in. So you can easily reach down and open up the clamp. Now there are different styles as well. This one does not have the locating ring. So you have a slight amount of flexibility in the fit up, and then you have a marman flange. This is most popular when it comes to having a down pipe that attaches to a turbocharger. Much like a VBand this outer ring will weld to the exhaust pipe, and the seal is made up of these two surfaces but instead a flat this has about a 20 degree taper, and the connection is sealed up with the same exact style of clamp. Now we're really just scratching the surface but these are the most popular types of exhaust connections that you're gonna find.

[ drill spinning ]

(Austin)>> If you were to dub an impact wrench the little hammer that could you'd be referring to this little pint size right here. This is Matco Tools' new half inch stubby push button air impact. With best in class 700 foot pound of breakaway torque it features a variable throttle that allows for precise control in those hard to reach places, and also a rear dial regulator that adjusts torque output in the far position. This unit comes with a two year warranty. Visit Matco Tools dot com for more.

(LT)>> One key ingredient to any truck upgrade is an exhaust system that performs well, but it has to sound great too. Our Sweepstakes Silverado sports the new Hooker Black Heart performance exhaust. [ engine revving ]

(LT)>> It's a cat back design that features a three inch intermediate pipe, dual two and a half inch tail pipes, and a straight flow through design that'll give an aggressive sound both on and off the throttle, and you can pair it with a set of Hooker shorty heads. Both are made from stainless steel and have been engineered to provide maximum exhaust velocity. Visit Holley dot com for more.

(Austin)>> Modern diesel fuels are not always the cleanest these days, and every fuel supplier adds different materials to help with lubricity, but sometimes these additives can lead to unwanted deposits in your engine or fuel injectors. Hot Shot's Secret Diesel Extreme is a new powerful formula designed to clean and boost engines to their peak performance power. Just add a dose every 6,000 miles to clean your tank, lines, injector tips, all while removing moisture. Find your nearest retail outlet by visiting Hot Shot's Secret dot com. Alright partner what you been up to?

(LT)>> Well I pretty much have the hot side of the turbo kit sorted out. I have one pipe left to put between the rear manifold and the merge. Then it's just a matter of figuring out where to put the waste gate, but this thing is well on its way.

(Austin)>> Looking good, and that brings us one step closer to putting the cab on this thing. Make it look like a truck again.

(LT)>> That's right, and if you guys have any questions about any parts we use be sure to check out our website, Powernation TV dot com.

(Austin)>> Thanks for watching Truck Tech. We'll catch you next week.
Show Full Transcript