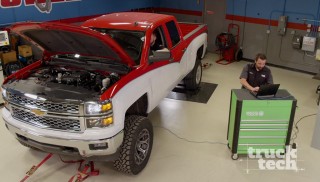
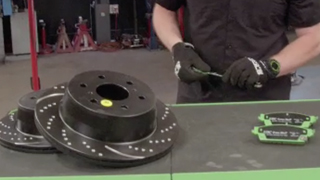
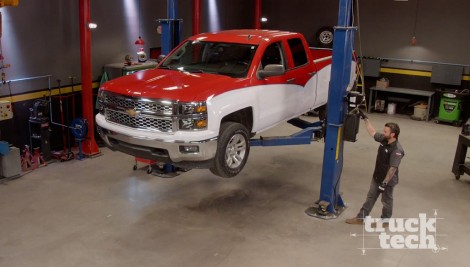
Parts Used In This Episode

General Tire
ATX LT325/60 R20
Matco Tools
Matco Tools are the Official Tool Supplier to Truck Tech
The Industrial Depot
Tools, Hardware, and Shop Supplies

Episode Transcript

(Narrator)>> Today the guys nab this Silverado and team with Seafoam for a one of a kind build. How high can you go?

(Austin)>> You know one of the questions we get asked all the time is what do you guys do with the build when you're done, and the short answer is it really depends.

(LT)>> You know some of the project trucks we keep around as parts runners. Some of them get sent off to auctions, and a lot of them just get sold so we can buy the next project in line, and then there's this truck. A 2014 Silverado LT double cab that we just picked up for a project that we think you guys are gonna love.

(Austin)>> Now we partnered with Seafoam for the Seafoam Truck Tech Sweepstakes where one lucky viewer will be able to call this truck their own.

(LT)>> You guys are all familiar with Seafoam motor treatment. They've been around since 1942, but on this truck we're gonna be showing off a new product, the Seafoam spray.

(Austin)>> This may look like a normal everyday Chevy pickup right but it's actually a 2014, which was the first year they made some specific changes.

(LT)>> Yeah you know 2014, that's the first year of the new body style. Also the first year that GM used direct injection on their full size pickup trucks, and it's that direct injection that actually makes the Seafoam product make a lot of sense. And later on we'll show you how Seafoam can help keep the top end of your direct injected engine nice and clean.

(Austin)>> What do you think man? I mean this is a nice truck. It's driving smooth. We've got what 75,000 miles on it, but it's plain jane. It's bone stock. So we've got four wheel drive. What's some ideas so we can make this thing cool?

(LT)>> Well you know the nice thing about a bone stock truck is it's a blank canvas. We can really make any decisions we want to this truck. We could build it in so many different ways. Now a lot of the trucks that we've done lately I'll admit they've been lowered to the ground. I can promise you guys this. This 2014 Silverado will not be going lower. In fact it's gonna be going up and quite a ways up. Well as always there's some stuff we can do to bump up the power output just a little bit. You know we could go through and build the motor, throw in a cam, a good set of heads, long tube headers, full exhaust, and get it tuned, or we could throw on some sort of a power adder. You know we're still trying to figure out which route to take but rest assured this giveaway truck is gonna have a whole lot of power when we're done with it. This 2014 Chevy Silverado is gonna be the perfect candidate for our next giveaway build. We already have a whole bunch of parts on order and we can't wait to get started.

(Austin)>> Yeah we're excited to jump in this thing but LT I've got one question.

(LT)>> Hit me.

(Austin)>> Why another red truck?

(LT)>> Well you know what there's just something special about the color red.

(Austin)>> Yeah it matches that beard real well. I've got a way to fix this.

(LT)>> Alright let's take care of it.

The Wrap Lab is just down the street from the Tech Center. They specialize in custom graphics for just about anything.

(Austin)>> Alright let's get this thing wrapped up.

(LT)>> That's a good one.

(Austin)>> It starts with the template of the year, make, and model truck and goes from there. We provided them with our digital assets and they laid the whole thing out.

(LT)>> We ghosted the Seafoam logo onto the rear doors, and from there added a few accents for a one of a kind look. Production starts by printing the panels on this massive color printer. And after a u/v lamination is applied they can get to work.

(Austin)>> LT has a thing for red heads, I mean red trucks, for some reason. So this half graphic treatment will break up the solid color and make this truck a whole lot more appealing driving down the highway, the trails, or maybe even in your garage.

(Narrator)>> Next inside a direct injected engine.

(LT)>> The vinyl wrap certainly transformed how this truck looks, and we're going to continue to make changes and build a pickup that we think any one of you would be proud to own after winning the Seafoam Truck Tech Sweepstakes.

(Austin)>> Right now this 2014 Silverado is bone stock and well we just can't give it away like that.

(LT)>> Bone stock is no bueno.

(Austin)>> So we threw together a rendering to show you how the final project's gonna look, and we're gonna address the suspension, drivetrain, and even the appearance to make this thing faster, louder, cooler, taller, and well just stand out from the rest.

(LT)>> Well I like the sound of faster and louder, and a little bit later today we'll get started by lifting the suspension and throwing on some larger tires, but first we'll show you some important parts of maintaining a late model engine. As we mentioned earlier this Silverado has a direct injected five point three under the hood, and it's a little bit different from a traditional e-f-i engine. In the intake tract of a port injected engine both air and fuel pass through the intake runner along with e-g-r and p-c-v gases to keep emissions output to a minimum. There will be small amounts of oily residue in the port, but since fuel is constantly washing the intake runner and back side of the valve there is very little build up that actually occurs. A direct injected engine is a bit different. Since the fuel is sprayed directly into the combustion chamber only intake air is passed through the port along with the same e-g-r and p-c-v gases. Since there is no fuel spray on the back side of the valve a buildup of carbon deposits will occur, which can cause rough running, hesitation, and a reduction of air flow into the engine. This truck only has 75,000 miles on it, and we're kinda curious as to how much crud has actually built up in that short amount of time. So we pulled off the intake to get a closer look. Now this is what an intake valve looks like when it's new, but on these direct injected v-eights the valve is buried deep down inside the cylinder head. So to help us see I stuck a small l-e-d on the end of a piece of tig wire to light the intake runner. As you can see there's an even layer of gunk built up on the roof and walls of the intake runner, and some concentrated around the valve guide area. This certainly isn't the worst case of buildup that we've seen, but it is a problem that needs to be addressed before it gets any worse. To do so we're going to be using Seafoam spray top engine cleaner and lubricant. And this is an important part of the maintenance schedule on any gasoline direct injected engine. It'll clean and lubricate the entire intake system, especially in areas where a fuel additive just won't reach, and it'll clean the carbon deposits and gunk off the back of the intake valve and the walls of the runner. And it's very simple to use since it comes in an aerosol form and it has a straw that lets you spray it directly into the intake system. We'll throw the intake back on and reconnect the wiring harness and intake tube.

And with the truck outside and up to operating temperature, first loosen the intake boot and place the hood guide around the lip of the throttle body so the cleaning tube is about a quarter inch from the throttle blade. Connect the straw to the can. Alright fire it up and raise the idle. [ engine starts and revs ]

(LT)>> And spray the entire contents into the engine. Get comfy since it'll take about seven minutes. Once the can is empty... Alright kill it! ...Remove the hood guide and reinstall the intake tube. Allow the Seafoam to hot soak for 10 minutes. What are you doing looking at me? Check out the beautiful trees. Then follow the last step on the can and apply some spirited acceleration to burn off the hydrocarbon residues. After at least 10 minutes of driving we'll remove the intake to see the results, and as you can see the walls and roof of the same runner are noticeably cleaner. It's important to know that you don't have to remove the intake manifold to apply Seafoam spray. It's actually one of the easiest maintenance items that you can perform. We just did it to get a look inside the engine and show you guys how it will work. Now it's especially important on a direct injected engine but you can actually use Seafoam spray on a port injected engine or even a two stroke. Now for best results you're gonna want to apply every 7,000 to 10,000 miles to help fight against the p-c-v and e-g-r residues that are constantly being ingested into the engine. With a before and after comparison you can really see how effective the Seafoam spray is at removing deposits, especially on the roof and wall area of the intake runner. Now that's a great result for only about 20 minutes worth of work, and now all I have to do is bolt this engine back together.

(Narrator)>> Next the build begins.

(Austin)>> Hey bro, so I see you got all that maintenance sorted out on that five-three huh?

(LT)>> Well I got the intake back on, she's wired up, and ready to roll.

(Austin)>> Now I hope this table full of parts don't make you too nervous cause we're actually gonna lift a truck in this shop once.

(LT)>> Alright well let's get one thing straight right off the bat. Yes I do lower trucks a little bit more often than I raise them, but that doesn't mean I don't know how to lift them. They say go big or go home. This truck's going up eight inches.

(Austin)>> Yeah and BDS is gonna help us out with that. We have these Foxx two point five front coil overs paired with some tubular upper control arms and all the brackets, crossmembers, and hardware needed to bolt this thing on. Since we're gonna be adding some power well we got some beefy rear traction bars and addressed those brakes too.

(LT)>> Yeah and in our opinion a half ton Chevy looks best on its eight inch lift with about a 35 inch tall tire. So we picked up a set of General Grabber ATX's in a 325/60 20, and we'll be mounting those up to a set of Foreplay wheels in gun metal gray.

(Austin)>> I say all we've got to do is get this thing on the lift and get it tore down huh?

(LT)>> Alright well since I don't know how to lift a truck, I guess you've got to do the teardown.

(Austin)>> Fair enough, fair enough.

(LT)>> I lift trucks all the time. What are you talking about?

(Austin)>> There are a few reasons to lift a truck. Whether you want to fit larger tires underneath, increase ground clearance for driving off road, or just want it to look cooler.

(LT)>> Most of the trucks for removing the taper between a ball joint and a spindle are a hammer and some frustration. Smack right there on the side and they pop off.

(Austin)>> When lifting an independent suspension there are a lot of components that have to be spaced further away from the frame of the truck. So the entire suspension system has to be disassembled and removed.

(LT)>> With the truck a little higher we can remove the front driveshaft and start to remove the differential.

Alright it's all you buddy. You got it?

(Austin)>> Got it.

(LT)>> Before we can install any new parts we have to trim off part of the original frame to make clearance for the diff in its new home. With the edges cleaned up we can weld in the provided reinforcement. [ welder crackling ]

(Austin)>> Over at the table we need to bolt an additional mount bracket to the front differential, and some drop brackets attach underneath the truck, which will allow for a correct c/v angle at the taller ride height. Then the front diff is lifted into place.

(LT)>> Next the quarter inch thick fabricated crossmembers attach to the original lower control arm mounting point. What's the hold up?

(Austin)>> Been busy man.

(LT)>> And the same procedure is followed up front. The differential support bracket ties the whole thing together. We'll cap off the bottom of the truck with the new laser cut skid plates, loosely attach the lower control arms, and finally reinstall the original driveshaft.

(Austin)>> Now the truck can be lowered down a bit and the Foxx two point five coil overs can be slid into place. These feature a seven-eighths hardened steel shaft, Eibach springs, and remove reservoirs, which together will allow the suspension to soak up the roughest of terrain and have a smooth ride out on the street.

(LT)>> The new upper control arms have a modified ball joint angle, which will allow for more droop travel and add one point four more degrees of positive caster, which will give us much more stability on the highway. The original c/v axle bolts to the front diff. The new cast knuckle installs.

The unit bearing and backing plate bolt on, and the spindle nut is tightened up.

(Narrator)>> Next bigger meats need bigger brakes.

(LT)>> With the front more or less taken care of it's time to move on to the rear, and the extra height back here is gonna be made up of a different leaf spring and a taller block. So I have the whole rear axle assembly supported and the first order of business is to remove the stock leaf springs.

There are a few bolts which hold the leaf spring to the axle and the frame that need to be removed, and on the driver's side the fuel tank needs to be slid back slightly to allow access to the front bolt. With the old spring removed the new spring is a direct replacement. A small lift block goes in between the spring and axle, and the whole thing gets bolted back together, and finally some Foxx two point zero shocks are bolted in. We've talked to you guys many times about the importance of stopping power, and since we're lifting this truck, installing heavier wheels and tires, and in the future we'll be installing a power adder, well we figured this would be the perfect opportunity to address the brakes. We chose an EBC stage three kit, which comes with their green stuff 6,000 series pads for trucks and s-u-v's and their GD dimple drilled and slotted rotors. Together these will give us a great improvement in stopping power over stock, and the best part is they're a direct replacement. And since we already have the front taken care of I'm gonna show you how to install them on the rear. With a few bolts the original caliper and bracket are removed. The retaining clips come off, and the rotor is swapped out. Now the bracket goes back on, the new pads slide in, the piston is pushed back into the caliper, and it bolts right back in place. With the lift finished up it's time to throw on some wheels and tires so we can get this truck on the ground and see what it looks like, and this is the combination that we've selected. The rubber is a General Grabber ATX in a 325/60 20. That works out to be just a little bit taller than a 35. This is an aggressive all-terrain tire that'll be at home on the street or in the dirt, and we have them mounted up to a set of Foreplay wheels Four-P-80 in a brushed gun metal finish. Now this will really accent the look of the truck and make it stand out from the crowd. The brushing is actually applied by hand. They have stainless steel through bolts and a weight rating that exceeds o-e-m specs. With the supplied hub centric spacer slid on, the wheel bolts to the truck completing the transformation.

(Austin)>> Whether you're trying to finally fix the dent in that old body panel or even tweak the shape of a style line, either way metal working can freak some people out if they haven't done it before, and this doesn't mean you need to break the bank on expensive tools either. Today I'm gonna show you with a little time and patience how to bang the ugly out of your metal. Say the words metal working and the first thing that comes to mind is the hammer and dolly. This is a tried and true method used throughout the years in collision repair shops and even home garages. With every strike of the hammer you're moving metal. The dolly is used to support the back side of the panel, helping create the shape you want. Now there are many different types of each and each one has its own specific purpose. Well let's get started with this traditional pick style hammer. The crown side is used to knock down those high spots and knock up those low spots from the back side of the panel. The round flat side is used for smoothing. The chisel hammer has a wide flat pick edge and this will help you reach the deep corners of a panel, or even bang out creases in a style line. Then we have a shrinking hammer. It looks very much like that meat tenderizer in your kitchen drawer. It has these grooves in it that help push and pull the metal with every strike. This will help shrink the panel over time. Lastly the go to bumping hammer. This is a great general purpose hammer. One side square, one side's round. Next onto our series of dollies. The most common shapes are the heel, the toe, the wedge, and utility. Now which one do you choose? Simply find the one that best fits the shape of your panel, whether it be flat, curved, or even a hard corner each one has its purpose. Now let's see what we can do to straighten out this panel. When you're trying to fix a dent this big you might not know where to start. I like to use a straight edge for a reference, and man look at this. From this edge to this edge there's a one inch gap. This thing is dented in hard, and this is the perfect situation for the hammer off dolly. When using this technique you need to have access to both sides of the panel. This is where you place the dolly on the back side. Then begin striking the panel around the dolly to slowly raise the low spot. Another technique is called hammer on dolly. You're supporting the dolly with solid pressure and let the weight of the hammer do all the work. The shrinking hammer then pulls in the metal. There you go. Just a few minutes on the hammer and dolly and this dent is almost worked out even though this panel has a long way to go. Now I just scratched the surface on metal working but the best way to improve your skills, find an old panel and get to banging. [ hammer banging metal ]

(LT)>> Abrasives are an important part of any fabrication project, and Forney Industries has you covered with a wide range to meet your needs, and first off are the four and a half inch double sided flap discs which combine some of the most popular grits. They have a 40 and 80 for course to medium work, a 60 and 120 for medium to fine work, and a double sided 40 grit. And the strip and finish discs are ideal for getting down to bare metal, and the open web design helps remove material without building up too much heat. To find Forney abrasives visit your local automotive retailer.

(Austin)>> Any time running wires, cables, or even hoses near sharp or heated areas of a frame it's always a good idea to protect them, and the old school method of just wrapping the old black electrical tape, well not always the best plan. DEI's Easy Loom offers a superior level of protection, and with its split sleeve design it features a 30 percent overlap against heat, solvent, and abrasion resistant. It's ideal when running aftermarket headlights, replacing o-e-m wire looms, or even entire electrical harnesses. It could be found in a variety of sizes and located at your local automotive retailer.

(LT)>> For a good visual comparison here's what our Silverado looked like when it was stock and here's what it looks like now. Well I have to say the combination of the 35 inch tall tires, 20 inch wheels, and the eight inch coil over lift have certainly transformed this truck, and we've turned it into something we hope that any one of you would be proud to have in your own driveway.

(Austin)>> It's a looker no doubt. Exactly what we were going for. Bigger, taller, well all we've got to do is make it faster, and that's up next.

(LT)>> Absolutely, we'll take care of that next time you guys see this truck, and for more information on anything that we've built on the show or to enter the Seafoam Truck Tech Sweepstakes be sure to visit Powernation TV dot com.
Show Full Transcript