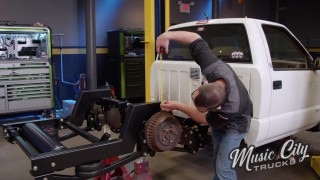
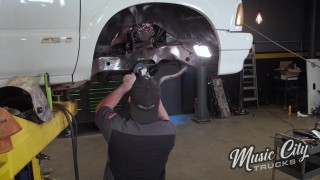
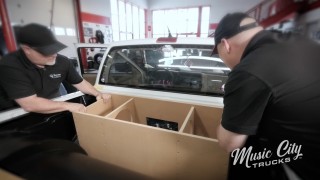
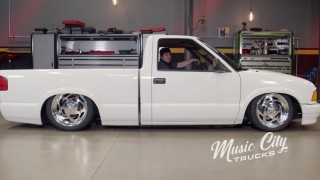
More Low-Fi S-10 Episodes

Music City Trucks Featured Projects

Music City Trucks Builds

Parts Used In This Episode

Summit Racing
AccuAir Suspension Ultimate On-Board Air Compressor System
Summit Racing
Billet Specialties GS Series GS53 Polished Custom Order Wheels: GS53770
Summit Racing
Billet Specialties GS Series GS53 Polished Custom Order Wheels: GS53810
EndDents
Paintless Dent Removal
Little Shop Manufacturing
S-10 No Toe Kit

Episode Transcript

(Marc)>> You're watching Powernation!

(Marc)>> Today on Music City Trucks our Low-Fi project is close to laying frame. First we need to add some finishing touches.

(Eric)>> And we clear the way for this frame to hit the ground. Plus we'll give it some extra stopping power.

(Marc)>> And we'll strip these ugly accessories off and buff and polish for a brilliant finish. [ Music ] This has got to be the most iconic design ever. [ Music ]

(Eric)>> Welcome to Music City Trucks. I'm Eric Smart, and today as you can see we finally got our S-10 mini truck back here in our own shop. Now the audio system is finished up thanks to Joey down at Outlaw Garage. And it might look on paper like this is a proper mini truck already, but we've still got a lot to do.

(Marc)>> On paper it's a mini truck but in person it's definitely not. Obviously all of the accessories need to come off. We're gonna address that today. We've got some loose ends that we need to tie up on the suspension, mainly the wiring. We got a nice, big upgrade for the steering, and then we've got some trimming and adjusting we need to do to get this thing to where it'll go all the way down and lay frame, and that's what we're gonna get done today. [ grinder buzzing ]

(Marc)>> Well I've got the frame cleaned up cause we're gonna need to do some welding. Now if you'll remember, when we installed the bags we had to remove the shocks because we installed the air bags where the springs went and the shocks went up through the middle of the spring, but we retained these shocks because we're gonna reuse them. We do need to run some shocks on this. Now it normally bolted to the lower control arm using this little flange here, this little T-bolt flange, that was pressed through the bushing. I went ahead and pressed that out, and I've got this bolt pressed in because we're gonna bolt it to the back of the A-arm here. For the upper we just made this out of some angle iron. So we're gonna get it mounted, do a little mockup here, figure out where we need to weld this bracket on the frame. Now since we've got it at full droop right now and I've got the shock fully extended let's get it up there and get an eyeball and then we'll get it compressed. [ welder crackling ]

(Marc)>> Not bad. [ drill humming ] [ Music ]

(Marc)>> We're gonna run it through full cycle. We've still have got maybe three quarters of an inch up here of shock travel. So we don't have to worry about that. That's good to go. Now we're gonna move on to installing the level sensors. Well I mentioned earlier we need to wrap up some wiring, and mainly what I'm talking about are these level sensors. Now you don't need these for your air suspension to work but with this Accu-Air system it's so smart that when it uses these it can self-level for you. You can push a button and it'll bring it up to the ride height you want. It's actually got the wiring harness built in here, the pigtails. So we need to just get this thing mounted, get it connected, plug it in, and we'll be good to go. You've got different options for holes. It actually normally is longer than this, but I went ahead and cut it off cause I'm gonna use this hole right here. [ drill humming ] [ Music ]

(Marc)>> I just need to figure out where this is gonna mount. With the standoff they provide it'll come out where it needs to be. So I'm gonna go ahead and drill a hole there. I'm actually gonna leave a little extra because we're not quite at full bump, and then I'm gonna measure from eyelet to eyelet. Five and three quarter. Well we're not past the limiter here. So we're still in good shape up top. I want to cycle through the whole movement to make sure there's not any binding or overextension of the sensor. Well because of the style of steering on these S-10s one of the major problems with lowering these trucks, especially when you're gonna lay frame like we are, is the steering geometry. It's got kind of an older style steering with a pitman arm, and an idler arm, and then of course all of the tie rods and everything. Problem is when you go really low on this they like to tow out. So if you're gonna ride at a lower ride height typically have a toe-out problem, which causes tire wear, drivability issues, and things like that, but thankfully Little Shop Manufacturing has this entire steering kit here. It's really nicely manufactured and totally adjustable, heavy duty rod ends, and even better than that it's a direct bolt-in to the factory stuff. We just need to pull this stuff out, put this stuff in, it'll correct our steering problem. That is going in the scrap bin. [ Music ] [ ratchet clicking ]

(Marc)>> Alright, that's done.

(Eric)>> Now that Marc's got our remote shock mounts finished up on the front and all the ride height sensors installed, it's time for us to move on to get this thing as low as it can go. To do that we're gonna need to make sure that everything underneath is above the scrub line. Now what is the scrub line and how do you find it? This right here at the top side of your straight edge is gonna be known as your scrub line. That is the lowest point of your frame and that's where everything needs to be above so that you can actually lay your truck all the way out. The exhaust is also in the way up here. See, nice and easy. Looks like that crossmember's next. [ Music ] Alright, with this crossmember all sand blasted and cleaned up I went ahead and marked out what needs to get cut off. So all of this down here is gonna get completely removed, and then we're gonna weld in a plate to reinforce it once all that's gone. [ torch hissing ] [ Music ]

(Eric)>> So now I'm gonna cut a plate to weld in there, and then we'll be ready to put it back on the truck. Well we've got all of our welding and clean up done on this crossmember, but we can't just go ahead and throw it in like this because obviously it would just get straight to rusting the minute we took outside. So to make sure that doesn't happen we got some POR-15 three step rust preventative system. Now it comes with your cleaner, your prep, and the coating itself, which is guaranteed to not chip, crack, or peel. First step is to wipe down your surface with a degreaser to get it nice and clean. Our second step is gonna be using the metal prep. Now this is gonna make sure that we get good adhesion from the coating itself. I'm just gonna pour some out into this cup here. After you brush it on you're gonna want to let it sit for about 10 to 20 minutes. Now we've got our prep done and washed off it's time to actually put the coating on. We're gonna go ahead and apply our first thin coat. This stuff prevents rust from recurring by protecting the metal from further exposure to moisture and it's made in the USA. Once the first coat is applied let it sit for about two to six hours, add a second coat, let that dry, and it's ready to go.

(Marc)>> Coming up next, we get rid of these pesky dents and dings without breaking the paint.

(Kenneth)>> We'll be using a whale tail.

(Marc)>> Well as tempting as it would be to go ahead and lay this thing out now we can't do that yet because there's just not enough clearance with these wheels and tires, but our new wheels and tires are gonna be here soon. The time has come for us to do what we, and I know you, have been waiting for.

(Eric)>> It is finally time to remove all these absolutely awesome custom accessories on the outside of this S-10.

(Marc)>> Awesome's not the word I would use, but it's gonna be very satisfying doing this. You know what helps with these, heat! These accessories don't use the best double sided tape I'll tell you that. This is the worst double sided tape I've ever had the displeasure of working with. I'm gonna work on this hood scoop. Wow, well it's just the most useless... This is one of those things that somebody's mother tells them, you're such a diva, and they think that's a compliment so much that they put it on the windshield of their vehicle. What you doing back there Eric?

(Eric)>> I've got to get rid of these rhinestones cause I don't think they're gonna fit in with the truck once we're done with it.

(Marc)>> Now it's time to move on to getting the original badges off of the doors here. There was some double sided tape. It's probably stuck better than this stuff up on the fender was. We're gonna be using this eraser wheel. Looking at it a little closer it looks like it said SS. I don't know if that means this truck was originally an SS truck, or if somebody put SS badges on it, or what. Either way it's got to go. So the thing with this. You just want to keep it moving. If you stay in one spot it'll burn through, and we definitely don't want to do that. Alright, it's gone. Well getting all of the flashy accessories off there sure made this truck look a lot better. Now we did have big plans to do a big fancy paint job on this truck but we're kinda running out of time and we don't want to shortchange something like that. So what we'd like to do is get the truck looking as good as we can without breaking this paint to kinda restore the current state of paint job. We're gonna do that with several different things. One is going to be paintless dent removal. To do that we've got the guys here from indents. Now PDR is a very specialized skill that I don't have. So I'm gonna get out of the way and let these guys do their thing.

(Rod)>> The first dent I'm gonna tackle today is this sharp dent on the cab corner. For those that are not familiar with our business it's nothing like conventional where you have to grind, and sand, and use body fillers to repair the dent. We actually access the dent from behind if possible, and we use our tools that are specialized in the industry to push the dent out from behind. It's kinda like giving a massage to get it back up to factory specs. Particular tool that I'm using is called a Whale Tail, and that actually slides between two panels. I use the leverage off the inner panel to push the outer panel back into place. In the process I use the reflection of the PDR light to see the depth of the dent. The process, I'm moving it back into place. Traditional repair would be to grind this off, use body fillers, and refinish it, but with this method you maintain the factory finish and the longevity of the vehicle. It's like the dent never even occurred.

(Kenneth)>> Our company basically does hail damage. We service body shops all over the southeast doing hail damage repair for insurance companies. Just like using the traditional stud welders you have to grind the paint off, weld the stud on. This you don't have to mess up the factory finish. You can literally just glue these right on. With a little time and patience just lift everything back out to original form and blend it out. We're gonna put some glue tabs on here today with soft neoprene. [ Music ] It's a glue that will adhere to paint without messing up the paint, or the temperature will not mess up the paint, and as it bonds to it it will stick to it and you can take the lifter and it will raise it up and you can watch the metal actually contract. We'll grab a mini lifter. Get that little pop. [ Music ] And there you go!

(Eric)>> Next up, we throw some new brakes on our S-10 and finally reveal our new wheels and tires.

(Marc)>> These things are the quintessential mini truck wheel.

(Marc)>> Well our mini truck's coming along nicely. Got the wheels and tires back off because we're going to address the brakes. Now normally when we go with EBC brakes we talk about something that's high performance, or something that's gonna help you stop when you're pulling a trailer or something like that. Our mini truck we really don't need that. We just need a good set of OEM style pads. So EBC's got these Ultimax-2 brake pads, and they're basically an o-e-m brake pad but with the quality that you expect from a product like EBC. It's got the break in coating here to help you break the pads in properly. It's gonna have low dust, zero metallics in here. So it's gonna extend the life of not only the pad but also your cast iron rotors. Speaking of cast iron rotors, we went with EBC's BSD Sport Rotors. Now this is very similar to their regular USR rotors. The grooves that help expel the gas and the brake dust. Now as for the centers and the hubs they're all geomet coated black. So you don't have to worry about them rusting over time. Just need to get these things installed on the truck. Let's get these calipers out of here. [ Music ] Now these pads, woo! This is a good example of some pads that have seen their best days. If they've cracked here in the center that means they could unadhered from the backing plate, and you can also see these have metallic, they have steel inside of them, and that's what is really hard on your rotors. On the EBC pads they put a knurling on the back of the pad to keep the pad from becoming unadhered from the backing plate. Get this dust cap out of the way. Let's see how loose this is. I think I'm gonna go ahead and put some new bearings in here anyway while we're at it cause if they've been in here as long as those pads have been on here it stands to reason they have been. Well gonna retain this washer and castle nut, but I am gonna install some new bearings. I've got new outer, inner, and the little axle seal. I'm gonna go ahead and get the inner bearing packed first. That way I get that in, get the seal installed, get the rotor on the truck. You can see how that grease pops up in between those rollers. That's how you know you got it all in there. We're good to go on this one. [ Music ] [ hammer tapping ]

(Marc)>> On to the truck. [ Music ] So the idea you don't want it to be real tight cause there's gonna be too much tension on that bearing but you do want to tighten it so that it seats properly and then back it off until that groove in the castle nut lines up with the hole for your cotter pin. [ Music ] [ hammer tapping ] [ Music ] So these are the Ultimax pads. Basically this o-e-m style pad, but they're gonna be low dust. So they're gonna keep our fancy wheels clean, which we'll be showing you later on. [ Music ] [ ratchet clicking ] Alright, that's all it is for that. Get the other side done and we can get our new wheels and tires installed. What you got there?

(Eric)>> I figure since you got those brakes done it's about time to get the wheels and tires put on.

(Marc)>> Look at those things.

(Eric)>> Billet Specialties, doesn't get much more '90s mini truck than that. Then we've got the Continental Extreme Contact Sports. That way the tires can match.

(Marc)>> They probably want to see. We got these from Summit Racing, and this is actually a modernized version, this GS-53. This isn't the original design of this wheel. It is the same center but you can see on the rears that you've got there they never made them that wide.

(Eric)>> It did successfully lay frame.

(Marc)>> That's a real mini truck.

(Eric)>> I think we did it.

(Marc)>> Coming up, we buff, wash, and shine this baby up. Then lay it all out.

(Eric)>> Well this, aside from getting the grille, the mirrors, and the taillights put back in, this truck looks like it's just about finished up from 20 feet away. Now if you get up a little bit closer you'll see regardless of the fact that we just washed it and had the PDR done there is still a lot of spots on this truck that are gonna need to be touched up. We've got some stains. We've got a couple of spots that are scuffed and scratched, and we just won't be able to get that out with a hand wash. I think that driver's bedside is just about the worst part of the truck.

(Marc)>> That's where I'm gonna be starting. This has got a few scuffs and scratches on it I think we can take care of with some products from Sonax. As a matter of fact we're gonna do a one stage buff on this, which is gonna buff and polish, and we're gonna be using Sonax's Ultimate Cut. So this is a very dynamic polishing compound. It's actually for cutting and buffing. What it is is a fast cutting compound polishing sanded or severely weathered paint. It's an odorless water based formula with low dusting and no silicone. As for the buffer we're gonna be using this Flex Series orbital buffer that we got from Sonax as well, and for the pad we're gonna be using the hybrid wool purple pad here, which is also a really diverse piece of machinery. Well one great thing about white paint is it hides a lot, especially when it comes to light scratches, which this truck has a lot of. The bad thing about that is it'll go a very long time without being cut out because they're easy to hide. Down the side here this truck has been used as a pickup truck, as it should be for a very long time, and there's a lot of little scratches right through here. You can't really see them very well but if you listen...

There are some contaminants on the outside of the paint that could be contributing to that, but also there's a lot of scratches in there. This Ultimate Cut and the hybrid wool pad are gonna take care of that. [ buffer humming ]

(Marc)>> That was only about 30, 45 seconds in that little spot right there. You can already see a lot of that gloss coming back out through that paint. It's really gonna brighten that up. If you listen...

It's quiet. It's nice and smooth. We do that to the rest of the truck. Then we can take this thing out, give it a final wash, and this truck's gonna look brand new. Well with our polishing done we want to protect that beautiful shine, and we're gonna do that with a quick wash using Sonax's shampoo, and then follow that up with some spray and seal, which we spray on with the vehicle still wet. [ Music ]

Final touch! [ compressed air hissing ]

(Marc)>> Well there you have it. I've got to say, it's done.

(Eric)>> We might not have gotten around to that paint job we wanted to do, but you can't always have time for everything, and we did touch a lot of bases that you need to for a mini truck. We got the custom wheels. We got it notched, bagged, and slammed. We got custom mirrors and grille, the sound system. I would say comfortably this qualifies as a proper mini truck.

(Marc)>> I'm gonna be knocking that off of my bucket list.

(Eric)>> We slammed the truck. Want to go slam a few?

(Marc)>> Let's go!
Show Full Transcript