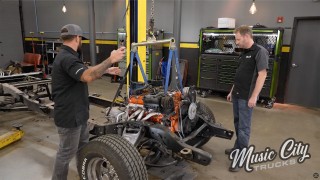
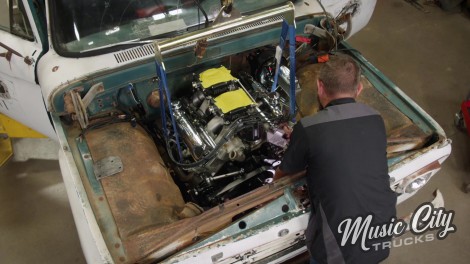
Music City Trucks Featured Projects

Music City Trucks Builds

Parts Used In This Episode

Episode Transcript

(Marc)>> You're watching Powernation!

(Marc)>> Today on Music City Trucks we're reviving our 1964 Ford F-350 Flatbed shop truck. It's been sitting on the back burner for a while now and it's time to bring it back with a new attitude and aptitude. [ Music ] This has got to be the most iconic design! [ Music ]

(Eric)>> Welcome to Music City Trucks. We're bringing back our '64 F-350 Flatbed from a few years ago. Now when we picked it up it was a Ran When Parked kinda deal, and it had sat in the same spot for more than six years not running. In that time a few roosters had called it home. We had to kick them out, get this thing running... [ engine starting ]

(Eric)>> ...bring it back to the studio and give it a whole new life. I've been looking at this thing in the warehouse every day since I got here and I've wanted nothing more than to get my hands on it cause how could you look at this and not want to get into it?

(Marc)>> This is one of my favorite projects that we've had here in the shop, and for good reason. It's old, simple to work on, and especially now with this empty engine bay that's a clean slate it's begging for a V-8.

(Eric)>> What better way to get some power than a 445 cubic inch FE? Now like I said before, this isn't just any old FE engine. It started out as a regular old 390 but Engine Power said nah-ah.

(Pat)>> It also leaked oil and was only running on five cylinders, but we could fix that.

(Eric)>> They took it, bored it out, put a stroker kit in it, which gave this engine an extra 55 cubic inches of displacement for a total of 445 cubic inches. Now obviously the displacement alone doesn't dictate what kind of power an engine makes. So they've got a custom ground Comp hydraulic roller cam, Scat crankshaft, Eagle I-beam rods, and a whole lot more goodies inside. On the outside we've got a set of these Trick Flow FE heads as well as a Trick Flow Tunnel Wedge intake, and that is topped off by this FiTech Go-EFI dual quad setup. Now all of that combined with the compression ratio of 10.06 to 1 equaled out to 587 horsepower and 567-pound feet of torque, and all of that was done on 93 octane pump gas, which means we can still drive this thing around on the street and fuel up anywhere we want but we're not quite ready to drop it in just yet.

(Marc)>> It's pretty obvious we're gonna be making some drastic changes to this truck this time around, and there's three main objectives that we've got here. We want to improve on drivability, reliability, and safety, and we're gonna be accomplishing all three of those by upgrading the brake system in a big way with a two-pot master and a vacuum brake booster. Well this tiny little single-pot brake master was perfectly acceptable for a one ton pickup truck by 1964 standards, but because we know better we do better. By the '70s Ford had gone to a setup like this, which is a two-pot master and a vacuum brake booster. There's advantages to both of these. Obviously having power brakes is a huge improvement over manual brakes, but then also the two-pot master if you lose a brake line you're only gonna lose brakes on either the back two wheels or the front two wheels. These are actually Duralast parts, brand new, that we found on the AutoZone Pro website. These are specific for a mid-'70s Ford truck. So they should go right in, but before we can get these things in I've got to get that thing out of the way. I already disconnected it from the pedal. So I'm gonna go ahead and get that line off of there next. [ metal clanging ]

(Marc)>> I'm alright with that. [ Music ] [ drill humming ] [ Music ]

(Marc)>> Well let's compare here the length of the rods. So you can imagine this is where the firewall is. This rod's quite a bit longer, but because we're going from manual brakes to power brakes the pedal rod doesn't need to be as high on the pedal because you don't have to have as much mechanical leverage with a power brake setup. So I'm not actually sure if we do need to trim this yet or not. I'll know more once we get it installed and see where the pedal lands. Let's see if these holes actually line up. [ Music ] Not at all! That's okay. We know how to drill holes. Coming up next, we dress up and drop in this FE between the fenders of our Flatbed.

(Eric)>> While Marc is getting our brake system upgrades finished on this '64 F-350 I'm gonna get our engine dressed out so that we can start our fitment process. Now when I say dressed out I mean the engine needs to be set up how it's gonna be when we get it installed. That's gonna mean installing our accessory drive and our headers, but we're gonna get started with the accessory drive. So here we go! Now that we've got r-t-v on both of our gasket surfaces and on the end of all of our bolts we can install the water pump. Now we'll get this bracket installed, followed by the alternator. Next up we're gonna install the turnbuckle that acts as the tensioner, and make sure to leave it a little bit loose so you can still move the alternator, followed by the water pump pulley. Come back and torque that down later once we've got the belt on. The last piece to go on for right now is gonna be this crankshaft pulley. [ mechanical humming ] [ Music ]

(Marc)>> With our engine sitting about where we want it to be it's time to start thinking about engine mounts. Now we've got this mount here. This is one of the ones we made when we installed our 300 straight six a while back. It's a little crude but it's functional, and that's really what we're going for here. Problem is the configuration is completely different. This is vertical on the engine side. This one's not gonna work. So it's time to go back to the drawing board.

(Eric)>> What we've got drawn up so far is just as crude if not maybe a little more. We've got a plate of cardboard on the frame side and on the block side just to give us a little bit of extra distance to judge the plate thickness that we're gonna be using. We've got another piece of cardboard here connecting the two so that we know we've got the right length. With this sitting right here it's right in place where we need it to be. So I'm gonna pull this out and we're gonna start doing some fab work. Now we've got our template here, and it would end up sitting about like so between the frame on this side and the block on this side. Which would work perfectly fine, but after a little bit more thought we realized that we might need some wiggle room. So we decided we're gonna go with some isolated motor mounts instead. Now the concept is pretty much the same but we will have to remeasure after getting our block side plates made and bolted on. So I went ahead and made another template here, and traced it onto this piece of steel, and got the holes marked out. So we're gonna get this cut out, drill our holes, bolt it on, and get some measurements. [ torch hissing ] [ hammer banging ] [ grinder buzzing ]

(Eric)>> Now with all of our holes drilled and all the edges cleaned up it's time to go get them fitted.

(Marc)>> I'm gonna guess. We can always adjust it later.

(Eric)>> How's it going over here?

(Marc)>> I got this clamped in but it can move depending on what you got going on.

(Eric)>> I got the block side plates made. So I figure we'll get these mocked up on there and get our new measurements.

(Marc)>> Connect the dots, sounds good! Here's what I was thinking. If we can put that there and then just connect with this.

(Eric)>> Cut that pipe at an angle, and then weld it flat on this side?

(Marc)>> We'll go ahead and cut the angles, and then we'll trim it to fit.

(Eric)>> I'm pretty much dead center on this frame plate right here, which is good. I think that'll be better right there cause then we'll be able to dodge these primary tubes.

(Marc)>> Looks like we're gonna have to cut it at an angle on both ends, but that's okay.

(Eric)>> We'll just have to put a little bit of an angle.

(Marc)>> We'll save that for the end. Let's give this thing a test fit. I don't know how it looks from under there.

(Eric)>> I think that's gonna fit perfect! I'm just gonna mark it right here in line with the plate.

(Marc)>> I'll leave it a little long and we'll test it again. Let me go make a cut. Let's do the test fit right here.

(Eric)>> That's pretty close. Ideally as close to the middle as possible. I'm gonna shift this back just a little bit more.

(Marc)>> Just leave it a little loose and let me just stick this in there.

(Eric)>> I think right there show work fine.

(Marc)>> Can you push up on the front of the engine just a little bit, just a little rock? Yeah, that's where it needs to be right there. Let's pull it out and tack it, and then test fit it. [ Music ] [ welder crackling ]

(Eric)>> Now fit this one more time, and I think we're just about ready to get everything welded together.

(Marc)>> I'm gonna get this finger tight, and then we'll check and make sure we've got clearance everywhere.

(Eric)>> Let me get us positioned back on our mark here.

(Marc)>> I'm good right there!

(Eric)>> We're a little close there on top bolt.

(Marc)>> I would err toward the passenger side a little with the whole motor. If we have to we can trim against the frame for that primary on the other side.

(Eric)>> We're a little bit close on our top bolts but we do still have room there. So I think that'll do. I've just got to re-mark. Hold it right there, if I can keep it in place. I'll get this stuff pulled out and welded together. [ welder crackling ]

(Eric)>> Well I got our first mount made. I think we should be good to go to get that other one done.

(Marc)>> I'll get this thing on there. With a little bit of material and a little bit of effort. That's in there! We'll get that other one made and move on.

(Eric)>> Next up, we get creative to upgrade and update the fuel tank in this old F-350.

(Eric)>> Now it's all fun and games to put a lot more power under your hood, like we just did with this '64 F-350, but there's a lot of supporting components that need to be upgraded along with that to make sure that your ride is gonna be safe and reliable. Now what we're about to tackle here is gonna handle both of those things, at least in a small part. So this old truck has the fuel tank mounted behind the seat in the cab, and that can be a safety concern, especially when you've got almost 600 horsepower under the hood. So we've opted to move the fuel tank back here underneath the bed. Now this fuel tank here is actually meant to go underneath of a '68 to '70 Dodge Coronet, but after doing some measuring we realized it'll perfectly between the frame rails underneath of our truck. But this is just a standard tank. It's not e-f-i ready. So we headed to FiTech and picked up this Go-Fuel e-f-i ready 340 liter per hour fuel tank kit. Now this kit is all inclusive and it will get you on the road with all the fuel you need. Now this kit includes your tank, your straps, sending unit, pump module, and all your parts, pieces, and hardware that you're gonna need to get it installed. Now this little high flow fuel pump right here might not look like much but that 340 liter per hour flow rating is gonna be more than enough to power that dual quad throttle body setup that is also from FiTech. I think the most important part of this kit is this nice, detailed instruction booklet that they give you. So I'm gonna go give this a read and get started. [ mechanical humming ]

(Marc)>> While Eric's prepping that e-f-i tank I'm gonna use this one for mockup. As a matter of fact... [ metal clanging ] I think it needs to go just about like that. You just need to make a couple of marks and then figures out how we're gonna mount our straps. [ Music ] Looks good right there! Alright, weld them things in. [ welder crackling ]

(Marc)>> That's all it needs to hold the fuel tank in. With those brackets tacked in place the idea with putting those brackets there with the little Kermit eyes inside there, we can get our tank straps in and lock them in place. Then we'll mount them with some bolts up on the front side and that'll mount our tank in place.

(Eric)>> Now that Marc's got those brackets welded in and the straps put on, and I've got our fuel pump assembly and our sending unit modified to fit into this tank. It's time to get the tank prepped so we can get it installed in the truck. These sending units can be a little bit challenging if you don't know this trick. That's why we loosened up the two screws that hold it onto the assembly. So we can fit everything in, come back, tighten them up so that it stays in place, and then mount it. Now it's never really a whole lot of fun to try and put an in-tank pump module into a fuel tank, but this one shouldn't be too bad. We're gonna be using the taller of the three gaskets that FiTech sent us for a little bit of extra clearance cause the tank itself is not very deep. So we're gonna use these screws here to keep the gasket and the pump module together while we get it dropped in. We're just gonna squeeze this and drop it in like so. Just like installing a tire you want to make sure that everything is snugged up before you actually go back and tighten it for the last time. The last thing we need to do to this fuel tank to get it put in is to get our filler neck installed. That's fairly simple. Little bit of lube, the grommet, and the filler neck itself. With it being lubed you get it slid in as much as you can. Then take a dull pick, or screwdriver, or something similar, and just give it a little bit of a push. Then get it right up to that. Now ready to get it in the truck. [ Music ] Still fits great. We're just gonna use this to stick it up in position. That way we can see where we need to drill to put this end of the straps in and where we need to drill for the filler neck. We'll measure this, and then cut a hole here that is probably about a half inch larger. That way it's got room to actually sit inside of that I-beam. Before cutting through this we're gonna drill a hole so that the plasma cutter has something to start with. I think we all know what to do when it doesn't just fall right out. Alright, now that we've got that hole cut out we're ready to put the fuel tank back in, get it bolted up on the back side, and then with that fully mounted we're ready to move on to get this thing running. The coolant system that was in this truck before will be sufficient. Coming up, we check off the last few requirements to finish this engine swap.

(Eric)>> We're almost ready to fire up this '64 F-350 once again, but there is still some more work we've got to do before we can get there. When it comes to doing any kind of a big job like this as far as engine swaps, transmission swaps, or even chassis swaps it is always helpful to make a checklist. That way you can stay on track and make sure you don't forget anything. Now an engine swap like this is a very short, very simple checklist, and there's just a few things that you have to make sure that you do. First up, you need the engine, which was pretty easy for us because we just hoped next door and grabbed the coolest one we could find. Then you're gonna need a fuel system. Then a cooling system, followed by your plumbing and your wiring, and lastly an exhaust. Now obviously we already have the engine installed. So we can check that off right now, and the fuel system just got finished up. So we'll check that off too, which leaves us with the cooling system being next. Now the cooling system that was in this truck before will be sufficient for what we're running now. So we're gonna be reusing it. The only thing we're gonna have to change is the radiator hoses. We're gonna stick that right there, cut just a little bit off right there, and it's gonna fit perfect. So we're gonna call this good and get underneath to do the lower. On the bottom side it's gonna be a little bit different. One of these hoses is from an early seven-three diesel and the other is from an early Cummins. I got us a piece of pipe here, and I could definitely make it work the way that we were planning on before but looking at it now I think I've got a little bit better idea. Instead of using that lower half of the hose that we've already got in there I think we use this side that we were gonna put to waste. We can use this pipe without doing anything more than just putting a bead on each end.

(Marc)>> That's all it takes.

(Eric)>> Now that Marc's got this welded up I'll go ahead and get her installed. Now with that cut I'll go ahead and install the other end of this pipe. That's looking pretty good to me. So all we've got left right here is to just get these hose clamps tightened up, and then we can head back to our checklist and go ahead and cross off that cooling system. With the cooling system finished up it's time to move on to our plumbing, and in this case plumbing is primarily getting our fuel lines ran. Now as you can see right here, we still have the old fuel lines from our last setup on this truck, and since it was already set up for e-f-i we're gonna be trying to reuse as much of that as we can. So let's get re-routing. Next we're gonna disconnect both fuel lines from our old fuel pump, and then splice them back together later on. Now we'll get the other side disconnected. Now we can unbolt the old pre-filter. Got everything underneath disconnected. Gotta get disconnected from this original tank. [ Music ] In order to disconnect the return line we have to disconnect the filler neck first. [ Music ] Now that we're running a returnless system instead of a system with a return we're gonna separate these lines and only keep our pressure line, which will be this one right here with the filter. So I'm gonna run this back to the new tank while Marc gets our new fuel lines connected to the throttle bodies, and then we can call our plumbing finished.

(Marc)>> Well with the fuel system finished up we can move on to the wiring, and thankfully for us we already had a FiTech system in this truck with our 300 straight six, and these dual FiTechs on our FE they built down Engine Power already has all the wiring on it. So really all we need to do is just connect the two. Well the lone connector there that needs something plugged into it is for our wide band, but I don't want to go ahead and plug that in because we can't get it installed yet without our exhaust system done and we can't put our exhaust system in until we get the transmission installed, and all that's just gonna have to wait until next time.

(Eric)>> And we've got pretty big plans for that transmission, but like Marc said, we're out of time for today and pretty exhausted anyways. I think we need to leave this for next time.
Show Full Transcript