
Engine Power Featured Projects


Engine Power Builds


Want more content like this?
Join the PowerNation Email NewsletterParts Used In This Episode
Matco Tools
MATCO Tools are the Official Tool Supplier to PowerNation
The Industrial Depot
Tools, Hardware, Shop Supplies
Episode Transcript
(Pat)>> When a junkyard engine
makes crazy horsepower in the dyno cell there's only
one thing you can say.
(Mike)>> Holy crap! [ Music ]
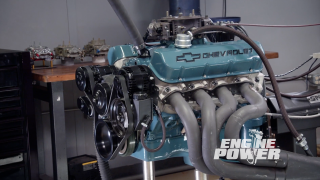
(Mike)>> Welcome to Engine Power where engine tech and real world dyno numbers go hand in hand. This season has been filled with awesome builds. They include a 292 inch inline six with artificial atmosphere, a stroked small block Chevy with a big blower, a big inch FE, and the list will grow as we continue pumping out these shows for you. This engine is going to receive a totally different approach than the ones we just mentioned. They had a lot of new parts and a pretty big price tag. Now this is a Vortec 5,300 LM-7 LS engine. It has an iron block, aluminum heads, and it was introduced in 1999. Now this engine is known as the garden variety of the gen-3's. When introduced the LM-7 produced 270 horsepower and 315 pound feet of torque. Through its production years it increased in both the horsepower and torque departments. The final gen-3 LM-7 made 295 horsepower and 335 pound feet of torque. Now the cam shaft is very small. Duration at 50 thousandths lift is 190 on the intake and 191 on the exhaust. Lift at the valve with a 1.7 ratio rocker arm is 466 thousandths and 457 thousandths, and it has a 114 degree lobe separation angle.
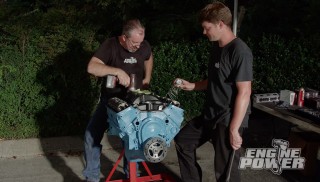
(Pat)>> This engine was pulled out of a Silverado that met its end with a hard front end collision. Now we were told it was a good runner with no known issues. Instead of just cleaning it up and dropping it in a project wouldn't you want to know its condition? Especially if you want it to run efficiently for any amount of time.
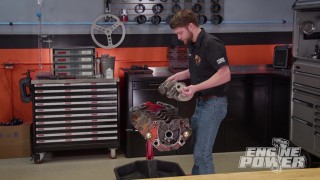
(Mike)>> This project is getting the badge name Low Buck Vortec, and it's for a good reason. We're going to tear this engine down, thoroughly clean all the parts, do some block upgrades, and spice up the oiling system including the oil pump. Then the entire engine is going back together with minimal new parts. Now there's some cool things we're gonna show you that will allow us to take this little 325 cubic inch engine to the next level and make it a bracket racer or a little street/strip bullet. When this engine was pulled pretty much everything was left intact. We won't need several parts and pieces like the wiring harness. So it will go first. The factory connectors are easy to remove. Simply press on the retaining tab and pull the connector. Coil packs are an important component to hold on to. They are expensive to replace. [ Music ] Look at there, look at there.
(Pat)>> A couple of leaves. Now this was a runner.
(Mike)>> Typical looking intake runner.
(Pat)>> Well that's why we're taking it apart and cleaning it. I mean other than it being dirty if it ran it'll run again.
(Mike)>> That's right. We're going for power numbers. So we definitely won't need the power robbing accessory drive. Plus it was a little damaged during the collision. Now there are several components that make it up. They range from the water pump, power steering pump, a/c compressor, idler and tensioner pulleys, the alternator, and balancer. The exhaust manifolds are cast iron. We will be using a set of dyno headers later. So these go in the scrap bin.
(Pat)>> This now gives us a good look at the outside of the engine, and I must say it's definitely had some issues leaking around the seams, but that really doesn't bother us because it's easy to fix oil leaks on an LS because the way the gaskets are designed. There is some truth to the saying it's all in the pan. Will there be bearing material, foreign matter, or even heavy sludge due to lack of oil changes? We're gonna find out right now. Well for as many miles as they say is on it.
(Mike)>> Typical LS pan.
(Pat)>> A little chunky.
(Mike)>> Just build up down here in the corners of the pan, like typical. You can tell they weren't very religious on changing the oil but they knew when they got 2,000, 3,000, 4,000 miles over it was ready. We'll clean and reuse.
(Pat)>> Absolutely! So far so okay. Any high mileage well used engine is gonna be a little dirty. You can never really tell what's going on until you tear into it.
(Mike)>> Man see the corrosion down in here? That one looks brand new. That's what makes these covers hard to get off and usually rip that seal.
(Pat)>> There we go!
(Mike)>> That one came out without ripping but look, the one that looked good ripped off.
(Pat)>> For the sake of your spark plugs and your engine always loosen the spark plugs by hand before power tools go on them. The valvetrain looks decent until we take a look at the push rods. The one on the right is in great shape but the one on the left reveals a heavy wear pattern with lots of metal worn off the ball end. The wear pattern is even more pronounced on the rocker.
(Mike)>> Alright let's see what happens over here. Yep same thing as one.
(Pat)>> Okay this is the exact reason why you tear an engine apart very slowly and look at everything because this will tell you that you have an issue.
(Mike)>> The cylinder head bolts tell a store as well. They are a little on the loose side, which makes us think this engine may have gotten overheated at one point. Look at that. There's no breakaway.
(Pat)>> There's no breakaway on that. How about that? That was running or was it?
(Mike)>> You never know.
(Pat)>> You never know if you're getting the truth.
(Mike)>> There is still quite a bit of cross hatching on the cylinder walls. That's a good sign that this engine was taken care of to some point. As we dig into this Vortec we keep getting hit in the face by the smell of old burnt oil. Like any high mileage engine this one has its wear and tear. Whether or not this was a runner we're certainly gonna making it one. Up next, with just a couple of hand tools and a little bit of time you're engine can run its best. We'll show you how.
(Mike)>> Why is it important to balance your engine? The answer is in today's tech tip.
(Steve)>> Balancing an engine minimizes vibration, helping the engine run smoother, maximizing engine life. Balancing requires offsetting the weight of pistons and rods by adding or removing weight from the crankshaft. An engine can be balanced internally, externally, or a combination of both. An internally balanced engine only has modifications to the crankshaft. External parts like a balancer and flex plate flywheel have a neutral balance. So they won't affect other rotating parts. If the crank's counterweights are too light the engine must be externally balanced. This involves adding weight to the harmonic balance and/or flex plate or flywheel. Generally speaking internal balance is the better option. External counterweights can cause the crankshaft to flex at high r-p-m's, which can cause engine damage. However either type of balance is fine for most engines. [ Music ]
(Pat)>> We're continuing on the teardown of the 5.3 liter Vortec. It's looking pretty good. For the most part like a decent running high mileage engine. A lot of this stuff looks kinda nasty but it will clean up okay. Nicely done! Oh yeah, the bearing looks good. [ Music ]
(Mike)>> Or not.
(Pat)>> Way to go Pat! Sorry about that. [ Music ] [ grinder buzzing ]
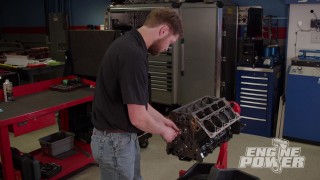
(Pat)>> It's crucial to label parts as you're disassembling any engine. Everything needs to go back exactly where it came from. [ Music ] This is what I'm very interested in seeing.
(Mike)>> This is the go to moment.
(Pat)>> Dude look at that!
(Mike)>> What the heck? High mileage LS and the bearings look new. There's still a little bit of coating on the skirt, anti-wear protection.
(Pat)>> That's unbelievable, and the bearing still has a little bit of crush. So I think we've got a winner. Some places it really looks like an engine with 100,000 plus miles, live the groove behind the main bearing. [ drill humming ]
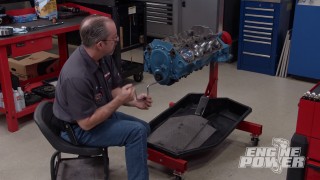
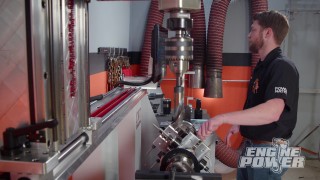
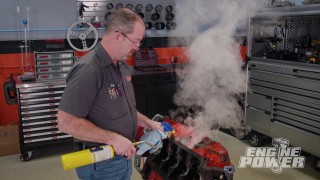
(Pat)>> A thorough cleaning in the jet washer will knock off years worth of grime. We'll run ours at 150 degrees for an hour or so. With all the heavy stuff removed we'll sand all the gasket surfaces with 180 grit sand paper. We're just cleaning the surface not removing material. On the deck we'll use a flat long bar to sand evenly across the entire surface. [ Music ] Keeping with the budget theme we are just going to ball hone the cylinders. This hone is 320 grit. We're going easy on the cylinder finish. First lube the cylinders with some 10-W30 and get going. We'll do roughly 20 strokes per cylinder making sure not to stop in one place while the drill is running. Keep the drill at moderate speed and try to achieve around a 40 degree cross hatch angle. Now we're left with a reconditioned surface that should help seal up our ring package.
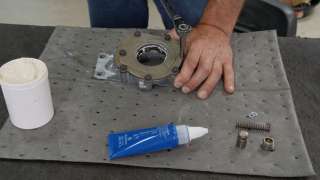
(Mike)>> We just finished washing the oil pump that came out of our budget 5.3. So now it's time to do some budget tech on the pump itself. Now these steps are going to improve the pump's lubrication, pressure, as well as the longevity even though it's a used pump. Now the first thing we're gonna do is go inside the housing and remove the sharp edges where the oil flows on the inlet and outlet side, being careful not to touch the area where the O-ring seals for the pickup. We'll also take the G-rotor gears and dimple every single one of the lobes. Now this will create a pocket of oil between the gear and the actual thrust plate. Last we're gonna shim the spring to increase the pressure about 78 to 82 thousandths. Let's get started. We'll start with a die grinder with a carbide burr. The goal is to smooth out any sharp transitions in the casting. Go slowly and use a light touch. We're just softening the edges, and a heavy hand can do big damage fast. Next we'll drop on a cartridge roll to smooth everything out. Now we have an o-e-m pump that flows more like an aftermarket one. The only cost was a few tools and a little bit of time. To dimple the G-rotors we'll start with a center pump to help guide the drill bit. Then we'll use a three-sixteenths bit to make the first pass, followed by a quarter inch bit. So now that we have the gear dimpled we're gonna go ahead and sand it down because you don't want any of the high spots to catch the front of the thrust plate. So with a little fat surface, some sand paper, and a little penetrating oil we'll knock the edges right off. Now I'll go ahead and keep sanding this with the 500 grit sand paper until the center stays black and quits coming off with the gray. That way we know the edge is knocked off. Looks good! Use plenty of assembly grease when rebuilding the oil pump. Once the G-rotors are in place and lubricated secure the cover and use Permatex blue thread locker on the fasteners. We like the gel formula because it stays in place on the threads.
(Pat)>> The bypass and spring drop back into place. We'll use a couple of washers to shim the spring. This will increase the spring tension, which will hold the bypass closed longer, therefore increasing the oil pressure in the pump.
(Narrator)>> Coming up the Vortec gets buttoned up. Then beat on in the dyno cell. [ engine revving ]
(Mike)>> The whole premise of this motor is to see how much power we can make even with a power adder, but one of the things you want to do is take it apart like we've been doing. Now here's one little step and to us it's kinda one of the most important, especially if you're gonna add a blower, or nitrous, or even turbos, and that is ring gap. So what we're gonna do is we're gonna remove the top and second ring. Place them in the bores individually, and see what they gap at. Right now just out of the engine our biggest gap is 30 thousandths on the top and second. So we're gonna try to get everything to meet that spec.
(Pat)>> Simply place the ring into the cylinder and use the ring squaring tool. Then measure the gap. [ Music ] Out of all of the rings we only had one gap that was tighter than 30 thousandths. [ grinder buzzing ]
(Pat)>> Check now.
(Mike)>> Is that eye-rometer?
(Pat)>> Well I had a gauge here but you said five. So I went dead on five.
(Mike)>> There's a 30. You ready? [ Music ]
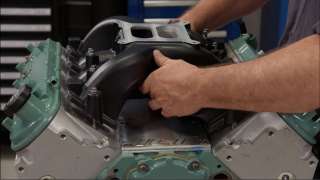
(Pat)>> Hmm, imagine that. Next up the crank gets a light polish with our Goodson crankshaft polishing tool. Both the main and rod journals are in fantastic shape. We didn't use a gritted belt at all, just the cork belt. The result a smooth, shiny, clean surface. We'll give the engine another pass in the jet washer and begin assembly. One of the few new parts we're installing on this engine is a set of main bearings. The cost is under $80 dollars, and since the old bearings looked kinda rough it was well worth the expense. As always we'll check main bearing clearance for all of the bearings. It varied between 20 and 22 ten thousandths. Excellent! [ Music ] Before installing the rod and piston assemblies lube the cylinders with break-in oil. We'll also lube the wrist pins as well as the rings. Using a ring compressor they are gently tapped into place. [ Music ] The fasteners are torqued to 15 pound feet. Then 85 degrees on our Matco half inch drive digital torque and angle meter. [ Music ] We wanted to do something a little bit different on the paint job, and we think this color does the trick nicely. It's Detroit diesel alpine green. We replaced the stock cam with a Cam Motion LS-1 stage 3 hydraulic roller. This is a mild performance cam that still works with stock components. [ Music ] The oil pump is shimmed in three places on the gear using 1.5 thousandths shims. This ensures proper alignment when tightened down. Since the stock valley plate was in really bad shape we decided to use an ICT valley plate instead. The cylinder heads were installed with new stock torque to yield fasteners, and torqued to 22 pound feet initially. Then we used a torque angle meter to tighten the fasteners two rounds of 90 degrees. [ Music ] Finishing out the build is the valvetrain, oil pan, and one more aftermarket piece, a Holley dual plane intake manifold. [ wrench clicking ] Any experienced welder knows that surface prep is the foundation for a great weld. Forney Industries makes that job easier with a full line of abrasives for welding and body work. Their two inch and three inch surface prep pads fit easily into tight spaces and they are the perfect size for stripping and cleaning just the right amount of material to lay down a clean bead. The pads are available in coarse, medium, and fine finishes, and they attach to Forney's roll lock backing pad for secure fit and quick changes. From cutting and grinding to sanding and buffing there are literally hundreds of products to choose from. Visit Forney IND dot com to learn more. Rock Auto dot com's slogan is all the parts your car will ever need. Their inventory is impressive and so are their prices. Plus they have a selection of whole sale or close out parts with even deeper discounts. To see these parts simply choose your vehicle. Then click on the orange r-s-s button next to your car's engine size. Then look in the upper right hand corner and click the r-s-s button next to love a bargain. Now you can browse a list of whole sale or close out parts available for your vehicle. The close out price is limited to stock on hand. So be sure to check out Rock Auto dot com.
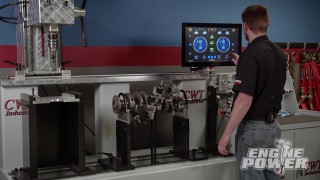
(Mike)>> Up next, sometimes the engine does what you think it will in the dyno cell but sometimes. I saw some big numbers dude.
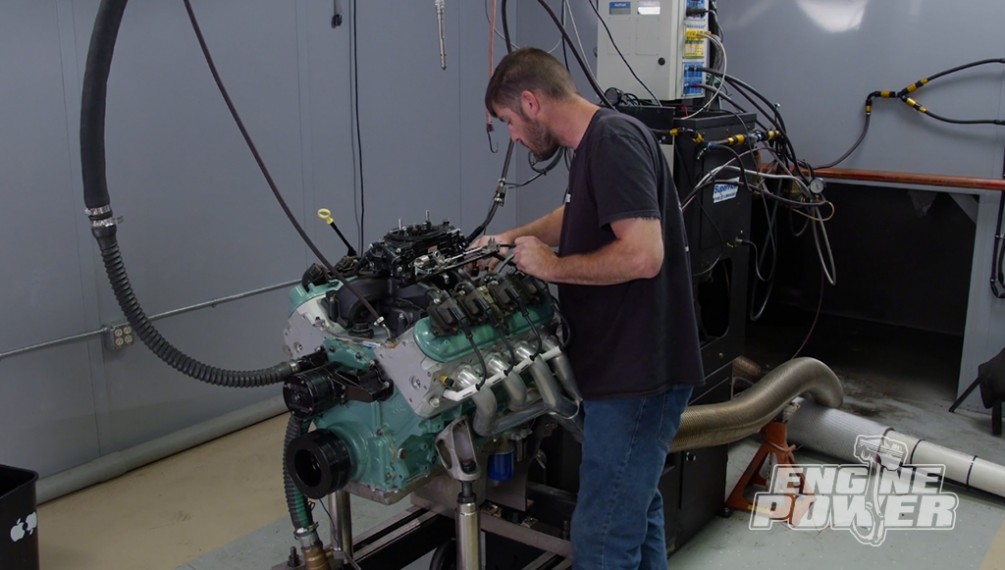
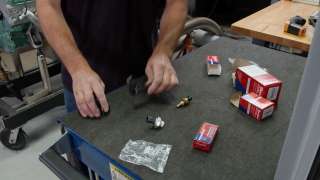
(Pat)>> We're almost ready to fire up the Vortec but first we need to install some electronic components. We're using a selection of sensors from Duralast. They offer thousands of o-e-m quality or better parts for almost any vehicle on the road today. Duralast products are rigorously tested for performance and reliability, and they are a top choice of professional auto shops. First is the coolant temperature sensor, followed by the cam sensor. Depending on your application the cam sensor can be in the front or the back of the engine. Finishing out is a 24 tooth reluctor crank sensor. Alright on our budget extravaganza here this engine requires zero break in. So go from 3,000 to 6,000 and make a hit.
(Mike)>> Here we go! [ engine revving ]
(Pat)>> Look at that. That is used rings, used rod bearings, used rod bolts, 337 horse.
(Mike)>> 351 pound feet of torque.
(Pat)>> Nice!
(Mike)>> Bone stock heads, dual plane manifold.
(Pat)>> This is the cheapest you can get one of these things running right. You can put injection on it but you'd have much more sensors, much more wiring, much more messing around with it. This is as cheap as you can get this thing going. [ engine revving ]
(Mike)>> 346 at 6,000.
(Pat)>> Yep 355. See how it's trying to tail off now?
(Mike)>> Oh yeah, definitely. At 200 r-p-m's it drops six. So now here's the thing. We did this to show everybody how they can get a junkyard engine, do a little tech to it, and put a power adder on.
(Pat)>> And again I guess the power adder is nitrous, and again you know how I am, a naturally aspirated guy. This is a good way to do it though. It really is because this is the cheapest you could do it to make the most power you can bang for the buck. So stick that plate on. We're running a Holley Sniper nitrous system, which has a range of 150 to 250 horsepower depending on the size of the jet.
(Mike)>> So 63 jets on fuel and nitrous. 150 shot.
(Pat)>> 150 okay.
(Mike)>> Sniper kit, 3,000 to 6,000.
(Pat)>> 600 a second?
(Mike)>> It is.
(Pat)>> I'm arming it.
(Mike)>> Here we go! [ engine revving ]
(Mike)>> I saw some big numbers dude. Holy crap! 724 pound feet of torque! 564 horsepower for a 150 shot. This thing made 347 N/A.
(Pat)>> 217 horse!
(Mike)>> God bless, look at the torque!
(Pat)>> That's the right jet?
(Mike)>> 63, 63, I triple checked them.
(Pat)>> Wow, 724 pound feet of torque. Now it's probably higher because we loaded it.
(Mike)>> It definitely was higher because we loaded it. The brake caught it, brought it down a hair, and then it took off.
(Pat)>> So on our 150,000 mile we reused pretty much everything engine I think we flirted with disaster right there.
(Mike)>> But we won.
(Pat)>> This time we won. Nice job! We made a lot of horsepower but we didn't spend a lot of money. The engine was $500 bucks. A set of main bearings was $80 bucks. Cam, lifters, and timing chain were $650 dollars. The valley cover was $40 dollars. The intake manifold ran us $300 dollars. The gasket set $210 bucks. Push rods were $30 dollars. Five rocker arms for $90 dollars. Finally the nitrous kit was $570 dollars. A total of $2,470 dollars. That's $4.38 per horsepower and $3.41 per pound foot of torque, very impressive. For more information on anything you've seen today visit Powernation TV dot com. [ Music ]
Show Full Transcript
(Mike)>> Holy crap! [ Music ]
(Mike)>> Welcome to Engine Power where engine tech and real world dyno numbers go hand in hand. This season has been filled with awesome builds. They include a 292 inch inline six with artificial atmosphere, a stroked small block Chevy with a big blower, a big inch FE, and the list will grow as we continue pumping out these shows for you. This engine is going to receive a totally different approach than the ones we just mentioned. They had a lot of new parts and a pretty big price tag. Now this is a Vortec 5,300 LM-7 LS engine. It has an iron block, aluminum heads, and it was introduced in 1999. Now this engine is known as the garden variety of the gen-3's. When introduced the LM-7 produced 270 horsepower and 315 pound feet of torque. Through its production years it increased in both the horsepower and torque departments. The final gen-3 LM-7 made 295 horsepower and 335 pound feet of torque. Now the cam shaft is very small. Duration at 50 thousandths lift is 190 on the intake and 191 on the exhaust. Lift at the valve with a 1.7 ratio rocker arm is 466 thousandths and 457 thousandths, and it has a 114 degree lobe separation angle.
(Pat)>> This engine was pulled out of a Silverado that met its end with a hard front end collision. Now we were told it was a good runner with no known issues. Instead of just cleaning it up and dropping it in a project wouldn't you want to know its condition? Especially if you want it to run efficiently for any amount of time.
(Mike)>> This project is getting the badge name Low Buck Vortec, and it's for a good reason. We're going to tear this engine down, thoroughly clean all the parts, do some block upgrades, and spice up the oiling system including the oil pump. Then the entire engine is going back together with minimal new parts. Now there's some cool things we're gonna show you that will allow us to take this little 325 cubic inch engine to the next level and make it a bracket racer or a little street/strip bullet. When this engine was pulled pretty much everything was left intact. We won't need several parts and pieces like the wiring harness. So it will go first. The factory connectors are easy to remove. Simply press on the retaining tab and pull the connector. Coil packs are an important component to hold on to. They are expensive to replace. [ Music ] Look at there, look at there.
(Pat)>> A couple of leaves. Now this was a runner.
(Mike)>> Typical looking intake runner.
(Pat)>> Well that's why we're taking it apart and cleaning it. I mean other than it being dirty if it ran it'll run again.
(Mike)>> That's right. We're going for power numbers. So we definitely won't need the power robbing accessory drive. Plus it was a little damaged during the collision. Now there are several components that make it up. They range from the water pump, power steering pump, a/c compressor, idler and tensioner pulleys, the alternator, and balancer. The exhaust manifolds are cast iron. We will be using a set of dyno headers later. So these go in the scrap bin.
(Pat)>> This now gives us a good look at the outside of the engine, and I must say it's definitely had some issues leaking around the seams, but that really doesn't bother us because it's easy to fix oil leaks on an LS because the way the gaskets are designed. There is some truth to the saying it's all in the pan. Will there be bearing material, foreign matter, or even heavy sludge due to lack of oil changes? We're gonna find out right now. Well for as many miles as they say is on it.
(Mike)>> Typical LS pan.
(Pat)>> A little chunky.
(Mike)>> Just build up down here in the corners of the pan, like typical. You can tell they weren't very religious on changing the oil but they knew when they got 2,000, 3,000, 4,000 miles over it was ready. We'll clean and reuse.
(Pat)>> Absolutely! So far so okay. Any high mileage well used engine is gonna be a little dirty. You can never really tell what's going on until you tear into it.
(Mike)>> Man see the corrosion down in here? That one looks brand new. That's what makes these covers hard to get off and usually rip that seal.
(Pat)>> There we go!
(Mike)>> That one came out without ripping but look, the one that looked good ripped off.
(Pat)>> For the sake of your spark plugs and your engine always loosen the spark plugs by hand before power tools go on them. The valvetrain looks decent until we take a look at the push rods. The one on the right is in great shape but the one on the left reveals a heavy wear pattern with lots of metal worn off the ball end. The wear pattern is even more pronounced on the rocker.
(Mike)>> Alright let's see what happens over here. Yep same thing as one.
(Pat)>> Okay this is the exact reason why you tear an engine apart very slowly and look at everything because this will tell you that you have an issue.
(Mike)>> The cylinder head bolts tell a store as well. They are a little on the loose side, which makes us think this engine may have gotten overheated at one point. Look at that. There's no breakaway.
(Pat)>> There's no breakaway on that. How about that? That was running or was it?
(Mike)>> You never know.
(Pat)>> You never know if you're getting the truth.
(Mike)>> There is still quite a bit of cross hatching on the cylinder walls. That's a good sign that this engine was taken care of to some point. As we dig into this Vortec we keep getting hit in the face by the smell of old burnt oil. Like any high mileage engine this one has its wear and tear. Whether or not this was a runner we're certainly gonna making it one. Up next, with just a couple of hand tools and a little bit of time you're engine can run its best. We'll show you how.
(Mike)>> Why is it important to balance your engine? The answer is in today's tech tip.
(Steve)>> Balancing an engine minimizes vibration, helping the engine run smoother, maximizing engine life. Balancing requires offsetting the weight of pistons and rods by adding or removing weight from the crankshaft. An engine can be balanced internally, externally, or a combination of both. An internally balanced engine only has modifications to the crankshaft. External parts like a balancer and flex plate flywheel have a neutral balance. So they won't affect other rotating parts. If the crank's counterweights are too light the engine must be externally balanced. This involves adding weight to the harmonic balance and/or flex plate or flywheel. Generally speaking internal balance is the better option. External counterweights can cause the crankshaft to flex at high r-p-m's, which can cause engine damage. However either type of balance is fine for most engines. [ Music ]
(Pat)>> We're continuing on the teardown of the 5.3 liter Vortec. It's looking pretty good. For the most part like a decent running high mileage engine. A lot of this stuff looks kinda nasty but it will clean up okay. Nicely done! Oh yeah, the bearing looks good. [ Music ]
(Mike)>> Or not.
(Pat)>> Way to go Pat! Sorry about that. [ Music ] [ grinder buzzing ]
(Pat)>> It's crucial to label parts as you're disassembling any engine. Everything needs to go back exactly where it came from. [ Music ] This is what I'm very interested in seeing.
(Mike)>> This is the go to moment.
(Pat)>> Dude look at that!
(Mike)>> What the heck? High mileage LS and the bearings look new. There's still a little bit of coating on the skirt, anti-wear protection.
(Pat)>> That's unbelievable, and the bearing still has a little bit of crush. So I think we've got a winner. Some places it really looks like an engine with 100,000 plus miles, live the groove behind the main bearing. [ drill humming ]
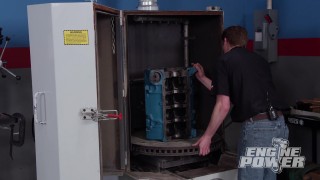
(Pat)>> A thorough cleaning in the jet washer will knock off years worth of grime. We'll run ours at 150 degrees for an hour or so. With all the heavy stuff removed we'll sand all the gasket surfaces with 180 grit sand paper. We're just cleaning the surface not removing material. On the deck we'll use a flat long bar to sand evenly across the entire surface. [ Music ] Keeping with the budget theme we are just going to ball hone the cylinders. This hone is 320 grit. We're going easy on the cylinder finish. First lube the cylinders with some 10-W30 and get going. We'll do roughly 20 strokes per cylinder making sure not to stop in one place while the drill is running. Keep the drill at moderate speed and try to achieve around a 40 degree cross hatch angle. Now we're left with a reconditioned surface that should help seal up our ring package.
(Mike)>> We just finished washing the oil pump that came out of our budget 5.3. So now it's time to do some budget tech on the pump itself. Now these steps are going to improve the pump's lubrication, pressure, as well as the longevity even though it's a used pump. Now the first thing we're gonna do is go inside the housing and remove the sharp edges where the oil flows on the inlet and outlet side, being careful not to touch the area where the O-ring seals for the pickup. We'll also take the G-rotor gears and dimple every single one of the lobes. Now this will create a pocket of oil between the gear and the actual thrust plate. Last we're gonna shim the spring to increase the pressure about 78 to 82 thousandths. Let's get started. We'll start with a die grinder with a carbide burr. The goal is to smooth out any sharp transitions in the casting. Go slowly and use a light touch. We're just softening the edges, and a heavy hand can do big damage fast. Next we'll drop on a cartridge roll to smooth everything out. Now we have an o-e-m pump that flows more like an aftermarket one. The only cost was a few tools and a little bit of time. To dimple the G-rotors we'll start with a center pump to help guide the drill bit. Then we'll use a three-sixteenths bit to make the first pass, followed by a quarter inch bit. So now that we have the gear dimpled we're gonna go ahead and sand it down because you don't want any of the high spots to catch the front of the thrust plate. So with a little fat surface, some sand paper, and a little penetrating oil we'll knock the edges right off. Now I'll go ahead and keep sanding this with the 500 grit sand paper until the center stays black and quits coming off with the gray. That way we know the edge is knocked off. Looks good! Use plenty of assembly grease when rebuilding the oil pump. Once the G-rotors are in place and lubricated secure the cover and use Permatex blue thread locker on the fasteners. We like the gel formula because it stays in place on the threads.
(Pat)>> The bypass and spring drop back into place. We'll use a couple of washers to shim the spring. This will increase the spring tension, which will hold the bypass closed longer, therefore increasing the oil pressure in the pump.
(Narrator)>> Coming up the Vortec gets buttoned up. Then beat on in the dyno cell. [ engine revving ]
(Mike)>> The whole premise of this motor is to see how much power we can make even with a power adder, but one of the things you want to do is take it apart like we've been doing. Now here's one little step and to us it's kinda one of the most important, especially if you're gonna add a blower, or nitrous, or even turbos, and that is ring gap. So what we're gonna do is we're gonna remove the top and second ring. Place them in the bores individually, and see what they gap at. Right now just out of the engine our biggest gap is 30 thousandths on the top and second. So we're gonna try to get everything to meet that spec.
(Pat)>> Simply place the ring into the cylinder and use the ring squaring tool. Then measure the gap. [ Music ] Out of all of the rings we only had one gap that was tighter than 30 thousandths. [ grinder buzzing ]
(Pat)>> Check now.
(Mike)>> Is that eye-rometer?
(Pat)>> Well I had a gauge here but you said five. So I went dead on five.
(Mike)>> There's a 30. You ready? [ Music ]
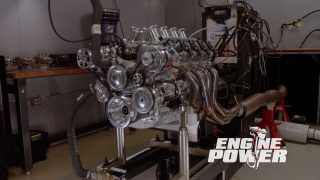
(Pat)>> Hmm, imagine that. Next up the crank gets a light polish with our Goodson crankshaft polishing tool. Both the main and rod journals are in fantastic shape. We didn't use a gritted belt at all, just the cork belt. The result a smooth, shiny, clean surface. We'll give the engine another pass in the jet washer and begin assembly. One of the few new parts we're installing on this engine is a set of main bearings. The cost is under $80 dollars, and since the old bearings looked kinda rough it was well worth the expense. As always we'll check main bearing clearance for all of the bearings. It varied between 20 and 22 ten thousandths. Excellent! [ Music ] Before installing the rod and piston assemblies lube the cylinders with break-in oil. We'll also lube the wrist pins as well as the rings. Using a ring compressor they are gently tapped into place. [ Music ] The fasteners are torqued to 15 pound feet. Then 85 degrees on our Matco half inch drive digital torque and angle meter. [ Music ] We wanted to do something a little bit different on the paint job, and we think this color does the trick nicely. It's Detroit diesel alpine green. We replaced the stock cam with a Cam Motion LS-1 stage 3 hydraulic roller. This is a mild performance cam that still works with stock components. [ Music ] The oil pump is shimmed in three places on the gear using 1.5 thousandths shims. This ensures proper alignment when tightened down. Since the stock valley plate was in really bad shape we decided to use an ICT valley plate instead. The cylinder heads were installed with new stock torque to yield fasteners, and torqued to 22 pound feet initially. Then we used a torque angle meter to tighten the fasteners two rounds of 90 degrees. [ Music ] Finishing out the build is the valvetrain, oil pan, and one more aftermarket piece, a Holley dual plane intake manifold. [ wrench clicking ] Any experienced welder knows that surface prep is the foundation for a great weld. Forney Industries makes that job easier with a full line of abrasives for welding and body work. Their two inch and three inch surface prep pads fit easily into tight spaces and they are the perfect size for stripping and cleaning just the right amount of material to lay down a clean bead. The pads are available in coarse, medium, and fine finishes, and they attach to Forney's roll lock backing pad for secure fit and quick changes. From cutting and grinding to sanding and buffing there are literally hundreds of products to choose from. Visit Forney IND dot com to learn more. Rock Auto dot com's slogan is all the parts your car will ever need. Their inventory is impressive and so are their prices. Plus they have a selection of whole sale or close out parts with even deeper discounts. To see these parts simply choose your vehicle. Then click on the orange r-s-s button next to your car's engine size. Then look in the upper right hand corner and click the r-s-s button next to love a bargain. Now you can browse a list of whole sale or close out parts available for your vehicle. The close out price is limited to stock on hand. So be sure to check out Rock Auto dot com.
(Mike)>> Up next, sometimes the engine does what you think it will in the dyno cell but sometimes. I saw some big numbers dude.
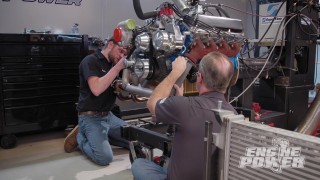
(Pat)>> We're almost ready to fire up the Vortec but first we need to install some electronic components. We're using a selection of sensors from Duralast. They offer thousands of o-e-m quality or better parts for almost any vehicle on the road today. Duralast products are rigorously tested for performance and reliability, and they are a top choice of professional auto shops. First is the coolant temperature sensor, followed by the cam sensor. Depending on your application the cam sensor can be in the front or the back of the engine. Finishing out is a 24 tooth reluctor crank sensor. Alright on our budget extravaganza here this engine requires zero break in. So go from 3,000 to 6,000 and make a hit.
(Mike)>> Here we go! [ engine revving ]
(Pat)>> Look at that. That is used rings, used rod bearings, used rod bolts, 337 horse.
(Mike)>> 351 pound feet of torque.
(Pat)>> Nice!
(Mike)>> Bone stock heads, dual plane manifold.
(Pat)>> This is the cheapest you can get one of these things running right. You can put injection on it but you'd have much more sensors, much more wiring, much more messing around with it. This is as cheap as you can get this thing going. [ engine revving ]
(Mike)>> 346 at 6,000.
(Pat)>> Yep 355. See how it's trying to tail off now?
(Mike)>> Oh yeah, definitely. At 200 r-p-m's it drops six. So now here's the thing. We did this to show everybody how they can get a junkyard engine, do a little tech to it, and put a power adder on.
(Pat)>> And again I guess the power adder is nitrous, and again you know how I am, a naturally aspirated guy. This is a good way to do it though. It really is because this is the cheapest you could do it to make the most power you can bang for the buck. So stick that plate on. We're running a Holley Sniper nitrous system, which has a range of 150 to 250 horsepower depending on the size of the jet.
(Mike)>> So 63 jets on fuel and nitrous. 150 shot.
(Pat)>> 150 okay.
(Mike)>> Sniper kit, 3,000 to 6,000.
(Pat)>> 600 a second?
(Mike)>> It is.
(Pat)>> I'm arming it.
(Mike)>> Here we go! [ engine revving ]
(Mike)>> I saw some big numbers dude. Holy crap! 724 pound feet of torque! 564 horsepower for a 150 shot. This thing made 347 N/A.
(Pat)>> 217 horse!
(Mike)>> God bless, look at the torque!
(Pat)>> That's the right jet?
(Mike)>> 63, 63, I triple checked them.
(Pat)>> Wow, 724 pound feet of torque. Now it's probably higher because we loaded it.
(Mike)>> It definitely was higher because we loaded it. The brake caught it, brought it down a hair, and then it took off.
(Pat)>> So on our 150,000 mile we reused pretty much everything engine I think we flirted with disaster right there.
(Mike)>> But we won.
(Pat)>> This time we won. Nice job! We made a lot of horsepower but we didn't spend a lot of money. The engine was $500 bucks. A set of main bearings was $80 bucks. Cam, lifters, and timing chain were $650 dollars. The valley cover was $40 dollars. The intake manifold ran us $300 dollars. The gasket set $210 bucks. Push rods were $30 dollars. Five rocker arms for $90 dollars. Finally the nitrous kit was $570 dollars. A total of $2,470 dollars. That's $4.38 per horsepower and $3.41 per pound foot of torque, very impressive. For more information on anything you've seen today visit Powernation TV dot com. [ Music ]