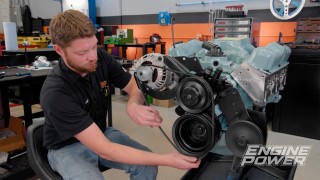
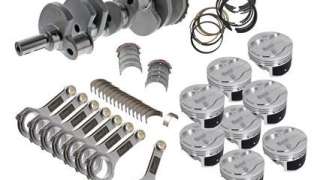
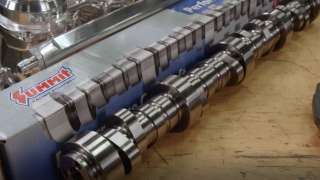
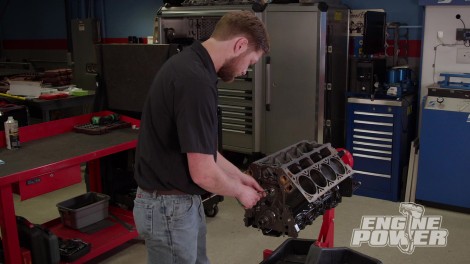
Engine Power Featured Projects

Engine Power Builds

Parts Used In This Episode

Summit Racing
Clevite H-Series Rod Bearings
Summit Racing
Cometic MLS Head Gaskets
Summit Racing
Piston Ring Compressor Tool
Summit Racing
Piston Ring Filers
Summit Racing
Speedmaster Downdraft EFI Stack Intake Manifold
Summit Racing
Summit Racing LS Main Cap Bolt Kit
Summit Racing
Summit Racing Pro LS Main Cap Puller
Summit Racing
Trick Flow GenX 255 Cylinder Heads
CWT Industries
CWT Multi-Bal 5500
Sunnen Products Company
Sunnen SV-15 Honing Machine
Total Seal
Total Seal Piston Ring Assembly Lube
Total Seal
TraceBoss Software

Episode Transcript

(Pat)>> You're watching Powernation!

(Pat)>> When it comes to LS engines there's a hundred different ways that you can build them.

(Frankie)>> Ours is a unique combination of style and substance. [ Music ] What you're looking at is an iron LS block that we pulled from a salvage yard, and today on Engine Power you're gonna see us transform this into 410 cubic inches of fury and beauty. Now looking at this engine from a distance it's pretty clear that it's a used engine, but if you start looking closer it's actually extremely clean, and the reason for that is that this is a remanufactured engine. With a lot of these LS powered cars getting up there in age it's gonna be really common to find rebuilt or remanufactured engines in place of the original, and that's necessarily a bad thing. As we were tearing this down this engine has very minimal wear and is very clean. There's not a lot of sludge in the oil pan or the crank case. The cylinder wall finish looks excellent, and it's already been oversized 40 thousandths, or one millimeter, over the stock four inch bore. So it's pretty clear that this engine hasn't had a lot of miles on it yet, but if you weren't gonna tear it down and you're trying to determine if it's a remanufactured engine a pretty easy way to figure that out is by looking at the cylinder case or the cylinder head and looking for one of these guys. This is a heat tab that's placed there by the rebuilders or the remanufacturers when the engine leaves so that if it ever returns for warranty work they can clearly look at it and see if the engine has been overheated while in use. Another clear indicator of a remanufactured engine is that a lot of the exterior bolts will be painted. Things like main bolts, timing cover bolts, all kinds of things will have a unique color on them. This is gonna be an awesome foundation. It's kind of a score to get from a junkyard, but it's gonna work great for our 410 cubic inch stroker that's gonna look like a jewel.

(Pat)>> We like all of our builds to look great, but because of the induction package we're gonna be using on this particular one it's gonna look spectacular. We'll get to that in a second. This build is based off an LQ-9 short block. We did that because we want thing big bore. You could do this exact same build on a four-eight or a five-three, it just won't give you the same amount of cubic inches that we can get when we use the bigger bore. So what we're gonna be using is an entire line of parts that were specifically created for this platform, and it is called Pro LS. Summit has gone through the trouble to make pro grade parts for the LS platform, and it all starts out with their crankshaft. This is forged out of 43-40 steel, and it comes in a variety of different strokes depending on your needs. This one is four inch stroke. That's how we're gonna get that 410 cubic inches. That is gonna be pushing around some forged Pro LS pistons that they had created. These have an 8cc effective dish, a 927 pin. They are forged out of 26-18 alloy, have an anti-friction coating on the skirt, and they have a 1.2, 1.2, 3-millimeter ring pack. They also come with heavy duty 150 wall wrist pins. Moving on to the connecting rods, another great Pro LS part. These are an H-beam design with a 6.125 center to center length. These have a full floating bushing 927 small end and the big ends are held together by quality ARP 2,000 rod bolts. These parts came as a full rotating assembly, which comes with bearings, rings, and everything that you see here. Now they come in different sizes, depending on what you want to build. So next we'll move on to the induction side, which starts with a cam shaft. Summit has also gone ahead and had their own cam shafts designed for their Pro LS line. This particular cam that we chose for ours has a duration of 234 at 50 on the intake, 248 on the exhaust, and it has 114 degrees of lobe separation angle. The lift at the valve is 625 on the intake and 605 on the exhaust with a stock 1.7 ratio. This camshaft is gonna be moving some serious air via our cylinder head. This is a Trick Flow Gen-X 255. These are a serious player right out of the box. 382 c-f-m at 700 lift through a 255cc intake port. They have a 2-165 intake valve, 1-600 exhaust housed in a fully c-n-c'ed 69cc chamber. The springs are already set up for our hydraulic roller application. So we are all set there. You might say, where is the intake manifold? I don't see one sitting here? There is where it gets unique. We have an ITB setup. This is an e-f-i i-t-b, meaning individual throttle body. This is from Speedmaster. Instead of having a common plenum we have eight injector stacks that go right to the individual runners for the ultimate in tunability. These have a 50mm throttle body and it is a sequential e-f-i that is going to be controlled with a FiTech Ultimate LS e-f-i kit. This is a self-learning kit that is programmable very intuitively through a handheld. It's gonna make it easy to get running and easy to tune once it is running. We also picked up a set of their coils to go with it. Now this is a lot of parts, and there's even more. So we've got to get moving on this. So the first thing we have to do is get some block prep done, and that's up next. Coming up, we'll show you how a torque plate helps us get rid of nasty distortions in the cylinders of an engine block.

(Frankie)>> Plus we give the crankshaft a next level balancing job.

(Frankie)>> In today's Summit Tech Tip we're gonna talk about something that is vitally important to understanding how your engine's running, and to do that we have one of our good buddies, Clay Millican, a Top Fuel driver. Clay O-2 sensors are extremely important in fuel injection applications but you can also use them in carbureted applications too, right?

(Clay)>> A hundred percent, these things are really valuable just to get your tune-up all pulled in together where it's nice, and the engine's running very even. You can do anything from o-e to the wideband right at Summit Racing. Call the guys and they can tell you what you need. They'll get you fixed right up.

(Frankie)>> Just as important as a good sensor is the correct installation to get accurate readings, right?

(Clay)>> And they're not as hard to install as you might think. If you can weld you can do the weld in bung, or if not they've got simple drill a hole, put a couple of clamps on, and you're good to go.

(Frankie)>> You guys probably aren't running these on a Top Fuel car, but for the every day hot rodder Summit Racing has the parts, the tools, and the tech you need to get them in, right?

(Clay)>> Everything from o-e replacement to the hot rod side of it, they've got the parts you need. You've just got to call the experts at Summit Racing.

(Frankie)>> Before we can start the buildup of our stroker six liter we have to finish disassembly. The next thing out is this stock cam shaft that looks great but will be replaced by the racier Pro LS design. To get to the rotating assembly we'll remove the factory windage tray. Then we can take out the rod and piston assemblies one by one. Since this is a remanufactured engine we expect the bearings to look pretty good, but these look brand new. [ Music ] A nifty item to make disassembly easier is this Summit Pro LS main cap removal tool. [ Music ]

(Pat)>> Not horrible!

(Frankie)>> We'll start cleaning the block by scraping off any leftover gasket material. [ Music ] Then we can deburr the block, starting with a small hand file on the main cap registers. We're just making a quick pass to soften the edges. We'll repeat the process on the main caps. The rest of the block can be deburred with an air grinder and various carbide bits. The final step is chamfering every hole in the block.

(Pat)>> Now that Frankie has the block all nice and deburred we threw it in the cleaner to knock the heavy chunks off. Then we took it out and put it back on a stand, and installed the main caps and torqued them to specs. That's very important. Now we have the block in our Sunnen SV-15 ready to straighten out the cylinders, and we're gonna be honing this block with a torque plate like we always do. Any block can benefit from a torque plate. No matter the design, when the head is bolted on it distorts the cylinder somewhat. Some are better than others. What I'm gonna show you is on our particular block how much the block moves around when a cylinder head torque plate is bolted on. With our Sunnen dial bore gauge zeroed to the size of our pistons we'll take several measurements along the thrust axis in the bore. Then we'll take measurements at the same depth but 90 degrees offset from the thrust face. Without a torque plate it has a maximum out of round of nine-ten thousandths. [ Music ] Using the same style of m-l-s gasket as the one we'll use during the installation the torque plate is tightened in three stages to a final value of 90 pound feet. We'll repeat the measurements getting a maximum out of round of 34-ten thousandths, nasty! [ Music ]

To correct that craziness and to set our piston to cylinder wall clearance to what we need for our application we will hone out the bores to a final bore size of 4.0427 with our 220-grit diamond abrasive. It takes a while to get there, and we'll check our progress often as we go. [ mechanical humming ] The chatter you hear also shows up on the Sunnen screen as a jagged pattern. As the cylinder becomes round and straight we can see the improvement in the readout. Much better! Once we get the final bore size we'll switch to a 600 grit finishing stone to set the proper plateau finish on the cylinder. This only takes five strokes at 11 percent load to achieve. You can see that the cylinder is now straight and round within two-ten thousandths. [ Music ] To verify the correct surface profile we'll measure with our profilometer. We can analyze the results with our Trace Boss software that we got from Total Seal Piston Rings.

(Frankie)>> Up next, we get the crankshaft dialed in and put together a precision rotating assembly.

(Frankie)>> We're continuing on the build of our 410 cubic inch LS, and the next thing we're gonna be doing is balancing the rotating assembly and it's really awesome that we can do this in house on our CWT Multi-Bal 5,500. Now like we said, this rotating assembly was a Pro LS kit from Summit and it was specifically designed for six liter engines to turn them into 410 cubic inches, and all the components were designed to work together. So we know this crank isn't gonna be too far out and it should be pretty easy to bring it within our balance tolerance. Speaking of components and weights, we've already gone through and weighed all of our components like the rods, pistons, rings, and bearings, and the machine will actually take all of those weights and build a bob weight card for us. So since we are using a 90-degree V-8 configuration we have a 50 percent reciprocating factor and a target bob weight of 1,800.8 grams, which is pretty on par for this combination. We've already built all of our bob weights, installed them on the crank, and we have centered them on the rod journals using CWT's nifty alignment tool. We are gonna start by spinning this crank at 500 r-p-m like we do with all of our combinations that are brand new just to make sure that nothing is crazy. Then once we know that the balance is not too far out we can step it up to 750 r-p-m to get a more accurate reading. So we'll do our first spin and see what we get. [ Music ]

This is not gonna be that far out. So that's pretty indicative of what you would normally have on this kind of setup. 10.277 grams on the rear and 9.347 on the front. We can definitely bring that within our tolerance pretty easy. So we're not gonna have to do anything crazy to get this crank balanced, but we'll get to work on it and get it within our tolerance. For the front we'll use a grinder to remove most of the material that we need from the counterweights and a flap disc to clean up the surface. On the rear we'll use the drill head mounted to the machine to drill a half inch hole in the center of the counterweight. We'll go slowly and spin the crankshaft several times until we get it where we want it. So that is awesome. That's right what we're looking for. .110 ounce-inch on the left, .112 on the right, and if we look at the force on the center on the center of the crank we're at .061 ounce-inch. That's right what we were looking for, and that eighth ounce inch might seem a little extreme to a lot of you. Back in the day quarter ounce inch was generally held as the standard for high performance and racing vehicles, but now days with modern technology like knock sensors a lot of factory cars come even way lower than that. It becomes really apparent the effects that has on the crank when we start looking at the force, and this machine will actually calculate for you. When we start it if this crank turns 6,000 it would 80 pounds of force on it every revolution. Now that we have actually balanced the crank within our tolerance at 6,000 we only have seven pounds of force on the crank on the left side. So literally more than 10 times less, and that's not only gonna be great for the crank but all the parts that swing around it. So this is awesome. We're very happy with this. We're gonna get it off the machine, get it polished, get it final cleaned, and then it'll be ready for final assembly. With the block final cleaned and the torque plate reinstalled we can file our Summit Pro LS piston rings. This is a 1.2 millimeter, 1.2 millimeter, 3-millimeter ring pack with a Napier style second ring and a gas nitrited steel top ring. Using our Summit Pro ring filer and following the very extensive instructions that came with the rings we'll set the top ring gap at 23 thousandths and the second ring gap at 25 thousandths. Because the torque plate is installed we'll use one of the Summit pistons with the oil control pack in it to square the rings in the bore.

(Pat)>> The key to keeping our vehicle running like it's supposed to is regular maintenance. Changing the fluids, the belts, the hoses, the plugs, the filters, things like that, but sometimes the fuel system will get neglected, but Hot Shot's Secret's Gasoline Extreme Concentrated One Tank Cleaner can help you out with that. It contains a highly effective p-e-a detergent to clean deposits found everywhere, like injectors, your carburetor, intake valves, and combustion chambers. They have infused it with their LX-4, which provides lubricity more than any other additive on the market, and it reduces wear in the entire system. One 16-ounce bottle treats up to 45 gallons of gasoline, and that includes gasoline with a high ethanol content. It dissolves gums and varnish in the system, which can help smooth idle, improve emissions, and reduce wear by over 60 percent. It is safe with all emissions equipment, and this will help improve performance by improving acceleration and reducing misfires. As an added bonus it provides corrosion protection for the entire fuel system. All that combined can help keep your fuel system in tip-top shape, and don't think they've forgotten about the diesel crowd. Their Diesel Extreme concentrate also has cetane booster to improve performance. For more information on these and other products check out Hot Shot's Secret's website. Up next, we'll install a rotating assembly that provides great bang for the buck.

(Frankie)>> With everything final cleaned we can begin assembly by measuring our main bearing vertical oil clearance. These Clevite H-series standard bearings came in our Summit Pro LS kit. The main caps are installed and torqued into place with a used set of torque to yield main bolts. We'll use a new set of fasteners during final assembly. Torque to yield fasteners can generally be retorqued up to two times, and we will torque these following GM's specifications. With the dial bore gauge zeroed to the main journal's size we can measure our main bearing oil clearance. They all come in between 27 and 29 ten thousandths. The next thing we're gonna do is set the rod bearing oil clearance for our stroker LS, and we're gonna be doing that with our Summit Pro LS rods that we told you about earlier, but one of the major reasons that we picked that rotating assembly for this engine is because it came with ARP rod bolts. ARP has been supplying quality rod bolts for the industry for a long time, and we have used them in a ton of builds with great success. For this specific build this kit came with an ARP 2,000 rod bolt, and that is an alloy that ARP created that is way stronger than o-e bolt, and even way stronger than an 87-40 chromoly bolt. It has a tensile strength of around 220,000 p-s-i and can have a fatigue strength up to 20 times stronger than other rod bolts. That makes it the go-to rod bolt for mild to high performance builds that are gonna see abuse. They're made with the same high quality metallurgy and machining processes that ARP uses on all of their fasteners, and that's why companies love working with ARP for high quality fasteners and engine components. These are spec'ed out perfectly for our build, and they're gonna allow it to live a long and happy life being thrashed on the street. Before installing the rod bolts we will generously apply ARP Ultra Torque lubricant under the heads and on the threads. Following Summit Racing's detailed instructions we will torque the rod bolts to 82-pound feet. We use our Sunnen dial bore gauge to measure our rod bearing oil clearance, which is between 27 and 29 ten thousandths.

(Pat)>> After coating the main bearings in assembly lube the crankshaft is tenderly laid into place. The bearings and the caps are lubed as well and installed making sure they're in the correct location and orientation. In order to align the thrust bearing surfaces the crank is wedged forward with a screwdriver and the new Summit torque to yield main fasteners are tightened to the specified 15-pound feet. Then the inner bolts are tightened another 80 degrees while the outers are tightened another 51 degrees. With a small amount of sealer on the side bolts they can be torqued to 18-pound feet. To assemble the rods and pistons we slather on assembly lubricant before slipping the wrist pin into the bore. The wrist pins are held in place with high performance spiral locks. After installing the oil ring support rail the rest of the ring pack can be put into place following Summit's instructions. The pistons receive a coating of Total Seal Assembly Lube and they are tapped into the block with Summit adjustable piston ring compressor. The rod bolts are torqued to 82-pound feet. To ensure the bolts achieve proper clamp load we'll check the rod bolt stretch with the ARP gauge.

(Frankie)>> I always feel way better once we have the rotating assembly bolted into the engine for real. It means we're making some actual progress, and these Summit Pro LS rotating assemblies are awesome. Summit did a great job with them. They always go together really nice, and as a bonus they're not gonna break the budget.

(Pat)>> We have run out of real estate for today, but that doesn't mean we are done. The next time you see it we're getting very serious. The camshaft is going in, the cylinder heads, the valvetrain, and some trick induction, and this thing is going to be on our Superflow making some power. This thing's not only gonna run good, it's gonna look good too.

(Frankie)>> If you want to see the rest of this build or any of the other builds we do here in Engine Power you can always find us at Powernation.
Show Full Transcript