Engine Power Featured Projects

Engine Power Builds

Parts Used In This Episode

Summit Racing
Moroso Timing Pointer
Summit Racing
Summit Racing Pro Ring Filer
Summit Racing
Summit Racing Pro SBC Hydraulic Roller Camshaft
Summit Racing
Trick Flow Chromoly Pushrods
Summit Racing
Trick Flow Roller Rocker Arms
ARP
Fasteners
ARP
Fasteners
ARP
Intake Manifold Bolt Kit
ARP
Oil Pan Bolt Kit
ARP
Oil Pump Driveshaft
ARP
Oil Pump Stud Kit
ARP
Rod Bolt Stretch Gauge Digital Billet
Duralast
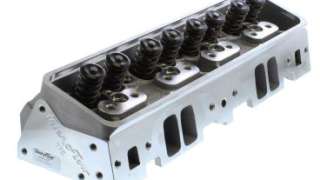
Edelbrock Victor Jr. Intake Manifold
Fluidampr
Harmonic Damper
Goodson Shop Supplies
Cam Bearing Installer
Holley
MSD Pro-Billet Distributor
Holley
Quick Fuel Black Diamond 750CFM Carburetor
Lubrication Specialties
Hot Shot's Secret Adrenaline Assembly Lubricant

Episode Transcript

(Pat)>> You're watching Powernation!

(Frankie)>> Our 305 small block Chevy recently generated a lot of heat on the internet, but today on Engine Power it's generating heat in the dyno cell.

(Pat)>> Watch our 305 go from boat anchor to 302 Ford spanker. [ Music ] Hey everyone, and welcome to Engine Power where we are continuing on the build-up of our current project, our 305 small block Chevy. Yes, you heard me correctly. We are building a 305. Why you might ask? Well a while back we used a 305 dyno mule to show some tech on the dyno, and the overwhelming response in the comment section afterward is why don't you do a full build-up on a 305? A lot of people have those instead of 350s or 400s. So we decided to run with that, and we're gonna do our take on what we think is cool for this little platform.

(Frankie)>> The big limiting factor for the 305 is that little bore size, and for most people that's enough reason to jerk them out and put them in a junkyard where they can rot. But that doesn't mean that you can't do all the upgrades you do with a larger engine, like the 400s, 383s, things like that to its little brother. That's what we're gonna be doing here today. This is gonna be a hot rod version for its first iteration. Something that's achievable and something that can be clicked together by you guys at home. The key is finding one that hasn't been so abused that it is unusable. And we actually went through a little bit of an issue finding one, but this is what we're gonna be using for our build today. It was a lot of work to get it to this point where we can actually use it for this build. So here's a quick look at what you might have missed. We started out with a pullout 305 that had previously been used on Engine Power as a low buck dyno test mule and began tearing it down for a new look on life as a hot rod engine. However when we got it apart we discovered it was barely useable, and for the sake of time and money drug in another 305, and although it fought us during disassembly it provided a much better foundation.

(Pat)>> After prepping the block and oiling system we loaded it up in our Sunnen SV-15 cylinder hone with a torque plate to open up the bores to 3.796 and achieve the proper cylinder finish. We wrapped up the machining by balancing our new cast steel crank in our CWT Multi-Bal 5500, and today we are going to assemble this little powerhouse.

(Frankie)>> We'll start out by measuring our main bearing oil clearances and install the main caps and new bearings with this ARP main bolt set. They are torqued just like final assembly to 70-pound feet. So we'll set our micrometer to the size of the journal, and then we can use that to zero out our dial bore gauge. The big thing here is that you want everything to be the same temperatures. If you just pulled the crank out of a hot tank or a parts washer you want to make sure it has plenty of time to cool so that everything is the same temperature as you measure it. Then we can zero out our bore gauge. Now that that is set it will give us a direct clearance reading. So we can just measure the housing and see what our oil clearance is. For minimal oil clearance we're gonna set all of these between two-seven and three-zero.

(Pat)>> Now while Frankie is doing that I'm gonna go ahead and load up the rods with bearings so we can check them as well. While we're mic'ing things it's the easiest thing to do. These are an H-series Clevite bearing, and you can't just pop them into the rod. What will happen is there's an upper and a lower. So if you get the wrong bearing in the wrong side what it'll do is interfere in the chamfer and it will interfere with the crankshaft, which will make the engine turn over hard. So you have to make sure you get the upper in the upper and the lower in the lower to get it right. With our bearings in and our bolts loose we can get these things torqued up and start measuring some rod bearing clearance. One important thing is the ARP 87-40 fastener that Scat uses has a maximum stretch of 46 ten thousandths. So their torque spec is 64-pound feet. So we're gonna go ahead and measure that. We're gonna make sure our bolts are loose, and we are gonna take our ARP rod bolt stretch gauge, put it on, and zero it out. We can't exceed that maximum stretch. So we'll get them torqued up and see where that is. [ torque wrench clicking ]

(Pat)>> See where we are here. We are right at four thousandths, which is 40 ten thousandths if you're seeing it that way. What that means though we are underneath our spec. So we are good to go. And remember, we check every individual rod bolt, log its position, and log its stretch. That means we know on paper what it was when it was new. If it exceeds that that means the fastener is bad and you need to change it because we don't want any sort of catastrophic failure because of that. Now we can actually measure for our rod bearing clearance. With the micrometer set to the rod bearing size we can use it to set our zero on the dial bore gauge and measure them to our exact rod bearing oil clearance. 27 ten thousandths puts us right in the zone what we're looking for. We're gonna go with 25 to 27 ten thousandths on this application for what we're doing. One is done but I still have a bunch more work to do. So I'm gonna get after it.

(Frankie)>> Since we know the main bearing clearances are set and do not need to be adjusted we can install the cam shaft bearings with this Goodson cam bearing installer. It's important on small block Chevys that the bearing oil feed hole is centered on the oil groove in the tunnel and clocked in the four to five o'clock position with the block upright to provide proper oil flow. So we've got all our cam bearings in. We've cleaned out the oil galleries, and we've cleaned the cam bearings very well. So the way we're gonna check to make sure they're right is actually test fit the cam shaft with some lube. And to make sure everything's in alignment if you can turn the camshaft by hand using the dowel on the front that tells you everything's good. You are in there like swimwear.

(Pat)>> Up next, whether it's a full bore race engine or our bolt together 305, attention to detail during assembly is essential.

(Frankie)>> The next thing we're gonna do is install all of the plugs in the block, and the first and most important one is this press fit plug that goes underneath the rear main cap. Now this directs oil to the oil filter. So it's extremely important and you cannot miss it. These brass core plugs get some green bearing mount and are pounded into place with this nifty tool.

(Pat)>> The threaded oil gallery plugs inside the block receive extreme pressure lube on the threads to prevent galling, and the plugs that are external receive sealant to prevent any chance of leakage. We like to do all of the plugs at once so none get missed, which could not only cause a mess but create a low pressure problem that might require disassembly to fix the engine.

(Frankie)>> We are almost ready to start putting parts together but there's one last thing we need to do, and that is file our Mahle piston rings. They came with recommendations from the manufacturer, and because of our application we're gonna be setting the top ring at 21 thousandths and the second ring at 23 thousandths. We're gonna be doing that with our Summit Racing Equipment Pro Ring Filer. Now Summit recently came out with these and we've had ours for almost a year. It allows you to accurately set your ring end gaps and do it with a repeatable fashion. This one comes with a 120-volt motor so it plugs right into a wall outlet. It has a three inch, 120-grit grinding wheel. So you're actually grinding material off the ring, not just rolling it over the edge, and a one thousandths increment dial indicator. The way we use this is once we get the ring set in here this knob here controls the angle of the ring against the wheel. So we can adjust that to make sure our end gaps are square. Once you have that set for one ring at that bore size you can just leave it, and then every ring after that will be repeatable. This plate is zeroed to the face of this wheel. We have that on our dial indicator here. As you remove material you turn this knob and you can adjust how far you want to cut. We usually do our cuts in one thousandths steps until we get to that final cut that we're looking for. So say we're doing a ten thousandths cut we'll do it in one thousandth steps until we've reached ten thousandths. Then we'll turn the machine on and we can make a cut. We'll roll this up to one thousandths. [ grinder buzzing ]

(Frankie)>> And then you can continually make cuts in that increment to reach the desired cut that you're looking for. This is an extremely good investment if you are building engines constantly. If you want one for yourself you can find them at Summit Racing Equipment.

(Pat)>> With everything cleaned we can begin assembly by installing our main bearings. They receive a copious amount of Hot Shot Secret's new assembly lube to protect them on engine startup. Our balanced crankshaft can be laid into place gently, and each main cap tapped into position. The ARP main bolts are torqued to 70-pound feet while the crank is pre-loaded in the forward position to align the thrust bearing surfaces. With all the rods and pistons assembled and lubed we can punch them into the block one by one. We'll temporarily tighten the rod bolts to rotate the engine during the install, and then go back and torque each bolt to spec once they are all in.

(Frankie)>> That's a nice setup for a 305.

(Pat)>> High speed, low drag.

(Frankie)>> We picked a camshaft for this build from Summit Racing Equipment, and this is one of their new Pro SBC hydraulic roller camshafts. It has durations at 50 thousandths lift of 218 on the intake and 227 on the exhaust. Lift at the valve is 560 on the intake and 555 on the exhaust with a 1-6 rocker. [ drill humming ]

(Frankie)>> The lobes are set on a 110-degree l-s-a, and this cam uses an LS firing order. For this street rod application we're using a Comp double roller timing set, and the intake centerline will be set at 108 degrees. Coming up, our 305 gets some trick parts, gets sealed up, and gets rolled into the lie detector.

(Pat)>> What we've all been waiting for.

(Frankie)>> Somebody's waiting for it. I definitely am.

(Frankie)>> We are continuing on the build of our 305, and as you can tell the block has clearly changed color. We've got this cleaned and painted. We also cleaned up and painted our timing cover. We got that installed with some ARP fasteners. We have a new Moroso timing pointer from Summit Racing Equipment, and we just finished up installing our harmonic damper. Now for this build we're using a fluid damper, internal balanced harmonic damper, which is a viscous style damper, and that has a few inherent advantages over an elastomer style. Namely this can cover a wider range of frequencies that it can cancel out on the crank, and it lasts way longer since an elastomer style has to be rebuilt regularly. So this is gonna work great not only in this mild build but if we decide to do some upgrades in the future it's gonna work for that too. We have a lot more stuff to do before we can even think about getting this on the dyno. So let's keep on moving.

(Pat)>> This M-155 high volume oil pump will provide the oil flow and is driven by an ARP driveshaft, and it will be held in place with an ARP oil pump stud that gets torqued to 55-pound feet. This pick-up is matched to the oil pan we'll be using, and we always double check the critical clearance between the pickup and the bottom of the pan.

(Frankie)>> A one piece oil pan gaskets and a bit of sealer on the corners will seal up this Moroso road race pan from Summit. It has internal baffling, a windage tray, and crank scraper for excellent oil control. It gets held down with some stainless ARP fasteners.

(Pat)>> The cylinder heads we've chosen for this setup are a set of Trick Flow Super 23 Degree Fast as Cast 175cc heads. These heads are set up for a small bore. That means they have a 1-940 intake valve, 1-500 exhaust, and they are swirl polished stainless, and they are housed in a cast but very nicely shaped 56cc combustion chamber. They have a 175cc intake runner and a 67cc exhaust runner. The valve springs are setup for our roller cam setup at 135 pounds on the seat, 385 pounds on the open side at a 1-800 install height. These heads also come in a couple of different rail configurations for the valve cover. A smooth rail for a center bolt, or the old school perimeter four bolt style. We're gonna get these things dropped on and running great. The head bolts use sealer on the threads since the holes go directly into the water jacket, and they are torqued in three stages to a final value of 70-pound feet. With the Cometic 4-030 bore and 27 thousandths compressed thickness and these tight 56cc chambers we have a measured static compression ratio of 10.01 to one. We soaked these Comp Cams Evolution Retrofit hydraulic roller lifters in oil to properly lube them and to remove any air before we install them in the bores. They have an internal cartridge style hydraulic plunger for increased rigidity and performance and allows them to be easily serviced.

(Frankie)>> A big thing on these is that the link bars are directional. They're marked but you have to make sure they're going the right way when you put them in. All the link bars should go the same way. These all face that way, those all face that way. Something to check as you're putting them in. These Trick Flow three-eighths rocker studs and five-sixteenths guide plates came with the cylinder heads and are torqued to 55-pound feet. The Trick Flow push rods for this application are five-sixteenths in diameter and 7-400 long and receive high pressure lube on both ends during installation. For a bit more lift we're using this set of Trick Flow 1.6 ratio aluminum rockers that have a narrow body to clear the center bolt valve covers and match our three-eighth studs. They're installed with a half turn of pre-load on the lifter and in the firing order, which don't forget is 1-8-7-2-6-5-4-3. This color matched Victor Junior single plane intake manifold has a 41-50 flange with a great runner design and cross sectional area for the application, and it will make excellent power. It gets held down with an ARP stainless steel intake manifold bolt kit.

(Pat)>> To circulate water through our 305 project we chose to go belt driven on the water pump side. So we went with Duralast and got us a brand new water pump. When I say brand new this thing is completely brand new. This is not a rebuilt o-e-m. Duralast goes through the extra effort to make sure that they improve on anything the o-e-ms have problems with when designing a new component. This particular water pump is a brand new housing. It's precision machined, and it contains all new components. This is made to meet or exceed its o-e-m counterpart in that application. A very cool feature on this pump is this threaded boss and this stud it comes with. What that does, it limits the camshaft's end play. Aftermarket roller cams need to be located, but sometimes it'll flex that timing chain cover like a thin one like we have. So that will but up against it and limit the camshaft's end play. Nice feature Duralast! We'll use the supplied gaskets and a small amount of sealer during the install. This water pump is available in cast iron form as well, but this heavy duty aluminum version is much lighter and will not rust. Both have precision machined housings, unitized seals and bearings, and optimized impeller clearance. We already set the cam thrust previously. So to set the cam button stop the stud is threaded into the water pump until it just touches the timing cover face so it cannot flex outward. Then the locking nut is threaded down and tightened to hold it in place. What we've all been waiting for.

(Frankie)>> Somebody's waiting for it. I definitely am.

(Pat)>> Stay tuned cause our 305 is making pulls and putting out power that just might surprise you. Great success!

(Frankie)>> So we have our 305 on the dyno and we have it running. Obviously there was a few things we had to finish up to get it there. So we have a set of our dyno headers, two inch primary, three inch collection. We ran them on a bunch of stuff and they work awesome, and we have topped this thing with our QFT Black Diamond 750 c-f-m carburetor. It's kinda one of our dyno standards. So it should work awesome on this, and for ignition we have used our MSD Pro Billet locked out distributor that we used before, but now we painted it black.

(Pat)>> I have a question. Why do you think people think 305s are junk?

(Frankie)>> My theory, back in the day they didn't really make a lot of power. So people just beat the crap out of them, and then turned them into junk.

(Pat)>> Some people have emotional attachments to engines. Some people from a purely scientific standpoint they want to do something. That's great, but we wanted to do this. I think it's gonna be great, and we'll see how it goes here. We're gonna let her rip and see what our initial pull is and see if the guts stay in it.

(Frankie)>> I'm excited! [ engine revving ]

(Pat)>> Smooth! More power than you would expect out of a 305.

(Frankie)>> 388.7-pound feet and 409.3 horse.

(Pat)>> How much horsepower?

(Frankie)>> 409.3 out of a 305. That's awesome cause that's comparable to if you did a 4-8 or a 5-3, which has almost the same bore size. And this is kinda in between the two in terms of displacement but that's about right. Why wouldn't it make that is really the question.

(Pat)>> Now it's the tune-up right? We're gonna time for torque and we're gonna jet for horsepower.

(Frankie)>> Let's see what we can squeeze out of this thing.

(Pat)>> Montage! [ Music ] We'll make incremental changes over multiple runs, adjusting timing and fuel based off the dyno data from each run. We are tuning for maximum power on the dyno and for this engine we landed on 36 degrees of total timing with our locked out distributor and 70 primary and 80 secondary jets in our QFT 750 Black Diamond.

(Frankie)>> Let's see what all these changes do. We've been slowly making progress. See what we can culminate it to. [ engine revving ]

(Pat)>> We'll take that, 413.6.

(Frankie)>> And 388-pound feet.

(Pat)>> Torque's about where it is. That tells you a couple of things. The chamber on this thing is very, very good.

(Frankie)>> It doesn't need a lot of timing.

(Pat)>> That's where it stops being sensitive to timing, but power picked up nicely. Almost 414 horse. There's nothing wrong with this engine at all. Is it small cubic inch, of course it is.

(Frankie)>> 1.31 per cubic inch.

(Pat)>> That's pretty good. On this particular one the only thing I think I'd like to try is maybe go through a few spacers and see if we can pick up some stuff.

(Frankie)>> We always try a few different spacers to see which performs the best. So it's super helpful to have a wide selection that we can run across the engine to see what comes out on top.

(Frankie)>> We have a one inch, four holed tapered spacer in between the carb and the manifold. So it still has good hood clearance but we get a little bit more plenum volume, and hopefully even out that side to side a little bit and maybe make some more power.

(Pat)>> Is it a boat anchor? Pretty nice running boat anchor if you ask me. Here we go! [ engine revving ]

(Pat)>> I'm gonna go ahead and call that 415, 414.9, and 390 pound feet.

(Frankie)>> It's a little bit, but that's why we do this. So we can see if we can squeeze just a little bit more out of it.

(Pat)>> Carries torque really nice, carries power really nice. Same thing. We could do a little stroker engine build on this. Give it a little bit more love cause I think it deserves it.

(Frankie)>> That's the thing. This is just another small block Chevy. So let's treat it like one. Let's do it! I'm all in!

(Pat)>> Great success!

(Frankie)>> To see more fun builds like this one you can find more on Powernation, and if you want to see behind the scenes content you can check out Engine Power on social media.
Show Full Transcript