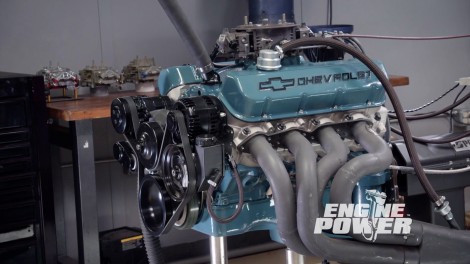
Engine Power Featured Projects

Engine Power Builds

Parts Used In This Episode

Summit Racing
Chevrolet Performance Valve Covers
Summit Racing
Cometic MLS Head Gaskets
Summit Racing
COMP Cams Ultra Pro Magnum XD Rocker Arms
Summit Racing
Edelbrock Rollin' Thunder Hydraulic Roller Camshaft
Summit Racing
Howards Cams Street Retrofit Hydraulic Roller Lifters
Summit Racing
Trick Flow Chromoly Pushrods
Summit Racing
Trick Flow PowerPort 320 Cylinder Heads for Big Block Chevrolet
Edelbrock
Edelbrock Victor Jr. Intake Manifold

Episode Transcript

(Pat)>> You're watching Powernation!

(Pat)>> Today on Engine Power we revamp our 496 cubic inch big block Chevy for its new home.

(Frankie)>> And the Sam Tech Coyote powered Mustang comes in for some serious testing. [ Music ]

(Pat)>> Hey everyone, welcome to Engine Power. You may recognize this rig right here. This is one half of our twin big block build up. This is 496 cubic inches of big block Chevy glory. Now we built this engine in a couple of different iterations, and both of them make great power for their application. Obviously because this is here there's more to come, but to see how this engine ended up here we have to jump in the way-back machine and see the historic but storied past of this engine. This engine was originally part of our twin engine dyno experiment where we built two identical 496 cubic big block Chevys that made 600 horsepower and 630-pound feet each, and ran them hooked together at the same time on our engine dyno.

(Frankie)>> After Engine-A ended up in a Music City Trucks project we took Engine-B and gave it a few changes to make it an extreme street power plant, with a larger solid roller cam shaft, 365cc Trick Flow cylinder heads, Edelbrock Super Victor intake, and a Holley 4500 flange throttle body e-f-i. The engine pumped 752 horsepower and 586-pound feet while turning 7,200 r-p-m. Now that was some really awesome testing not only because we got try out one of our crazy ideas, but also because we showed that you can build engines that perform completely different with the same short block assembly. And today we're gonna be putting this engine into its final form. Our first combination made really great low r-p-m torque and okay power. Our second combination turned a ton of r-p-m, made awesome power, but we lost some of that torque. So today we're gonna be shooting for somewhere in the middle with our final combination, and we're also gonna be making this engine easily swappable and low maintenance for a very good reason. We always get questions from viewers about what happens to engines when we're done with them and how they can get one. Well for this engine we partnered with POR-15 Products to actually give you the viewer a chance to win this engine when we are done, but before this engine gets into its final form there's a lot of parts that have to come off. So let's get cracking. After slipping the serpentine belt off the front accessory drive can be partially disassembled and removed from the engine. Next we'll pop off the valve covers and remove the rocker stud girdles for easy access to the poly-lock rocker nut.

(Pat)>> The rockers and pushrods are removed from one cylinder at a time making sure the cylinder is at t-d-c compression stroke. All the valvetrain is kept in order and looks great for a high spring pressure solid roller setup. The intake was sealed well, but after a little wiggling it comes off.

(Frankie)>> This is a brand new build, and it's only had dyno time on it. Engine's had no troubles and ran awesome. So we weren't expecting to find anything but it's still a good sign that everything looks good, there's abnormal wear, and that's a good sign for a foundation.

(Pat)>> We'll remove some of the guide plates to get a socket on all of the head bolts. The ARP fasteners can be loosened up before removing the Trick Flow 365cc cylinder heads. When the carbon looks like you've spray painted it on like that, that means everything's doing what it's supposed to in the combustion chamber.

(Frankie)>> We'll keep tearing the engine down with the lifters and harmonic damper coming next. We always feel satisfied when the oil looks great and has no particulates in it. To get to the cam shaft we'll remove the oil pan and timing cover. We'll reuse this double roller timing set later, but with it out of the way we can slide out the large solid roller cam shaft.

(Pat)>> If you're like us you not only like working on your hot rod, but if the need arises to work on your daily driver you're up to that task as well. So when you're looking for parts from budget minded all the way up to o-e-m quality or above look at RockAuto dot com because they have a wide selection of anything you're gonna be working on. For instance, they have a large selection of gaskets if you're just sealing your engine back up. If you are doing tune-up stuff to your ignition. Say you're working on your old Mopar and need a lock cylinder they have you covered. Also brake components, drums, shoes, pads, rotors, and even brake hardware to make your job easier. All in all no matter what you're working on RockAuto has your solution. So get online and check them out. Coming up, the guys from Sam Tech stop by with their Pro Charged Coyote Mustang for some high powered dyno testing.

(Pat)>> We have a special guest today here in the shop, School of Automotive Machinists and Technology, better known as Sam Tech. EFI instructor Darren Smithers and students Charles and Cameron are here, and they brought us a car. Now this car goes all around the country and is displayed to show what the Sam Tech students get to work on. It's a real race car. So they said, we want to test some stuff while we're out. So I said, hey, we have a chassis dyno. So come strap it down to the dynojet and let's make some hits.

(Frankie)>> This car has a long and storied history at Sam Tech and is completely student built. So Darren tell us about the current combination of the car.

(Darren)>> Well we use the SN-95 for training and testing purposes. Current configuration about 10 to 1 compression. It has our cylinder head program in it, F-1-A-94 Pro Charger, and currently running C-16.

(Pat)>> That's pretty racy. So it's fun to get to work on actual race cars. Tell us a little bit about that Charles.

(Charles)>> It's like a dream come true. When I was a little kid used to play with Matchbox cars, and now it's got my hands on the real thing. The school is amazing and working on cars is even better.

(Pat)>> What do you think Cameron?

(Cameron)>> I think it's a lot of fun. You get to go and play around, and in real time change parts, do it yourself, and see the benefits and the cons to what you're trying to accomplish.

(Pat)>> Now you have a few things you want to test today. Enough talk, let's get this thing fired up and see if we can make some power.

(Darren)>> We're gonna establish a baseline on this dyno and these atmospheric conditions and see what we're starting with.

(Pat)>> Everybody got ear protection? Light it! [ engine starting ] [ engine revving ]

(Pat)>> Darren will gently run the car up to 6,000 r-p-m before staring the full throttle pull. [ engine revving ] [ engine winding down ]

(Pat)>> What is it?

(Frankie)>> Clean run, 897.28, 631.12.

(Darren)>> We're within two horsepower of our dyno.

(Pat)>> That means everybody's stuff's right. What's the first thing you want to do?

(Darren)>> I'll have Cameron pull the logs, walk through that. I don't think we have enough heat on the plug for it to really tell us. So we'll put two in it and see if we roll over or make any more. Then go from there. Go file, save as.

(Frankie)>> After looking at the data logs and making sure everything looks normal Cameron will add two degrees of timing and make adjustments to the fuel table to compensate for today's atmospheric conditions. [ engine revving ]

(Frankie)>> 912, 641.

(Pat)>> I would say that is an improvement!

(Frankie)>> With a good pick up down low.

(Pat)>> I can see it from here. When doing R and D it's important to check your tune-up on each run by checking the spark plugs and comparing them to the acquired data logs. One of the tests Darren wants to try is going from their current C-16 fuel to a more expensive oxygenated race fuel called Q-16.

(Darren)>> Cause of the oxygen content, I would imagine as rich as we have it it'll pick up power, but we want to play around with the tune to ultimately optimize it. Just pouring it in I expect it to pick up as is. [ engine revving ] [ engine winding down ]

(Frankie)>> There we go, 946.19, and 661 for torque!

(Pat)>> That's a nice change right there!

(Darren)>> It's a lot more than we thought.

(Darren)>> We'll have to see what the log says. I'd imagine it would be adding a bunch of fuel because more fuel, more oxygen, and being boosted.

(Pat)>> Testing is literally endless right because there's always something to do, and everything affects everything else. Once you do something, like oh my god, now we have to go down that rabbit hole. You're already thinking about cause I can see it going. You're already thinking about what you're gonna change.

(Frankie)>> It's a solid gain everywhere in the graph. It's the same graph, just higher, which is good. There's nothing weird going on.

(Darren)>> How fun is this to go do a bunch of testing and see what kind of power we can make.

(Pat)>> Congrats to you, congrats to you, everything did what it was supposed to do, and just continue on from here. This is exactly the kind of real world testing students experience at Sam Tech. Now they can't wait to take this data and use it at the track.

(Frankie)>> Our big block goes back together with a new combination and a new look.

(Frankie)>> In today's Summit Racing Tech Tip we're gonna show you how to use one of their adjustable piston ring compressors. The first step is to properly lube the pistons rings and the compressor with some type of assembly oil. Then we're gonna take the compressor, slide it onto the piston from the rod side until it's just below the piston rings themselves. Then we can set the tension using the hose clamp, and we don't want it too tight. We want it just enough to compress the rings, and you still should be able to slide it off the piston by hand when you're done. Now if you were installing this in the engine you would square the ring compressor up with the deck, and then gently tap or push the piston into the bore. The good news is that once it's set you can use it on the other piston and rod combinations without actually changing it. Now these come in a bunch of different sizes, and they're adjustable to fit almost any automotive application, and if you want one for yourself you can find it at Summit Racing Equipment. We're back on our 496 cubic inch big block Chevy and kicking off the reassembly by installing this new hydraulic roller cam shaft from Summit Racing Equipment. It has durations at 50 thousandths lift of 253 degrees on the intake, and 261 degrees on the exhaust, with the lobes set on a 112-degree lobe separation angle. Lift at the valve is 632 thousandths on the intake, and 648 thousandths on the exhaust. We'll re-install our timing set and set the intake center line at 104 degrees.

(Pat)>> A new gasket and some silicone seal up the timing cover. We'll also use a new one piece oil pan gasket and dabs of silicone on the corners to prevent leaks on the freshly cleaned oil pan. To seal up the front end we can press on the balancer and re-check our t-d-c timing mark.

(Frankie)>> We're not only going to be revamping this engine but also we're gonna be revamping the look of this engine by painting it with POR-15's engine enamel. Now POR-15 is well known for their rust preventative coating that can be directly over rust, seals it in, and keeps it from spreading. We're gonna be using that as a base foundation, but then we're gonna be painting this engine with Buick Green Turquois. Now it's gonna give it a really unique, and the POR-15 engine enamel is awesome. It's good for up to 300 degrees and it comes out with a smooth, glossy finish. We're also gonna be adding some black accents. So when we're done this engine is gonna look pretty sweet. We'll add a small amount of thinner to the rust preventative so we can spray it rather than brush it on. There's no rust on this engine, but the rust preventative provides excellent adhesion to the surface and a solid color to paint over. A few light coats as a base, followed by a thicker coat provides an awesome foundation. After cleaning the gun we can load it with the comparatively thin POR-15 engine enamel. We chose this color for a unique look that is still from the GM family. Laying the paint down in several coats, we get that smooth, glossy finish that we love.

(Pat)>> Now that the engine enamel is fully dried we can return to assembly. A small amount of silicone goes at the top of the deck surfaces to prevent oil seepage, and the cometic 4-320 bore, 27 thousandths thick m-l-s head gaskets are laid into place. These are the 320cc Trick Flow Power Port cylinder heads from the first iteration, and their 122cc combustion chambers give us a measured static compression ratio of 10.33 to 1. They'll provide enough flow for our new power goal and are already setup for our new hydraulic roller cam shaft. The reused ARP head bolts are torqued in three stages to a final value of 70-pound feet. The rest of the valvetrain is being reused from the previous builds since the components only have dyno time on them. The Howards hydraulic roller lifters have been soaking in oil and are slid into the pre-lubed lifter bores. These Trick Flow pushrods are 7-900 and 8-800 long with a three-eighths diameter and are actuating these 1.7 ratio Comp Pro Magnum rocker arms. The rocker girdles aren't necessary on this lower spring pressure setup. So the pre-load is set at one half turn past zero lash on these shorter poly-locks. We'll install the rocker arms in the standard firing order of the engine, making sure that each cylinder is at t-d-c compression stroke before adjusting them.

(Frankie)>> With these new SCE intake gaskets glued in place, a bead of r-t-v around the coolant ports and on the China walls will seal up the color matched Edelbrock 454-R intake manifold. Like last time, it's cinched down with a set of stainless ARP intake bolts. With the painted Chevrolet valve covers in place the color combo of this engine really starts to come together. Finally we can re-install the Holley mid-mount accessory drive. With everything attaching to the water pump housing, it goes on as easily as it came off. [ Music ] At last we can roll our new combination into the dyno cell to run this engine for the third and final time.

(Pat)>> Next up, we test our rowdy pump gas 496 in the dyno cell.

(Frankie)>> So we have our 496 cubic inch big block Chevy on the dyno and we have it running. So we've topped this thing with one of our 10-50 Dominator dyno carburetors so that it is easy to get into a car and get running, and it has no spacer on it so that it has plenty of hood clearance. We've been making some preliminary pulls on this engine, tuning on it, tweaking on it a little bit, and we think we have it right where we want it for pump gas. So we're gonna make some pulls and see what this thing makes. It is at operating temp, which is street temp, 175, 180 degrees. So we're gonna make a hit and see what our racy street engine does here. It looks cool, I can tell you that. Here we go! [ engine revving ]

(Pat)>> Just like that, smooth as glass! 629!

(Frankie)>> And 577, but that's a flat torque curve. I like building engines with flat torque curves cause they just carry.

(Pat)>> Everything looks good as far as the air/fuel ratios look nice, the oil pressure looks nice. 629 at 6,200, 577 at 5,100.

(Frankie)>> We were shooting for somewhere between the first version and the second version. So this is the perfect combination in that it's very close to torque of the second version but it's 20 up, 25 up on the first version. I think that's perfect.

(Pat)>> Think of the things we've changed. We've changed the cylinder head. We have changed the cam shaft. We have changed the intake manifold, we have changed the carburetor. This is still one of those deals where you could put this in a car, and this is what I want to do here. You could drive it to the strip. You can drive it with the a/c on, and then cool it off and make a run. What I want to do is let's drag strip cool this thing and see what it makes when it's all cooled off. Oil temperatures is still up there. The oil's at operating temp. Let's cool the water down, and make another hit on it, and see if we pick up anything.

(Frankie)>> We have cooled the engine off pretty good. We're at 119 now. It'll go down a little bit more once we start the engine up and get the water pump circulating. This is gonna be a drag strip pass. This should show a decent increase in power. It varies from engine to engine, but this is reminiscent of if you took it to the drag strip, got a bunch of oil temp in it, cooled it off, and then made a pass.

(Pat)>> We're not gonna ice down the intake or anything like that.

(Frankie)>> We're not to that point yet.

(Pat)>> Let's see what this does. Level off at 110, here we go! [ engine revving ]

(Pat)>> Might have made a little difference.

(Frankie)>> I think I saw a few numbers. Okay, 635, that's pretty solid for just cooling it down!

(Pat)>> I'll take 635! 635, we were 629!

(Frankie)>> 629 to 635, that's a little bit.

(Pat)>> What'd torque do? We're still at 77.

(Frankie)>> 78.6, so basically up one pound feet. So not a huge difference. It varies from engine to engine, but it's always fun to see what it does. This thing looks good. I'm excited for whoever gets it. I kinda wish it was us.

(Pat)>> The thing is, full accessory drive, starts, runs, everything is very smooth.

(Frankie)>> It's a drop in really.

(Pat)>> You could put a big, giant spacer on it. May even pick up some power. You can have that big, tall manifold on it and it performs well but if you don't want to butcher a big hole in your hood.

(Frankie)>> This way it's easy to swap into something. It's not making crazy power where somebody really has a spend a bunch of money to put a drivetrain behind it. This is a good swap engine, and for pump gas it's a pretty stout engine.

(Pat)>> Nice job!

(Frankie)>> Our engine dyno is a lot like a vehicle in terms that it requires some regular maintenance, and today we're gonna be taking care of some of that maintenance by replacing our battery with a Duralast Gold battery. Yes, our dyno does have a car battery to run a lot of the systems on the engine. Things like the ignition or electronic fuel injection if we use it, but also things on the engine dyno itself, like our stand alone ignition and our twin starter setup. They all run off a standard 12-volt car battery. That's why we chose the Duralast Gold line of battery because we needed a quality battery for our engine dyno. Duralast has gone through and engineered this battery to meet or exceed an o-e specification of the same group size, and they started out by building an extremely durable case for the battery. Then they gave it really thick lead plates and a special gel to help it resist vibration, which being in an engine dyno room with a lot of high horsepower open header engines there's a fair bit of vibration that it needs to contest with. It also has a high output capacity. This battery has 900 cold cranking amps, 1,000 cranking amps, and a reserve capacity of 150, which is way over an o-e battery of the same size. Duralast backs this battery with a three year warranty. So we don't have to worry about it. We can install it, know that it's gonna run everything we need it to, and do it for years to come. To find a Duralast Gold battery for your vehicle you can stop your local AutoZone.

(Pat)>> To find more cool builds like this one check out Engine Power on Powernation.
Show Full Transcript