More Project Saggin' Wagon Episodes

Xtreme 4x4 Builds

Parts Used In This Episode

12 Volt Guy
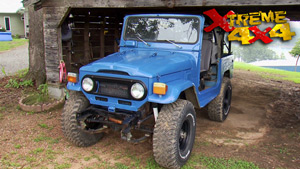
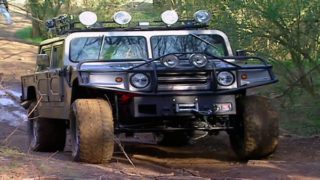
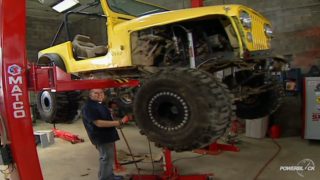
Switch Panels for both Land Cruisers
Advance Adapters
Underdrive Gear Set, Colorado Off-Road Express Reduction Housing Kit
Airaid
Cold Air Intake
ARB 4x4 Accessories
Air Lockers
Centerforce
Clutch - Friction Disc, Pressure Plate, Throwout Bearing
UniChip
Power Chip

Video Transcript

Today,

they're jumping for joy and dancing like fools all over the two fjs sagging wagon and the cruiser be there for the trail ride. Plus this Arizona trail is known for eating axles

another day at extreme and another truck pretty much ready for the trail. Well, actually today we're going to have two trucks out on the trail. That's right. Our

old 85 land cruiser and our new 07 Toyota FJ will both complete their transformation. This from a film find to a trail truck and that one from a mall crawler to a rock crawler. Now to get you up to speed. Here's what we've already done on our old 85.

We started with a torn up worn down FJ 60 that we affectionately named

the

wagon.

After performing a spring over axle conversion on the front,

we

dove into this truck with a vengeance by completely gutting and back

in the rear

been designed and built a custom forming

set up.

We stop the axles with air B air lockers and 5 to 9

years for

the ultimate in low range selectable.

Then the entire truck was treated to a full roll cage

custom suspension seats

and a hydraulic assist high steer kit.

Now, today we're going to get under the truck so we can install a new clutch and go ahead and add some crawl to a transfer case. Thanks to a gear reduction box.

Now, our 2007 FJ has undergone a less radical transformation and it all started with a six inch Pro

comp suspension system that allows us to roll on these 35 inch extreme MT tires mounted on 17 inch Pro

comp bead locks

wheels. Now, instead of cutting the body in half, we chose to protect it and we built a complete exo cage on the outside of this truck. Now, if you're wondering why it's not on here right now, but we made it removable and it's sitting right back there. We're gonna send it out and get it coded today.

Now, the first order of business is to install a set of selectable lockers, both front and rear and we're gonna be using a RB air lockers just like in our old 85 FJ. And that's gonna allow us to have true four wheel drive when we want it.

And then we're gonna be able to unlock it when right on the trail to make those super tight turns.

Now, the rear axle in the FJ is the same as the older Toyotas with an integral third member that can be removed so we can work on it on the bench

Now, these fjs do have an optional electric locker in the rear from the factory. And if you wanna upgrade to the A RB air locker, you're gonna have to buy a brand new housing just like this one from Toyota. Now, this is gonna run you an additional 400 bucks. But if you have an A RB air locker in the front, you'll probably wanna change out the rear to match. So you just have one compressed air source and a simplified locker set up.

Oh,

installing this double

K is gonna make our drive train a lot longer. So we're going to have to modify the front cross member and make a new rear mount.

The whole plan for this truck was to tear out the transfer case to get a more aggressive gear ratio,

but that truck hasn't seen the road or the trail and only God knows how long. So the condition of the clutches unknown.

So when you're this deep into a project, it's not a big deal to tear out the transmission to go ahead and replace the clutch.

The fly wheel in the sag and wagon is in pretty good shape with no score marks or bloom.

We are installing a new center force friction disk, pressure plate and throw out bearing.

Now, our new cruiser is an Ifs truck, which means it has independent front suspension

and it's pretty common for newer light duty trucks to have this kind of set up. Now, the rear axle is a solid axle and a solid axle swap is a pretty popular upgrade to an IFS truck and I'm sure a lot of you guys are wondering why. So, I'll show you on the chalkboard,

a solid axle underneath the front of your truck will have the axle assembly, the axle shafts, the tires and wheels all traveling as one fixed unit, while an ifs axle has the center portion of the axle, the carrier assembly and the interior stub shafts fixed to the truck's frame and then the tires and wheels travel on the half shafts that go out to the wheel bearings. Now, the benefit of this kind of suspension is you get a better rod,

you basically have each wheel absorbing the bumps independently of each other. The downfall is you're limited to the amount of wheel travel, you can get out of that axle because the CV joints reach their operating limits a lot sooner because of the shorter shaft. Now you can get long travel, independent front suspensions, but it usually means you have to increase the track width of the vehicle and it costs a lot of money.

Now, the solid axle,

it's basically pivoting from the center of the truck so you can get a lot more articulation of that vehicle off road for a lot less money. Now, the downfall to a solid axle truck is that the ride is a lot harsher. You basically have one fixed mass absorbing all the bumps. And when this tire tries to go up because it's connected this side over here is gonna try to go down, resulting in a harsh ride inside the driver's compartment.

Now, the older land cruisers came with a solid front axle straight from the factory. But with the new cruiser having an ifs, we can go ahead and compare the two of them together out on the trail later.

Now, most trail trucks rely more on gearing than they do on horsepower. And since we kept the original six cylinder in the land cruiser with just a small little EF I modification, we're definitely going to need to lower our gear ratio.

And we're going to do that by installing a new lower gear set and a collar

off road Express reduction housing kit all from advanced adapters.

Now we're going to get that lower craw ratio thanks to the underdrive gearing

and this adapter will allow us to adapt the front half of an MP two or three transfer case as a secondary reduction box

with the range has removed from the two or three in the transfer case off the back of the stock land cruiser for speed train,

the new outlet shaft is installed in the range box in the Colorado Express adapter is bolted to the back of the range box.

The second adapter is bolted onto the front of the range case.

And depending on your transmission, you may have to install a new input gear in the 203

with the transfer case disassembled and cleaned. We will now press the bearings off the intermediate shaft

and install the new low range gears.

The housing will have to be ground for clearance of the larger gears.

And once the gear no longer hits the case, the new gears can be installed. Then the front half of the

case is mounted on the two or three,

then the entire assembly can be bolted on the back of the transmission

and reinstalled into the track

with all these upgrades. Just how trail ready will these fjs be? Stay tuned. But up next, bring lots of drinking water

and a bunch of tools. Arizona desert crawling when Xtreme 4x4 continues

time. Now for an Xtreme 4x4 tech tip,

as you guys know when you get a block back from machining or just out of the junk yard, it's a great idea to pressure wash it down. Well, I thought I'd show you one of my homemade tools to make that job a little easier. Simply a three eights bolt welded on to an old connecting rod that came out of a junk motor, it screws into the back of the block. And that way you have a nice big hook to hook your crane to

gravy.

And you guys know that one of our main goals on this show is to take you to some of the most sickest off road destinations in the US. Well, this week we're headed to Cactus country and their annual trail days.

The Arizona Desert is known for some of the most extreme trails in the country. This whole area out here is a four wheelers, Mecca 1.5 hours north of Tucson. It's an off road classic.

How are you

going?

Good morning.

Where are we going,

Max Lally.

Hell, yeah.

Axel

Alley is one of the most extreme trails out here and it's also one of the most well known. It's very hard on vehicles and very hard on drivers.

They call it axle alley because of a lot of breakage of axles. Very gnarly trail, a dry river bed between two mountains. The trail is only three quarters of a mile long for most. The punishment is endless.

How far is it? Three quarters of a mile you're out here all day. It's pretty gnarly. Soon as it's rolling, you

hug this thing hard,

bring it up.

I better win it. The

train is very, very rocky. It's brittle.

There's a lot of ledges and a lot of big boulders. It takes some skill to get up on us.

The ideal wheelbase is somewhere between 100 and three and 100 and 10 on this trail any longer than that. You get hung up on turns

any shorter than that. You can't make the climbs as a trail leader, Michael Clin

is an expert on these rocks. Try just sliding up it, typically you want to try to crawl it real slow. There is, there is a couple of spots on the trail where you really have to put your foot in it,

but typically you really wanna not have tire spin and try to crawl it

going pro. Next season, Michael used lessons learned on axel alley to design his competition buggy.

This is a custom built rock buggy, took us, uh, two months to build and as far as money goes somewhere between 30

$50,000 the driving style for Arizona is unique to the area. It's 80% slow crawling and 20% put your foot in it and hold on

that. 20% of the time, put our foot in it. I have a uh 3.4 L

Toyota motor with a supercharger.

It's pushing 300 horsepower and about 360 ft pounds of torque.

Got a lot of bang for your buck on it

out here. It needs to be tough enough to withstand the brutality of the rocket.

All right,

the suspension travel is 14 inches in the front and 17 in the rear. We need that much travel because a lot of the stuff out here

is, uh, big boulders and big crevices that you're going through. And if you don't have a tire hitting the ground with traction, you don't have any way to get up. All of our links are quarter inch wall tubing they have to be very strong. The skid plate under there is a quarter inch. Everything on the bottom half of the dry

is extremely strong for these hard hits on these boulders that we drive over rock crawling may mean fame and fortune for Michael.

But he'll always come back to the Arizona desert. It's a lot of fun coming out here and playing it. There's nothing else in the world better to do, Get on the rocks and see if all your hard work paid off, which it does.

Now, it should go without saying that if your rig isn't lifted, locked and ready to rock, then axel

alley is gonna swallow your junk hole. But I'm sure if you got the gear in the guts, the Tucson rough riders will be more than happy to take you around their playground.

Welcome back to Xtreme 4x4 where we're well on the way of getting both of our land cruisers ready to hit the trail later on today. Now, I've already gone ahead and finished up installing the A RB air locker into the center section of our brand new FJ. And we've shown you how to install a locker into this type of axle four. But the front end is an ifs, this is that center section that we were talking about earlier that's mounted securely to the truck's frame. And in order to get a locker or set of gears inside this thing, you basically have to split the whole thing apart and the procedure is a little bit different. So we're gonna take you through it step by step

with the passenger side axle extension removed, the perimeter bolts on the axle housing are taken out

and it's separated. Be sure not to pry on the gasket surface,

the carrier will lift off with the upper half of the axle housing.

And once the axle stub shaft is tapped out, the ring gear can be removed

and transferred to our new A RB air locker.

Then swap the side bearings from the old carrier to the new locker,

air actuator installs under the bearing rays for the side bearing.

Then the two halves are bolted back together.

Now their case has bolted together, all that's left is mounting up the air locker bulkhead fitting into the housing itself and then snaking the feed tube around and feeding it out, making sure that we stay out of this synchro hub on the stub shaft and all we have to do is install the extension tube back onto the main housing and the whole axle is ready to go back underneath the truck.

Yeah.

Yeah.

Yeah.

Yeah.

So we've got new switch panels going in both of our land cruisers. In our new FJ, we had 12 volt guy make us a simple two switch piece to fit inside this coin holder in the center console to control our A RBS both front and rear. Now, in our old land cruiser, the stock wiring is basically junk. It's been cut on, added two subtracted from. So we're going to completely replace the harness and control everything with another 12 volt guy switch panel. Now, this is a pre terminated switch panel with led S

and switches to control everything from the fan. The lights, both A RBS as well as the compressor and we can also control the winch from inside the truck.

Next, the cruiser hits the trail extreme style where the modifications enough to make this cruiser survive. Stay tuned.

Welcome back to Xtreme 4x4 where our team is putting the final touches on our dual and Toyotas.

Ok.

All right. Well, it looks like a brand new FT is pretty much ready for the trail. What do you think, Jessi? I think it looks pretty sick. I wish I could go out with you, but unfortunately, Tommy and I are gonna stay here and finish this because it's not quite ready yet. Well, I'll fill you in on how the day went. Please do have fun.

We modified our new FJ cruiser for some serious trail duty

but not to the extent that it's impossible to drive on the street.

That's why we get to drive it to the trail.

Thanks to

pros MX suspension package and its six inches of

rocks.

The intermediate trails present no problem.

Now, our FJ did not arrive in stock trim. Already installed magnet flow cat back exhaust unit, chip, power chip and an air raid cold air intake

all in order to give us a few more ponies under the hood.

Tight trails are pretty common in our area

and when we had to rub our way past trees and rocks, the axle cage protected us from body damage

on the tubes. The linex truck bed coating held strong with no feelings.

No

that we're pulling cable 30

minutes. Ok.

Some might look at winching over an obstacle and giving up. But our objective make it up the trail without putting our brand new FJ on its roots.

And since Toyota says that the FJ can pour some pretty deep water almost up to the hood line, we had to find out for ourselves

and the foot.

So there you go. Great day out on the trail. A little bit of winching and a whole lot of mud. Pretty much everything worked the way it should. And if you want to get a close up, look at this FJ cruiser check with your local four wheel parts store. It's gonna be making the rounds and setting up on tours and personally, I don't even think they should clean it.
Show Full Transcript