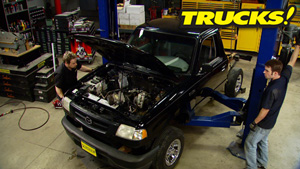
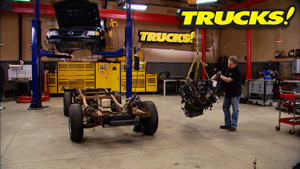
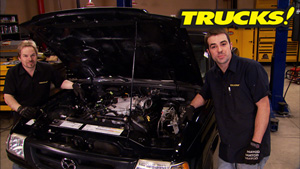
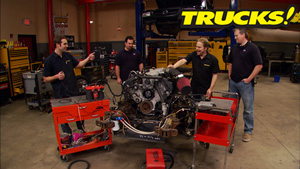
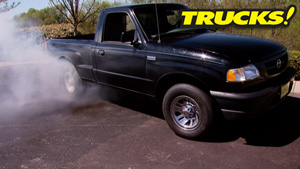
More '01 Mazda B2500/Ford Ranger "Rolling Thunder" Episodes

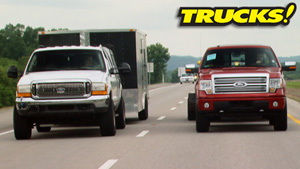
More Rolling Thunder Episodes
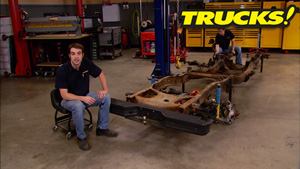
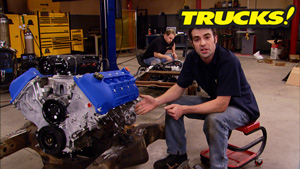
Trucks! Builds

Parts Used In This Episode

3M
Sanding Pad, Scotch-Brite, Nylon, Maroon, 9 in. Length, 6 in. Width, General Purpose, Box of 20
Classic Tube
Tube Straightener, Straightens 3/16" to 1/2" Light Wall Tubing
Dupli-Color
Paint, Engine, Enamel with Ceramic Resin, Semi-Gloss, Black, 12 oz., Aerosol, Each
Dupli-Color
Wax and Grease Remover, 11 oz., Aerosol Each
Lizard Skin LLC
Sound Deadener, LizardSkin, Spray-On, 2 Gallons, Each
Lizard Skin LLC
SuperPro Spray Gun Kit, 32 oz. Canister, 90 Degree Tip, Mixing Paddle, Each

Video Transcript

Today, project Rolling Thunder is getting a layer of heat insulation under the cab and we need it to cut down the heat from our new exhaust system.

It's all today here on trucks.

Hey guys, welcome to trucks. Well, we've got Project Rolling Thunder back in the shop today. Now, this is kind of an ambitious project. We're taking an XFO cylinder five speed Mazda B 2500

essentially turned it into a truck version of a Mustang. Now, this thing is going to end up being a really fast and great looking street truck, but it's also something we're going to be able to take to the racetrack.

And despite the really wide rear tires, I'm not talking about the drag strip, either we're talking about an auto cross or a road course somewhere where we can really stretch the legs of this pickup truck and kind of get into some triple digit speeds legally. We want to be able to test the power suspension brakes and traction of our little Ford Ranger,

but we're going to need an exhaust system first. So that's one of the projects we're going to be working on today.

The other project we're gonna do today is to deal with the by product of all of that power heat.

And I don't know about you, but riding around feeling like a burrito in a microwave is not my idea of having a good time on the race track. So we're gonna deal with that problem, but we're not gonna stack up a whole bunch of heat insulation tiles because number one, they weigh a lot and we're conserving weight on this truck trying to keep the whole entire vehicle weight down. So we're gonna show you guys how to use a product that is easy to prep get it just about anywhere. And

didn't we? Very much lizard skin?

So why all the cardboard? Well, those of you who've been watching trucks for a long time, you might remember the 67 Chevy pickup project. Copperhead. Well, I painted that truck top and bottom and the way we're gonna shoot the lizard skin insulation on the bottom of this truck is the same way. I shot the floor pan with the truck tipped back on the back of its cap cardboard. Of course, is to protect the sheet metal. Work smarter. Not harder.

Yeah,

to put that thing in the way.

I,

that's one way to clean it out.

Thanks guys.

Now there's a couple of things you notice right away with the cab sit up on it.

The first one is, well, we've got a really good rust free cap. The second one is this,

that's the factory sealer. There's absolutely no sound or heat insulation on the bottom of this cap. With the truck being low, the exhaust heat is just gonna radiate up into the cab. So we're gonna do something about that.

We're gonna scuff the entire bottom with these scuffing pads. And it's also gonna give us the opportunity to

give it a bit of a cleaning

the red scuffing pads you will find in every body shop on the planet and they're the perfect tool for prepping this bottom since it's an inconsistent surface with lots of gas.

The prep solvent we're using for final white is also a body shop staple, but we got ours from

DLA color, which means you can get it at just about any automotive retail store in the country.

And it's always a great idea to chase out any solvents from your pinch welds or gaps with a little compressed air.

Now, rarely does something high tech come at a paste, but that's exactly what lizard skin is. It's a sprayable water based thermal barrier that's filled with ceramic particles and just like your ceramic coated headers, keep the heat from out of the engine bay. This stuff keeps the heat from out of the cap.

It's safe to use. It's environmentally friendly with easy clean up and it's even easier to spray if you use a kit that they also offer.

The kit includes this siphon feed gun, which is all we're gonna need today because of the way a work piece is set up. But they also have this hose attachment that allows you to get inside door frames and tight crevices.

And this attachment here that allows you to drop it down into the bucket. Attach a piece of hose, the length that you need to where you can work independently of the bucket with the gun body itself. If you've got a huge job,

this

is pretty necessary. This is included in the kit as well and allows you to stir up the paste and make it into a consistent format.

Just attach it to a cordless drill and you're done. Now, it does require a little bit of safety equipment. It doesn't atomize or produce over spray and it is water based, but they do recommend that you wear a dust filter mask,

glasses come in handy if you're spraying upside down. We're not. So we don't need them.

Now, we're gonna do a little experiment today. Lizard skin claims to be a lightweight thermal barrier. So the weight of the bucket is gonna be measured before and after. Right now, it weighs in about 12 pounds.

Now, we're masking for obvious reasons to keep the lizard skin from going into places that we don't want it to go into, but it's not like a paint job in the sense that all we need is 18 inches of masking paper to control the minimal over spray that we're going to have.

The biggest thing we're masking for is the square chassis harness on the bottom of the cab and a couple of threaded bosses.

Now with the lizard skin mixed to the consistency of peanut butter. I've put it in the gun and I'm testing the gun pattern on a couple of places.

Now, the gun which comes in the kit is a huge pressure fed gun with a giant orifice. So the pattern is not gonna be like a spray gun pattern. It's a round pattern and about two inches wide. But you can see how effective it is for this material.

By the way, I've got my gun pressure set at 35 pounds at the inlet

here with the film in real time, you can see the thickness and consistency of the lizard skin paste, but that doesn't mean it's heavy. It's very light.

The magic here is the ceramic particles that are loaded into the paste that literally deflect the heat from the surface that is sprayed onto.

We're gonna be using two coats of the lizard skin on the bottom.

The first coat is thick. The second coat is just as thick

which ends up giving us a consistent film and a nice even texture.

So now the bucket weighs

seven pounds, that means there's five pounds of material gone from the bucket. Just for the sake of argument, let's say we wasted a pound from clean up overspray and over mix. So that means we've got four pounds of additional weight on the vehicle on the floor pan,

four pounds to give us a 30% reduction in interior temperatures. And everybody knows that less weight means the same thing as more horsepower.

Hey, welcome back to trucks. Well, our thermal barrier coating looks great. However, it tends to be a little bit porous. So we're gonna give it an extra coat of paint to make it look a little bit better. But also keep dirt and road grime from getting caught up in the texture of the coating

and I'm gonna suit up

so I don't breathe the stuff in. Ok.

Now, even though the lizard skin looks great, it's really not designed as a top coat. So a coat of paint is really going to help seal the surface seal it away from dirt, debris and moisture penetrating the coating.

The pain we chose is duple colors, engine enamel in semi gloss black. It's easy to use. It looks great with a nice eggshell sheen and it's got the same temperature rating as the lizard skin itself 500 degrees.

Well, now that Kevin's got the floor of the ranger completely insulated. We can move on with the installation of the parts that are going to make the heat in the first place. The exhaust system.

Now, during stage one of this build, well, we built an exhaust system using a pair of magna flow mufflers and some tubing we had around the shop using the Bender we've got here.

The problem is that Bender doesn't produce manual

bends. So we wanted to upgrade and replace the non manual bent tubing with some manual bent stuff that flows a little bit better and can support the higher horsepower levels. This new engine is going to produce. So to do that, we picked up a universal kit from Magna Flow.

Now, this 2.5 inch universal stainless steel pipe kit includes J bends, 40 fives, nineties, plenty of straight exhaust pipe, ball and socket flans, as well as about half a dozen exhaust hangers and a pair of 02 sensor buns. So you've got everything you need to complete the system. Now, speaking of which, while this stuff isn't cheap, you can usually get an entire exhaust system out of it

sometimes too. So if you play your cards right,

you can stretch your dollar.

Now, we also picked up a pair of 2.5 inch stainless steel mufflers from Magna Flow. Now, these have a straight through design. There's no baffles and no restrictions. So they should provide plenty of exhaust flow. Now, to complement this stuff, we're gonna be running an X pipe but we're not sure which style will suit our application best. Now, there's a number of benefits for running an X pipe. We'll get more into that later. Now, beyond all this new shiny exhaust stuff. We're also gonna be reusing some of our old parts

right over here.

Now, if you remember our exhaust system starts with a pair of 04 Mustang Cobra manifolds, they flow a surprising amount of air and they're gonna save us from having to fabricate a custom set of headers and we probably don't have room for anyway.

Now, we're gonna be reusing our high flow stainless steel catal

converters. They don't have that many miles on them. It just makes sense to reuse them. Same story with our two sensors. Now, here's an example of a non manual bent piece of exhaust tubing. Not exactly what you would consider show car or race car material. We are not going to be reusing these.

Hey guys, welcome back. Well, with project rolling thunder up on the lift and at a reasonable working height, we can get started on our custom stainless steel exhaust system

and well, frankly, we've talked about it enough so time to work.

Now the driver side frame rail is awfully close to the output of the exhaust manifold, but we were able to sneak an exhaust pipe in there and if we need to, we can go back later and relief, cut the frame rail and plate it in if we need to for. Now, we're gonna say it's good enough.

Now, like we said, we are going to be reusing our catalytic converters and we found the perfect home for them right on either side of the transmission

and that'll lead into the X pipe.

And you can see which style we chose.

Now, an X pipe has a few benefits. It'll change the overall sound of the engine and the exhaust by smoothing out the exhaust pulses, it'll also reduce the overall sound coming from the exhaust by a few decibels.

And while that doesn't sound like much, your neighbors will certainly appreciate it. And it can make a difference if you're driving your car or truck at a race track that has noise restrictions.

Cool looking good. Yeah,

an X pipe also has a scavenging effect,

meaning that when one downpipes exhaust pulse passes through the X pipe, it helps pull the opposite downpipes, exhaust pulse through.

Now we're just tacking this system together using our mig welder because it's quick and easy, but we'll go back later with the tig welder for a nicer and cleaner appearance.

Now, even though this is a performance truck and performance first, there's no reason it can't look good at the same time.

And even though it's not going to be seen very often, we wanted the exhaust system to be as symmetrical as possible.

Now, the exhaust hangers came from the local part store.

We ended up having the perfect mounting location for them using this rear cross member.

Now, typically they're held in place by a U boat, but we wanted a cleaner look. So we ended up welding them directly to the muffler.

Now we're gonna take the easy way out because I don't even wanna think about running the exhaust through the IRS and past the fuel tank,

plus exhaust out of the side of the truck

just looks and sounds cool.

All right, our exhaust system is completely mocked up and we've got the tail pipes sticking out of each side of the truck in front of the rear tires, but we don't want to finalize their position until we get the bed back down on the frame. So we can correctly position the tail pipes. We've also got to add our 02 sensors,

an exhaust hanger or two. And we've got to figure out how to make this system removable. We can probably come in and make a cut along here,

put it back together using a stainless steel band clamp. That way, the back half of the system is removable by itself along with each down pipe and catalytic converter. Well, that can be removed individually.

You're watching trucks for a DVD copy of this episode. Just go to Power Block tv.com and order your copy for just 595 plus shipping and handling. Start your own trucks, collection delivered right to your door from the power block.

Hey guys, welcome back to trucks. Well, we're making a lot of progress on project Rolling Thunder today. And while Ryan finishes up the tig welding on the exhaust system, I wanted to show you what we've got left out of our Magna Flow Universal Hot Rod kit. Now, we've got a couple of good sections of straight pipe, a couple of nineties, what's left of AJ band of 45 some miscellaneous scraps,

ball and socket joints. Heck even some hangers left over. Essentially, we could almost make another exhaust system out of this. But remember, Magna

Flow also sells individual pieces. You can go to their website and pick them up just enough to make up a system. So if you're working on more than one vehicle at a time or you and your buddy want to split a setup, Magna

Flow may be the way to go for you for a man

bain exhaust system.

Now, with the exhaust system mounted in the frame, we're gonna drop the bed back down onto the chassis and get a really good visual idea of how this thing is gonna look finished

with the bedside sitting down here. You can kind of see where we're headed with the body mods, metal work filler and some of the priming and blocking is done. You can see that it's really starting to take shape with the custom body mods and the wide body bedsides. By the way, 3 35 30 series tires have plenty of room between the bedsides and the side wall.

Now, it's a good thing, we didn't weld the tail pipes into position before we dropped the bed down onto the frame. They'd be both pointing right at the bedsides. Not good. So we'll get those adjusted, put them where we want, throw some good looking exhaust tips on there and call this system done.

Now, another objective we had with this truck was to make sure nothing hung below the bottom of the frame rail due to

ground clearance issues because the truck just sits so darn low and luckily we are able to achieve that. Now, the exhaust system does sit nice and low in the chassis which keeps the weight down low as well. Now, we still got to come in here and wrap heat insulation around the down pipes, catalytic converters and we might throw some around the X pipe section as well just to try to keep heat off the drive shaft

you join and the transmission output shaft seal. Now on the other side of the frame, well, you can tell we've been working on the brake lines a little bit and that started out as a coil or roll of 316 stainless steel line

and we had to straighten it out by hand

while it did come out looking pretty good. Well, during the process, we were thinking to ourselves, there has got to be a better way

and there is a better way. Now, you guys might know classic too from their pre

bent brake lines, brake line fittings and brake line supplies, but they also offer tools like this brake line straightener. Here's how it works.

Now, the process is pretty straightforward,

simply feed the tube or line into the tool and slowly work it back and forth. Then you can put a little bit more preload on the rollers as you go again, slowly working it back and forth.

Once you see the tube start to take shape, well, you can work it until you're happy with how straight the line is.

Well, you get the point in less than a minute. We turned a three or 4 ft section of coiled stainless into a relatively straight piece of line. We didn't wear our thumbs out by straightening it and we didn't put kinks every few inches in the process. So if you guys do a lot of custom fuel lines, brake lines or transmission cooler lines, check out classic tube.com guys. Thanks for watching trucks. See you next week.
Show Full Transcript