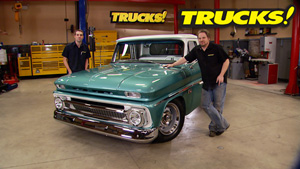
Parts Used In This Episode

International Chemical Products,Inc.
Metal pre-treatment.
LMC Truck
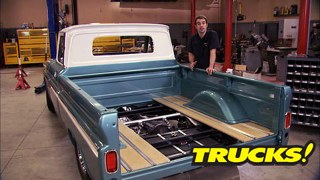
Front bed panel, wood floor kit, wood floor strips and hardware.
Mr. Gasket
14" round air cleaner.
Mr. Gasket
Spin-on oil filter adapter.
Painless Performance
Striker I Module.
Pertronix
Ignition II points conversion, flame thrower II coil, custom fit wire set.
The Industrial Depot
Misc. bolts and hardware, Cut-Off wheels.

Video Transcript

Today, it's a brand new project and we're gonna cut a truck in half. We're taking a vintage Chevy C 10 that's been hidden in a barn for more than 10 years and first getting it to run

and then we're gonna hack 20 inches out of the frame and the same amount out back to make it the more popular short bed.

That's all today here on trucks.

Hey guys, welcome to trucks

with the last vintage pick up we had on the show was our 53 F 100 project Old School.

Now, we had a ton of email about that Old Ford. As a matter of fact, old school was one of the most popular projects ever to be done on trucks. So we thought it was about time to dig into a vintage Chevy.

Now, if you're talking about classic lines and styling, these mid sixties C 10 trucks, they're some of the nicest looking trucks out there. And as a matter of fact, I'm very happy to say that this particular truck, well, it's mine. It's been in our family since it was new. I got it from my father in law Howard L Copeland who got it from his dad, Charlie Copeland who got it from the blunt county commissioner in the fall of 1966 with less than 200 miles on it.

Now, the original 283 V8 and the three on the tree standard shift have been replaced with a later model 350

a 700 R four automatic.

My brother in law Randy and I threw a paint job on it about 15 years ago as a father's day present

and someday all this stuff, it's going to get freshened up. But one thing's for sure, this truck is going to stay in the family and it's going to stay looking like it is clean and classic.

And this old tag this has been riding on the truck since 1967.

1 thing's for sure,

Ell and Charlie,

they're Bama fans, but check this out. We've got our hands on another 66 Chevy and this one's a long bed too.

Now, the long wheel base trucks aren't as popular as the short beds. And for that reason,

they're less expensive and a lot easier to find

even as clean and original as these two trucks are.

But if you're like a lot of folks, we know and your dream truck is a short bed C 10 where you don't have to find one, you don't even have to inherit one. You can make one today. We're gonna show you how.

But before we do that. We want to take a closer look at our new project vehicle. This thing is so clean and straight. Look at that grill. This truck is living proof that the barn find still exist. So we wanna see if it'll fire up,

but don't be tempted to throw a battery in it and see if it'll start. There's definitely a few things you wanna check first.

Ok. Now here's a red flag that's breathing through a straw right there. Right here is the jewel. There's some custom body work for you.

Ouch that was modified for the new carburetor and the new fuel inlet.

Well, now that we can see more of our 283. If you look at the carb, it was remanded in December of 99. So we're probably all right there, but we're not gonna trust the fuel in the tank. It's probably turned a sludge or varnish by now. So we'll run a new fuel line into the pump from a fresh fuel source just to be safe.

Oh, the alternator spins

and the water pump

that's good and tight. I think we're in good shape

before we pull the distributor, the position of the vacuum advanced and the rotor are marked for reinstallation.

Now, when you're pulling the vehicle out of storage, like we are with this truck, spark plugs are an easy thing to check

and these look carbon up

and they smell like old gas. So we're just gonna start with a clean slate, throw a new set of plugs in

the points are basically nothing more than an old school method of mechanically controlling the coil and the contact points when they wear out over time and they pit, they require filing and periodic adjustment. So we want to replace that with something that won't wear out.

So we're gonna use a Prot

TRS Igniter two electronic conversion kit comes with a magnet ring and the pickup module.

The old points are sent to file 13

and the patron system falls right into place on the stock distributor.

The new module hides under a stock cap for an original appearance.

All right, with everything installed and snug down, you need to measure for clearance in between the pickup module and your magnet ring, you can't have any contact here. So with your distributor shaft bottomed out, you need to have at least 10 thousands clearance in between here and with your distributor shaft pushed up, you need to have no more than 60,000. That'll give you a good accurate signal if need be the shims provided

all with the rotor lined up with our original reference mark. You can rotate the distributor body to line up with the other mark we made.

That'll keep us in the ballpark when we're setting the timing.

It's not a real good idea to trust the gap on your new plugs.

They could shift around in the box and squeeze the gap together and our old plugs are gapped at 35,000. But since we're upgrading to a new electronic ignition and a higher voltage coil, the new gap is going to be set at 40,000.

The new higher voltage coil,

sock replacement cap

and wires get dropped on and connected to the new plugs.

Let's try and see if anything comes at the bottom.

Our C Ten's canister style oil filter is effective but messy, especially if you're changing your oil on your back in the driveway, you'll end up wearing the oil.

So we're gonna add this Mr Gasket adapter so we can use a modern spin on style filter.

Old oil can actually acidify in the pan as well as wick moisture in over time.

So an oil change should be pretty high up on your list when you're reviving a stored engine.

Give it a shot, man.

Ha.

Sounds good, man.

Sounds good.

We got oil pressure

about 40 pounds. Sweet.

Another few leaks.

Now that we know she runs after the break, we'll saw this beauty in half. No, turning back now. It's no magic trick. Stick around.

Hey, welcome back.

We started a whole new project with a 66 Chevy half ton one owner Barn Find truck that we were lucky enough to get our hands on.

It's still sporting its original paint and the drive train is bone stock right down to the brakes, the wood bed. Well, it's mostly termite food, but all the hardware is good and solid. So now that we know that it runs good too, now it's time to start hacking it up. Making a long wheel base into a short wheel base

is not without a set of challenges. You have to section the frame the right place the right way and shrinking that body. Well, nobody makes a new short wheel base bedside for this 66 Chevy truck. So shortening, the body presents its own unique set of challenges and we'll talk more about that later, but for now it is tear down time.

Ok. So we're tearing another truck down to the frame.

This is for a couple of reasons

so we can get to the right place to section our frame

and to be able to give you guys a very clear look at what we're doing in case you ever want to do the same thing,

the 12 inch section gets removed in between the front and rear cab mounts.

So the rear mounts get hacked off and relocated later.

Here's a cheap and easy way to mark your cut lines. A quick coat of black paint and a silver sharpie. Give you a nice contrast and a clear map of where you'll be cutting.

We've measured to cut a 12 inch section out of this frame. One thing you don't want to do whether you're lengthening or shortening. A frame is just to do a straight cut. It's not as strong you want to do what's called a Z cut. Now, it's pretty obvious what we're doing here. This piece goes away and that piece goes away and the two pieces join together. It does two things. It locates your frame rail to help you do a parallel joint and it triples the weld strength. So it triples the strength of your frame.

Now, before you break out the saws in the cutters, you're gonna wanna brace the frame. We're using tubing that'll stabilize the frame once it's cut in two and make it easier for the frame to slide back together.

Now, getting a straight cut with a plasma cutter can be next to impossible using simple guides like these will give you almost complete control.

If you don't have a plasma cutter, don't worry, an inexpensive cut off wheel works great too, but it'll tax your air compressor pretty hard.

Don't give it a shot.

No turning back. Now

we're gonna clean these edges up and then bevel the edges inside and out. For better we penetration.

We good.

Yeah,

that's good right there.

OK? We look good. It looks nice and square. But before you weld, you wanna make sure that it is square, you wanna measure front to rear, find a common point of reference on each rail. And then more importantly, you wanna exit out measure like this

and like this in an X pattern that will tell you if your frame square don't commit to weld until you've measured at least twice.

Ok. We got 47 and 38 of the center of the front bed Mountain.

Right. They're center of the whole, yep, 47 to 38. We, on, we're right on.

Right. They're center of the hole. Ok. 59 and an eight to the front

or to the middle of the river.

Right. They're center of the hole. Ok. We got 59 and 316. So the 16th, let's burn this thing even before it moves and better do it.

That's well within the one quarter inch factory tall ins. So this thing is gonna track great

over the break. We'll tack the frame back together and when we come back, we'll show you how to weld it together the right way, then we'll cut more than a foot and a half out of the bed.

Hey, welcome back to trucks. If you're just joining us, when we've started a brand new project today, the 66 seat 10 long wheel base pickup and believe it or not,

we cut it in half, but just to make the more popular short wheel base version out of it. And today, we've made a lot of progress and we've already got one frame rail completely welded up and the driver side, well, we got it partially welded and before we go any further,

we want to show you a few important things to keep in mind

you need good solid weld penetration and that's seen by the blue

or the heat affected zone. Now, on the backside of our Z cut, I went ahead and filled in the weld at a lower voltage setting to lower the risk of burning through.

And now that I've got good base metal, we can turn up the voltage a little bit and make sure we have good solid weld penetration.

Now, I know it's easy on a project like this to get anxious and want to hurry up and finish as well.

But you definitely wanna let this cool naturally resist the temptation to cool it off with compressed air or spraying it down with water. If you're not gonna do the metal any favors and you're probably gonna end up warping it.

Now, it's pretty obvious that we need to do bed floor.

So we got one from L MC truck, a brand new stock replacement short wheel base oak kit that they've got in their catalogs. But it also drives home the point that we've got 12 inches too much room on the front and eight inches, too much room on the back just like our frame.

So now you gotta make some decisions and you're not without options. If you're doing a short wheel base conversion, like we are, you can go with a step side bed, there's bedsides and fenders available after market that are pretty reasonably priced

or you could get a used short bed, but you know, as well as I do that. A 40 year old bed. Well, it's probably gonna have some rust so you can spend your time fixing rust on a short bed or you can spend your time sectioning a virtually rust free long bed like we've got here. Either way it's a wash for time, but

this is gonna be a lot more fun. But keep in mind when you're sectioning sheet metal, no matter how straight or how flat that panel looks, there's a crown or a contour engineered into it for strength. And what happens if you end up lobbing a big chunk out of the middle? Well, you disturb that crown and create a situation

that you're gonna have to repair either with filler or metal finishing techniques. Either way you cause a lot more work for yourself.

So what we've decided to do is take our 12 inch section out of the front of the bed and our eight inch section out of the rear of the bed right here. Next to the end. This does two things for us. Number one, it creates a factory looking bedside. Number two, we get to retain the original contour of this panel.

Now to finish this thing off, we're going to reinforce the welded joint with what's referred to as a fish plate. We're gonna mount ours to the inside of the frame rail. So from the outside, it gives a nice factory appearance.

Now to do the 12 inch section at the front of the bed on the top of the rail. I'm going to do an offset cut that's going to allow me to keep the steak pocket for a more original look.

Our damaged front bed panel gets removed to give us better access for cutting and welding and will be replaced with a new panel from L MC.

The 12 inch front section is trimmed using masking tape as a guide.

You don't want to force the blade. This can cause too much heat, excessive blade wear and metal warpage

with a final test fit,

the front tap is ready to tack into place.

The surrounding metal is ground back about half an inch for welding

for sheet metal. We're using a smaller 0.024 welding wire

along with a lower voltage setting of about 14 volts and a slow wire speed.

We created this overlap on the front panel for added strength

out back. The same techniques are used with an offset cut to retain the ST pocket location.

The cut on the back edge is made roughly a quarter inch from the factory rolled seam.

This is so the appearance of the factory seam is not distorted and the end result will be an invisible section

with both rear sections cut out. We've left small strips of metal to hold the rear panels in place.

Since the rear tie bar is attached to both end panels. Tom Boser's

was nice enough to lend us an extra set of hands to help us finish and locate our rear sections.

Baby.

There it is.

After the break, we'll show you how to keep all these fresh cuts from rusting until you're ready to finish the job. Stay tuned.

Hey, welcome back to trucks. We're taking care of a few last minute details on our long to short bed conversions such as cutting eight inches out of the back of these frame rails to match the eight inches. We took out of the back side of the bed.

We've also relocated our rear cab mounts 12 inches back from their original position to compensate for the 12 inch section. We took out of this part of the frame and we've mounted it back to the frame rail using grade eight hardware we got from Industrial Depot.

Now, this is just a mock up since we're gonna have to blow this truck apart to refinish the frame anyway.

There you go.

Well, it took us about 30 hours to get to this point. So if you got a couple of good buddies and a couple of weekends to spare, you could turn your long wheelbase truck into a short one. No problem.

Ok. Here are a couple of things for you. Diesel truckers,

Magna Flow now offers this new catalytic converter design for Ford Chevy and Dodge diesel pickups in both the universal and this direct fit configuration.

Their six inch converter body is combined with mandrel bank, stainless steel tubing

Oe

FLS and hangers to make this an easy bolt on. But what's important here, this is a high performance cat designed for maximum air flow while keeping you legal in all 50 states.

The magna Flow's new diesel catalyst

converters started about 900 bucks for universal cats and about 1300 bucks for bolt on applications.

If you've got an 0 4.5 to 06 dodge with a 5.9 cummins in it. Well, painless performance has something for you. They just come out with a striker one power module. Now, I know you're saying, yeah, you showed us programmers before. It's nothing new. Well, this is not a programmer. You can get a safe 100 horsepower and an extra 200 ft pounds of torque with,

without getting into your vehicle's computer or settings. It's an easy four plug hook up and the striker module intercepts and reinterprets the vehicle information and helps the computer make more power. The striker one settings range from fuel economy all the way up to high output. The display shows boost pressure, fuel pressure and it even has an anti theft mode. The striker one from painless performance products comes in at about 600 bucks. That's about six bucks per horsepower.

Not bad.

Here's a tip for you guys that might be short on time. I'm finished with my metal work, but unfortunately, I can't do the body work right now. We gotta push this truck out and get another one in here. So I'm using a conversion coating called

Plex 20. You spray it on, wipe off the excess and you're done. The manufacturer claims that it stops flash rusting indefinitely and it's safe to paint weld and powder coat on top of. So now your metal work is gonna wait for you until you're ready to finish it. Thanks for watching trucks. We'll see you guys next week.
Show Full Transcript