Parts Used In This Episode

Dupli-Color
Weld-Through/Cold Galvanized Primer.
Certified Auto Recycling
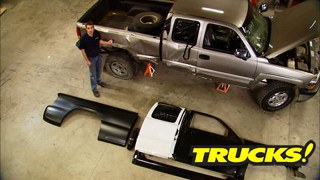
Recycled passenger rear door.
Keystone Automotive
Bedside panel RH 6.5 ft. bed
Kimberly-Clark Professional
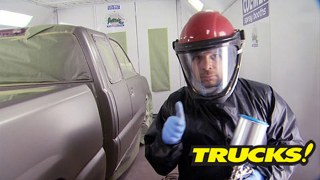
KLEENGUARD* V50 Contour Eye Protection with Foam Fog & Particle Shield, WYPALL* Red Shop Towels, SCOTT┬о Shop Towels.
LMC Truck
Outer rocker panel RH, door shell RH, front fender RH, cab corner RH.
Norton Automotive Refinishing Products
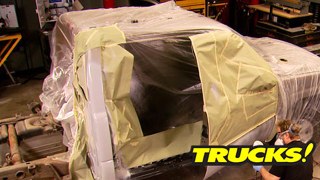
SpeedGrip epoxy panel bonding adhesive.

Video Transcript

Today, we're starting a brand new budget minded project. It's our second chance Silverado. We've rescued this 01 Silverado from the Auto Recycler so we can give it a new life as a sharp everyday street truck for pennies on the dollar. It's all today here on trucks.

Hey, welcome to trucks. Well, if you've ever done any paint and body work or even know somebody that has and you're looking for a smoking deal on a truck. Well, today's show may interest you. This is a 2001 Chevy Silverado, Zse,

14 wheel drive four door cab with the off road package. It's fully loaded with every conceivable option. Has a nice color combination and we picked it up for next to nothing, but it's definitely a used truck with over 100 and 4000 miles on the clock. But the 53 V8 still runs great. The dry train seems to be in good shape and believe it or not, we only gave 2200 bucks for it,

but there is one small, small detail we haven't mentioned yet

and that little detail. Well, most of the right side of this truck has been wiped off in a wreck. The insurance company has written it off as a total loss and the $2200 sale price. Well, that is now the salvage value that this truck has. But before you write this project off and flip the channel, let's take a little closer look.

Now, inside it's loaded sea warmers and everything. It's in pretty good shape too.

But more importantly, the airbags never deployed in the wreck, which can be a major expense. So be aware of that if you're looking for a fixer upper and there's no warning lights in the instrument cluster or any fluid leaks in the drive train.

Now, there's no visible signs of frame damage other than a couple of bent brackets, quick cross reference with a measuring tape and we know that the frame is straight. So what have we got? We have sheet metal damage and that's about it, but we can't drive it around like this. And that's what today's show is about.

We're calling this our second chance Silverado. We're gonna give those of you who have never seen what happens in a body shop, a chance to learn the process. And for those of you that have, well, we'll show you some budget minded tips on how to do a collision repair the right way and save a few bucks doing it because the truth as bad as this truck looks, it's really not hurt. It's just that it would cost more to fix at a commercial body shop than the insurance company was willing to pay to have it done thereby at least in their eyes making it a total loss, but

their total loss

can be your gain.

And here's why

sheet metal on modern vehicles is fairly easy to replace. And if you have a vehicle that's new enough or popular enough, it's not that hard to get parts for.

And as you can see, you can practically build a new truck with parts that are available either through the aftermarket or source from a salvage yard, fender and door from L MC. The fourth door from certified auto recycling in Ardmore, Alabama, the rocker and cab corner from LM

C truck

and the bedside from any number of after market vendors and believe it or not replacing an entire skin or outer panel like this bedside is more often than not easier than repairing a damaged one than the one that's on this truck. No, just ain't worth the trouble.

Now, we looked around for undamaged trucks like this just to see what they go for. And we found examples between $8500 up to $11,000 for low mileage on the high side, extra clean trucks.

N ad A confirmed our search and gave this thing about a $9000 value with the 104,000 miles on it.

Now, when an insurance company does a claim on a damaged vehicle, they set their total loss threshold, the maximum they wanna pay to have it fixed at 75% of the vehicle's retail value. We've got a $9000 retail value on this truck. So 75% of that is $6750.

We also had some estimates done. The average of which is this one from Gerald's auto body in Pulaski, Tennessee. Gerald's is a certified qualified shop

with state of the art gear and a fair and professional reputation. I know this because I used to work there as a collision, repair tech and a manager. So when they do an estimate, you can hang your hat on it, their estimate says that it's gonna cost $7946 to fix this truck. It's gonna cost more to fix it than the insurance company says that they're willing to pay to fix it thereby making it a total loss even though it's not really damaged.

Now, we've already shown you that between good old fashioned used parts and the available aftermarket sheet metal. You can get everything that you need to fix this truck without having to pay the price that it's gonna take to go to the GM parts counter and like you guys at home, we're not gonna fact to in our labor only would it cost us to fix this truck, right? So, follow us with our second chance Silverado and we'll show you there was some well spent cash, some sweat equity investment and a well chosen vehicle. You can rebuild your way into a nice late model truck for pennies on the dollar.

So, we've already told you that this frame is not bent. So what are we doing with a frame machine? Well, it's called a rough out pole. And it's designed to get the sheet metal structure out to where we can actually start taking some of these parts off. Now, if you don't have alignment equipment at home, which most people don't, you can sub this out to a local frame shop for a couple 100 bucks

with the clap positioned at the end of the rocker and tension adjusted out of the chains. We start the pull with a safety chain weighing down the pull chain just in case

the goal is to get back the basic shape of the rocker and the cab

where you can't clap to, you can just weld the tab and pull off the sheet metal since it gets replaced. Anyway,

pulling and releasing heats the internal molecules of the metal allowing it to go back into shape with less pressure and more speed

with tension on the chain tapping, buckles and high spots releases the built up pressure of the pole.

Tension release big time

using the truck frame as leverage to align the inner structure makes the job of replacing the outer skin that much easier

up. Next, we'll get our Second chance are prepped for new body panels and later we'll get our new rocker rocking stick around.

Hey, welcome back to trucks where we're in the middle of tearing down our crashed out Second chance Silverado.

I'm in the process of drilling out about 50 spot welds so we can get this damaged skin off and replace it with a new bedside. And when we do attach that new skin, we're gonna show you a way to do it saves you both time and a lot of prep work.

Now, inside here, we've got a carpet peeled back, the seats out the trim panel off the front door and the fourth door completely removed. And we can clearly see that the floor is kind of wadded up a little bit. We've still got some pulling to do, but that's ok. This is still just sheet metal. So what we're gonna do is use these tabs we made on our torch mate, weld them to the outer rocker skin and pull out that way. So it's, it's gotta be replace

anyway,

on the hinge pillar. Good news here because the hinges are still in the right place. The pillar is not pushed in. And that's a good thing because these are welded on hinges. They're very difficult to replace and put back in the right spot. Keep this in mind too when you're tearing your doors down, make sure you get inside the door and unplug everything instead of cutting it that way. It looks professional when you put it back together.

Since you can't weld the paint, we'll grind down to bare steel, to weld the tads to the outer rocker since it'll take several pulls from different areas.

Now, here's an example of what happens when you don't use tension and release technique

and just instead try and muscle your way through this process.

What happened?

The

metal is not as strong as we thought.

Now, all you need to worry about is the basic shape of the inner cap which is folded into itself pretty solidly.

Alternating your pull points works the entire area without pulling too far.

Now, this is why your frame shop charges you by the hour and not by the minute,

it just takes time to get set up and get things back into alignment the right way.

Now you saw what happened here when I did a cold pull, it just sheared the metal right off and broke the weld. But here when we did tension and release tension and release tension and release it eventually heated the metal molecules up and the metal gave in and did what we were asking it to do. This is working. We're close,

sir.

Mhm.

All right. With our spot welds drilled out, we were able to remove our damaged bedside. Now, even with a spot weld cutter, sometimes you have to go back with a tool like this and cut through any remaining weld Now using an air chisel is also an option, but it's gonna give you more work to do because it's gonna damage the sheet metal. And once I get these spot welds ground down and some of the inner structure straightened out, we'll be able to test fit our new panel,

grinding down what's left of the factory spot welds gives us a clean and flat mating surface which along with the 50 grit scratches in the metal is essential for a structural bond.

Using a hammer on dolly technique will help you straighten out your sheet metal so you can get a better test fit.

Give me a

hand with this thing.

Yeah,

see if she fits

that looks a lot better than the other one

fits. Good back here. Wheel arch fits great. How's this? This flange just needs to come out maybe half an inch or so, but

it looks to be in good shape. This fits good.

You gonna go ahead and paint

it.

It's ready for paint scuff and shoot.

There's a rattle in it though.

Up next, it's a quicker, easier and cheaper way of attaching body panels.

And later we'll weld in our new cab corner. Stay tuned.

Hey, welcome back. As you can see, we're doing pretty darn good on our second chance Silverado with the outer rocker removed. We got the inner, pretty much shaped up, but the floor is exactly where it's supposed to be. Now,

we've got our old cab corner off, ready for the new L MC cab corner to go back on. But we still got a little bit of sectioning right here on this inner rocker before we can put the new place.

Our new L MC rocker panel is really more than we need for this fix. So like we've showed you before, we're only gonna use a section of it.

Ch ch ch ch, check it out.

Look at that.

I'm skipping.

Come my taste back.

How does it look? Not bad?

Drilling holes in our existing rocker allows us to slide the new one underneath and attach with plug welts.

Now, aftermarket, sheet metal has a bit of a reputation for being uh not so good quality and weaker but not this piece. Check it out. It's electroplate primer, front and rear. It's got the captured inserts for the door latch and it's 1/16 of an inch thick. So even though we're sectioning this panel, we're not giving up any strength just because of the way this rocker is made.

D

colors weld through spray can primer essentially cold galvanizes the steel and will help prevent rust in the future.

And with a rocker clamped in place, rosette welds or plug welds are used to lock it into its final position.

Now, I'm no paint and body guy, but you don't have to be when using a panel bonding adhesive. Just remember when you're working on a body panel, this large pick out a glue that's got a long enough set up time to allow you to get around the mating surfaces of both your outer and inner panel.

Now, we've chosen a glue with a 45 minute set up time and this stuff self mixes in the tip, giving you a precise 5050 mixture.

Applying a bee to both sides will make sure we have adequate contact

and back brushing it. Well, that'll just prevent future rusting issues.

Yeah.

Hello

with the bedside locked in place. The dry time is four hours, but it never hurts to leave it overnight just to make sure it's fully cured.

Now, if you're wondering why we glued our bedside on instead of welding it. Well, not only is an adhesive bond as strong but each one of these spot welds represents an individual repair area that we would have to prep and there's about 50 of them. So what we did was save ourselves a boat load of prep time and some materials

build on a budget truck projects that save you time and money.

Now sometimes saving money is as simple as not spending it in the first place. For instance, our second chance Silverado has these body side moldings on either side, the side that we're repairing. Well, they were damaged. The insurance company factored in about 300 bucks to replace them, but here's what we're gonna do.

Using a plastic Bondo spreader allows us to peel the corner of the side molding off, safely removing it from the panel.

Now, here is your money saving secret. The stripe eraser wheel is available from almost any auto body supply store and fits into an electric or pneumatic drill.

The eraser wheel is made of a soft compound rubber and essentially just rolls the adhesive off the panel without damaging the paint.

A

spray detailer and a microfiber towel safely remove any dirt or residue from the painted surface.

And there you go, we got a nice clean look and that 300 bucks. Well, I can stay in your pocket.

Hey, welcome back to trucks with the four door in place. Now, we can set our outer cab corner, skin set that panel gap

with the L MC cab corner trimmed to fit

and tacked into place. Tommy's filling the gap by welding off of his tack.

This allows him to use a hotter setting on the welder and still get good penetration on either side of the welder without blowing through the thinner sheet metal.

We'll finish up the installation with rosette welds spaced about three inches apart.

This just mimics the way GM put these trucks together the first time.

Now, some of you guys may have noticed we didn't bond the leading edge of this bedside. There's a good reason we're gonna show you why.

Now by leaving this bedside loose, we can align it to the rest of the cab, get it to match up almost perfect.

Check it out. It looks a little different than the first time you saw. It, doesn't it? And like we showed you most of this was cosmetic repair. So, let's see where we're at.

We paid

$2200 for the truck. We paid $894 for the parts. So we are into this truck for 3094 bucks and that's not too shabby for a $9000 rig.

Now, you guys know we use Kimberly Clark's line of shop towels around here, but I bet you didn't know they also make eye protection.

These are their clean guard V 50 line of safety glasses. They're contoured to wrap around for better eye protection and they have a patent pending fog shield that's supposed to reduce fogging by 50% over traditional safety glasses. When you're using an industrial respirator, they come in clear amber and smoke and they're designed for comfort with a cushion brow bar and specially designed temples. Kimberly Clark's Clean Guard V fifties also block out 99.9% of U VA and UVB rays and their scratch resistant coding give them a much longer life than traditional safety glasses.

Now, obviously, we're not done here because the truck still looks like a patchwork quilt and we got a bit of body work left to do on this store. But the next time you guys see this truck, well, we're gonna show you how to make it all one color without having to paint the whole truck. Now, if you guys have any questions about this truck or anything else you saw on the show, go to Power Block tv.com.

Thanks for watching trucks. See you guys next week.

Watch out for that mirror.
Show Full Transcript