More Cheep Cherokee Episodes

Trucks! Builds

Parts Used In This Episode

Bushwacker
Five inch "Cutout" flares for '84-'96 Jeep XJ two door models.
Dynojet Research
Chassis Dyno.
Magnaflux
Spotcheck Dye Penetrant And Solvent Developer
Quadratec
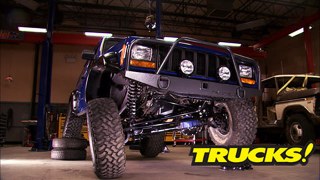
Skyjacker three inch value flex lift system with front coil springs, Nitro shocks and rear leaf spring replacements, & polyurethane one inch spacers.
Royal Purple
Royal Purple Superior Protection Extended Life oil filter.
Torchmate CNC Cutting Systems
Torchmate 2, 4ft. x 4ft. light industrial table, Thermal Dynamics Cutmaster A120 and Torchmate New Automated Plate Marking Attachment.

Video Transcript

Today, project cheap Cherokee returns and it's the first time we've ever done a four wheel drive chassis

dyno

test.

Then we'll get started on a budget minded boring stroke of our Js four leaders straight six. It's all today here on trucks.

Hey, welcome to trucks. Well, I know you guys remember our 88 XJ project cheap Cherokee and just in case you don't. Well, this was a sensible budget bill that showed that not only did Jeep really get it right when they built this platform, but with a few simple upgrades and some well spent cash, we can make it even better kid. We're really happy with the way our cheap Cherokee performed out on the trail. Specially considering it's a fairly mild build. I think we're all happy with the way it turned out looking. It didn't start out that way.

Now, the nail in the coffin of an already worn out Jeep was the collision damage on the right front. So we tore it down and went to work stretching out the right front framer.

And since we were hanging body panels anyway, but we thought we'd modernize it a little bit. We're throwing 97 and newer fenders and grill. So after a $70 paint job, we wanted to continue the facelift with Bushwhacker flares, new bumpers and brand new 30 threes.

Then we moved on to a junkyard Ford 8.8 inch axle swap, locked up the front end and finish things up with a skyjacker short arm lift kit.

And then we took it out to see how it would do and man, it impressed us, it had great traction, front and rear flexed out really well and surprisingly held its own on a very aggressive rock course.

And our only complaint all day long was a lack of power.

Not too bad for a grocery getter.

Now, like we said before, we're pretty happy with this Jeep overall and the straight six makes adequate power. But with the taller vehicle profile in the 33 inch tires out on the highway and on some of the hill climbs, it's a little lacking plus on first start up and under load is 4 L. Sounds a little rough.

So we went over to the horsepower shop to get some baseline numbers, but our first run left us scratching our heads.

I

don't even know

and we couldn't believe it, but our second run numbers were even lower and that just left us with more questions.

Is that in two or four,

a two wheel drive

since our dyno Jet has the capability of measuring power or lack thereof at all four wheels. But we thought we'd give that a try.

Now we knew our numbers were gonna be down. But what showed up on the readouts? Well, you could smell the disappointment and the blow by in the air.

Well,

58 80 47 49 to heaven.

Yeah.

Now we knew we were flirting with disaster

but we made a second run anyway, hoping for some consistency.

It is real tired.

Yeah, it's really tired. 35.3

rear wheel or four wheel horsepower.

They topped out about 4000 got to 4150 last time. So

yeah, it's time for a rebuild and to freshen it up.

Now, as you can see by the three dyno runs, we've got pulled up on the screen, our suspicion of engine problems. They're confirmed by the numbers on the first run. We started out making only 65 horsepower and about 98 ft pounds of torque pretty low

and we ended up with about 53 horsepower and 78 ft pounds of torque and the power was falling off progressively with each run when we switched into four wheel drive, it got even worse.

Now, we were hoping to get a percentage of power lost when we switched to four wheel drive,

but with the 4 L pinned at wide open throttle.

Well, this thing barely wheezed its way to 4200 RPM. On the first run, we got 48 horsepower and only 82 ft pounds of torque. The second run, we bottomed out at 35 horsepower and a miserable 62 ft pounds of torque. This 4 L is in serious need of some help. So we threw in the towel

now that left us with a few options because we had to do something. Now, after doing some research and digging around, here's what we came up with. Now, generally speaking, you can pick up a remand 4 L for about 1700 bucks. You can probably build one for less than a grand,

but it will only put you back at stock horsepower levels. And while it's not much hassle, it's just not worth it in this case. Now, a V8 swap would be really cool

and you can get a decent crate engine for about 2500 bucks or you could build a Junkyard engine for around 1500

that'll get you over the 300 horsepower mark.

But it's a lot of hassle. You'll still have to deal with ef I issues radiator transmission or transfer case adapters and you'll end up with just too much power and torque for your existing drive train. Plus it'll cost you 3 to $5000 to do it.

Not to mention the time investment, but we think stroking our existing 4 L is the best option. Now, you can get a stroked long block for about 3500 bucks, but we're hoping to build ours from between one and $2000 depending on the modifications we make that should put us at about 230 horses. Now, the hassle level isn't much more than a stock rebuild. We're thinking we're going to use a later model for liter.

We need bigger injectors and a little bit of tuning

and we'll probably throw an after market cam in there and this will probably set us back between 4500 bucks. But we end up near stock V8 power. Plus it'll be externally stock which will help on the install. So that's what we're going to do now. It's not the cheapest option, but it's still affordable. Plus there's just something cool about a hot rod in straight six.

Now with the engine apart, it tells a little more of the story and it's not a good one up next. We'll dig around inside our four leader to see what's wrong. And later, it's an inexpensive way to check cylinder heads for cracks, stick around.

Hey, welcome back to trucks. Well, we have obviously got some serious mechanical issues with a whopping 35 horsepower at the wheels. So we're gonna give it a leak down test, which can be a good way for you to diagnose an engine problem if you're down on power or maybe have a miss and that starts with hooking an air source up to your gauges and setting them to zero.

All right, with the piston near top dead center and both of the valves closed. What we're basically doing is forcing air into the combustion chamber which should hold the pressure, but as you can see, as indicated by the gauge, well, it's losing pressure and not holding it in the cylinder. Now, there's a few possibilities for that.

It could be bad rings letting air escape into the crank case, that intake or exhaust valve or even a blown head gasket. Now, if you've got bad rings, you'll hear air escaping into the crank case and you can hear it escape through the valve cover. If you've got a bad intake valve, we'll just crack the throttle body open and listen for air escaping that way

if you can hear it through the exhaust manifold, but you got a bad exhaust valve. Now, in our case, we got quite a bit of air coming up through the valve cover

indicating bad rings.

Now, with the engine apart, it tells a little more of the story and it's not a good one. For instance, it hasn't been that long since we had this oil pan off to fix the rear main seal and look at all the accumulation in the bottom of the pan

on the head. The combustion chambers actually look pretty good, but the top end is a different story.

All this accumulation

is a serious cholesterol problem and is caused by nothing more than horrible maintenance. This causes oil drain back issues and really bad circulation problems.

Now, not only did we have a huge compression issue, but I think we found the source of our rattle. I just can't believe it didn't make a more constant noise while the engine was running. It does explain where all the metal particles came from that showed up in the oil pan. Now, this crank shaft and all the connecting rods I'm sure are ready for the metal recycling bin. That's no big deal because we're gonna replace the entire rotating assembly anyway, with parts from a 4.2 L.

Now using 4.2 internals gives us benefits a couple of different ways. In the first place, there's stock replacement parts, so they're relatively easy to get and inexpensive in the second place. Well, it's going to make us more power and here's how, now with your stock 4 L crank, you've got 3.41 inches between the center point of the crank shaft and the center point of the piston rod journal.

With your 4.2 you've got 3.9 inches between the two center points that gives you a longer length. More leverage. Think of it like a ratchet.

Now, with the 4 L ratchet, you've got the stock amount of distance between the center points and

the stock amount of travel with your piston and the stock leverage with a larger ratchet. You've got more leverage, more distance between your center points, more piston travel, thereby more displacement, which makes more leverage and more power.

And all of that gives us a larger engine, but it's all internal, externally. It's exactly the same a Stroker and that gives us a cool stealth factor with more power, but also the engine goes back in exactly the same way it came out nice and easy.

Let's see what we got here.

Oh, my goodness.

Like it looks like a record like we were about one

dyno pull away from showing those rods to the outside world

and take a look at the bearing. It is completely trashed. But if you look a little closer at the center of the bearing where it lines up with the oil circulation hole, I don't know if it was a lack of lubrication or trash that got pumped through, but it completely wiped out that bearing.

Now, this assembly of the rest of the short block is pretty straightforward and goes rather quickly.

But don't just take your main bearing caps off and throw them in one big pile. They go in a specific order and if they're not marked already,

go ahead and take the time now and mark them.

This crankshaft smells

now, surprisingly, these main bearings aren't in terrible condition, especially considering the condition of the rod bearings,

but just like our leak down test told us we had a major ceiling issue, check it out. The piston ring is completely snapped in half on the cylinder.

But

now that we got the block torn down, it's just about ready to ship off to the machine shop. We hot tank it, clean it up, take some measurements and make sure this block is worth building. Then they can do all the machine work necessary. Let us know what size bearings we need to order. We can get the parts on the way. Go from there

up next, we're upgrading one of the coolest tools in the shop and later we're still getting our head checked.

Really stay tuned.

Hey, welcome back to trucks. Well, we're taking a little break from what we're doing today so that we can go to school. We've had a lot of great feedback from you guys about our torch mate CNC plasma cutting table. And although we've done some pretty advanced projects with this piece of gear, we have barely scratched the surface as to what is truly capable of. So Bill and Jack from torch mate have come down to give me Tommy and Ryan a little bit of in house training

and lucky for us, they also bought a couple of upgrades with them like a replacement plasma cutter and this new plate marker attachment and this thermodynamics, a 120 true series plasma cutter will give us the ability to cut thicker material while taking up less space. Plus it's fully automated to better interface with our torch mate.

This plate marker is basically a computer controlled engraver

it'll give us the ability to label things like switch panels or engrave things like a logo or a part number into a bracket.

This engraver works on almost any type of metal. And as you can see,

it's very precise.

It's a, uh, carbide tip that, uh comes down to the plate and sits there and oscillates as the table moves similar to a tattoo needle or like a jack hammer bid.

Now, as impressive as a plate marker is, they've also made some improvements on the torch head itself.

It mounts exactly the same way as the previous torch head,

but this model has less lag time instead of having the synod to for the airflow back at the, uh plasma cutter power supply. It's actually on the torch here. And what that does is allow a consistent and quicker firing of the torch

that's just cool. Well, what are some of the improvements that thermodynamics has made with the new A 120 cutter? Um, they've, they've made them smaller, more powerful. Um, you get better cuts, uh, longer consumable life, less draws to clean up. Speaking of consumable life, what if you get a worn out tip and you get a misfire? What happens? Then

it'll actually, the height control will send a signal to the torch mate driver software to shut the machine down so that it'll,

it'll pause and wait for you to change out tips. So you don't lose that plate.

Jack showed us that with the torch mate C ad software and a little bit of practice, you can cut out just about anything you need.

Now, you don't have to be ac ad expert to run the torch mate if you prefer to just use a pen and paper to draw out your parts. Well, that's an option too

and that's as simple as loading the image into a flatbed scanner, which imports it into the torch made software.

Now, the best thing is that the plate marker and the torch head work together on the table and that's going to save you a lot of time while you're cranking out cool custom parts like our new trucks tag

build on a budget truck projects that save you time and money.

Now, like we told you earlier, we're gonna be using a later model 4 L cylinder head on our engine build. Now, this is a cylinder head and casting number off a 91 to 95 4 L ho engine. It flows a little bit more air should be well suited to our Stroker build up.

Now, before we get too far into this thing, we wanna do a couple of inexpensive tests to make sure it's in good shape.

The first thing we wanna do is check the cylinder head for cracks. Now, the best option probably would be to send it off to a machine shop and have them do it,

but to save quite a bit of time and money.

We're gonna give this stuff a shot.

Now, this is a two part system.

The first part being a dye penetrate, which gets sprayed on an already cleaned head,

let it soak in for a little bit and wipe off any excess.

Follow that with a few heavy coats of the developer.

Now, the developer is nothing more than a powder suspended in solvent. When it evaporates and dries, it leaves the powder to seek out any of the penetrate, potentially stuck in any cracks.

It's like this one here right between the valves.

All right. Well, now that we know this stuff definitely works. Let's give it a shot on our cylinder head.

Now, the reason we opted for a used head instead of a new or a remand.

Well, it's all about saving money

and doing it this way. We saved at least two or $300

believe it or not. We picked up this cylinder head at a pull it yourself junkyard for less than $50.

Now, we see some seepage of the penetrate from around the valve, but no cracks are jumping out at us. So we're in good shape. Plus these 4 L cylinder heads have a track record of being pretty reliable.

All right. Now, all we need to do is a quick clean up so we can check the cylinder head surface for flatness.

Now, using the machine, a straight edge and a 3000 spar

gauge.

We can check any cylinder head warpage.

So, all right, as you can see, our feeler gauge fits under the straight edge in a couple of spots.

Now, to be thorough, you need to check both sides of the chamber down the center crisscross and perpendicular. Now, three thousands isn't too bad, but we got parts going to the machine shop anyway. So we'll send our new head as well and have it resurfaced.

Now, you guys have seen this use all kinds of royal purple products in tons of trucks, project vehicles over the years. Now, check it out. They've even got their own oil filters. This is their superior protection, extended life oil filter made of 100% synthetic micro glas medium and it has a 99% filtration efficiency. Its high capacity allows for

oil change intervals so you can get the most out of your royal purple engine oil, an internal anti drain back valve prevents dry starts even under extreme conditions. And this filter is fully compatible with all synthetic and conventional motor oils and royal purple says that if you stay with your manufacturer's recommended oil change intervals, all your warranties stay intact.

Now, if you have any questions about anything you saw on today's show, go to Power Block tv.com. Hey guys, thanks for watching trucks. See you next week.
Show Full Transcript