More Cheep Cherokee Episodes

Trucks! Builds

Parts Used In This Episode

Auto Body Color & Supply Co.
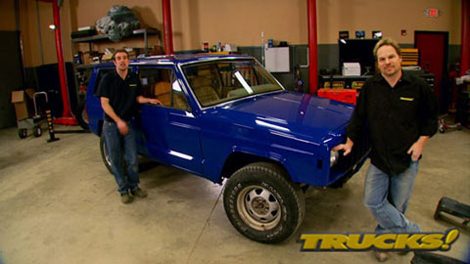
Single stage Acrylic enamel PPG paint and catalyst.
Auto Body Toolmart
Five ton Mighty Pull frame puller, hook and chain sets, floor anchor pots, Mo-Clamps.
Bushwacker
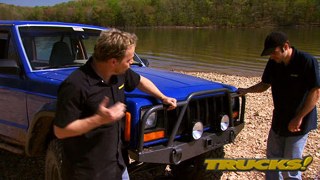
Five inch "cutout" flares for 84-96 Jeep XJ two door models.
Fitch
Bolt-on fuel catalyst for Dodge Cummins 5.9.
JD Squared Inc.
Model 3 tubing bender.
KC HiLites
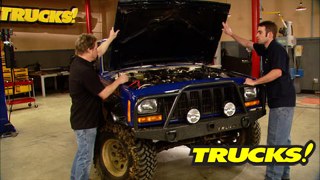
Slimline driving lights 100w, backup light system, manual switch for backup lights.
Powder-X
Powder coating of Cheep Cherokee's bumpers with grey Hammertone finish.
Quadratec
Steel front fenders both drivers and passenger side, manual mirrors for both sides, side marker lens for both sides, parking lamps for both sides, front header panel.
Summit Racing
33x12.50R15 BFG Mud-Terrain KM.
Torchmate CNC Cutting Systems
Torchmate 2, 4ft. x 4ft. Light industrial table, Thermal Dynamics Cutmaster 101.

Video Transcript

Today, it's a show all about tools. First, we're back to working on our project cheap Cherokee and we're making our own bumpers with one of the coolest tools we've ever had in our shop. Then we're off to Orlando to Matt Cole's Tool Expo.

Not only to get some great help on our Cherokee, but also to check out some of the coolest new tools on the market. It's all today here on trucks.

Hey guys, welcome to trucks and thanks for watching. Today's show is all about tools, some of the best tools in the world find their way into our hands and we consider ourselves lucky, for instance, check out this torch mate. We'll give you guys a guided tour of this later on. And we're gonna take you with us to Orlando, Florida, Florida to a convention. That's nothing but Tools

Mao's Annual Tool Fair.

But before we head out, there's a few more things we need to take care of on our cheap Cherokee here. Now, I know it's obviously changed just a little bit since you saw it last. So to refresh your memory and get you up to speed on what has changed let's take a look back

after limping this tub into the shop, we gave it a once over and hatched a plan for some basic repairs and simple upgrades. With the end goal of having a cheap really cheap weekend wheeler that we could drive to and from the off road park.

But there was that matter of the wadded up frame rail to deal with.

So while me and Tommy took a trip to a salvage yard to scout some axles and use parts.

Kevin took care of the body damage with

help of our mighty pull frame straightener from auto body tool mark.

Then we gave it an inexpensive face lift with some aftermarket sheet metal from quadra.

After smoothing out a few more wrinkles, we wanted to give it a paint job but like everything else, we're on a shoestring budget. So after a little digging around and talking with Brian Smith at Autobody color and supply, we decided to go with this unbelievably inexpensive acrylic enamel from PPG.

This single stage industrial coating is one of PP G's best kept secrets. In my opinion, it's sprayed great. It looks great. It's available in all these different colors. And the best thing is that the entire setup, the gallon of paint and the pint of catalyst cost us less than $70. No kidding. And we see a lot of quart left over for touch ups and that my friends is a good value.

Now with the wrinkle straightened out and a new coat of paint. It's time to start thinking about bumpers because these stockers just ain't gonna cut it anymore. Now, building bumpers is something you guys can easily do at home. And if you remember we built the bumpers on D Os Bronco and they held up great on the trails.

No, we don't have a whole lot of time to make ours because we're heading down to Orlando

and even though we could make all the cuts we need to make with some fairly basic tools. We've got a secret weapon. This is the torch mate AC NC plasma cutting system,

torch mate CNC cutting systems come in several days, different sizes and prices and are surprisingly affordable.

Ours is the torch mate three. It took about five hours to put together,

use a PC based computer as a controller with enough memory to be able to run the basic software.

It's interface to the cutting table with the applied robotics hardware that comes in the kit.

The C AD software gives you the ability to lay out your designs on the computer or using a flatbed scanner. You can import your drawings or designs giving you unlimited freedom of design.

This is hard work

real hard.

This bumper is being cut out of 3/16 plate and it cuts through like it's butter with super clean cuts and incredible detail.

You can dial in that quality using the line speed cut test. Provided on torch mate's website.

It allows you to pick the right AM

and the line speed of the cutter for the metal you're using.

Now, the strength of your plasma torch will dictate how thick a metal you can cut.

But this thermodynamics cut master 101 will allow genuine cuts up to one inch. Now, all the bumper pieces you see in front of me, the torch mate cut out in about 10 minutes. Now, typically with a band saw and a grinder plasma cutter or a set of torches doing something like this would take you much, much longer. Plus the detail on the trucks logo, we cut out. Well, you're not gonna be that precise or that quick with any other tool while I was at it went in and cut out some bumper brackets so we can get this thing hung,

the assembly starts with the brackets that Ryan designed to bolt right into the factory locations,

followed by the upper support plate

and the front face.

Now these parts are just getting tacked in so we can make sure everything lines up

followed by the ceremony of cricket games.

Another benefit of building your own bumper is that you can build it to fit your vehicle with the features you ought to have incorporated like a winch mount or running lights.

Ryan's design allows for steep approaches with great protection of the front end

and when it's all burned in after assembly will be super strong and surprisingly lightweight.

Well, we're not done with the bumpers yet. We want to build some protection for the off road lights. We're gonna mount up front as well as protect our newly repaired front end. So to do that, we're using a budget friendly manual model three bender we got from JD squared.

Calibration is the first step with this bender

and then

just watching the degree ring,

you can easily gauge the angle of your bends.

Give me a lever long enough and I can move the world. This is true for the ancient scholars and it's true for the model three bender. We're using,

the model three is definitely a professional piece of gear, but it's affordable price less than 300 bucks and can easily bend round tubing up to two inch diameter or square tubing up to an inch and a half

eight in Greece, right

on.

All right. With our tubing bent, we'll just get it where we want it, trim it to fit and burn it in.

Then I gotta do the same thing for the back bumper

up. Next. We're going to

Mao's Tool Expo and we're taking our Cherokee with us and later we'll test out a system that promises to give you more

MPG. Don't go anywhere.

Hey, welcome back and welcome to Mao's

Tool Expo,

Matco distributors from all over the country. Gather every year for the Tool Expo,

dozens of manufacturers, hundreds of new tools and thousands of people make for a great gathering of folks that make their living in the automotive field.

Now, since we're right smack in the middle of all the latest and greatest tools available. Mat goes hooked us up so we can get some work done on our project

and being in to heaven is great. But like Brian said, we got some work to do.

Now. We've already met some great people since we've been here, including these two guys, Mat Co's top two distributors for 2007, Chuck and John, and they're going to help us work on our cheap Cherokee today. But first, let's take a look back and see what we've already done

in case you missed it with a new coat of paint on our cheap Cherokee. We built some bumpers with the help of our new torch mate.

Then we hauled it

and the crew down here to sunny Orlando to see what's new in the tool world and try to move this project along in the process.

Now, the first thing we're gonna do with our Cherokee is install these bushwhacker fender flares for a little bit of extra wheel and tire clearance. And that starts with holding the flare up and tracing the outside for a reference. And the best thing about having Chuck and John help us is that if they mess it up, it's their fault.

Now, John's got a cut lines marked out, but this rear is a little more involved in the front cut because we've got a double panel back here in the wheelhouse.

Now, the front panel is cut, it should fall off, but the back panel is holding it on. So we have to pull that wheel to get it from the backside of it.

It pays to know how to use tools when you sell them for a living.

Chuck and John are real gear heads and they work cheap.

That looks pretty good.

Where do those guys go? I guess we have to do all the work

man. This is great. Not only do we get free labor, but we get a whole truck full of tools to pick from, set up right behind us.

Now, it's big fun to bring the Jeep down here and work on it in amongst this sea of brand new tools. But since we had such qualified help me and Ryan took a little break and had the opportunity to visit with some of the fans of the show because they're the reason that we do what we do in the first place. And of course, we had to pull the crowd to see what they drive.

Now, the last time you guys saw our front bumper, it was just tacked together. Since then. We've added some headlight protection, some heavy duty tow shackles, some bracing for our receiver hitch and we burned in all the welds then to finish it off, we powder coated it with this cool hammer tone finish. We got from Powder X then to make our logo pop, we recycled those ugly stainless steel window vent shapes that fell off our Cherokee

Ryan's bumpers, incorporate PC driving lights, slim lights, but we'll have solve them a little later on,

man. That looks pretty good.

Yeah.

Now we just need some tires and wheels

bad.

Now we already know our Jeep is definitely gonna need a lift kit and we've got one on order from quadri

tech, but we couldn't resist seeing what our Cherokee is gonna look like sitting on our 33 inch BFG mud terrains that summit racing hooked us up with.

That does look much better

where those guys keep going.

And we wanna say a huge thanks to John and Chuck for helping us transform our chief Cherokee and really helping us move this project along today. Thank you. Thanks guys and uh congratulations to the two of you for the great sales year you guys both had with Matt

and uh I think we could use you guys around the shop,

put you to work

when we come back. We're checking out some of the most advanced tools available today. Stay tuned.

Hey, welcome back to trucks and welcome back to Mad Co's Tool Expo. Well, we got our cheap Cherokee project buttoned up and now it's time to walk the floor and check out what's new in tools.

It was almost overwhelming. How many vendors were set up, showing their latest and best offerings.

But there was other attractions as well. Even Courtney showed up

along with some of the race cars and drivers that Matco sponsors,

Jessi. This is nuts, kind of claustrophobic in here. Good thing. These guys don't spend any more than about 4.5 seconds in here. 8000 horsepower quarter mile. It's on

Jack Beckman showed up after winning big the previous day all the way over in Phoenix and he shook hands and signed autographs all day long.

We even got the chance to talk a little with Corey mccleen.

I think one of the biggest things that people don't understand, you know, they see the race cars of the track, they see Matt Co on the cars. We not only talk about Matt Co, we use every one of their tools. It's the only way we can get our top field dragsters back in shape in 75 minutes and make that turnaround

the next round.

And we all know how important footwear is in the workplace. We even found a pair of boots that are resistant to slippage on concrete floors. Basically, it's a design instead of using rubber soles that most people use.

Uh, we use a thing called thermoplastic urethane

and it's a new technology. It's been out about six years

and it's directly injected

and it's a combination of slip is a service contact and uh and the actual outsole.

You guys got to check this out. They call this the video stick. It's a video diagnostic tool made right here in the USA by the visual optics company.

Now, this thing can come in pretty handy looking in hard to see areas if you can look inside cylinders, checking for damage inside crank cases, rear axles, you name it

our video stick uh features a high resolution

color camera chip

uh with a 2.5 inch monitor

with auto

focus. So the the end user doesn't have to focus it. It, it auto

focus is from a quarter of an inch to infinity.

With the color monitor can also show the

what you're looking at to two or three people. When you make a living with your hands, you need protect them.

And the technology that goes into every pair of wringer gloves is impressive. We removed all the stitching from the top of the glove and it's a single piece construction on the top of the glove, removing all the seams

and we direct inject thermal plastic rubber panels completely all over the top anatomically placed where the protection is needed.

Now, this is a fry bar. We're over here at the mayhew tools Booth.

I'm gonna show you guys a few things.

Well, what we've done now is that we've actually grown from pry bars that are actually starting out as short as 10 inches and gone all the way up to 58 And again, with the success of the 58 we got a lot of feedback from the professional mechanics. Can you a make us a bar that will fit in the standard tool boxes? And

can you make them stronger? Can you actually envision

just pretend that two guys are going to hang on this bar? What would that bar look like? And that's how we ended up with the new mat

45 by one pry bar. It was great meeting so many of the guys that make their living with Matt

and to let them know how much we appreciate having our hands on the best tools in the world.

Thanks guys.

After the break, we'll try out a simple bolton

that's designed to ease your pain of the pumps. Stick around.

Hey, welcome back to trucks. Now with the price of fuel, the way it is, we thought we'd take a look at a unique product designed to enhance your fuel economy. Now, it's bad enough to pay for gasoline. But I know it's really hurting you diesel guys because the reality is most guys that are making their living with their truck. Well, they're burning diesel

and we didn't want to just stand here and flap about some new product. We wanted to give it an honest test, something that shows results one way or the other.

So today we're going to install this Fitch in line fuel catalyst on

Tommy's 06 Dodge and give it a long term test. Then we'll report back to you guys on any gains in fuel economies.

Tommy's truck has a 5.9 cummins turbo diesel engine with standard shift and his bone stock other than a cold air intake and slightly larger aftermarket wheels and tires,

we had to establish what kind of mileage this truck was getting from the factory. So we ran a few tanks of fuel for it and came up with a surprising 20.1

MPG. And remember this is the mega cab version with 30 fives on it as well.

It's pretty darn impressive for a 7500 pound truck. But the challenge here is seeing what kind of improvement we can make over that baseline.

The installation starts with removing the fuel cap to release any tank pressure.

Now, this truck has two batteries and they're both disconnected. The Fitch unit itself is mounted using the provided band clamps right here to the intake plenum.

The fitch's fuel lines use factory style connectors and plug right into the truck's fuel lines at the filter.

Then to reset your computer's memory touch, both battery leads together for at least 30 seconds,

then cycle the key to the on position four or five times

that'll prime the system so you can check for leaks.

That's great. We got no leaks and we're going to do our comparison test on the highway since that's where most guys rack up their miles.

So we'll run a few more tanks full of diesel through this little truck. We'll let you guys know how it does.

Now, you've seen us use patrons

performance parts on many project vehicles and here's some new stuff from their flame thrower line. This is their 60,000 volt

core coil and will operate with no degradation throughout a temperature range that even surpasses military specifications.

And the heat sink is made from aircraft aluminum plus, it's 50 state legal protonic also offers their flame thrower mag +28 millimeter custom wire sets. These are dual current path for reliability and the low 500 0 per foot rating gets more energy to the plug.

An outer silicone jacket resists high temperatures, moisture, oil and chemicals. While the inner fiberglass reinforcing braid adds strength and flexibility, flame throwers. HV coil starts at just under 70 bucks. Their eight millimeter mag two plug wires just under 50. Thanks for watching trucks. See you guys next week.
Show Full Transcript