More Cheep Cherokee Episodes
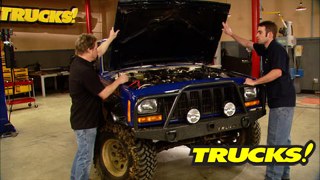
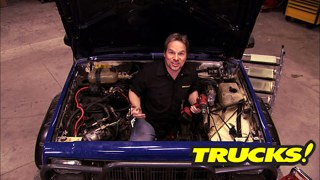
Trucks! Builds

Parts Used In This Episode

Airaid
Replacement air filter.
All Star Auto Salvage
Used rear 8.8 axle housing, used front axle shafts, battery box.
Auto Body Color & Supply Co.
Single stage Acrylic enamel PPG paint and catalyst.
Auto Body Toolmart
Five ton Mighty Pull frame puller, hook and chain sets, floor anchor pots, Mo-Clamps.
Bushwacker
Five inch "cutout" flares for 84-96 Jeep XJ two door models.
Cherry Bomb
2 1/4" Cherry Bomb Glasspack muffler.
Hypertech
Max Energy E-CON economy Power Programmer.
JD Squared Inc.
Model 3 tubing bender.
Lincoln Electric
Lincoln Mig welder and equipment.
Midas
Machining rotor surfaces.
O'Reilly Auto Parts
Leaf spring perches, u-bolts, driveshaft flange, brake cleaner.
Quadratec
15 x 8, 5 x 4.5, 4 inch B/S, Silver Cragar 399 series.
Quadratec
48 inch hi-lift jack, handle keeper, bumper mount.
Quadratec
Accel Super Tune Up kit, upgraded fuel pump.
Quadratec
Bestop Trailmax high back denim seats.
Quadratec
Ected differential for Dana 30, ring and pinion gears, Overhaul kit.
Quadratec
Mile Marker PE8000 winch and winch mount adapter plate.
Quadratec
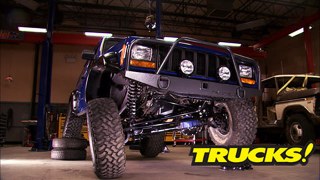
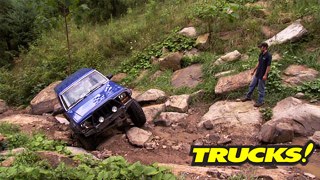
Skyjacker three inch value Flex Lift system with front coil springs, Nitro shocks and rear leaf spring replacements, polyurethane one inch spacers.
Quadratec
Spidertrax wheel spacers.
Quadratec
Steel front fenders both drivers and passenger side, manual mirrors for both sides, side marker lens for both sides, parking lamps for both sides, front header panel.
Summit Racing
33x12.50R15 BFG Mud-Terrain KM.

Video Transcript

Today, we're getting our project cheap Cherokee ready for the road and ready for the trails first. It needs better legs to stand on. So we're adding the lift kit and swapping in our new Junkyard 8.8 inch rear Axa.

Then up front, we'll upgrade our differential and get our XJ riding on much bigger wheels and tires.

I am talking about,

I don't understand.

It's all today here on trucks.

Hey, welcome to trucks. Well, as you can see, we are neck deep in a long list of things that we still have to do to our low buck cheap Cherokee project before this former pile could carry us to the trail and back. And with the price of fuel today, we wanted to leave the gas guzzling and tow rig at home and just drive our project when we go four wheeling.

Besides, there's something kind of fun and a little bit challenging about heading out for a weekend's worth of wheeling without the luxury of a truck and trailer ready to rescue your sorry broke rig in case something happens on the trail. So today we're gonna show you a little bit about how to get your daily driver ready for some weekend wheeling.

Now, like Kevin said, allergy needs to serve more than one purpose. So, it's a fairly mild project. Now, we could build this thing to roll on some nasty 37 inch tires, throw on some bulletproof drive train parts, add a full exo cage and go full tilt with this thing. But it takes somebody that's rather, uh, dedicated to drive something like that to work every day.

Now, speaking of

cages, while we don't plan on getting inverted on some trail, you never know when it might happen anyway. And if you've ever seen a rollover unibody rig or not, well, it's brutal and you know that some kind of protection is necessary. So we're not going to install a full cage, just a simple hoop, but it's going to get the job done. Now, since the last time you guys saw this Jeep, we've added a few must have items mostly to the interior like this high lift jack.

Now to make it accessible and to keep it from knocking one of us out. If it was just laying loose and bouncing around in the back,

we went ahead and welded the mounting brackets to the interior body panels, same with the mount for our 33 inch mud terrain. Now, using a section of the old spare tire rack that was on the back of the Jeep, we cut off the portion we needed and through the rest of the metal recycling bin. Then we just made it work in the space vacated by the old backseat.

Now, we like to keep a winch with us when we're wheeling. The problem is these guys get kind of expensive. Well, quadrate tech had these 8000 pound mile marker winches for sale for less than 400 bucks. So we just couldn't pass it up. And while we were shopping,

we got this receiver hitch mount. So now we can use the winch front and rear in our custom hitches. Now to keep this thing locked down and secure, Ryan used a piece of leftover square tubing, welded it to the floor drilled and tap for a tea handle.

Keep it in place.

Now up front, we ditched the funky shag like carpet and stock seats in favor of these value price buckets.

They're made of a tough material

that cleans up easy, but they don't recline and they're not a bolt in for our XJ. So we made them work using the factory sliders,

a

welder and a little bit of creativity.

And now they fit our Jeep and our budget and it gives a nice two tone look to that 20 year old interior.

Now, to show you what else this Jeep has been through over the last couple of decades. Let's take a look back what we started with

our cheap Cherokee came to us, run down, beat up and barely alive,

but it's hard to kill these xjs. And since we got it for free, we decided to keep that thing going and do a low buck build.

The frame damage was the first of many ills to be corrected,

followed by a bolt on facelift in the form of aftermarket fenders and header from a newer 97 Cherokee Ducks while Kevin was stretching the frame,

Tommy and I went down to the salvage yard and dragged home a ford 8.8 inch rear axle and the larger you join axle shafts for the front,

it's now sporting homemade bumpers,

cut out flares

and an el cheapo paint job.

Now I'm welding in the foot plates or mounting points for a roll bar to the floor. It can be a challenge. Now in the past, Kevin has given you and me some tips on welding sheet metal when doing body work, but this is a little different. So here's a tip when trying to attach heavier metal like three sixteens plate to thin sheet metal,

start the bead on the thicker material and then somewhat briefly drop down into the thinner material.

That way the heat is absorbed more by the plate and greatly reduces the chance of burning through.

Now, this technique works whether you're running a bead or just a series of tacks for t

you want to take your mig wire and aim it just above the base of the heavier metal as the lighter gauge metal heats up it pulls the weld pool together, eliminates the possibility of adding a bunch of drain holes into the project.

Here you go. Three sixteens plate welded to 20 gauge sheet metal

with no holes.

All right, with our plates welded in our braces, cut and notched and our main hoop bent and trimmed to fit. We can get this thing fully welded in

using the same 110 volt Lincoln Mig we used on the floor.

I like it because the smaller handle of the 110 machine gives me better access in tighter areas and makes it easier to get complete. 360 degree welds

all the way around

a

good shake.

Now, obviously, we want to lift the jeep up to make room for the bigger wheels and tires. We also want to get the engine power levels up the stock maybe a little bit better. So you combine the heavier rolling sock along with a little more gear that we're going to throw at it. And it's not a wonder. We want to upgrade the rear axle to this Ford 8.8. We pulled out of the junk yard.

Now, this axle and our Cherokee axle both come with the leaf spring setup, but it's far from a direct bolt in. So first before we start installing it, we're gonna address one of the problems of the 8.8.

What I'm doing here is preheating the cast center section, prep it to we,

the center section is cast from steel which makes it weldable with the M

running the bead around the axle tube eliminates the possibility of them twisting in the housing and letting us down on the trail just like our old YJ axle did

up next. We're making a Ford axle fit under a Jeep and putting our front desk under lock and key and later baby needs a brand new pair of shoes. Stick around.

Hey, welcome back to the shop. We're making progress on our Chief Cherokee here getting it ready for the trail and making sure we get home at the end of the day.

Now up top, we put in a simple roll bar, some recovery gear and brand new seats. And right here, Ryan's created some protection for our rocker panels. A couple of cross braces some 90 degree bends on the model three manual bender and viola instant rock guards.

As we told you earlier, we definitely need to go with a taller suspension. So for our lift, we went through the quadra

tech catalog and picked out one of the Skyjacker three inch kits

with the extra room provided by our cut out fender flares. We're hoping that's enough, but in case it's not, we've got this Daystar coil spring spacer and shackle kit on standby. It'll give us a little extra lift. The price is tough to beat. Now, Skyjacker relies on coil springs up front to get the altitude but out back, we had a couple of choices and you've seen us use lift blocks on the back of the

Bronco to get our lift. Now, blocks work and they're cheap. But you've got definite advantages going with a spring pack over top of a

leafs or blocks. So in the case of our Cherokee, we've opted to spend a little bit more money because we think it's worth it. In this case,

with the cheaper blocks, you increase the amount of leverage, drive train torque puts on the spring,

therefore, increasing the tendency for the axle to wrap or twist.

When that happens, that could get your truck hopping.

And then when that happens, axle shafts and you join, start popping

the rear spring packs

go right into the stack location.

Is it not on there?

Yep.

When swapping an axle, rarely do you get to just throw it in. There's almost always something you have to buy or modify to make it work. Like we told you before. This one is no bolting, but the strength and peace of mind gained far outweigh any installation hassles plus the list of parts needed to make this explorer axle work in our Cherokee.

It's pretty short

and just about everything you need for this axle swap. Well, you're looking at it right here spring perches from Mister gasket dry shaft adapter fledge and new U bolts from your local o'reilly and spring plates and shock tabs courtesy of the torch made.

The purchases get set into place, then the axle get centered. All right. What do you got? Right.

I'm looking at three and 916. I've got three and three eights. So, can you wait?

I got

3.5 now. Yeah. Perfect.

Cool. And

then the U

bolts hold everything together

using the homemade spring plates up top.

This allows you to accurately adjust axle placement and pinion angle before you weld everything solid.

Ryan's using a homemade tig wire gauge to match the angle of the output shaft to the pinion.

That's,

that's about it right there.

And finally, the shock mounts get tacked into place.

All right, with both our shocks installed, we're going to show you how to make your factory e brake cables work with the new parking brake assembly by using just a cut off wheel. These small cable clamps,

the cable end gets cut off using your weapon of choice,

then gets wrapped around the axle bracket

and marked

a simple cable clamp available from any hardware store creates a loop and gives you a quick and inexpensive tie to the vehicle's E brake system.

Now, the factory and a roll bar is staying, it's not going to interfere with flex that much and it's going to give us the stability that we want on the highway. Since this is a dual purpose rig, you've got a couple of options for mounting. You can either flare the holes and go right to the U bolts or you can trim it down a weld right to the spring plate and the brake lines for the 8.8. Well, they tie right into the Jeep's hard lines.

Now, the only other difference worth noting is the 8.8 is actually

a bit narrower than the stock rear axle about a little over an inch. So to remedy that we're going to be installing some wheel spacers, spider tracks make some of the best available. So that's what we're using to maintain as much stability as possible by keeping the track width, at least as wide as stock. Now, these are an inch and a quarter wide, double anodized and hub centric. We'll get them installed once we get our rusty rotors cleaned up.

Now, up front, we wanted a selectable locker to complement our mild factory installed, limited slip out back, plus doing it this way, but we only had to buy one diff and one ring and pin set for the front axle. The gears we've already set up

changing to a one piece axle shaft, changes the seal location as well.

A couple of quick measurements and a trip to the part store will get you fixed up.

Now, the diff we're using comes from Auburn,

their

limited slip e locker is about 100 bucks cheaper than our other options. So it was definitely the right choice for this building.

Drilling and tapping the cover gives your wiring a safe route out of the axle and into the cab.

Now, to give you guys an idea of why we're going through the trouble of changing out these axle shafts. What's for the U joints and check out the difference in comparison to the U joints that came in our original shafts.

The caps are much larger and the cross is a bit heavier too while they're not bomb proof. It's definitely a worthwhile upgrade.

When we come back, we're off to have our rotors turned the right way by some real pros.

Hey, welcome back to trucks where we're elevating our cheap Cherokee and with our new axle upgrade in place, now, we can take care of the rest of the lift up front

and we've gone over this jeep pretty thoroughly, but we're not going to ignore the brakes. We're not going to just replace parts. We're going to visit our friends at Midas, see if they can help us out.

Now, you guys remember a while back. Our local Mida

shop helped out muscle car. Well, we're back here again because they also want to give us a hand, getting our cheap Cherokee up and running again. And more importantly, stopping

now, machining rotors for do it yourself. Customers is not a service Midas normally offers, but that's ok

because with the secure stop brake service, they work on your entire braking system

going through a 55 point checklist and using their very own brake pads that are made to the highest standards in the braking industry.

Now, that's easy enough. You just drop your truck off here and these guys will take care of everything for you. But we wanted to give you thanks an inside perspective on what it takes to properly resurface brake rotors.

Now, the rotors that came off the front of our Cherokee, as well as our junkyard axle. Well, they obviously need to be resurfaced. Now, the fronts, they're pretty standard but the rear, the parking brake drum is actually part of the rotor hat itself and this surface needs to be machined as well,

which cheating at a faster speed makes a rougher cut but it removes any heat hardened metal.

This stage is just for chewing.

Now, with that done, they'll do a second cut and make sure the surface of the rotor is true and flat.

The second cut is not always necessary. It's just good insurance in getting a perfectly flat surface.

All right, with our fast cuts done the rotors straight and true, but it's left the surface a little bit rough. So Brian's going to slow the machine down, go back for the final pass, put a nice smooth finish on the surface of our rotor,

slowing the speed down, creates a much finer cut

with less pad wear and no pedal chatter.

Now, like we showed you before the rear rotors because of the parking brake require a little bit different setup,

parking brake surfaces are machined to the same tolerances as the rotor surface, but maintenance is usually less frequent.

Thank you.

Well, these look great. We're headed back to the shop

after the break. Our Cherokees looking not so cheap anymore. Stay tuned.

Hey, welcome back to the shop. Well, over the break, we had a chance to throw on our resurface rotors as well as finish up our suspension lift installation.

And that included longer coils

replacement shocks,

new lower control arms with a single flex joint at the axle end

and the track bar relocation bracket

and with our back rotors on and our new wheel spaces, we can get the wheels and tires on this thing, get it down on the lift to see what it looks like.

Speaking of our wheels, we thought we could do a little better than the silver paint that came on them. So we used the duplicate color textured metallic paint that matches our powder coated bumpers perfectly.

Now, this is a cool transformation and I think it looks great. What do you think I'm with you? I think we got plenty of room for that. 33 inch mud rain out back. Looks like we're a little tight up front. I think we need to go up a little more.

Now. We're out of time today, but we're still not quite done yet.

Yeah, we're gonna get this thing running better with this Excel Tune up kit. Go with a low buck cat back exhaust system in the form of a cherry bomb glass pack and drop in this air rate replacement filter

in lieu of that oil soaked paper mess. And I guess we'll have to flip a coin to see who the lucky one is that gets to go back and install these Daystar coil spacers to level out the Jeep. You know, I see Tommy's name on both sides of this.

Yep, Tommy.

Now we all know that fuel prices are sky high. So here's a simple plug in that's going to give you some help.

This is hypertext's new Max Energy Econ economy, power programmer and it plugs right into your truck's OBD two port to reprogram your engine computer in less than 15 minutes. Now, what's unique about the

is that it's designed to extract every bit of energy from every molecule of fuel, which is going to give you more

MPG at part throttle where most people drive as well as more power at wide open throttle.

The max Energy econ is 50 state legal and will cost you right around 320 bucks. Thanks for watching trucks. See you guys next week.
Show Full Transcript