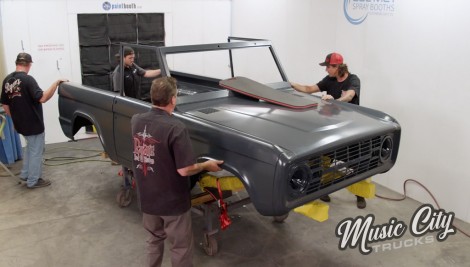
Music City Trucks Featured Projects

Music City Trucks Builds

Parts Used In This Episode

Matco Tools
MATCO Tools are the Official Tool Supplier to Music City Trucks
Sonax USA
Profiline Perfect Finish
Sonax USA
Profiline Ultimate Cut
The Industrial Depot
Tools, Hardware, Shop Supplies

Episode Transcript

(Marc)>> You're watching Powernation!

(Brandon)>> Today on Music City Trucks it's part two of our Bronco build.

(Marc)>> From sanding to shiny, this supercharged beast of a truck gets some serious upgrades.

(Brandon)>> Get ready as we get it done. Clicks in like Legos. ♪ ♪ [ engine revving ] ♪ ♪

(Brandon)>> Welcome to Music City Trucks. I'm Brandon Burke...

(Marc)>> ...and I'm Marc Christ.

(Brandon)>> Now the last time you guys saw the Bronco we put it on the frame, got all the panels hung. Now it's time to get it from epoxy into body work and prime, and at the end of the week paint and clear. So to help us do that we brought Chris Ryan and his crew. You guys know them. They do excellent work. Thanks for Coming out.

(Chris)>> Anytime, we appreciate you having us here.

(Brandon)>> First thing we need to do is get the roll cage out, and that means cutting the tack welds on the base plates. ♪ ♪ [ saw buzzing ] ♪ ♪

(Brandon)>> First we're going over the epoxy with 180 grit.

(Chris)>> With the epoxy we're in the window now, and we don't have to sand it before we apply our filler on top of it, but we did not personally assemble this vehicle. So I want to make sure how straight it is. So it's kinda giving us an idea of how straight it is. So when we go over a pattern you can see some of the shiny sticking through. That means we're low right here already. So we know we're gonna need some filler in this area right here. It will promote adhesion, although we don't have to do this since we have an epoxy on it right now. ♪ ♪ [ sander buzzing ] ♪ ♪

(Marc)>> While I'm mixing the primer the guys are spreading the last bit of needed filler using a lightweight glazing putty. ♪ ♪

(Brandon)>> Now that we've got all the larger areas done we've got to hit all the cracks and crevices. ♪ ♪ Now that all that's done it's time to mask up for the first round of polyester primer. ♪ ♪

(Marc)>> Well the next round of primer's gonna be this high build. This is a four to one polyester primer. It's basically a sprayable body filler. What's great about this is it's gonna give us a really good level surface to work with, and we can block that down and move on to the next step.

(Brandon)>> The reason why we use poly on a high end build like this is because this primer doesn't shrink like a 2-K urethane high build would, giving us the ability to build up the surface enough to block everything flat hopefully in one go around.

(Marc)>> Man that looks good! I'm sure glad I didn't have to do that.

(Brandon)>> Now we've got to guide coat it, block it down, and make this thing straight. So let's not waste any time and get this thing going. ♪ ♪ The reason for guide coat is it gives you a gauge while sanding to find all your high and low spots. When you remove all the orange peel, which is the texture left behind from the application of primer, the surface is level. ♪ ♪ [ sand paper scraping ]

(Brandon)>> What Dolph is spraying right now is finish sand. It's a hybrid polyester primer. It's less heavy than the super build but still a polyester. So it's gonna give us that nice finish, not as much orange peel to sand off like the high build. ♪ ♪ During final sanding you really want to focus on not flattening any of your radiuses or edges and keeping those body lines crisp. ♪ ♪

(Marc)>> Before the body is fully prepped for paint we want to double check fitment on the top so we don't run into problems down the road. ( )>> Alright I'm coming down.

(Dolph)>> We're just putting some seam sealer in all these gaps and cracks here to prevent water from getting inside the truck and prevent rust.

(Marc)>> The first step, sealer. [ spray gun hissing ]

(Dolph)>> Alright now that the sealer's dry we're gonna mix up some of this Caribbean Turquoise chroma base and get Chris back in the booth spraying, turn this thing green.

(Chris)>> I don't feel any.

(Dolph)>> I really like it. I think it's gonna look good on the Bronco and kinda lend itself to the era it came from. It's gonna look really good.

(Brandon)>> And finally this is the moment where a concept of the build becomes reality. Seeing this color on this Bronco is a reminder of where we're heading with this build, and also the heritage of the Bronco. So yeah, this is pretty exciting. ♪ ♪ [ spray gun hissing ]

(Brandon)>> The reason we picked this color, Caribbean Turquois, is not only does it look cool, it was a factory option in 1966, the first year of the Bronco. Now that's cool! Alright our base is on. That's gonna be the color and it looks amazing. Now we've got to get that clear on to make it shine. The clear coat we're using is as good as it gets. It's a high solids clear, which is gonna give us more u/v protection and a deeper appearance than other clears. Well I was able to persuade Chris to let me take the reins for the final coats of clear. See if I can match his ability behind the gun. [ spray gun hissing ] ♪ ♪

(Marc)>> Up next, the Bronco gets protection inside and out, plus big power.

(Brandon)>> Careful with the firewall Marc!

(Brandon)>> Well we've got the Bronco pretty much stripped down and getting it ready for bed liner. It's pretty much the same process as doing the underside. A bunch of masking and sanding. So all there is is to get to it.

(Marc)>> Now when applying this bed liner you might want to take your time using light coats and with 15 minute flash times in between because if you put it on too thick it will run, and that's no bueno. [ spray gun hissing ]

(Marc)>> As you can see the second coat really makes this color pop, and it also shows one of the reasons why we decided the suspension made for too much turquois. When you look really closely at the paint surface, which sometimes requires using a light, you can start to see the imperfections and the rough surface, which we call orange peel. That's when you can get a rough idea of how much work it will take to get to the finished product. Sanding can be a tedious process but it's necessary so we can move on to the compound and polish to ultimately reach that beautiful finish we all want to achieve. ♪ ♪ Now I've got this fender cut down with 1,500 wet, and what that did is get rid of all that orange peel, maybe the trash that was in there. It's nice and smooth. Now it's not shiny yet but we'll get to that later. We just need to get the rest of the panels cut down with the same 1,500 wet and then we can go back and start buffing. It doesn't matter the color of the paint, dark or light, the orange peel will be there, and here we have a chance to really make our top color pop. [ sander buzzing ] ♪ ♪ [ buffer buzzing ]

(Jason)>> Alright so what we've done is we've wet sanded the vehicle with 1,000 grit sand paper working it with purple wool cutting pad using our Ultimate cut product. We're then following back up with step number two that will remove any sanding scratches with Ultimate Cut with a yellow pad and our Perfect Finish product.

(Marc)>> Now you start to see the clarity of the paint coming through with the reflection of Jason's hat along with everything else reflecting in the light.

(Jason)>> So as you can see I've used the Ultimate Cut compound to finish the top of the door. We've removed all of our 1,200 grit sanding scratches. So now what we're gonna do is we're gonna remove our pad. We're gonna switch to our yellow Sonax medium cutting pad. We're gonna use our Perfect Finish product. This will remove any micro scratches left behind from the Ultimate Cut and it'll give us an absolutely brilliant finish. [ buffer buzzing ]

(Brandon)>> Well Jason, Cole, I think you guys did an awesome job on the tub.

(Jason)>> We're excited about how it turned out and we can't wait to see it on the floor at SEMA and at the Mecum Auto Auction.

(Brandon)>> I think it's gonna blow people's minds how nice this truck's gonna be, and I think me and Marc can get the rest of the panels with the techniques and advice you guys showed us. So I think we've got it.

(Jason)>> We'll leave you some product and turn it over to you guys.

(Brandon)>> Alright sweet! I think we've got the work cut out.

(Marc)>> This is it.

(Brandon)>> Careful with the firewall Marc.

(Marc)>> I see it right there. Okay, throttle body's gonna get in the way now. We're gonna have to tilt it back.

(Brandon)>> You want me to get under it?

(Marc)>> Yeah. Go down.

(Brandon)>> What was that?

(Mark)>> I think it was just the spring. So it's just sitting on the front crossmember.

(Marc)>> The track bar's kicking everything cause it's not sitting...

(Mark)>> I think it's sliding on this power steering pump, or sorry, the a/c.

(Marc)>> I'm good on the driver. Declare victory.

(Mark)>> I think so.

(Marc)>> Well it's nice having some good help around here for a change. Now we move on to our transmission and transfer case. We going up?

(Brandon)>> Yep! This thing's going in pretty easy. Bring it down. Seems kinda heavy duty.

(Marc)>> It is really heavy. ♪ ♪

(Brandon)>> Alright that's it.

(Marc)>> Well all the drivetrain's in.

(Brandon)>> Axles, suspension, body's on the frame, roll cage is in.

(Marc)>> All we have to do now is just put the thing together.

(Brandon)>> Seats, and wiring, and air conditioning, radiator. It's all coming together, plus we're getting it cool.

(Brandon)>> Alright now that I'm done busting my knuckles getting that old door torn apart we're gonna be working on the new parts. First thing we're gonna put in is gonna be the window lift channel, and what you're gonna need is this glass setting tape. It's pretty easy to do. All you do is cut it to length. Try not to break the window. Just kinda shake it on. ♪ ♪ Yeah very nice! [ ratchet clicking ] ♪ ♪

(Brandon)>> Alright moving on to the vent window. Alright if the sun and the moon align this should drop right in. ♪ ♪ Oh yeah! We've eclipsed that part of the assembly and can move on to the latch and linkage. Don't scratch it! ♪ ♪ Oh yeah! ♪ ♪ Oh yeah! Well I'm calling the guts of that door done. It's getting there!

(Marc)>> Well I've been working up front here trying to figure out what we're gonna do with all of our plumbing, specifically for the a/c system. A big part of the a/c system though is the heat system as well, which is also a part of the cooling system. So I'm trying to figure out the radiator and the condenser. What we did was we got this radiator. It's a replacement for a '97 T-bird as well as the fan just because it has that nice o-e-m look and they're easy to mount with these tabs here. So I think I've got figured out how I'm gonna mount this. We'll get this in and then we can connect the rest of the plumbing. ♪ ♪ It's tight! [ drill humming ] ♪ ♪

(Brandon)>> Installing new hoses for both heat control and the new a/c is a little time consuming, but fairly easy and well worth keeping our Bronco running cool. ♪ ♪ [ drill buzzing ]

(Marc)>> Well that pretty much does it for all of the components on our a/c system except for the hoses of course. Now you've probably heard lots of terms related to a/c systems like compressor, condenser, evaporator, and you may not know what those components are, what they do, or even where they're located. So we put together something fun to show you how it all works. It all starts with the compressor, which is driven by the belt and draws in the refrigerant through the suction line. It then compresses that refrigerant and sends it into the discharge line, which dumps into the inlet of the condenser. The condenser works like a radiator and is the part that mounts in front of your actual radiator. It's job is to condense that hot high pressure gas into a liquid. It does this by cooling the refrigerant down via ambient air passing over the fins and tubes. From the condenser this liquid refrigerant collects in the drier, which also acts as a filter for the system. From there the refrigerant travels through the liquid line to the expansion valve. This valve meters the amount of refrigerant that is released into the evaporator core. This is where the magic happens. As the refrigerant begins to expand from a liquid to a gas it rapidly cools. The blower motor in the evaporator case pushes air across the tubes and fins of the evaporator and is cooled as a result. At this point the cooled air is blown through your vents and into your interior. You'll notice there's a lot of plumbing under the hood of this truck, and we're not done yet. So keeping all of these hoses routed neatly is key. Well this is the last hose and this is actually the final hose that the refrigerant travels through as it goes back into the compressor to be cycled again and to cool the vehicle. Now that does it for the a/c except for one thing, and that's the controls. Up next, our Bronco is really coming together.

(Marc)>> One of the problems we've been needing to solve under the hood here that I've been kind of avoiding is our throttle body situation. Now the way that this throttle body comes on this crate engine it's bolted on just like this. The major problem with that for us is because this is drive by wire it's got this motor here that actuates the throttle plate and our hood would actually contact that. So this thing's got to at least get clocked, but if you try to clock it it hits the radiator hose, and even if we could do that there's really not enough room for an elbow to get in here because the fan's so close. Everything's really tight under this hood as you can see. So the solution would be to move the throttle body out here and clock this where the connector faces down. The advantage to that also is that gives us a straight shot to our air intake and we want as straight and as long of a shot as possible between the mass air meter and the throttle body so we don't really mess with the tune too much. So this will actually allow us to do that.

(Brandon)>> Well since Marc's out of the way I'm gonna be working on the front of the truck, and that's gonna be installing this heat exchanger. Now one important thing is you want to make sure it gets the coldest air possible, which means in front of the radiator, in front of the condenser. If you've got a trans cooler or an oil cooler, in front of that. So we're gonna be mounting it on the front side of the core support. Somewhere like that, and then I made these little tabs, just bent out of sheet metal. [ drill humming ]

(Brandon)>> I didn't really spend a lot of time engineering the brackets but I still want to make this install look nice. ♪ ♪ Oh yeah, look at that! ♪ ♪ [ ratchet clicking ]

(Brandon)>> Oh yeah, that's quality work right there. Next thing to install is this pump. ♪ ♪ Oh yeah, that ain't too bad man.

(Marc)>> That looks good.

(Brandon)>> Like it?

(Marc)>> Yeah that looks great. I don't know about the tape on there.

(Brandon)>> It's for cooling.

(Marc)>> Well let me get this on here, and we'll get an air cleaner on it.

(Brandon)>> Damn that looks good!

(Marc)>> Like it was made for it. ♪ ♪ Well this definitely solves a huge problem we had with that throttle body. Let's get this filter and maf housing in here. I really like the way that looks. Definitely have to come back with some clamps, and actually may even come in here and paint this tube black just to make it all match. What do you think?

(Brandon)>> Dude I like it.

(Marc)>> It needs a little tweaking. This makes me nervous.

(Brandon)>> This is the delicate part of the process right here.

(Marc)>> I'll follow your lead.

(Brandon)>> It clicks in like Legos. Oh man we're getting good at this. Push on it.

(Marc)>> Yeah it needs a little...

(Brandon)>> A little persuasion. Some stuff takes finesse and others take some straight up brute force.

(Marc)>> Ready?

(Brandon)>> Hey Scott.

(Scott)>> Huh? ♪ ♪

(Brandon)>> The beauty shot! Alright you ready?

(Marc)>> Here we go! ♪ ♪ Oh look at that! ♪ ♪

(Brandon)>> A couple more dudes.

(Jeremy)>> How we looking?

(Brandon)>> Slow on the roll cage.

(Jeremy)>> Still good?

(Brandon)>> Yep!

(Jeremy)>> And down.

(Brandon)>> Watch that corner on that door.

(Jeremy)>> We're good.

(Jimmy)>> Nicely done!

(Marc)>> The contrast!

(Jeremy)>> That's a huge color change right there.

(Jimmy)>> That's nice!

(Brandon)>> And it's still pretty just the way we left her.

(Marc)>> It's like, what'd we say, 90 percent done?

(Brandon)>> It's like 90 percent done.

(Jeremy)>> It looks really close though.
Show Full Transcript