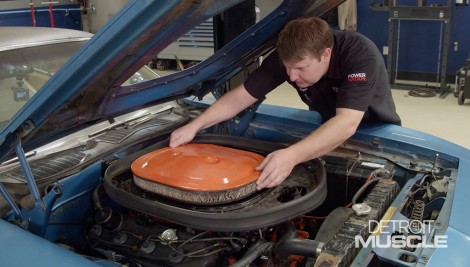
Detroit Muscle Featured Projects

Detroit Muscle Builds

Parts Used In This Episode

Summit Racing
Seafoam Deep Creep Penetrating Oil
Matco Tools
MATCO Tools are the Official Tool Supplier to PowerNation
The Industrial Depot
Tools, Hardware, Shop Supplies

Episode Transcript

(Tommy)>> You're watching Powernation!

(Tommy)>> Today on Detroit Muscle we dig into a piece of automotive history, and with the price tag on this one it would take a second mortgage on the house to pay for it, right now on Detroit Muscle. [ MUSIC ] [ engines revving ] [ MUSIC ]

(Tommy)>> Hey guys, we're out and about on another Driveway Rescue. The vehicle we're gonna be working on today isn't really something that you would just normally see sitting on the side of the street. To even see one of these that's the real thing in person is kind of a big deal.

(Daniel)>> So when we had an opportunity to pull this old car from its slumber, nurse it back to health, and get it back out on the highway we jumped all over it. Oh and if you want a hint of what it is, well it's got a Hemi in it. [ MUSIC ]

(Ted)>> This car is a Hemi Cuda. It is one of 652 they built that year, and I've owned it for about 20 years but it has been somewhat neglected. I stay pretty busy with the business, and it's just sat. It probably hasn't started in 10 years, and probably a lot of people say how can you have a Hemi Cuda and not drive it? You work all the time that's the way it goes. It just needs getting up. It'll need probably the fuel tank cleaned, and carburetors and stuff looked at, and tuned, and what not, and brakes checked, and need new tires put on it, stuff like that to get it road worthy again. I'm looking forward to having it that way. [ MUSIC ]

(Tommy)>> Not a bad trip.

(Daniel)>> A short one really. [ MUSIC ]

(Daniel)>> That's it!

(Tommy)>> Dude that's a nice ride. I can't wait to drive it.

(Daniel)>> Me too.

(Tommy)>> Have you worked on one of these before?

(Daniel)>> I've worked on one or two.

(Tommy)>> This is gonna be my first. Let's check this thing out. You know having an engine from fender well to fender well is pretty sweet.

(Daniel)>> Oh yeah, I like the shaker too.

(Tommy)>> Now I'm sure we're gonna have to dive in on the ignition system and probably the fuel system and brakes. What do you think?

(Daniel)>> I know the brakes. They look probably haven't had any fluid in them in maybe 10, 15 years, and the carburetors probably hadn't been cleaned out in at least that much.

(Tommy)>> Now we've got some aftermarket antique go fast goodies on the distributor and coil. How hard do you think that's gonna be to come up with?

(Daniel)>> If he's got an original distributor that'd be the easiest thing to do is just put points and condenser in it, and go ahead and put it back in.

(Tommy)>> Yeah I remember he said he had some stuff in the trunk.

(Daniel)>> Let's see what he's got.

(Tommy)>> Oh yeah, there's a couple of pieces in here. There's a factory distributor it looks like.

(Daniel)>> That's the original distributor.

(Tommy)>> Carburetor, guess he wants three of them.

(Daniel)>> No he's got a spare for some reason. We'll find out later.

(Tommy)>> Well let's get this thing loaded.

(Daniel)>> Sounds good!

(Tommy)>> Ready?

(Daniel)>> Oh yeah!

(Tommy)>> I'm pushing. Are you even pushing?

(Daniel)>> I'm pushing! Are you pushing? [ MUSIC ]

(Tommy)>> This Hemi's gonna need quite a bit of tender loving care to get it back on its feet and standing tall like it once was. That's why we have our RockAuto Driveway Rescue here in the shop.

(Daniel)>> Obviously with this old Plymouth being such a high caliber vehicle we wanted to give it some special attention. Now after giving it the once over we figured out we've got our work cut out for us.

(Tommy)>> But I'm also hopeful that a small amount of some detective work will save us some labor.

Now here on the fuel system what we're wanting to do is make sure there's no rust and corrosion or even settlement in the tank cause as a car kinda sets out and hangs around for a little while all that stuff seems to happen. Now we're gonna be using a bore scope to slide down off in there to save us some work instead of having to drop the tank and then if everything checks out putting it all back in there. Let's see what we got. At first glance it doesn't look too back. Normally with a car that's been setting there would be that old cruddy stuff here on the neck. I rub on there, there's nothing on my finger. So we maybe okay. Let's look a little deeper. [ MUSIC ] Everything looks as it should. Right there's the opening of the tank. Let's see what's in there. [ MUSIC ] The floor of the tank looks nice. I don't see any rust. You guys just don't understand how excited I am to not have to pull the fuel tank out of this old Cuda. The state that we're in right now we're ready to dump in some fuel. We will end up checking the rubber hoses that goes from the tank to the lines and the lines to the pump because we don't want any dry rot on those that could come back to bite us. Right now it's time for us just to move on to the next task.

(Daniel)>> Up next, we dig in to this old Hemi and break down the dual quads for some long overdue service.

[ MUSIC ]

(Tommy)>> Tackling a rare car like a Hemi Cuda can be a stressful task. There's a lot that can go wrong in a shop, and one missed step can end up costing you a wad of cash. Take this shaker for instance. This is a 50 year old piece. If you were to damage one of these finding another one is not only tough but expensive. [ MUSIC ]

(Daniel)>> Now that's a sight to see. Those dual quads peeking through that shaker assembly makes me happy.

(Tommy)>> Don't drop that.

(Daniel)>> I ain't trying to. These carbs are extremely hard to find. So taking special care in disassembly and rebuilding of these old Hemi feeders is essential for this Cuda to live up to its legacy. [ MUSIC ]

(Tommy)>> Doing these Driveway Rescues give me a great deal of satisfaction because we get the joy of taking an old ride that's been sitting on the back burner, or even in the back woods, and get it back out on the highway. We went to RockAuto and got several components, and some of those you might not normally think about, and that would be the fluids cause we're gonna have to service that old Hemi. Now with that Mopar finding parts for that thing can be a little bit difficult because of its rarity plus it age, but RockAuto had plenty for us. We got several brake components because of the age of that thing and it sitting, whenever we have to get on the brakes we want to make sure everything's nice and safe. We also got some tune-up components and some belts and hoses cause I'm sure this stuff is all dry rotted. Then we got this box of goodies here and that one, which is where Daniel comes in. He's got a strong point on them carburetors. We gonna let you get busy son.

(Daniel)>> I'm gonna do my best. You have fun with them brakes.

(Tommy)>> Man you didn't have to rub it in.

(Daniel)>> While Tommy's over there elbows deep in those brakes I'm gonna get started on these carburetors. Now when a car's been sitting a long time there's a couple of things you need to look for when rebuilding the carburetors. One is missing parts. This carburetor's missing its choke and all its mechanisms. Second thing you want to look for are leaks. Obviously like this one has right here. That's a result of dried out gaskets, which comes from age. A third thing you want to look for is shaft wear. A lot of times these carburetors, when they get a lot of age on them, some miles, the shafts get worn out and the best way to tell if the shaft is worn out is when the carburetor is cleaned. So the first thing you want to do is get these thing apart and get them in the tank. Now these aren't too tough to strip down. Having a couple of different screwdrivers and a pair of needle nose piers will get the job done. Now that I got the top off this old carburetor I'm pleasantly surprised to see how clean this thing is for as long as the car has been sitting. There's some rust and some lacquer in there but that's pretty typical, and all of that comes out of the cleaning tank. The next thing to do is to finish tearing this thing down so we can get it all inspected, and get it back together and get it on the car. Half, one, half, two, okay that's right. One thing I like to do when I'm taking apart a carburetor that was on a car that I've never heard run before is to see where the mixture screws were and to give me some sort of a baseline for when I reassemble these things. This gives me an idea of what kind of shape the carburetor and engine was in. [ MUSIC ] To finish disassembly on our carburetor there are several components we need removed. Things like the primary and secondary boosters, the air valve, and so on. Now I've taken hundreds of these things apart and it's easy for me to fly right through them, but here's a little tip for you. Now a lot of times when you're taking these old carburetors apart the main jets get stuck in the casting. The reason for that is because they're brass and they're in aluminum. What I do is I typically take a drift or like a grade eight bolt, which I have here, and bump the top of them, which helps me get them out without damaging them. [ MUSIC ] These get dunked in carburetor cleaner, and soak for about 30 minutes. [ MUSIC ]

(Tommy)>> Man that thing turned out pretty nice.

(Daniel)>> It looks good for a 50 year old.

(Tommy)>> I don't mind age.

(Daniel)>> This thing's in good shape.

(Tommy)>> You need anything from me?

(Daniel)>> No I'm good.

(Tommy)>> Let me get out of your way.

(Daniel)>> Now the first thing we want to do is check for shaft wear before we start putting the carburetor back together. In order to check this properly what we want to do is hold the shaft open at about the idle position. Wiggle it up and down. Now you're looking for about five thousandths. Any more than that and you've got excessive wear. Now I built enough of these to know that this one's right in the sweet spot. Now the next thing we want to do is check our idle feeds and bleeds for obstructions. Obstructions can cause tuning issues and operational problems. This is a really simple thing to do and it doesn't require any special tools. Now using a simple piece of welding wire we can check this idle feed for blockages. 24 thousandths diameter is perfect because it's smaller than the orifices we're checking. From the looks of things this one's clear. Now this was the last one we had to check and now I can put this thing back together.

(Tommy)>> Using a long piece of welding wire allows you to precisely drop your jets into place. Typically you wouldn't lubricate your carburetor but a little dab on these wear spots goes a long ways. [ MUSIC ] Moving to the top plate this is where the floats come into play. You have to set the float level and drop. This is crucial because it controls the amount of fuel that is stored inside the carburetor. Now on the exterior there are several components as well. Obviously the screws that attach the top plate to the main body, the accelerator pump rocker arm, and the pistons and metering rods. [ MUSIC ] You know hoss I have to say that could be the fastest carburetor rebuild I've seen.

(Daniel)>> Well that's cause I do a bunch of them.

(Tommy)>> How many you think you've done?

(Daniel)>> Oh hundreds.

(Tommy)>> Well you've still got one more to do.

(Daniel)>> I know, it ain't got as many parts in it as this one does though.

(Tommy)>> Now I sure hope you guys enjoyed that, and there is a lot of pieces to the inside of a carburetor but it's kinda just nuts and bolts. Take it apart, pay attention, and you can put it back together. So how long you think you're gonna do on that second one?

(Daniel)>> I think I can do it in about four and a half minutes instead of five.

(Tommy)>> Go! Coming up, we're tackling the safety system on this 50 year old relic. What we find after a long hibernation next on Detroit Muscle.

(Tommy)>> Well we're well on our way working on our old Hemi Cuda. Now just to take this old car, get the engine running, and try to drive, well is a recipe for disaster without addressing the brakes. Out here on the back of this car it's got a drum brake setup. A lot of modern mechanics haven't even ever worked on this type of stuff because it's such old school technology, and really and truthfully when you get this drum off it can look a little intimidating. It's because of all these small parts like the springs, cables, linkages, and such. This is your brakes. You want to make sure you do it correctly, but if you take your time it's really not that much to it. Another thing that you want to pay attention to is leaks. Now right now ours is all dry but that could have something to do with no one pushing the brake pedal in 15 years. Now what would age out is this wheel cylinder. What happens is you apply fluid pressure. It causes the drums to expand creating drag on the drum and the car stops. Now our shows look like they're okay but we might as well replace them since we're in here. We'll start off by removing the upper springs. Then move on to our self-adjuster cable. Then a few more clips and this thing is stripped down to the backing plate. That's bad right there. We're ready to remove this wheel cylinder. It's got a couple of bolts and tube that feeds it here on the back that's exposed to the elements. I like to spray them with some lubricant like Sea Foam's Deep Creep. A little bit of slick'em on that line will go a long ways because rust and corrosion gets built up between the line and the tube and we don't want to damage anything. [ MUSIC ] Now that thing came out a lot easier than I was anticipating but let me show you the sins that this thing's got on it. Peeling this little rubber piece off here you can see all that nastiness. Assuming we would have not touched the brakes and tried to drive this car, if the master cylinder would have moved any fluid either the brakes would not have worked at all or if it pushed the piston out all that debris would have locked it up and not allowed to return causing the brakes to continue to hold. To get started on reassembly we're gonna give the backing plate a quick squirt of some cleaner, scrub it down with a brush. Then wash away all that grime. The wheel cylinder goes in first, followed by the links. With it all greased up the tedious task of shoe assembly can start. If you're concerned about this don't give up. You've got this. [ MUSIC ] And there's nothing wrong with taking a couple of photos to use as a reference, but if you get ahead of yourself an online search can help you find the same information. Just remember you've got to put all the pieces back in the same place they came from and you don't want any pieces left over.

(Daniel)>> Up next, we get this old Hemi up and running.

(Tommy)>> And boy does this elephant motor sound like a stampede.

(Tommy)>> Hey guys welcome back. We're finishing up the final details on our Rock Auto Driveway Rescue 1970 Plymouth Hemi Cuda. Now this old thing hasn't started up in 15 plus year and we're just moments away to hearing what this thing sounds like. Daniel you think it's gonna go pretty smooth?

(Daniel)>> Oh yeah buddy this is the easy part. We just need some fresh gas, a little bit of fire, and she'll crank right up.

(Tommy)>> If it goes that easy we'll be sitting sweet, but to get to this point it's been kind of a journey. Laying underneath that killer shaker was a set of dual quads. You can say that they we're needing some lovin' for sure, and after Daniel worked his magic our Hemi was one step closer to full throttle.

(Daniel)>> Tackling the brakes was a necessity to make this car safe for the road. So when you're working on old rides that have been sitting on the back burner you need to be prepared to get dirty.

(Tommy)>> Under the hood the first thing we tackled was the cooling system. This antique thermostat had to go. Then we swapped on a couple of new hoses.

(Daniel)>> Next we had to dig a little deep and swap out that old crusty fuel pump. This is always a good idea because of the diaphragm goes bad you'll be pumping fuel into the crank case, resulting in a disaster.

(Tommy)>> To say this thing needed a belt is an understatement. Just check the old one out. It retained its shape as if it was still mounted on the car.

(Daniel)>> Next it was time for a tune up. The owner told us that when he last drove the old Hemi that the ignition system was giving him a fit, and since all this stuff had to come apart so we could prime the old 426 it made repairing the ignition issues that much easier.

(Tommy)>> With the ignition system needing some attention we pulled the plugs.

(Daniel)>> It's not burning hot enough. Just really caked up with carbon.

(Tommy)>> And I have to say a plug swap on this ole girl has to be the easiest job ever. While Daniel polished off the electrical system I got to work bleeding the new brakes we installed. How I got stuck with this job I don't know.

(Daniel)>> Well you drew the short straw on this one there. It's now time to put the cherry on top. These dual quads were all we needed to put the rumble back in this old Hemi.

(Tommy)>> With all the hard work done we're pretty much ready to dump fuel in the back and fire it up. Can you think of anything else?

(Daniel)>> Not right off hand but if we're forgetting anything the car will let us know here in a minute.

(Tommy)>> Don't speak like that brother.

(Daniel)>> It'll be fine! [ MUSIC ]

(Tommy)>> I'm gonna slide on in here.

(Daniel)>> Spin this thing over.

(Tommy)>> Man this car fits. [ engine cranking ]

(Daniel)>> Well that's pretty good. Give it some more gas. [ engine cranking ]

(Tommy)>> You can tell a Mopar's only designed to start once cause it takes so long for that starter. Here we go.

(Daniel)>> Alright buddy. [ engine starts & stops ]

(Daniel)>> Hang on a minute. I'm gonna lower the timing and see if that helps it any.

(Tommy)>> Okay! [ engine cranking ]

(Tommy)>> Man I thought she was going.

(Daniel)>> Let's let it sit for a minute, cool off. [ MUSIC ]

(Tommy)>> You want to give it one more again.

(Daniel)>> Yeah buddy, let's try it one more time.

(Tommy)>> I think this is gonna be the one. [ engine starting & revving ]

(Tommy)>> Woo! [ engine idling ]

(Tommy)>> I have to say by the sounds of this thing I see why people were buying Mopars back in the day.

(Daniel)>> Ain't no doubt. Buddy it sounds great.

(Tommy)>> I think it's about time to stretch the legs on this thing and get it out on the highway.

(Daniel)>> Well let's put the shaker on and take a trip. [ MUSIC ]

(Tommy)>> Getting to work on this old school Hemi is definitely a great day at the office, and getting to sit behind the wheel takes it to a whole nother level. This isn't the last time you're gonna get to see this piece of Detroit Muscle.
Show Full Transcript