More Sydewinder Episodes

More Street Regal Episodes

Detroit Muscle Featured Projects

Detroit Muscle Builds

Parts Used In This Episode

Permatex
Permatex OPTIMUM GREY Gasket Maker
Summit Racing
Aeromotive A1000 Stealth Fuel Tank
Summit Racing
Flex-A-Lite Aluminum Radiator and Fan Kit
Summit Racing
Trick Flow® by Quick Fuel Technology Track Heat™ Pro Carburetor
Classic Industries
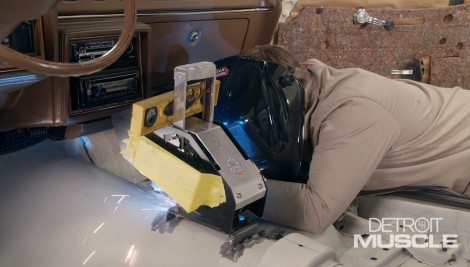
Center Console & Shifter
Lincoln Electric
Lincoln Electric is the Official Welding Supplier to Detroit Muscle
Matco Tools
MATCO Tools are the Official Tool Supplier to Detroit Muscle
RockAuto.com
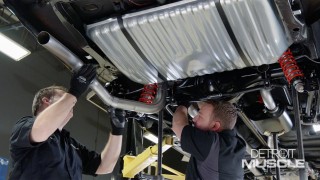
Factory Gas Tank Straps/Filler/Accessories
RockAuto.com
Stock Radiator Hoses/Thermostat
The Industrial Depot
Tools, Hardware, Shop Supplies

Episode Transcript

(Narrator)>> Today on Detroit Muscle Marc dives into "Project Sydewinder" installing the cooling and fuel systems, getting one step closer to hitting the road. Plus Tommy adds some custom fabrication pieces to the interior of "Project Street Regal".

(Marc)>> Hey folks, welcome to Detroit Muscle. We're busy working on our '85 Buick and '81 Mustang Cobra, "Project Sydewinder". Now Tommy's out picking up some parts for the Buick. So I'm gonna get started on the Mustang right off the bat. There's a couple of systems that I want to get wrapped up on this thing today. The fuel being one of them, and the cooling. Now I do need to get the car up in the air to get up underneath, get that fuel tank swapped out, but I've got a bunch more stuff under the hood. So I'm gonna start there first. Well here's what we've got going on under the hood of our Mustang here. First thing you notice would have to be the 427 cubic inch Windsor. Now we got this from our friends down in Engine Power just down the hall. They built this a while back and it made 613 horsepower on 93 octane pump gas on the engine dyno. We went ahead and coupled that with a pair of long tube headers with two inch primaries as well as this engine belt drive kit. Now conspicuously missing would have to be the carburetor, the rest of the fuel system, and of course this big void right here, that's where the radiator goes. To fill that void we're gonna use everything you see here on the table. This all comes together as one single part number that we got from Summit Racing. It's a radiator and fan combo kit for '79 to '93 Mustangs but it'll work with other fox bodies as well. The center piece is this two row aluminum radiator with the fan already attached. It's got the inlet and outlet in the factory locations with the factory diameter. So you don't need to change your radiator hoses to get this installed. It's a 3,300 c-f-m electric fan that's gonna move plenty of air, and it's got the curved blades. So it's gonna be quieter than a straight blade fan. The only drawback is that this thing does draw about 18 amps. So if you've got a factory style alternator that only makes about 70 you need to upgrade that. But other than that everything else you need to get it installed comes with the kit including this coolant overflow, the bracketry for it. It's got this adjustable thermostatic controller, and everything you need to get it installed like the wiring, connectors, and fuseable link. And of course you need the brackets to get the radiator mounted in place, and the hardware as well. Now first things first, I'm gonna get this thing dropped in, see where we're at.

This thing just slides right in the factory location and sits on the lower radiator support. These studs slide into the T-channel and are used to attach the mounts to the radiator. We'll get the nuts started on the radiator side. ♪ ♪ Then bolt the mount to the upper radiator support. ♪ ♪ Then we can tighten the nuts. ♪ ♪ This overflow tank mounts to the side of the radiator using the same T-channel. With it in place we can tighten those nuts. ♪ ♪ Then the overflow hose gets installed onto the tank. ♪ ♪ And with it trimmed to fit it goes onto the nipple attached to the filler neck. ♪ ♪ Then we'll secure it with hose clamps. Now all that's left for that radiator install is going to be the controller but I'm gonna wait until I tackle the rest of the wiring in the engine bay and just do all of that at once. But I do want to connect the radiator to the engine and I'm gonna do that with all the stuff you see here on the table we got from Rock Auto dot com. We've got upper and lower factory style radiator hoses, the clamps to get those installed. We've got the thermostat, housing, and gasket, as well as the bypass hose and the clamps for that as well. First things first, it's gonna be this thermostat and housing. We'll drop the thermostat into the housing and grab our r-t-v. We're using Permatex optimum gray. This stuff is for high performance and high temperature applications like our 427 Windsor. ♪ ♪ We just want to put a really thin bead around the housing. Then we can install our housing gasket and another layer of that optimum gray. ♪ ♪ The thermostat and housing go on. Then we'll fasten it with these ARP bolts. ♪ ♪ The bypass hose comes along and it's trimmed to fit. So we'll measure it, cut it to length, and install it onto the nipples, and those hose clamps can get tightened. ♪ ♪ The lower radiator hose goes onto the water pump first. Then onto the radiator outlet, and gets tightened down. It's on to the upper hose. ♪ ♪ Well that does it for our cooling system. We do have to add the coolant itself but we'll do that later when we top off all of our fluids before we fire this thing up for the first time. Gotta do the fuel system and that's next.

(Narrator)>> Stay tuned, "Project Sydewinder" gets an upgraded fuel system.

(Marc)>> Hey folks welcome back. We're busy plugging away on our '81 Cobra, "Project Sydewinder", and just before the break we got the cooling system all wrapped up. Now I'm gonna move on to the fuel system and I do need to get back under the hood to do some stuff there, but we're gonna do that later on. For now I'm gonna head out back. I like to get the two strap bolts loosened one at a time, and then rethreaded by hand to hold the tank in place. Then I can lower the car until the tank just rests on this cart. Then take the bolts out and remove the other end of the straps.

Then we can raise the car and the tank is free. Well here's the factory tank we just pulled out of our Mustang. This is significant because 1981 was a cutoff year for fuel tank design in the Mustang. From 1979 to part way through the 1981 model year they used the earlier style tank, and then after that cutoff date they used the later style tank. Thankfully for us ours is built after the cutoff date. So this is the later style tank that Ford actually used all the way through 2004. That's important because you can run a tank like this. We got all this stuff from Summit Racing, and this is actually a 2003-2004 factory style Mustang Cobra tank. They moved the pump from up here to down here because they needed a larger fuel hat and larger pumps to support that factory supercharged engine. This is actually an aftermarket pump that'll support up to 1,000 horsepower. Now we also needed the hoses and hose ends, and the fittings, and a post filter. The pre-filter's already built into that pump. Got a fuel pressure regulator, fuel gauge, and we need the wiring of course to get the juice to it, but before we get all stuff in the car there's some things I need to do over here first. I'm going to modify this sending unit pigtail by cutting off the factory connector and installing two ring connectors, which we'll attach to our new pump assembly. Then I'll run the power wiring from inside of the car and attach the ring terminals to those wires as well. Now that I've got the wiring prepped on the car I'm almost ready to put the tank in but there's a few things I want to do first. I want you to take a look at this stuff that we got from Rock Auto dot com. These are brand new o-e-m style tank straps. We're gonna use those. This is an o-e-m style Motorcraft gas cap. That's pretty cool, and then also this seal here. This is for the filler neck where it goes into the tank. Anytime you have the tank out you want to replace this. I'm gonna go ahead and put this in the tank along with a couple of other things and we'll get it in the car. This seal just pops into the tank and we're reusing the old vent and seal. These O-ring fittings get a dab of oil, and we'll get them installed and tightened. ♪ ♪ Then we'll get our feed and return hoses attached to the pump and secured, and the tank can go into the car. Before the tank goes all the way in we need to attach the wiring and tighten the terminals. Then the straps can get cinched down. Next we'll attach the feed to the inlet and outlet of the post filter and get the regulator mounted and the hoses attached to it. ♪ ♪ Well now it's time for our carburetor. We went to Summit Racing for this. It's a Trick Flow Specialties 950 c-f-m unit. It's got 41-50 base plate, that's billet. It's got the billet metering blocks as well. It's got no choke but since it's got that 41-50 style flange it's just gonna bolt right onto our intake manifold. And because it's a 950 it's gonna give that hungry 427 all the fuel it needs. ♪ ♪ And now we can attach our fuel delivery system from the regulator to the carburetor. Well that pretty much does it for the fuel and cooling systems on our fox body Mustang here. I need to go back and put a throttle cable in, get an air cleaner installed, and I'm probably gonna have to cut a hole in that hood cause it's not gonna close, but I'm okay with that. ♪ ♪ We've shown you several times here on the show how to measure for custom wheels. There's several things you need to know. You need to know the diameter of the wheel, but you need to know the width as well and the offset, which is how far in or out it is in relation to the hub. Another thing that's important of course is your lug pattern, how many studs you have, and the spacing. Ours is five on four and a half in this instance. But when a custom set of wheels is being made the company that's making them for you may request some more information. There's like three major things they'll want. We're gonna talk about those today. One of the things they may want to know would be the hub diameter, which is right here, especially if you're using a hub centric wheel. We're gonna use a dial indicator to measure that. You could do it with a measuring tape but it's not gonna be as precise. Alright, it's two point seven-seven-five. The next two measurements involve the caliper itself. One is gonna be the radius, which means from the center of the hub here to the outside edge of the caliper at its widest point, which is gonna be right around here and this edge. The other measurement is gonna be caliper overhang, which is very important. What that means is the amount that the caliper overhangs the hub, or in our case how far the caliper sticks out from the face of our rotor here, which is where the wheel's gonna mount. Alright this measurement I'm taking is gonna be the radius and I've got it on the highest point of the caliper there. And I want to find out how far it is from there to the center of the hub here. Looks like it is seven and three quarters inch. Now the next measurement we're gonna get is gonna be the caliper overhang. So I'm gonna use the same square, put it on the face of the caliper but I want to make sure that I get my measurement from the square to the face of the rotor. So there's two things I want to make sure. One, I've got a couple of nuts on here so that the rotor is completely flush up against the hub. First thing and the second thing is I want to make sure that this is gonna be parallel with that rotor as well. So I'm gonna take two measurements, one over here and one over here and make sure this is straight and figure out what the spacing is. ♪ ♪ Close! Alright that measurement was two point two-eight-five but since I measured from the outside of my square to the face of the rotor and I need to measure from the inside I just need to minus that thickness there. Alright one point five-zero-two. A little bit of math, carry the one. Alright that's 783 thousandths. So that's exactly what our caliper overhang is, point seven-eight-three. Well that's all there is to it. Now keep in mind if you are running an aftermarket brake setup most of the time all of that information's already done for you and is available online, but if you run into something kind of odd or a factory style setup you may have to measure it yourself.

(Narrator)>> Coming up, Tommy fabricates some custom interior pieces for our '85 Buick Regal.

(Tommy)>> Hey guys, welcome back to the shop. Now ole Marc's making some pretty good progress on his Mustang and it's time for me to make some here on this Buick. And the subject matter that we're gonna be covering all happens here on the inside. What we're wanting to do is jazz it up a bit on the inside of here. Now you know a lot of times those sporty and high performance cars have a full console and a power shifter. Our old car being far more on the comfortable side, well it's got it up here on the column. So we're gonna go a different route. If you were wanting to go down the path of kind of a restored car there are options for a reproduction like this we got from Classic Industries, but we're wanting to step it up even further than that. And that's where this thing comes in. It's a very aggressive looking horseshoe shifter with some simulated brass knuckles. It's quite a trick piece. Whenever you're mounting something like this there's a few things that you want to keep in mind. One of those is the sweep of the shifter. You don't want to be jamming your knuckles into the dash and you don't want it crammed up into the seat. Another thing is it's got to have a solid foundation. If you're gonna be mounting it through the floor with some bolts or something take a look at the bottom side. There could be some inner structure and scooting it up or back can save you a whole lot of work. Now what we're planning to do on this thing is lift it up here in the front just to give it that cooler effect. We'll have to build a bracket but we can handle that. We taped up the side of our shifter because we don't want to damage it while we're making our bracket here. And to make that bracket we're gonna be using some eighth inch material. And I know that may sound a little bit heavy but we want it plenty strong enough to support this thing. Now here on the base of it we're gonna have to make a few measurements, and then we'll transfer that here to the plate, and then we can cut everything out.

What we're looking for here is a piece that's nine inches long and four inches wide. ♪ ♪ I'll use a square to keep everything straight. This next piece is gonna be the mount that we're gonna use to attach to the floor. I'm gonna mark off an inch on each side so that we can bend the tabs down and grind those to shape to the floor. Our next pieces will be the mid-plate and a couple of wedges. ♪ ♪ Now a quick trip to the band saw so I can whittle all these out. ♪ ♪ We got all of our pieces cut out and I went ahead and bent the tabs here on our base mount. What we're gonna do is lay this up here, take a marker, lay it on top of the transmission tunnel, kind of drag it across. That'll give us a perfect mark to know exactly how much we need to grind down. Once we're done with the belt sander it's time for assembly. I'll clamp our mid-plate to the floor mount, make a few marks, and drill four holes. We'll install these threaded inserts to make installation easier. Then burn all of our pieces together and it's back to the car. ♪ ♪ We're mounting this thing in place. We want to make sure it's level, and with our adjustments made we can fuse the two together. [ welder crackling ]

(Tommy)>> That turned out alright.

(Narrator)>> Keep it dialed in. Tommy tackles our trunk situation on "Project Street Regal".

(Tommy)>> Hey guys, glad you made your way back. We made some pretty good progress up front and now it's time for us to make some back here. What we're gonna be doing is filling in this big ole hole. This is where as a factory car would have a spare tire hump. We don't need that and our chassis kinda got in the way. What we need to do is a little bit of measuring and then we can get to cutting up some metal. With this piece I want to make it plenty big enough and then come back and trim it down later. ♪ ♪ What we're looking for is an eight by eight panel with a two inch flap. ♪ ♪ [ saw cutting metal ]

(Tommy)>> I'm gonna use some electric shears to cut it out. [ saw cutting metal ] ♪ ♪

(Tommy)>> Our break is pretty straight forward. We're looking for a 90 degree bend. ♪ ♪ Matching the contour of our wheel tub can be somewhat difficult but using some cardboard and a little bit of time makes it much easier. Now we'll just transfer this pattern that we just made to our piece of metal and then cutoff the corner. ♪ ♪ Now to cut this contour you could use a cutoff wheel but I prefer the body saw. [ saw cutting metal ] ♪ ♪ To hold this thing in place I'll make a few welds, and then we can move on to that big piece. [ welder crackling ]

(Tommy)>> With that tacked into place now we can make a filler panel for this big hole. ♪ ♪ So roughly we need to cut us a piece at 29 by 17 inches. ♪ ♪ With another template we can transfer our pattern to our sheet metal and trim off the excess at the band saw. [ saw cutting metal ]

(Tommy)>> We got our piece all cut out and the next thing we're planning to do is run this thing through the bead roller. That way I can give it some extra added structure. Now to do that I need to draw on my pattern and then we can get started. Nice thing about doing it this way gives you the ability to see your design. Then give you a map at the bead roller. We're using a half inch dye on the inside and a simple step dye around the outside. ♪ ♪ Oh yeah, that's gonna work. To lock this thing into place I'll use a few plug welds and then she'll be good to go. Well that ought to do it. It turned out pretty nice. I still have to do the other side but it won't be nearly as complicated as this side with that big ole two foot hole. If you have any questions about what you've seen on today's show go to Powernation TV dot com.
Show Full Transcript