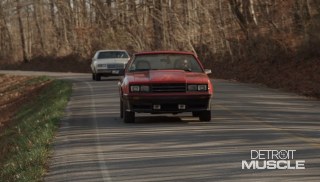
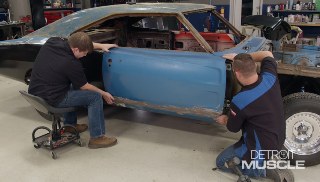
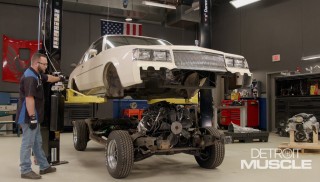
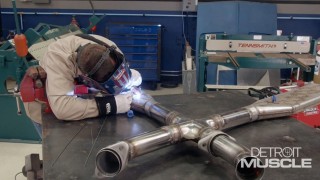
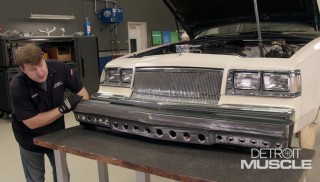
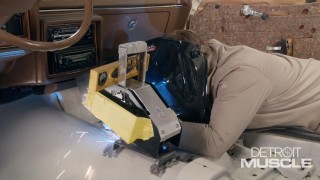
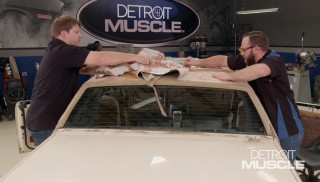
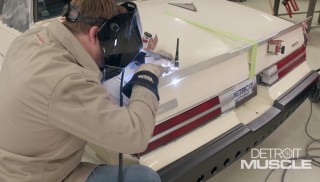
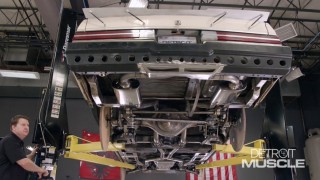
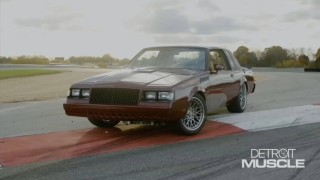
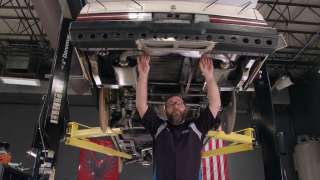
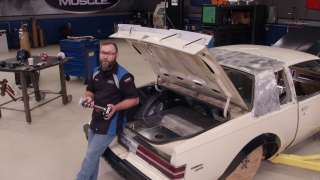
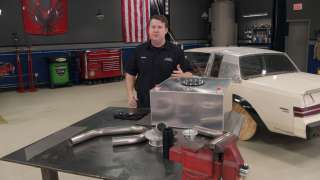
More Street Regal Episodes

Detroit Muscle Featured Projects

Detroit Muscle Builds

Parts Used In This Episode

Chevrolet Performance
Connect & Cruise LS3
Matco Tools
MATCO Tools are the Official Tool Supplier to PowerNation
The Industrial Depot
Tools, Hardware, Shop Supplies

Episode Transcript

(Tommy)>> Hey y'all, today on Detroit Muscle we're working on our Buick Regal. Now this is a pretty trick car. It's got an aftermarket suspension up under it, LS power, several body mods, and so on and so forth. Now to make a car operate correctly there's several systems that have to work together and today we're gonna work on the last few.

(Marc)>> Yep one of those, the main one, is gonna be this fuel system. Now we've actually created some obstacles for ourselves with some of those things that Tommy mentioned before but that's okay. We're gonna figure out a way to make it work.

(Tommy)>> You like them wheels?

(Marc)>> Nope!

[ engine revving ]

(Marc)>> Well at a quick glance you can see what I'm talking about when it comes to hurtles. Nothing under here is original including that fuel tank that's conspicuously missing. It's because it's not gonna fit. We've got a custom chassis, narrowed frame rails so we can get some big wide wheels and tires here. We've got an anti-roll bar, not to mention the exhaust system. These mufflers are in pretty far, and Tommy made those fancy tips, and that's gonna leave us a little bit of room. We need to do some custom fabrication and I think we can make it work. What do you think?

(Tommy)>> Absolutely! [ mechanical humming ]

(Tommy)>> So our solution is all these pieces. We've got a fuel tank and several other parts for the filler neck from Summit Racing. We just need to get some dimensions, cut us a giant hole, and we can get started.

Basically what I'm doing is making a few marks where we're gonna cut the trunk floor so that I can recess the gas tank down in there.

Here's Tommy. [ saw buzzing ]

(Tommy)>> Got it! Let's save that just in case I was off a little bit. The reason I built this little frame work is to give the floor a little bit more structure and that big gnarly hole looks really raw. This way it gives it a bit of a trimmed out look. To weld all this up I'm using our Lincoln Electric 225 precision tig. Now you don't have to use a tig welder. If you wanted to use a mig that'd be just fine. [ grinder buzzing ]

(Tommy)>> Now I'll drop the frame into place, secure it with some clamps, tack it in. [ welder crackling ]

(Tommy)>> Now we need to do some fab work here on our tank. Now with it, it's 10 inches tall and I don't want whenever we mount it up you'll be able to see the thing hanging out from under the car. So I'm gonna take these angle iron brackets and mount them about three inches from the top. That's our sweet spot.

[ welder crackling ]

(Tommy)>> Here you go boss. I'm gonna let you put it in.

(Marc)>> Man you did all the hard work and you're gonna let me do this?

(Tommy)>> I want to admire my work from afar.

(Marc)>> It looks nice. Yeah look at that. I mean it's racy looking but you've got to pop the trunk every time you go to fill it. That's not very classy.

(Tommy)>> Trust me brother I've got a plan for that as well.

(Marc)>> Okay.

(Tommy)>> You know Marc's right. Having to pop the trunk to fill up the gas tank is a pain. Even with these cars from the factory having a flip down the license plate. Well that's a pain in the tail as well. So what I'm gonna do is take this gas filler neck that we got from Summit Racing and drill a hole in the quarter panel, mount this up, and then build us some tube to fill up the gas tank. It's not all that hard but we do have to cut a hole in the quarter. With placement of this cap there's a few things that you want to keep in mind and one of them is the appearance. You want to make sure that the cap looks like it belongs on the side of the car, and the other one. Well it's that old plumbing rule of thumb. All that stinky stuff rolls downhill. If you mount this cap too low you're gonna run into problems with it filling the tank. What I'm thinking is this thing needs to be about right there. That should do it.

Since the cap I'm installing has a flat surface and the quarter panel is curved I've got to build me a little cup if you will so that I can mount it. I'm gonna use some 20 gauge steel to cut me out a disc, and then wrap some steel around it. Now to weld these two pieces together I'm gonna use my table here, some washers and a bolt, and build myself a jig, and then tack weld this strip and pull it tight all the way around.

That's one generic looking cookie cutter. Let's see if it fits. It's a little warm. Oh yeah, that's nice. Burn that dude in. [ grinder buzzing ]

(Tommy)>> Now from the factory our old car had the gas filler that was behind the license plate, and that was kind of a pain. The way we're doing this now gives us a much more modern feel and it looks pretty snazzy too. [ grinder buzzing ]

(Tommy)>> Now it's time to work with the tubing. This next process isn't very complicated at all. We've just got to get from this point to this point. What I'm gonna be using is some two inch stainless steel tubing that I got from Summit, but what I did run into is this neck here is two and a half. So I went to an exhaust shop and got a little reduction piece, and that solved that problem. Now it's time to figure out what bend I need and cut some stuff up. Looking in here what I need to do is come out with a 90 pretty tight and drop down this way because what I'd run into is when the trunk closes this hinge is gonna come down so I can't really come straight out. [ saw buzzing ]

(Tommy)>> Don't be alarmed about running a filler neck like this. Heck them old Mopars came from the factory this way.

(Marc)>> Wow, you got that done pretty quick.

(Tommy)>> Yeah it doesn't take long with you out of the way.

(Marc)>> That looks nice. What are you gonna do so it? You gonna finish it out?

(Tommy)>> I don't know if I'm gonna paint it, polish it up, or heck I may even wrap it with some exhaust tubing and give it kind of a custom touch.

(Marc)>> That would look cool. Well I guess I can work on figuring out what we need to do for a pump.

(Tommy)>> Well that's good and I hope you like now that you don't have to pop the trunk to put fuel in it.

(Marc)>> Yeah, good solution! I should have thought of that. Tank's installed, now to get that fuel to our 500 plus horse power plant.

(Marc)>> Well we're working on figuring out the fuel system on our Buick and because we've got that fuel the best thing we figured we needed an in tank pump. So we decided to go with this Holley Sniper universal pump. What's cool about this it's got a 340 liter per hour pump. 600 horse that'll support. Way more than we need but the other thing IS this is a returnless style system. So this is built for that. We just need to figure out where it needs to go, cut the hole, and bolt it in. Well we've got our filler here in the center and it goes up that way. So we want to stay away from the center in this corner, and our sender's here and the float is over in this area, and there's a baffle that goes here and here. So we can't go here or here because there's really not enough room for that port there. So we kinda need to be in this area here, and we really don't want it to one side because if you do take a right turn it'll starve the pump if it's on this side. So we want to put it in the middle here, and find the filler, and this is a 20 inch tank. So I want to make sure that we mark it right there at 10 to start.

And then we want to center it up front to back here as well. That way it fits and it's about five and a half. So I'm gonna go see.

That's where we'll drill our hole. We're gonna cut this hole to three and a quarter inches.

The reason we drilled that three and a quarter inches is because that's the diameter of the bottom of this hat here. That slides right down into the tank and the top of the tank seals by this piece of foam here. It's this thick because you can use this pump on a corrugated tank like a factory style one. The other thing is once we've tightened these bolts up top here it's gonna flip these tabs out and that's what grips it all together and seals it tight.

Well we' got our pump installed and tight, and I went ahead and install the two fittings that come off of the pump. One is going to be the feed and the other one is gonna be the vent. There is no return. This is a returnless style. So we figured out where we want to make those go. Right through here under the car. Then we'll route them once we get under there, but instead of drilling a three quarter inch hole and just running our hoses through there with a grommet we want to make it a little cleaner and safer, and we're gonna do that with this dash six bulkhead fitting. Just need to figure out where we need to drill our holes. Drill a couple nine-sixteenths holes. [ drill spinning ]

(Marc)>> With our bulkheads tight we can run the hose from the pump to those bulkheads. I went ahead and made the first one. I'm gonna copy it and then we'll go get them on the car.

Well we talked about that vent hose, and rather just plumbing it to the outside in case it does get fuel out of there instead of it contaminating the environment it's going to go into this catch can right here that we got from Finch Performance. It's made of billet aluminum. It just mounts to the floor here. I need to drill a few holes and bolt it in place. This thing comes with this plate, which is a template here so you can mark where all your holes need to be drilled and get them right the first time. [ drill spinning ]

(Marc)>> That'll do it. And with the car in the air we can finish up our plumbing. Well we got our feed line attached to the bulkhead and that needs to go up to the fuel rail but there's one thing that needs to go in between and that's gonna be this post filter right here. The pre-filter's built into the pump. I've got to find a safe place to mount this where any suspension components aren't gonna interfere with it, and we don't want it too close to the exhaust either. I've actually got a good spot. I want to mount it on the inside of this frame rail right here, but in order to get my tools in there to get it mounted I need to get this muffler and tube out of the way. So I'm gonna do that next. [ drill spinning ]

(Tommy)>> So wild man what kind of progress you been making?

(Marc)>> Well I got the hard part done. I've just got to route this hose to the front. I just wanted to get your input on how you wanted to route it. You want it on top of the frame, side?

(Tommy)>> Whatever's easiest and looks professional at the same time.

(Marc)>> Okay so simple and clean. I got it. What are you working on?

(Tommy)>> I've got to go grab some of the electronics so that you know we can start doing all that business, and I'm not looking forward to that.

(Marc)>> We gonna fire it up today?

(Tommy)>> I hope we don't catch it on fire today.

(Marc)>> I'll take that as a no.

(Tommy)>> We start wiring up the connecting crews and install that skinny pedal.

(Tommy)>> When doing fab work it's pretty common to use a four and a half inch grinder and you've probably got your go to corded version, but if you're out in a field or you're looking for the convenience of a cordless Matco may have what you need. This is their 20 brushless angle grinder kit. It has an integrated spindle lock head for quick changes, a side handle for better control, and even screens to protect the internals from debris. This kit comes with one lithium ion battery and charger, and this battery is interchangeable with other Matco products like your drill or impact.

(Marc)>> Well we terminated the plumbing for our fuel system here at the rails, and that's all done. We just need to wire up that pump. In fact we need to wire up pretty much everything on this car because we haven't touched it all have we Tommy?

(Tommy)>> No we haven't, and whenever you're doing an LS swap like we're doing with the Buick this part right here is the most intimidating. You've got all these little connections, and sometimes you don't know which ones go where.

(Marc)>> Yeah I mean it looks like a bunch of spaghetti. I can understand why people find that intimidating.

(Tommy)>> Yeah for sure man, but what's nice about the setup we went with is they've simplified it a whole lot. This is a full standalone harness from Chevrolet Performance. It's got a fuse box, your e-c-u, your electronic throttle pedal, and all the connections you're gonna need to make that engine run. All you've got to do is terminate a few of these loose ends and the rest of it's plug and play.

(Marc)>> Well this is simple. I mean they make this thing to just go in anything right?

(Tommy)>> Absolutely, you could even put it in a Ford to make it worth something.

(Marc)>> I hear you. So where are we starting?

(Tommy)>> I guess we probably need to start putting all this in. You see why it looks intimidating don't you?

(Marc)>> Yeah!

(Tommy)>> Well I guess the first thing we need to do is kinda plug in a few of these things and see where we can put that main fuse box and such.

(Marc)>> I see some injectors here. Wonder if that's for this side?

Let's see if we can find the engine coolant temp sensor cause I know that's over here. Alright well this is for the throttle body. So it looks like we need to flip it.

(Tommy)>> There's you mass air flow on that one.

(Marc)>> Oh yeah.

(Tommy)>> It just takes a minute.

(Marc)>> Getting somewhere. Got one plugged in.

(Tommy)>> One down, 3,700 to go. "B" 46.

(Marc)>> Bingo! There's your maf.

(Tommy)>> Hey, hey, you don't be talking about my maf. Good way for you to pick a fight. Knock sensor!

(Marc)>> So this whole harness right here needs to go through the firewall. I guess we need to figure out where and how. Well I talked about this harness that needs to run into the car, and rather than just drilling a big hole here I want to utilize an existing one and I found the perfect spot here. This is the speedo cable. We're not gonna be using that anyway. So I'm gonna go ahead and take it out. I think that hole will work.

So many things in the way. Why did I choose that hole? Oh yeah, let's try the big one first. That's gonna be this o-b-d two port.

Oh yeah! Alright let's get the next one. That's gonna be the pedal. Barely, but it goes. Well in this harness that I pulled through we've got the data link connector for the o-b-d two port, one wire that goes to the ignition switch, and one for your check engine light, and this one that goes to the pedal, which is basically just a sensor but we've got to get it mounted to the firewall and a good safe place we can get full wide open throttle. Let's take a look.

A stud there. Not right there. Yeah that'll do it. Measure from those spacers and we'll be in good shape.

(Tommy)>> While Marc's up under the dash mounting that gas pedal I'm gonna work on mounting up the e-c-u and our fuse block. Now with this type of setup man sometimes it's really difficult to make this stuff look like it belongs, and that's the challenge that we're gonna have. So it looks like I'm gonna have to fab up some brackets. Yeah! [ saw buzzing ]

(Tommy)>> I'll cut up some three quarter inch thin wall tubing and a couple of pieces of 18 gauge mild steel and fab this thing up.

It's that simple. A couple of basic brackets and that stuff looks like it belongs in there.

(Marc)>> I got this pedal assembly all figured out. I had to make some little pedestals here. There's not a flat spot on this firewall, but I got it all figured out now. I just need to get it bolted in and I'll be done.

Oh yeah!

Alright, it's good to go.

(Marc)>> Tommy fabricates a custom steering shaft.

(Tommy)>> Now I would imagine from your point of view you were thinking we were making some really good progress on the Buick and I've just backed up about 10 steps taking that front cap off. The reason I did is because spending a few minutes removing that sure does make my tummy a whole lot happier working on this steering and not having to bend over that fender. Now we've got a destination that we're gonna hit today but we've got a few hurdles, but that's just a stone for a stepper. So what we've got to do is connect this point here, the shaft coming out of our steering column, to this little shaft down here coming out of the rack, and the obstacles we have to avoid is the motor mount and all these header tubes. And after studying it just for a bit I noticed if I was to shorten this shaft up and move it back that'd give me some room around this header. That's what we're gonna do. [ saw buzzing ]

(Tommy)>> Now where I just lobbed off the end of that shaft is a little bit crooked. How I'm gonna true it up is gonna be pretty primitive but it's gonna be effective. I'm gonna spin the steering wheel, causing that shaft to rotate. Tighten my grinder, touch the end of. Just want to true it up. [ grinder buzzing ]

(Tommy)>> With all our pieces cleaned up we're ready to weld them back together. Now to help assist this I'm using an old drop a piece of three quarter double-d. I'm gonna slide this old piece onto there, and then slide all this into the steering column. It'll help keep everything nice and straight and give us a backing for our weld. With that piece tacked on now it's time for us to make all these parts work together. What I like to do is have several different u-joints and a few different lengths of the shafts and then start installing them. The car itself will tell you what will work and what won't. Now you may have to start over and regroup a couple of times but you've got to stay true to it, and eventually you'll figure it out. [ grinder buzzing ]

(Tommy)>> Now this ole car's been sitting around for a while and finally getting back on it, well that's putting a smile on my face. Yeah a few of these things are quite difficult but actually I enjoy them the most cause it allows me to be creative and show my craft, and when you're all said and done being able to put your stamp on saying yeah I created that and being proud, that's a compliment all in its own. Well we got our shafts and the joints all figured out, and the next thing we're gonna have to install is some shaft supports because otherwise these are gonna flex around and it's not gonna work properly. It's not that big of a deal but it's time to do some more fab work.

[ saw buzzing ]

(Tommy)>> After bolting my bracket on here I'm gonna twist that shaft around or put it at the sweet spot and we'll probably have to trim it off. Then we can weld that dude in. [ welder crackling ]

(Marc)>> Well you got that steering done?

(Tommy)>> Cuz you make it sound like that's the only thing I worked on today.

(Marc)>> No we got a lot done. That wiring harness, which wasn't too bad actually. The entire fuel system's wrapped up and I got the pedal installed, which reminds I need to go to the chiropractor.

(Tommy)>> That was a rough one for me too. But man in all reality if we put in another serious day, maybe a day and a half or so, we may be riding in this thing. I think we could do it.

(Marc)>> I'm ready man. It's been a while and I want to hear that exhaust anyway.

(Tommy)>> I'll tell you though I got a little flat I'm gonna have to fix. Put a plug in it or something.

(Marc)>> I hope we don't have to roll on those.

(Tommy)>> Dude they're pretty awesome. I call these one offs.

(Marc)>> Cause one fell off.
Show Full Transcript