More '49 Chevy 3100 "ClasSix" Episodes

Trucks! Builds

Parts Used In This Episode

Diablo Sport, Inc.
With a high resolution color touch screen, state of the art graphics/GUI, and the ability to customize gauge layouts the Trinity enhances the interior of any vehicle.The Trinity also has the capabilty to control/communicate external devices such as the DiabloSport Extreme PowerPuck, DiabloSport EGT Module, and other third party devices. The DiabloSport Trinity is simply put, one of the most advanced tuning devices in the market.
Mickey Thompson
Sportsman S/T Radial 245/60R15
Summit Racing
Rack and Pinion, Manual, Cast Aluminum, Chrome finish.
Jim Weimer Rod Garage
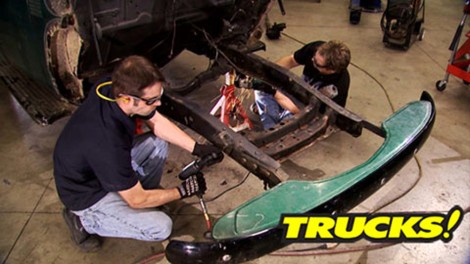
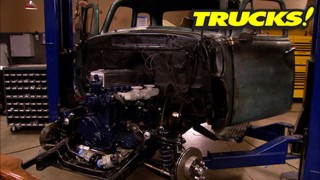
Set of four stamped Mustang II arms. Mustang II spindles. Strut Rod Kit with Hardware. Bushing kit for strut rods. Calipers with rotors, bearings and seals.
Summit Racing
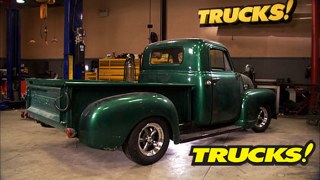
141 Legend 5, Aluminum, Gunmetal, 15 in. x 7 in., 5 x 4.50 in. Bolt Circle, 3.75 in. Backspace.

Video Transcript

Today, it's project class six and we're folding up Automotive Origami. We're making our front cross member from flat stock and building up our front suspension from a budget kit. It's all today here on trucks.

Hey, welcome to trucks. Well, today we're back on project class six, our 49 Chevy half ton pickup. Now a while ago, you saw us take this thing out on the road and blow the cobwebs out of it and the truck did great and it was a blast to drive. We had a lot of fun on the road. However, there are some things that we can make some improvements on one of them being turning up the wick and making a little bit more power.

Now, another area we can make major improvements on is the overall road manners this all pick up and we can't expect a whole lot from a truck from the forties, but there are some areas we can make some definite upgrades.

The steering is kind of vague. The drum brakes are less than stellar and it rides kind of rough. So we're gonna get rid of the leaf springs, the solid axle drum brakes, steering setup and these tall tires that look more at home on a green tractor than they do on a green pickup. And we're going to do it all without spending a ton of cash.

So today we're gonna show you guys how to install a suspension system that stops. Great rides nice in steers very precisely. And like Ryan said, is not gonna cost you an arm and a leg and break the bank. We're gonna use something that the street roter guys have been using for decades. The Mustang two suspension system which debuted in 1974. In surprise surprise, the Mustang two shown here in this guide that we got from motor books. That's a

on the power block website,

although the car didn't really get that great of reviews. Sorry Mustang, to you guys, the suspension system is still raved about mostly due to the fact that it has a front mounted rack and pinion steering system available in power or manual. Now, on top of the rack and pinion, the geometry is nearly perfect and these systems are available in any suspension configuration. This one's for a coil spring in shock.

Now, the truth is you could spend as much money as you want on a turnkey hub to hub Bolton Mustang two system, but that's not what we're talking about today. What we're gonna show you is something that if you got some welding skills and you don't mind a little bit of hard work, you can save big money. Check this out.

This is a Paul Horton's Welder series Mustang two cross member kit. This flat stock actually is this cross member here. Paul Horton's has hundreds of different products including this cross member kit and here's how it works.

The laser cuts along here with the little joining tabs allow you to fold up your metal pieces just like automotive origami. Once you've got it folded up into the correct shape, well, then you weld it in.

We're gonna walk you through every step of installing and building this cross member kit. But before we do that, we've got some prep work to do on the chassis to make it ready to install.

Although there's a certain nostalgic coolness with a straight axle set up like he saw on our street test, it just didn't perform very well. So we're saying goodbye. But you got to admit this system is nearly bulletproof and lasted 60 plus years.

One thing for sure

that lubrication system did not fail,

that's pretty cool.

Now, we're completely stripping our front end down to the bare frame rails, but the exhaust system is also in the way it's rusty and it's gonna get replaced anyways. But when we put it back,

look for more than one pipe

like an open road Titanic, most of the frame components are riveted on and they take a little finesse to remove.

Now we're boxing the front frame rails for a couple of reasons. First and foremost is to provide a mounting location for our new cross member

and the metal we're using to box in the frame is eight inch plate.

It matches the thickness of the oe frame. It should work out pretty well.

Now, when we went shopping for a new project, we made sure we picked out a truck that wasn't chock full of rust

and it paid off big time right here. So all we had to do was buzz the paint off the edge of the frame rail weld in our new boxing plate.

Now, we don't have a frame jig, but we do have a flat concrete floor and some jack stands and that's all it takes to set our desired ride height, which gives us a base to build our new front end from.

All right.

Good on this side.

That's a little bit better.

That's a little lower.

I kind of like that

7.5 at the back

12 at the front.

So we're kind of the opposite of a nice rake.

Now, we're going to set the nose back on the truck and using a generic wheel. We're going to set our axle center line

since the Jacksons

weren't short enough

using a four inch riser to compensate for our ride height.

And here's a trick that Paul Horton showed us with a rod in the lowest part of the wheel. It naturally centers itself so you can use a

line, hang the line from the top and mar your center line.

Now, we can't stress enough how important it is to make sure everything is square and measured properly because your entire suspension geometry is based off of your measurements.

What do you have?

2015, 16?

I got 27 eights. I mean, that's real freaking close. That's a 16 inch

there right there. I've got 2015 16. Ok, let's mark that.

Although we use the permanent marker, Ryan's using a permanent marker. So the mark doesn't get washed off.

Now, those tires and wheels we were using for mock up. Well, they're late model Mustang takeoffs from some power block project and while the 17 inch wheels look pretty good. Well, we think they look a little bit too modern for the direction we're taking with this old truck. So we wanted to go with something a little bit more traditional, not to mention at least smaller wheels, more affordable too

up next. All these parts makes this and later we'll finish updating our front suspension. Stay tuned.

Hey, welcome back to trucks. Well, today, if you're just joining us, we're installing a Mustang two modern front suspension system on our 1949 Chevy pickup project class six and we're doing it with a twist. Literally check this out. This is the Paul Horton Welder series Mustang two cross member that comes flat stock, but look here, it's laser cut as you can see by these lines, you fold it up and weld it in and it starts like this

armed with a square table edge, a couple of sea clamps and a bowl full of wheaties. All you do is fold parts until they measure out to be perfectly square. We're looking for 90 degrees here.

Yeah, there's 90

the cross member comes in two halves. When you've got both pieces bent to 90 degrees, they clam shell together and locate with the tabs.

Now, first things first, you want to put several solid tacks in different locations to keep things locked together and from shifting when you fully burn in the wells.

Now, one of the great things about the welder series design is that it leaves you with a perfect gap to weld where you're gonna get great heat penetration. And when you grind it off for aesthetics, you're not gonna sacrifice your weld's integrity.

One look at the heat affected zone and you know, we're pouring the coal to it. This weld has to be strong. So we're jumping around to keep things cool.

Another high tech metal fabrication tool that you're going to need is just an adjustable wrench. This allows you to easily fold the tabs in for the rack mount and bend it in a place and burn it in.

According to our initial measurements and markings, we needed to create some clearance for our upper a arms

and to get that done Well, we just cut a couple of slits in the frame rail so we could depress the top rail.

And to do that, we're using a big sea clamp that'll hold it in place until we get it welded solid.

After some quick work of the flap wheel to grind down the welds and verifying our measurements, we can move on to the next step.

Now, all this measuring and marking we're doing may look a little confusing and overwhelming, but it's just to establish the correct pickup points for different suspension components.

That way this universal kit will fit your vehicle no matter what make or model you have.

Now for a project truck named Class six, we wanted a traditional wheel entire cell. What we ended up with is perfect for this truck. These wheels come from summit racing and these are 15 by sevens with the traditional five spoke design and dark center and at just over 100 and 20 bucks a piece, you can't deny the value and they look great.

We've wrapped them in these Mickey Thompson

sportsman sts to give you the option of the black wall or raised white letters

with a 2 45 60 50. We got a nice fat side wall that's gonna ride good and with a 440 treadway rating. Well, that's a good value because they're going to last a long time. Now, one of the things we have to do is figure out our spindle center. Here's an easy way to do that.

What you wanna do is get a straight edge,

put it on top of the wheel

and using a level,

you just draw a reference from the very top of the wheel, which is gonna give you the outside tire diameter. So that gives us an overall tire diameter of 26.5 inches. Half of that, which is the actual center of the wheel is 13 and a quarter inches, but you have to allow for a half inch of tire compression due to the weight of the rest of the front of the vehicle. So the measurement that gets transferred onto the side of the frame rail is 12 and three quarter inches.

Now, just like the cross member, the upper towers that hold the coil and upper shock mounts in place are available both as a diy kit or as a completely preassembled piece if you're going in the diy route. Well, it's pretty simple. Just need some half inch spacers

set your plate on top,

drop in your upper shock mount and you just weld it in.

All you gotta do is add the lower prebent bracket. What you're gonna end up with is something like this. Now, since these are already done, we're gonna cop out and use these and all we've got left to do is make some notch cut outs. So these things fit our frame, we know where to make the cuts based on our previous measurements.

When installing the cross member, it's got to be level front to back and side to side.

All right,

turn it in

and here is where all that measuring and marking and accuracy really pays off. Do you know everything's gonna fit? You don't have to second guess yourself.

It's coming together.

Nice

wire. It is. Now, we're making progress

after the break. We'll stand on our new suspension. Now with the weight of the engine out of the vehicle, you need an opposing force in our case. It's Ryan's giant chute. Stick around.

Hey, welcome back to the shop where we're working on our 49 Chevy project class six and we obviously had a chance to fully weld in our Paul Horton's Welder series Mustang, two cross member and Upper Towers even had a chance to hit him with some black paint. But we want this pick up sitting on the front tires and wheels by the end of the show. So we definitely need to add some more parts.

Now, lots of new parts. Yes. But what we're not gonna do on this project is start throwing money, hand over fist at it. We're on a budget. So we did some digging around. Found a company called JW Rod Garage. These guys have been kicking out high quality street Rod parts for almost a decade. Everything from frame rails to a full rolling chassis to several different versions of a Mustang, two suspension system. So what we ended up with here is pieces of their budget minded economy Mustang two kit. This system utilizes stock forge spindles, stamp steel, upper lower control arms, stock configuration shock and coil springs set up along with single piston calipers and 11 inch brake rotors.

Now JW Rod Garage offers several versions of a Mustang two system including upper and lower tubular control arms, even an airbag set up. But with the economy set up, we still get the benefit of an independent front suspension with rack and pinion steering and way better brakes than stock all for a budget minded price.

Now, some people might think the stamped steel, upper and lower control arms don't look as cool as tubular, but it's kind of a question of preference because they are just as strong.

Now, the lower stamped arm does require a strut rod for stability and triangulation.

Now, there's no custom one off and high dollar expensive parts here. All of these components are easily attainable and very affordable.

You may want to recruit the help of some friends to compress that coal spring though.

Now, with the weight of the engine out of the vehicle, you need an opposing force. In our case, it's Ryan's giant

or maybe

two giant shoes.

There we go.

All righty. Let's got it.

I, I think it's

on.

Yeah,

we

go.

Now we do a preliminary set on our bearing preload by rotating the rotor and snugging it down till it stops turning

and you back it off a notch and pin it.

Now, you just might get luckier than we did. And the strut rot may sit directly below the frame rail,

but if it doesn't line up, well, it's nothing a little heat can't fix.

That ought to be about right.

And with the bushing in bracket assembled needs to be pulled tight up against the bottom of the frame rail and welded into position.

But don't just rely on the 38 thick bracket needs to be gusted too.

Hey, welcome back to trucks. But we got our front suspension built up and ready to test. But guess what just came in? This is our manual steering rack. We got from summit racing. It looks great. And for right around 100 and 80 bucks, it's a heck of a bargain too. But we may have a fitment issue

because it's pretty apparent. We're gonna have a clearance problem

with our factory Chevy Gusset here. We left it in place to tie the two cross members together for strength.

It's no big deal. We'll trim it to fit. We've got grinders and welders, no problem.

But for now we want to throw the new wheels and tires on this and get the sheet metal on. See how she looks.

Well, check it out what a drastic improvement over stock that a straightforward suspension change and a cool set of wheels and tires can do and now we're finally starting to see the awesome potential that these trucks have to be cool. Street rods.

Yeah, this thing's already got a much improved stance and once,

get the weight of the engine and transmission over the front end of this thing and it squats a little bit. Well, then we can determine if we need to go any lower.

And the great thing about a Mustang two suspension set up. Well, there's plenty of options. We can always go with a shorter set of coils or just some drop spindles.

Well, by now, just about everybody knows about OBD two tuners and programmers and the name Diablo Sport is well established. Well, this is their new Trinity and it may very well be one of the most advanced devices in the field.

The Trinity is a performance programmer and it can read and clear diagnostic trouble codes as well as being capable of advanced data logging and instant gauge readouts for several different vehicle functions, all with a totally customizable touch screen.

The Diablo Sport Trinity is available for most late model gas and diesel domestic trucks and they're constantly updating the vehicle application list. So if you're looking for one device that does it all very well, we'll check out the Trinity.

Now, some of you eagle eye viewers noticed that this engine might not be the original 216 and you're right. So good catch. We ran the casting numbers and discovered that this is a 1956 235. And for you guys that are up on your history. Well, you know that the Blue Flame six is the same engine that they put the original Corvette.

And while we're gonna make this three speed transmission, go away, we are gonna try to incorporate the foot pedal activated starter. That's just neat.

So if you got any questions about this project or any of the other products that you've seen on today's show, go to the power block website at Power block tv.com.

Thanks for watching. See you next week.
Show Full Transcript