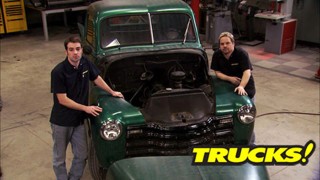
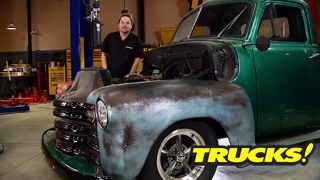
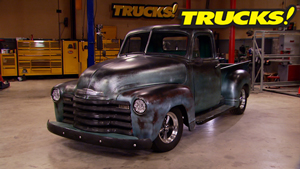
More '49 Chevy 3100 "ClasSix" Episodes

Trucks! Builds

Parts Used In This Episode

Mickey Thompson
Sportsman S/T Radial 245/60R15
Summit Racing
141 Legend 5, Aluminum, Gunmetal, 15 in. x 7 in., 5 x 4.50 in. Bolt Circle, 3.75 in. Backspace.
Summit Racing
Coil-Over Spring, 275 lbs./in. Rate, 10 in. Length, 2.5 in. Diameter, Silver Powdercoated, QA1 Aluma Matic Ride Sensitive Shocks, Coil-Over Shock, Aluminum, Clear Anodized, Street, Front/Rear, Eyelet/Eyelet Mount.
Summit Racing
Single stage urethane paint of various pre-mixed colors with optional clear coat. Also offering different speeds of activator and reducers.
Certified Auto Recycling
Used 8.8 rear axle housing with 3.73 gears, limited slip differential and disc brakes.
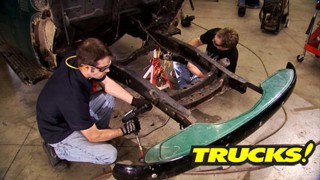
Jim Weimer Rod Garage
Set of four stamped Mustang II arms. Mustang II spindles. Strut Rod Kit with Hardware. Bushing kit for strut rods. Calipers with rotors, bearings and seals.
O'Reilly Auto Parts
Rack Mount Bushings
UniChip
The Unichip is a sophisticated supplemental computer integrated into your vehicle's engine management system putting the power of electronic engine control into the tuner's hands. It's not just data squirted into your car, it's a fully functional computer working seamlessly with your car's engine management system.
Welder Series
Mustang II coil-over front crossmember kit, 56" track width, Mustang II tower wrap-around plate, Mustang II tower top plate for mounting coil springs. Shock mount/spring locator.
Welder Series
Triangulated rear four link kit. C-notch kits and frame bend sections. Rear axle bracket for mounting coil-over shocks.

Video Transcript

Today, we're dumping the antique torque tube from project class six. So we can build in a triangulated four L

rear suspension.

Then it's how to create a custom paint effect on a budget. It's all today here on trucks.

Hey, welcome to trucks. We're making some great progress on our 49 Chevy project class six. Now, the goals for this project were very simple. Right from the start, it was never going to be a super expensive custom nut and bolt restoration trailer queen quite the opposite. In fact, we wanted to start out with a typical advanced design series truck, one that everything worked but had an older restoration and then break it down component by component and finally end up with a rock solid daily driver with a minimal investment and one that pegs the cool meter and so far we're doing pretty good.

So we yanked the turn of the century buggy axle and installed a Paul Horton Welder Series. Do it yourself. Mustang two cross member and wrapped it with JW Rod garage suspension components. So now with 11 inch rotors, we're gonna stop grade with a modern suspension. It's gonna ride nice and it's gonna steer precisely with rack and pinion steering. Now, we had to do a little trimming on the frame to make room for the steering rack bellows. But, hey, that's hot rotting. And Paul Horton's has you covered with sea notch kits, all kinds of tabs and builder parts, including these frame, be sections that ship flat, assemble easily using the locator tabs and when you burn them in, you end up with something that looks magical bent, that's pretty cool.

But the front, well, it's obviously only half of the equation.

And unless we want this old green pickup looking like some sort of clapped out two wheel drive mud dragster. Well, we've got to do something about the back half of this thing and we told you right

in the beginning, we're getting rid of the torque tube in the rear axle that's attached to it and going with something a little bit more modern, something that matches the front. We wanted a suspension system that had a much better ride and a little bit of ride height adjust ability built into it. And since we're swapping axles, well, we decided to go with something that had a proven track record and something we've reached for in the past. So we put in a call to certified Auto Recyclers down in Alabama and they came through for us with this Ford 8.8 inch rear axle. Now, this one came out of a Ford Explorer and this axle in conjunction with these tires and wheels puts our track width at only a half inch wider than the stock set up. So we're in great shape there. Now, this one's got 373 gears and just like our cheap Cherokee. It's got a limited slip differential, 31 spine axles, disc brakes and a 51 4.5 inch bolt pattern. And this one seems to be a low mileage unit in pretty good shape.

The Ford 8.8 can be found under Explorers, Crown Vics, Mustangs rangers and full size pickups. So needless to say they're easy to find and parts are cheap.

Now, each model has a different track with. So like Ryan said, the Explorer axle fits our application perfectly. Now we're not hacking stuff up, we're unbolting things and taking it apart because after all these are antiques.

Ok? Through the magic of television, we already have the front sheet metal and the engine sitting on the front suspension. That way

we get an accurate representation of where the front ride height actually is

and knowing where that's gonna sit. Well, we can set our rear ride height exactly where we want it. And on this old truck, well, we're after either a level stance or even one with a slight rake to it.

Good,

little more

right there. Perfect.

So with the help of our bubble gauge and a couple of jack stands, we can set the attitude and altitude of our truck because after all, it's all about how this thing looks coming down the road.

All right, with the rear half of our frame strip down and the ride height set about where we want it. We're almost ready to start throwing some parts of that thing. But before we do that, we've got a few brackets to fold up and weld first. Now, the kit we're using is a welder series triangulated four link. Now, all four links have some adjust ability built into them so you you can dial in your pinion angle. Now, the kit comes with the tube sleeves and urethane bushings to attach to the link ends as well as all the hardware you need.

It's got coil over mounts, upper and lower link mounts as well as the shock tabs to attach both the axle and the frame end.

Now, before we do that, we got to bend up and weld these lower link mounts, we'll be ready to go.

Now, once you have the solid block that axes your coil over attachment point welded in,

you can go ahead and fold up both sides to approximately 90 degrees.

Now, here's a pretty handy tip using a thin piece of cardboard stock as a shim and the link mount bushing center as a spacer,

you can weld together the lower link mount and not risk it being too tight together

and having to pry it apart to install the link

and with the bracket tacked together, go ahead and install the lower link mount bolt

and that will prevent the sides of the mount from spreading apart during the final welding process.

Ok. We removed the copious amounts of axle brackets from the explorer axle and I'm grinding everything down to smooth it out with a flap wheel. But since we don't know exactly where our new four length brackets are gonna go, I'm gonna go ahead and get rid of the rest of the paint on the axle tubes.

Now, with the tubes cleaned up, we're using the original axle location to use as a reference to position our new axle.

Now's the time to check and recheck to make sure the axle is located perfectly

and we'll make sure it's dead on square before we set our opinion angle.

There's four inches in between the wheel and the frame. Yes, there's four inches in between this wheel and the frame.

We're still centered.

Yeah, I don't think we moved.

Yeah, right about there.

We can dial our S in with a four L cool

up next. We'll get our rear axle locked in place and later it's how you can turn a single solid color into a custom candy effect. Stay tuned.

Hey, welcome back to the shop. Well, we're in the middle of swapping axles and suspension on our 49 Chevy pickup project class six. Now, we've got our Ford 8.8 inch rear axle centered in the frame and square. We've got our opinion angle set about where it needs to be and the frame is sitting at ride height ready to start adding some brackets to this thing.

Starting with a measurement of two inches in board, the frame mark the backside of the axle tube using a plumb bob. But before you tack welded on, make sure the link and coil over mount is perpendicular to the ground.

And with the lower link bar right where it belongs, you can see that the front link is almost exactly where the original leaf spring mount was and we've got a box this, so there's some trimming that has to be done.

But here

right about there, now,

this work would be possible with the bed still on the frame. However, the labor involved in pulling the bed off pays dividends big time when it comes to the convenience of working on both sides of the rail and being able to stand flat footed while you can see everything that you're doing.

Now, a plasma cutter is a great tool. But if you're gonna weld to the areas that you're cutting with the torch, make sure that you grind the slag off for better weld integrity.

Now, just like on the front of the truck, we're using cardboard to make a template and transfer it on to eight inch steel to make our boxing plates, then staggering our welds and burning it

in.

It's up to you whether or not you grind down the welds completely for a nice finish, show quality look, but you at least need some flat real estate to weld the frame bracket to

and the front link mount pivot point needs to be about five inches below the axle center line.

All right. Now, you may have noticed we haven't discussed the need for a rear track bar. That's because the four length system we're using

utilizes triangulated upper links with both upper links mounted at opposing angles that's going to eliminate any side to side or lateral movement of the rear axle letting us run without a your track bar.

Now, the axle end of the upper link just gets installed over the axle tube and

the only other measurement we've got to pay attention to is the frame end, we've got to mount it two and 18 inches above the rear axle center line that will maintain all the correct geometry that the welder series suspension has designed into it.

Now, before we send this antique suspension system off to its final resting place, we wanted to show you guys some of the cool engineering that was incorporated into this system.

Now, this is referred to as a torque tube where the drive shaft runs internally of this external protective tube.

Now it conf flex at the front where it bolts of the transmission,

but there's no flex going on right here. It's hard mounted unlike today's conventional modular drive shaft with a universal joint. Instead, the flex is incorporated right here where the leaf spring meets the axle. There's an actual pivot point that allows her suspension articulation and eliminates binding. The other cool thing is this right here?

Now, the shackle bolts are designed to last. There's a grease fitting on one end and they're machined hollow. Here, there's a grease galley and a channel is designed to self lubricate every time the suspension cycles now, we're showed a little bit aware, but I would be willing to bet that these guys are ready for another 60 years of use. It's not on this truck.

Now, these components were designed to last out of necessity because you got to remember, unlike today, there just wasn't a service center on every second street corner. The trucks had to be tough and they had to last. So it's kind of a shame to see it go

almost.

All right. Now, our triangulated four link is mocked up and tacked into place. And remember guys, each one of these link bars is adjustable so you can really dial in your opinion angle and make sure the rear axle is square in the chassis.

Now, the money we did not spend on our recycled rear axle, but we did spend on these coil over shocks. These are Q A one's Carrera

line of coil overs and they cost less than you think. In fact, for each coil and shock combination. Well, it cost us about 100 and 80 bucks per side. As far as adjust ability goes, we've got plenty but the shock body is threaded for adjustment. We've got three different choices as far as the mounting location down here on the axle bracket.

All we've got left to do is come up with some sort of cross member that goes from frame rail to frame rail to provide a mounting location for the top of our coil los

once we do that,

burning all these wells rear suspension will be done

after the break. It's painting that will use free sunlight to create an expensive look, stick around,

build on a budget truck projects that save you time and money.

Now, the cost of a paint job can get out of control fast, especially when it comes to the cost of the paint itself. Well, the good news is there are some high quality inexpensive paint systems available. Summit Racing has just come out with their own line of high salt as urethane paint with an optional clear coat.

They've got tons of great colors and they're coming out with more and more all the time. What we're going to show you today involves their candy apple red paint. Now, they've also got downloadable free information, including material safety data sheets, product in

information, even a step by step guide to achieving the ultimate paint job.

Now, this is a panel that I shot yesterday. Using the candy apple red. The gloss is great. It's sprayed beautifully and it laid out nice and flat. And as you can see, it's a nice quality paint being urethane, it's gonna last a long time.

But we're going to show you an old school custom technique that takes this paint intermixes a little bit of clear and gives you a high end custom look for just a little more money.

Now, thanks to the talents of our resident artist Hutch,

we're gonna show you the difference between reflection and refraction reflection is what you saw on the red panel where the light hits the panel bounces off and reflects to your eye. It's a very nice gloss. However, refraction is when the light hits the panel bounces around inside the layers of paint softening it refracting it so that when it hits your eye, it's a very pleasing look, which usually takes lots of layers and lots of money in paint. We're going to show you how to get this effect on the cheap and without a ton of extra work,

the first coat we lay down is with 100% color or full strength as it's referred to.

Now, one way to tell the quality of a single stage paint is by the color saturation and we're getting 100% hiding with the first coat.

Next is a 5050 mixture of catalyzed, clear and catalyzed paint. After you've let it sit for 10 minutes dry time.

10 minutes later, we in 25% paint and 75% clear. And I'm spraying with an Ensa

LP H 400 set up for clear coat, which works great on single stage.

This time after 15 minutes dry time, we'll go to 10% color and 90% clear.

You kind of get the picture of what we're doing by now. We're building a staggered translucent layer that's chemically tied together.

After another 15 minute dry period, we'll go with one more final coat of 100% catalyzed urethane clear coat.

This is applied as a full wet coat and we'll finish things up providing the final gloss to our panel.

Now, here's the first panel I shot. It still looks nice and glossy with just a single stage, but check this out.

This is the built up and layered single stage with the clear. The refraction is obvious. The tone is softer. It's a nicer color and the quality of reflection is outstanding. But the best way to look at all of this is outside in natural light.

Now, out here, the sunlight is bouncing around in there like a super bowl in a concrete room down here. It's a nice subtle tone. It's a different color up here and the gloss holdout is excellent summit paint along with a little bit of old school technique may be the answer you're looking for for a budget paint job that looks fantastic.

Hey, welcome. Back to trucks. Well, project class six is finally off the jack stands for now. Anyway, now we had a chance to finish up most of the welding and all I've got left to do is add a few gussets here and there to add some strength and finish things up.

And we also got our coil overs mounted and you've seen the lower bracket, but we added this upper cross member, that's nothing more than a piece of heavy wall tubing. We added a couple of tabs too and then welded directly to the frame.

Now, we're doing pretty good budget wise on this whole 49 Chevy pickup, especially considering the tires and wheels are both new products. The wheels are a new five spoke design from summit racing and the tires are a new tread pattern from Mickey Thompson. Now, we also went to summit racing for our coil overs. We've got less than $400 in the pair.

The upper triangulated four link system was just over 300 bucks,

add another 200 for our junkyard rear axle. And we're looking at about $900 for the entire back half of this truck. Now, the front was about $1300 but that included steering and brakes. So all told, we're looking at about $3100 for everything we've done to this truck so far. We're on the right path.

Now, with all the performance programmers and tuners out on the market. It's great to finally see some products coming around for those of you guys who drive imports like the Toyota Tundra with the 57 gas burner. Well, this is Unic,

I's P and P module and it stands for plug and play because it's that easy to install.

Now, this is not a ref flash or a programmer. It's a supplemental computer that complements the factory ECU and works either with a bone stock vehicle or ties into other performance upgrades that you've done like Turbos, Nitrous or even water injection.

And since the P MP works in concert with an unchanged factory ECU where you're not gonna raise any flags if you bring your vehicle in for service while it's still under warranty

units.

PNP is available wherever quality performance parts are sold and all it takes to install it.

It's a 10 millimeter inch.

All right, with the bed back on our 49. This thing's starting to look like a truck again

and you can decide for yourself whether the three grand we forked over was money well spent or not. I think it's looking pretty good. Now, if you got any questions about this thing or anything else you saw on today's show, go to Power Black tv.com. Thanks for watching. See you in a week.
Show Full Transcript