More '53 Ford F-100 "Old Skool" Episodes

More Project Old Skool Episodes
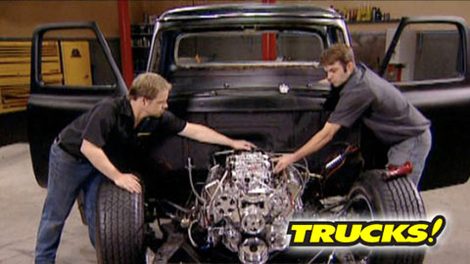
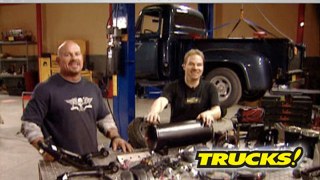
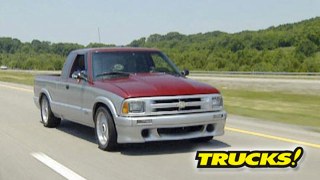
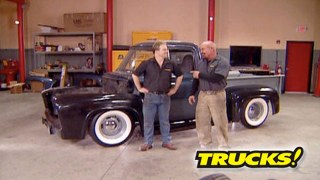
Trucks! Builds

Parts Used In This Episode

Air-Ride Technologies
Air tank, air compressor, air distribution block, air sending unit & air lines.
Bestop
HighRock 4x4 jeep Bumpers.
Denny's Driveshaft
Custom aluminum driveshaft.
Denso
Platnuim Plus spark plugs.
Mid Fifty
Aluminum fuel tank & sending unit.
Optima
YellowTop Battery.
Performance Friction
Z-rated brake pads.
Pertronix
Flame-Thrower billet distributor.
Power Slot
Cadmium plated rotors.
Ron Francis
Custom wires, fuse panel, transmission lockup sensor & guage feed harness.
Suprepme Performance
Cherry Bomb Glasspack muffler.
Taylor Cable Products
Full Metal Jacket ignition wires & battery box.
Total Cost Involved
1953-56 Frame Mounted Brake system, with 7" booster & dual master cylinder.

Video Transcript

Today. Project Old School is back on the rack to get a completely new braking system.

Then we're running an all new wiring harness fuel lines and mounting the tank.

Finally, with everything hooked up, we're firing up our 350 small block for the very first time.

It's all here today on trucks.

Hey, welcome to trucks

where project Old School has really struck a chord with you guys

with its retro style and its realistic goals of being a daily driver and not just some restored trailer queen. Yeah.

Now this f 100 is gonna be a classic whether we restored or hot rod it, but like Paul said, this is no trailer queen. We've planned the whole time to make this a truck that turns heads, but also one that's reliable every single time we turn that key.

And the last time we had project old school in the shop, we fixed up more than 50 years worth of problems on the body. Then we primed and blocked it out including our all new fiberglass panels. Finally, we sprayed everything with a modern clear coat paint system that replicates a vintage flat black primer only look

we're still a long way away from taking this thing to a cruise in. We got a lot of work to do so much. In fact, we've recruited the help of Ryan Shan to help us through some of these vehicle systems starting with the electrical system. What you got cooking. We got a Ron Francis wiring system specifically designed for project old school right down to the type of transmission and the style of gauges. We're gonna,

wow, that's great. But a lot of guys get seriously intimidated with a kit like this. Basically creating a wiring system from stem to stern. It's really not that complicated. You got pre terminated ends,

isolated systems and check this out. Each wire is individually labeled about every six inches from end to end to eliminate any confusion.

And this fuse panel couldn't be any easier to read. You've got relays, flashers, modern blade style fuses and a space for just about every accessory we could dream up on this truck. Yeah, it's a really nice complete system. Well, you look like you got it under control. I'm gonna leave it with you. All right. We'll take care of it.

Well, Ryan's making sure it's going to light up. We're going to make sure it's going to stop. This is the brake system we pulled off of our truck and there's nothing wrong with it. It's probably from the same donor car. It's got a dual reservoir master cylinder power brake booster. And they just adapted this pedal assembly to fit under the dash, but we're going to change things up a little bit.

We call total cost and,

and got their 1953 through 1956 frame mounted brake system comes with a nice bracket goes into a seven inch booster for good clearance and a dual reservoir master cy

this tux in the frame rail looks great, but the best thing that it does is freeze up our firewall. So that when we open the hood, we get a nice clean look.

Even though our truck had been clipped, we were still able to use some of the original frame holes. This system was designed to mount to

master seminar

was right back up in here behind the booster,

but that presents us with a little bit of a problem. So we're gonna have to cut a hole in the floor here to

give us access to the reservoir

later on. We'll add an access door for this when we finish the interior

RF 100 like a lot of vehicles had a firewall

mounted master cylinder and booster set up that fed a distribution block a little further south. The master cylinder fed a dedicated line out to the back and split at the axle and split right here at the block to the left front and right front wheel. Well, we're going to get rid of this and clean the system up a little bit. What we're going to do is come off of our frame mounted brake system and come back here and put in an adjustable proportioning valve that's gonna let us balance the front and rear brakes, come straight back and just go into the distribution block or the splitter at the axle

up front. We're going to come off the front cylinder, go to A T that we've made up and split it off to the left and to the right front wheel.

The only problem with this system is that now our calipers are level two are even a little bit higher than our master cylinder.

And this can cause a pressure problem. The solution to that problem is these residual pressure valves, 10 pounds for the rear two pounds for the front. These just act as a check valve and will maintain enough line pressure so that you have minimal pedal travel and your brakes are there when you need them.

Here's a great way to run your brake lines without getting them all out of whack.

Take either some tig rod or a coat hanger wire and bend it in the shade that you want your brake lines.

Then when you're happy with it,

use it as a pattern to bend your new lines.

Well, now we've got all new lines and we've upgraded our front brakes to these cadmium plated power slot rotors, but these slots not only let gas water heat and dust escape for more efficient braking, but

the slot ax is a wear indicator. So when it goes away, you know, to change your rotors,

we've paired them up with these performance friction Z rated pads. Now, these pads are specifically designed for less dust, longer life and more clapping power. So even though it's the same size braking system as the original Nova had, we've really got better braking performance.

Hey, Ryan, looks like you're making some good progress in the wiring harness. Yeah, we pretty much got everything laid out as far as we can go without putting it into the truck. So Ryan, you've made your living as a mechanic for a long time. What's the most common electrical problem people bring to you? People tend to focus on the power side of things, neglect the ground side, need to have good clean ground connection for an effective circuit. Yeah, especially if you're working on a fiberglass rod or something like that. Yeah, definitely. And this Ron Francis kid is obviously not a stock wiring system.

Uh stock system wasn't designed for the modern accessories. We got on here. We got an auxiliary cooling fan draws a lot of amperage can literally melt wires together, burn this truck to the ground

with all the work we got in this thing. We don't even wanna go. Nobody wants that.

So you guys take a break. We're gonna set the system up, get it in the truck. Stick around.

Hey, welcome back to trucks. And our old school F 100 we are resurrecting this 53 Ford, turning it into a bitch and street truck with retro style. Now, when you start off with an empty hall like this, it can be a tad intimidating. But if you plan your projects and take it one system at a time, it's no problem.

So far today, we've installed a new master C

and power brake booster assembly and re plumbed the brake lines. So the next order of business is to install a new Ron Francis wiring system specifically designed for old school helping us make that happen. Is Ryan Shand. How you doing, man? Good. Just got the fuse panel mounted. I found a great central location for the heart of our system.

So I'll start here, get all the individual harnesses laid out, cut them to the length they need to be and work my way out.

The reason you want to start with a central location is so that you don't cut yourself short. Literally start with your fuse panel, run each individual harness out and custom fit it to your vehicle, then you can cut and terminate your ends.

Like we said, we're going for a clean look. So we're using this discrete location in the driver's side footwell to run our wiring harness into the engine compartment.

We're using corrugated wire loom cover to protect our harnesses and it makes it easier to run our wiring through the frame rails.

Yeah, right there. It's plenty,

you can get wire loom at any parts store in many different sizes. And it's good cheap insurance for your electrical system.

Now, not only are the wires labeled in this system, they're also color coded to match their terminals on the fuse wire.

Well, Ryan's got us about as far as we can get on the wiring without having our engine in place with it still out. We're going to take care of a couple of things like putting these dental platinum plugs in

using these cool looking tailer, full metal jacket wires that are fed by our patrons distributor. Then we can finally make this engine to the transmission for the last time and stab it in between the rails.

Seven.

Our 350 mechanical pump means we don't need pressurized fuel lines. We're making our out of a high quality braided line and using a N fittings for good looks and durability

in 1953 Ford, put the battery to these trucks underneath the floorboard in the pasture side right here. By the time we got a hold of it, this was all that was holding the battery in place. Not good enough. So we're going to keep the battery here, but use this aluminum battery box kit from Taylor to hold it secure. We just got a finish fab in our bracket. We'll be good to go.

Yeah.

Don't skimp on your battery cables. The heavier the gauge, the better the current flow and the better the ground. All right, give it a shot.

Contact.

Cool.

Now, with our wiring system all laid out, we're ready to move on. Yeah. And when we get back from the break, we're gonna finish running those fuel lines and then we'll get it started for real.

Also coming up, we'll install our compressor and airlines for the suspension

and later we'll show you the right way to fire up an engine for the very first time. That's what I wanted a year.

Hey, welcome back to trucks where we're rewiring re plumbing. We doing everything on this F 100. We're about to get on a roll. Yeah, we've got the brake lines locked in.

We've got the wire harness laid out.

Now it's time to run the fuel system.

Our aluminum tank is for mid 50 F 100 parts and holds 17 gallons. Now, we've decided to move the tank's location from under the cab to right here under the beds frame rails. So it's out of the way and safe.

We got 2 500 CFM carburetors to feed with a mechanical fuel pump through a high flow filter. So we're using three eights inside diameter lines and dash six A N fittings.

Our mid 50 fuel tank comes with its own sending unit, but you need to be sure to ground the unit to the frame for safety and consistent fuel gauge readings.

Well, now that we can feed the engines, let's feed the air bags. What I've done is remove this right side running board, support from the frame and I'm going to mount my tank right here like this. And this is going to make it a lot easier for me to attach the air tank to the framer.

That way it's nice and safe and tucked up in here out of the path of the wheels.

We're mounting our air compressor on the other side of the frame rail near the tank along with our air distribution block and our gauge sending units,

grouping these components together means shorter airlines and faster air tank recovery times between drops.

Hey,

check out our all new aluminum custom drive shaft from Denny's drive shaft.

This sweet piece was made to order fully balanced and ready to throw in our truck.

And when we get back from break, we're gonna fire this thing up.

Hey, welcome back to trucks and project old school. Now it's time to fire up that 350. Now, our buddy Ryan Chen

has been helping us with the different vehicle systems all day and we thought it'd be pretty cool to show you guys how to start up a fresh engine for the first time. Now, I know you've seen the shows to where they turn the key and it fires up right away. Nothing leaks, nothing breaks and nothing smokes. Well, unfortunately, that not always the case. So here's a couple of things you need to be aware of before your initial start up.

Let's start with the oil. You got to have good oil pressure in circulation. Otherwise you can dry, fire your engine and damage your bearing surfaces. Not good. We've temporarily mounted an oil pressure gauge up here on the cow and removed the right bank valve cover so we can make sure that we've got good oil flow to the top of the valve train.

We're using an oil pump priming tool that slips down into the distributor shaft. This pushes oil through all the engine's passages before your initial start up.

Now, here's a good safe way to check for spark. You can get yourself an in line spark tester available at any parts store goes right in between your spark plug

and your plug wire.

Lets you know right away if you got fire,

hit it.

If you don't have one of these in your shop, you need to get one. We're going to prime the carburetor, get enough fuel in there so that when it kicks, it'll spin the pump enough to get some fuel up into the carbs and keep itself running.

You ready? Yeah, let's give this thing a shot.

No way.

Burning rich.

I

think we got this thing. 180 out.

I think you

might be.

What we're trying to do is figure out if the distributor is 100 and 80 degrees out. In which case, it's probably trying to fire in the exhaust stroke. We have to flip it around. Possibly. So it fires on the compression stroke,

you know, bump it over, I'll bump it over. You tell me when.

All right.

All right.

00, man. It was perfect. Wow.

I hit it.

Well, we weren't 100 and 80 degrees out. So the problem had to be somewhere else.

Well,

yes,

if we've got nothing here,

I would say our pumps

not working. It is.

It's dry as a bone. Yep.

And we need to try another pump.

Yeah.

Well, here is a big problem. We were getting absolutely no fuel flow out of our mechanical pumps. So remember the problems aren't always going to be so obvious.

It's gotta be closed. Hold on. Oh, check this out.

Fire and gas. I'm good. Let's tighten this up.

Let's take care of that.

So now we know the fuel pump's working anyway, don't we?

You check your systems and you check your systems again and then when you find out you missed something, you check your systems again.

All right.

That's what I wanted to hear that.

Now, we've got about a 20 minute break in period at 2000 RPM that we can't do right now. But this, that's the sound we wanted to hear, man.

Awesome, good job. Thanks, man. Get this time and set,

check this out. These are High Rock four by four bumpers for Jeeps. High Rock four by four is a new division of best top and these are for hardcore rock crawlers and city drivers alike.

The rear and front bumpers are made from heavy duty 316 steel plate

and are black powder coated to provide a tough exterior finish.

This system also introduces a 2 ft approach roller that acts as the first point of contact for extreme approach angles.

Best tops high rock four by four from bumpers were only 525. The rear bumpers were only 295 and these approach rollers 95 bucks.

Now, I know most of you guys remember cherry bombs. Cherry bomb mufflers came on the scene in 1968 at the peak of the muscle car era and quickly became one of the most popular performance mufflers. They faded out of the spotlight for a little while, but now they're back in a big way.

This is the original high performance glass packed muffler with its traditional deep mellow sound.

The straight through design reduces back pressure maximizes horse power. And as always, it's built right here in the USA.

You can get your hands on a set of cherry bombs for about 40 bucks. Thanks for watching trucks. See you next week.
Show Full Transcript