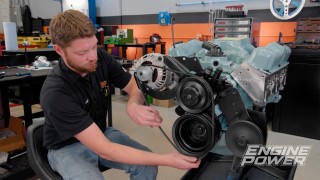
Engine Power Featured Projects

Engine Power Builds

Parts Used In This Episode

Summit Racing
AFR Cylinder Heads
Summit Racing
Cometic MLS Head Gaskets
Summit Racing
COMP Cams Endure-X Roller Lifters
Summit Racing
COMP Cams Pushrods
Summit Racing
COMP Cams Roller Lifters
Summit Racing
COMP Cams Valvetrain Assembly Spray
Summit Racing
Edelbrock Super Victor Intake Manifold
Summit Racing
ICON Forged Pistons
Summit Racing
Jesel Valvetrain
Summit Racing
LSM Racing Valve Lash Torque Wrench
Summit Racing
MSD Flying Magnet Crank Trigger Kit
Summit Racing
Summit Racing Harmonic Balancers
Summit Racing
Summit Racing Valve Covers
Summit Racing
Total Seal Piston Rings
Summit Racing
Trick Flow Roller Rocker Arms
Summit Racing
Trick Flow Specialties Intake Manifold
Summit Racing
Trick Flow Super 23 195 Cylinder Heads
Summit Racing
Trick Flow Track Max Hydraulic Roller Camshafts
Sunnen Products Company
Sunnen SV-15 Honing Machine

Episode Transcript

(Pat)>> You're watching Powernation!

(Frankie)>> Ethanol fuel has some definite benefits, especially for a high compression engine.

(Pat)>> We've got a barrel full of race E-85 and we're gonna see how it performs in our Compression Obsession small block Chevy. [ Music ]

(Frankie)>> Welcome to Engine Power. Today we're gonna return to one of our funnest builds, our Compression Obsession engine. This is a 360 cubic inch small block Chevy that turned into a bit of a dyno mule. A dyno mule's an engine that doesn't really have a home or a specific application but is a great test bed for us to try out new parts combinations, engine theories, or any crazy ideas that we can think of. This one has a pretty unique history, and if you're not familiar with it or you want a quick refresher here's a look at the evolution of this power plant. The first time we worked on this engine we wanted to recreate the backyard build experience that many people have at their home. We found a well used and worn out engine. Then took it, some extra parts, and some simple hand tools outdoors. We gave the engine new seals and valve springs designed for a sportier hydraulic roller cam and refreshed the cylinder bores with a 320-grit ball hone. We checked the main bearing clearances using Plasti-Gauge and installed a ten thousandths under crankshaft kit. We kept the existing pistons but replaced the worn out rings. After finishing the top end the engine fired right up in our parking lot. [ engine starting and idling ]

(Frankie)>> Back in the dyno cell the small block made 276 horsepower and 345 pound feet of torque. [ Music ] We really enjoyed this build. So, after a few months we decided to bring it back to demonstrate the relationship between static and dynamic compression ratio. Since almost everything but the crankshaft would be replaced the engine was torn down. We used our Sunnen SV-15 to hone it to 4.060 and two-ten thousandths. We started with our rebalanced stock crankshaft. This build would increase the static compression ratio to 13.15 to one, and the dynamic compression ratio to 9.17 to one. Dynamic compression ratio is the actual compression ratio inside the cylinder after the intake valve closes. We used a Trick Flow Track Max cam shaft to keep it in a manageable range. We chose Icon forged pistons with a 13cc effective dome mounted on Scat I-beam rods. They received Total Seal rings with a gas ported top ring. Comp hydraulic roller lifters were dropped in, followed by Trick Flow's Super-23 degree fast as cast 195cc cylinder heads. 7-400 long Comp push rods and Trick Flow 1.5 ratio roller rockers completed the valvetrain. Next came a Trick Flow dual plane Street Burner manifold. Once the engine rolled into the dyno it received FiTech's Go-EFI classic black system rated for up to 550 horsepower. This power plant cranked out 413 horsepower and 424-pound feet of torque running on pump gas. Then we gave it 118 octane oxygenated race fuel, adjusted the timing, and swapped in a bigger Trick Flow Track Max cam shaft, which was degreed to maintain a similar dynamic compression ratio. The work paid off increasing our small block's numbers to 480 horsepower and 474-pound feet of torque. This engine ran really great on the dyno, and because we were using race gas we could really optimize the timing and the fuel. Normally in a conservative pump gas tune-up the top of the piston will have a nice, thin layer of black carbon, but because we weren't worried about the fuel's octane or its quality we could really get after the tune-up, and that's pretty evident by the top of the pistons cause there's not a lot of unburnt fuel left over. Clearly the induction package is missing from this engine, and we actually robbed it for another project because it was a great combination, but that gives us an awesome opportunity to try something that you guys actually requested. Today this engine is gonna get a high flowing induction system, a solid roller valvetrain, and we're gonna run it on a fuel that we haven't actually messed with in a while, E-85. All that should add up to a high compression, high r-p-m bullet in the dyno, but before we can do any of that we do have to tear it down just a bit more. As always, we'll check the oil for any debris or metal. Since this engine only has several hours of dyno time we expected it to be clean and it is. Since we're swapping the cam shaft, we'll tear down the front of the engine. We'll be reusing all of these parts. So, we'll be gentle and keep everything in order. To take off the front cover we don't need to remove the oil pan, but we'll drop it enough to easily slide off the timing cover. [ Music ] This cam shaft doesn't have many hours on it. So, we'll save it for a future project. [ Music ] Up next, after an induction swap and an E-85 conversion we'll see if the Chevy puts out the ponies in the dyno cell.

(Frankie)>> That's about as far as we're gonna tear down our small block Chevy. We're still gonna be using the same rotating assembly. So, the cast crank, the I-beam rods, and the forged pistons that we were using before to keep our compression ratio up. We mentioned that we're gonna switch it over to a solid roller valvetrain, and that's all gonna start with this cam here. This was a custom grind that we've had on the shelf from a previous project, but it's also gonna work great in this application. It has more duration and more lift than the one we just pulled out. Durations at 50 thousandths lift are 252 degrees on the intake, 260 degrees on the exhaust, and they are set on a 110-degree lobe separation angle. Lift at the valve is 653 thousandths on the intake and 660 thousandths on the exhaust. This is really gonna compliment the higher r-p-m range and the higher flowing induction that we're gonna be using for this combination.

(Pat)>> Because this cam was originally designed for another build it has a 900 thousandths small base circle lobe, which will help with clearance on larger stroke engines. This isn't necessary for this application, but it doesn't hurt either. You can tell by the slight wear pattern on the cam shaft it's been used before, but it only has a few hours of dyno time. So, no big deal! Even though we're reusing the same timing set, since we changed the cam we'll re-degree it, setting the intake center line at 105.5 degrees. After applying orange thread locker, the ARP cam bolts are torqued to 25-pound feet. In order to check piston to valve clearance we'll temporarily install a set of lifters, a head gasket, and one cylinder head with checking springs.

(Frankie)>> Here's one of the benefits to being a pack rat. We managed to find a Jesel valvetrain setup from a previous project. Admittedly it's a bit extreme for this engine, but since we have it we might as well use it. Since this is an adjustable shaft system we'll follow Jesel's instructions and install the rocker with the adjusters at one turn out from their fully seated position. With a feeler gauge for our cold lash setting between the valve tip and the rocker tip we'll lengthen the adjustable push rod to take up any remaining lash.

(Pat)>> Some where in there.

(Frankie)>> Before removing and measuring our adjustable push rods we'll also use them to check piston to valve clearance. The exhaust has a minimum of 210 thousandths at 10 degrees before t-d-c on overlap, and the intake has a minimum of 122 thousandths at 10 degrees after t-d-c on overlap. This setup has plenty of room but it's something that should always be checked. Now with the rockers removed we'll take out the adjustable push rods and measure them. Eight inches, dead on the nose.

(Pat)>> Exactly what I have too.

(Frankie)>> After the lifters are thoroughly cleaned they are soaked in break-in oil for a couple of hours to properly lubricate the roller wheel. We found our lifters at Summit Racing Equipment. They are a set of Comp Cams' Endurex solid rollers for a late model three hundred thousandths taller lifter bore.

(Pat)>> We wanted to tighten up the quench area. So, we chose a 4.060 bore by 23 thousandths compressed thickness Cometic m-l-s head gasket. Combined with our AFR heads this gives us a measured static compression ratio of 13.36 to one. Speaking of cylinder heads, we picked up a set of AFR 220 Eliminators at Summit Racing Equipment. They have 220cc intake ports that are fully c-n-c'ed. They have a 2-100 intake valve and a 1-600 exhaust valve housed in a 65cc fully c-n-c'ed combustion chamber. They're torqued in three steps to 70-pound feet. It's important to use the supplied Jesel head bolts to clear their rocker stands. After spraying some Comp valvetrain assembly lube we'll slide the timing cover on, bolt it back in place, and refasten the oil pan. Then we'll reinstall the Summit Racing harmonic balancer. Because we're increasing the r-p-m range significantly we wanted extremely accurate ignition timing. For that we'll use this MSD seven-inch flying magnet crank trigger assembly. This kit was designed for a small block Chevy. So, it's super easy to install. The non-magnetic pickup is set to the specified gap of 50 thousandths.

(Frankie)>> To install the rocker stand we'll just run down the bolts loosely so we can put on a set of rockers to align the rocker tips to the valve stems. Once it's set we'll tighten the stand, remove the rockers, and torque the stand bolts to 65-pound feet. The bolts have sealer on them since some of them intrude into the intake port. The push rods receive assembly lube and are slid into place. They are three-eighths in diameter with an 80 thousandths wall thickness for extra rigidity and decreased deflection. [ Music ] The rockers are 1.5 to one ratio, and they are torqued to 26-pound feet. Cold lash is set to 10 thousandths on the intake and 14 thousandths on the exhaust. This LSM valve lash adjustment tool has a built-in torque wrench to make the job easier.

(Pat)>> After laying down our usual beads of silicone an Edelbrock Super Victor intake manifold from a previous project drops on. We'll leave the fasteners loose enough to adjust the alignment of the intake manifold to the cylinder heads' ports. Then the manifold is tightened down. After a generous coating of valvetrain assembly lube these Summit Racing valve covers slide on. The gear on the MSD crank trigger distributor receives the included break-in lube. Then it's installed and aligned with a number one cylinder's terminal. [ Music ] Coming up, we roll our small block Chevy into the dyno. Then fuel it up and fire it up.

(Frankie)>> One of the last things we need to do before we can run our engine is switch out the fuel to E-85. Because the level of ethanol in pump E-85 is very inconsistent we're using racing E-85 for our dyno testing. Because we need a lot and it's significantly cheaper than racing gasoline, we bought a full barrel at roughly $8.50 a gallon. [ Music ]

(Pat)>> For fuel metering we chose this QFT 850 c-f-m E-85 drag race carburetor that we got straight from Holley.

(Frankie)>> In a carbureted application it's relatively simple to switch from pump gasoline to E-85 because you can change out the carburetor or convert it, and the biggest reason most people switch to E-85 is its naturally higher octane level. Usually well over 100, while the best you can usually get at the pump for gas is 91 or 93 depending on where you live. This is gonna be a lot better in higher cylinder pressure applications to help keep the engine away from detonation. It does come with some negatives though. Namely E-85 takes up to 34 percent more fuel because it has a lower stoichiometric ratio than pump gas, which is usually 14.7 to one, while E-85 is around 9.7 to one. This means a lot more fuel has to enter the engine with the incoming air.

(Pat)>> To accommodate for all of that additional fuel flow we'll need we'll have to make some changes up top. This is the same thing structurally as a carburetor for gasoline but with some distinct differences. It is setup on the jets, air bleeds, and particularly the metering blocks to handle the additional fuel flow. This carburetor is set up to run right out of the box, but for our particular application it will probably require some additional tuning. Like in our previous dyno tests, we're running Hot Shot's Secret 10-W-30 Adrenaline R-3 racing oil. It contains FR-3 friction reducing additive designed for wear protection. That's great for this engine, especially because it will lead a hard life as a dyno mule.

(Frankie)>> Well we got our high compression, high r-p-m small block Chevy 360 on the dyno and we have the corn juice flowing through it. We've already gone ahead and burned the paint off the headers, but we haven't actually made any full bore hits. So, we're gonna have to see what this thing actually does. It should make a lot more power because we really upped the induction, but the short block is still the same and we still have relatively the same amount of compression. So, it'll be pretty interesting, right?

(Pat)>> Every time we do this we have to keep its guts run.

(Frankie)>> We're gonna start out relatively low and safe.

(Pat)>> We're gonna go 3,500 to 5,500 at 600 per second just to see where we are. [ engine revving ]

(Frankie)>> Not bad! You can see it's definitely trending up. 424 horsepower and 405-pound feet, and now that we've really stepped up the induction package and the valvetrain with the solid roller cam and stuff that whole r-p-m range where it makes power is gonna shift dramatically. So, we're really low right now.

(Pat)>> I'm gonna start the actual pulls at 4,000 because this is a dyno mule. It doesn't have an application other than it is a learning tool. This is like everything else that we do. We're here to learn. Now can we apply stuff from this engine to other things? Of course, but this is something where we wanted to see what E-85 does with better induction, a little bit better cam. The ticker on this baby is stock block, stock crank.

(Frankie)>> That's gonna be interesting once we start getting into the higher power levels. I don't know how that's gonna hold up, but it's gonna be interesting. [ engine revving ]

(Pat)>> Ooh, that's nice! It's still going up too! At 360 inches we're making 547 horse pressures and 469-pound feet of torque.

(Frankie)>> It's corn!

(Pat)>> What's the first thing we normally do? Jam some timing in it, right? It's a huge jump but we already kinda know what the short block is. Cam is slightly different profile but solid roller. Jump her right up to 35 degrees.

(Frankie)>> Sounds good!

(Pat)>> What do you feel about a stock crank at this kind of power level going 7,000? What's the worst that could happen?

(Frankie)>> It comes apart and we have to clean up the mess.

(Pat)>> Dyno mule! Sometimes you have to clean up after the mule.

(Frankie)>> That's the great part about a dyno mule is that we can do this stuff, and kinda push it to the limit, and see what happens.

(Pat)>> We're not gonna push it until it shows its guts. Not intentionally anyway. To 7,000 with more timing. [ engine revving ]

(Pat)>> 7,000, stock crank. We're not scared. 477-pound feet of torque, 567.

(Frankie)>> At 6,800.

(Pat)>> That's like threshold, right?

(Frankie)>> Right where we wanted it to be.

(Pat)>> We figured it was gonna make max power in or around 7,000. I'll take that. Oil pressure is still great.

(Frankie)>> One-five-seven per cube!

(Pat)>> One-five-seven per cube!

(Frankie)>> That's a huge improvement over what we had before cause even with the big cam and the race gas in it, it made 472 horsepower.

(Pat)>> So we're almost 100 up everywhere. I'm sure there's more in it. We're gonna look at some things on the tune-up side, some spacer stuff. Fuzzing on it, that's my favorite term.

(Frankie)>> Up next, we find the best spacer for our small block Chevy the old fashioned way, by process of elimination.

(Frankie)>> So we still have our 35 degrees of timing. Same tune-up in the carburetor but we added a one inch four-hole tapered spacer. We're gonna see what it does for power and see what she does. [ engine revving ]

(Pat)>> Alright, 571, 480, little bit of torque.

(Frankie)>> I'd call that a pick up.

(Pat)>> Not crazy!

(Frankie)>> It's a relatively easy change and you get a decent amount of power out of it. To see that everywhere, that's big.

(Pat)>> You never know how a spacer will perform until you try it. So, we tried several different designs and discovered that the two-inch tall four-hole tapered spacer works the best. We haven't touched the carburetor yet. The fuel was close enough out of the box. I think we're gonna tune on that when we get more time. But as far as the spacers and everything I think this one's gonna be the heat. [ engine revving ]

(Pat)>> Not bad, 576.6, 485-pound feet of torque.

(Frankie)>> Overlay that with what we started with before we did all this spacer swapping and all that stuff. That's cool cause you can see a solid gain everywhere, and all we did was take 20 minutes and try a couple different spacers real quick. Average that's gonna be up between five and ten over the whole pull. That's pretty cool. That's easy power right. It just takes a little bit of time.

(Pat)>> And now comparatively speaking to where we started with the other manifold, the other head, and all that stuff a bunch of changes. We've changed the operating range of the engine and all that stuff, but essentially at peak power we're up 100 horsepower, and we can put this thing back on gasoline if we wanted to.

(Frankie)>> It wouldn't be super hard to take some compression out, put it back on gas, but we do have an entire barrel of E-85. We might as well use some of it. There's a ton of opportunities for tech here, and there's all kinds of stuff that we could try, and honestly we're gonna run out of time.

(Pat)>> We run out of time every time. Wish we just dyno'ed the whole time but you have to have something to dyno. This is the big thing. Stock block with the stock crank.

(Frankie)>> Turning 7,000 and making one-six per cube. That's crazy!

(Pat)>> On our torque number we're one-three-five per cube. We are putting parts on and doing these things so people don't have to. If we're designing an engine to do specific things that's one thing but we are literally changing out parts to show how they affect the entire package. If this was built for a race car of some sanctioning body we'd build it different, but these are parts that are put together that gives a general cross section of a compression high performance engine. I think we did a good job at showing some really cool things and it's just gonna get better. Great success!

(Frankie)>> To see more cool engine builds and dyno tech go check out Powernation!
Show Full Transcript