More '66 Chevy C-10 Episodes

More One-Half A C-10 Episodes

Trucks! Builds

Parts Used In This Episode

Borgeson
Steering u-joints
Dupli-Color
Aerosol prep spray and semi-gloss black.
Edelbrock
600 CFM Electric choke Performer series carb
Edelbrock
Classic series aluminum finned polished valve covers.
Edelbrock
Performer EPS intake manifold with oil fill tube.
ididit Inc.
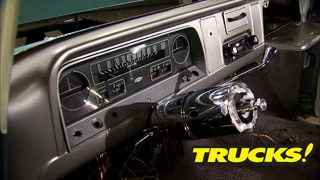
1967-1972 Chevy Truck Chrome Tilt Floor Shift Column Deluxe Kit for original harness
Made For You Products
Heater-A/C T-Clamps.
Spectre Performance
Chrome steel double groove LWP upper and lower pulleys and GM press fit power steering pulley.
XS Power
12V AGM Power Cell and billet hold-down.
[none]
Maxfilm is a multipurpose, synthetic lubricant that excels in many applications. It deeply penetrates, cleans and loosens rusted parts.
LMC Truck
Complete replacement wiring harness for 60-66 Chevy PU, non A/C.
LMC Truck
Stock replacement radiator and radiator support mount.
LMC Truck
Vinyl bench seat reupholstery kit complete with hog rings and hog ring pliers.
Monster Transmission and Performance
Ford NP271 Fully upgraded remanufactured transfer cases and adapters to fit Chevy,Dodge and Jeep drivelines.
Napa Auto Parts
Master Cylinder Fittings
O'Reilly Auto Parts
Accessory Belt
O'Reilly Auto Parts
3/16" Tubing 5 Ft.
O'Reilly Auto Parts
Electric Fan
O'Reilly Auto Parts
Gallon of antifreeze/engine coolant
O'Reilly Auto Parts
Master Cylinder Fittings
O'Reilly Auto Parts
5/16" Fuel Filter 1 Each
O'Reilly Auto Parts
Gallon of antifreeze/engine coolant.
O'Reilly Auto Parts
Power Steering Hoses
O'Reilly Auto Parts
Fuel Filler Hose, Lower Radiator Hose
O'Reilly Auto Parts
1156 Bulbs
O'Reilly Auto Parts
Lug Nuts (20)
O'Reilly Auto Parts
Heater Hose 4Ft., Water Neck, Thermostat
O'Reilly Auto Parts
Speedometer Cable
O'Reilly Auto Parts
Miscellaneous
O'Reilly Auto Parts
WIX Oil Filter
O'Reilly Auto Parts
Power Steering Gearbox
O'Reilly Auto Parts
16LB. Radiator Cap
O'Reilly Auto Parts
Coolant Hoses
O'Reilly Auto Parts
Steering Linkage
O'Reilly Auto Parts
Copper Tubing Kit

Video Transcript

Today, we're finishing up our 66 C 10 short bed conversion by adding a customized exhaust system and showing you how to make it shine. Then recovering your upholstery is actually easier than you think it is. It's all today here on trucks.

Hey, welcome to trucks. Well, we're finally coming down the home stretch on our 66 C 10 project.

Now we've been working on this thing for quite a while and I think both Kevin and I are equally anxious to get this thing finished up, get it out on the street and get some drive time. So today we're gonna throw an exhaust system on it. We're gonna recover our factory bench seat to match our now two tone interior and we'll deal with a couple of other issues as well.

Now, here in the truck shop, as a matter of fact, all of us here at the power block. Well, we use every waking moment to tie up loose ends and take care of some of the stuff that we just don't have time to show you on TV. The C 10 here. Well, it's no different. So we wanted to give you a little tour of some of the stuff that you haven't seen yet.

Now, we've been taking care of things like the heater hoses held down with the made for you clamps. The accessory drive system is all in place with some pretty good looking chrome stuff from Specter. Now, over here, the master cylinder is in place, but obviously the brake lines aren't completely plumbed.

Now, we're using Borgeson universal joints to connect her. I did its steering column to the 1972 Chevy steering box and along with the wiring harness, L MC truck hooked us up with the under hood plastic stuff that usually deteriorates time.

Now, this is not a lawn mower battery. As a matter of fact, this is something brand new from excess power. This is their compact sealed a GM battery. It could be mounted to any orientation and with 900 cranking amps, it's all the power we need for this truck. Now, we think the crown jewel of this whole truck is the vintage 283 that's still in there. Dressed up with the Edelbrock components like the enduro

carburetor intake manifold and especially the vintage Breathless valve covers. As a matter of fact, when Vic Edelbrock himself was in here, he said those valve covers are the ones his dad designed in the sixties. So we think it's pretty darn cool to have some automotive history right here on our truck.

Now, the exhaust system we're using behind our little 283 is a Magna flow system. We're pretty psyched that somebody even made a kit designed for our old 1966 Chevy. Now, this system's got an X pipe in it. It's 100% stainless steel mandrel Bent, threw out

and has a pair of magna flow mufflers to give us that deep mellow sound

and it's got all the brackets, hangers and clamps. We need to install this thing.

Now, our trucks pretty heavily modified as far as suspension goes. So we may have to make a few adjustments to get this system to work, but it's a great place to start

now when doing a typical exhaust system installed. Well, we usually start at the rear of the catalytic converter flange or at the header collector and work our way backward.

This time, we're starting with the tail pipes working our way forward

and with our fully polished mufflers hanging where we want them. Well, we can work on connecting them to the headers using the supplied X pipe.

All right. Now, before you snug your collectors down, you wanna clock them so that the flat spot is facing the ground, especially with the lower truck

now, because our C 10 suspension is pretty heavily modified and not so typical. We're having to do quite a bit of marking, cutting and fitting to get the system to look like we wanted it to,

but it's definitely worth it because the X pipe is gonna help us with both exhaust flow and sound

cool.

Still got clearance, get the tranny pan off. We might have a hater leak right here

now. So far the installation has gone pretty smoothly, but just like we anticipated, we've run into a few fitment issues. We don't exactly have a stock suspension system. So we went ahead and ordered up some 2.5 inch stainless steel straight tubing from Magna float to help finish the job. We'll just use the straight sections installed into the muffler

and connect it straight to the X pipe

that make it look good and flow just as well. We're gonna use some unused bands that we've got kicking around. We'll pie cut the middle of the band and insert it, make a nice smooth transition.

Now, this technique works perfectly here and it'll give the exhaust gasses a nice smooth transition or pathway even if you don't have access to a manual tubing bender.

Now, stainless steel exhaust systems are definitely gonna cost you a little bit more up front,

but there are advantages as well. One of them being the ability to ditch a standard type exhaust clamp in favor of just welding two pieces together, grinding it down and polishing it, making two pieces of tubing look like one

and it'll give it that high end custom look too.

Now, when you're welding stainless steel, it's ultra important that you have a perfect gap, especially when you're fusion welding like Ryan is here.

It's also mandatory that you clean and prep the substrate before welding. Here's a tip, get a dedicated brush and keep it specifically for your stainless. That way you won't contaminate it.

Now, fusion weld is just the process of melting the two pieces together and with stainless, it's very forgiving and very easy.

Brian's now adding filler rod to give us a little bit more of a filling property. very much the same as body filler on a sheet metal panel

and we're going to dress this down and finish it out in a minute.

Now, the scuffing pad creates a really nice brush look, but you can still see the welding joint. So we're going to show you how to take it up a notch, polish it to a mirror gloss. Here's how

we're starting out with 40 grid on a rotary grinder and this is just to establish our basic shape just like body work. You start with the coarse grids. First,

we'll follow that with 80 grit on a hand sanding board. This is to eliminate the scratches of the 40 grit as well as to put a linear scratch pattern into the substrate.

Next, we'll step up to 180 grid, but we're not using a pad this time. We're allowing the sandpaper to contour around the tubing to work our shape more

the red scuffing pad is pushed in the same direction and puts an even finer scratch into the stainless steel. Now, this is a process of working your way up through finer grits to eventually create something that can be polished.

Now, we're going to polish our sanded areas with the same two stage method we've showed you in the past coarse and fine, starting with priming the coarse compound onto the coarse wheel.

For the first stage, we're using a compound that's specifically formulated for polishing stainless steel. Now, this is important. The orientation of your workpiece needs to be about the four o'clock mark with the wheel rotating towards you. And if you've ever seen the movie, Tommy Boy, you know that a workpiece can get launched across the room, maybe even taken a finger with it. So be careful. Now, stage two is done with a white rouge compound on a softer wheel.

So you can see how this works. It takes what scratches are left and levels and polishes them to a beautiful mirror. Gloss. Stainless being the soft substrate that it is, is one of the easiest metals besides aluminum to polish into gloss.

All right, let's take a look at what we got

right here is our unpolished fusion weld as we rock it around a little bit. You can see where the fusion weld's been polished and uns sanded, rotate a little more. It's been sanded, polished and buffed. It looks really good.

However, take a look at this

look where the fill rod has leveled out the surface.

It looks outstanding.

Now, a small section like our test piece is easy to move around the buffing wheel. But if you've got your whole system welded together, you could throw it on a bench top and get to it with hand tools. Either way you're gonna have a substantial time and investment, but I'm sure you'll agree. The end justifies the means

up next. You finally get to use Hall Green pliers. Yeah, that's really what they're called.

And later we'll explain what a Felix test is and what it measures. Stay tuned.

Hey, welcome back to trucks. Well, out of all of the things that we have worked on on the interior of our 66 C 10, the seat is not one of them. And although from a distance, it might look like it's in pretty good shape. But if you look a little closer, it is filthy and the dirt is embedded into the grains of the vinyl to the point where it can't be cleaned.

So we're gonna do one of the easiest interior upgrade projects that you can possibly do on a budget. We're gonna just give it a face lift, change the seat cover

that's nice and clean.

Oh, nasty.

Look at all

the, oh

my goodness. Grab the Hazmat suit.

This actually looks to be in pretty good shape. Actually, this is in really good shape. The jute covering is still in nice condition and the seat foam still retains its shape. So all this thing really needs is a cover.

Now, after eliminating all the signs that our little friends were ever here,

we can start working on the exposed seat print, which starts with sanding it down and then prepping it with a dup color prep spray.

Once you wipe it down, make sure it's dry.

We're gonna apply a duplicate

semi gloss black to closely resemble the factory finish.

Now, this is the cover we're gonna be using to cover up and freshen up our factory bench seat.

Now, typically we'd reach for the solid gray cover. But we noticed in the L MC catalog they had this two tone gray and white cover, we thought it might look pretty good, so we'll check it out and see how it looks.

Now, we've had this thing sitting out in the sun a little while to make it a little bit easier to work with, but you can get the same effects by using a hair dryer or a heat gun.

Just don't get carried away.

Now, just like the factory did, we're going to hold our seat back cover in place using hog rings and hog ring pliers which have a groove cut into them. So it'll hold on to the hog ring and won't let it slip out of place while you're crimping into the seat frame.

Once you have one done,

you get to repeat the process about 11 billion times

shoot that laid out pretty good. That's it.

That's gonna look good in there. No.

Now the seat bottom, it's gonna be a little bit different than the seat back. We're gonna ditch the hog rings and the hollering pliers because the original seat cover and the replacement seat cover both get held on by clips. Just get pushed on by a screwdriver. It's gonna make the job a little bit easier

in pretty good shape.

Start by attaching the seat bottom cover in just a few spots. We

don't finish the job just yet.

All right, cool. Now, before you get carried away and put all your clips on the seat bottom and lock it into place. Make sure the stitching lines up that way end up with a nice professional look

again. Coast.

Hey, welcome back to trucks.

Well, I think it's safe to say by now that we and the rest of the automotive world have proved the superiority of synthetic lubricants over conventional. As a matter of fact, the guys over at horsepower have shown us that on their chassis, dyno,

you can actually free up more horsepower just by switching to synthetic lubricants.

Now, way back in the 19 thirties, engineers developed a test to determine a lubricant's film strength and at which point it fails, it's called a Felix test. And today Royal Purple wants to use that test to prove something to us.

So today Patrick Burris is here to show us some of the differences between conventional spray lubricants and synthetic spray lubricant. Patrick. Tell us a little bit about what we're using to compare these products. This is a

PEX test machine. It uses a quarter horsepower electric motor, the motor rotates the shaft. We have an amp meter that measures amp draw

and we have an arm to apply our weights which will apply pressure to a stationary bearing.

Now, Patrick, here's a lifelong gear head just like we are. He's been in motor sports his whole life and if his face looks familiar, you've probably seen him before on television. Now, you've done this test thousands of times. Walk us through this. What are we doing?

We're gonna take samples of our aerosol lubricants. We're gonna place them in this cup

so we can lubricate them on the rotating bearing and apply pressure to the stationary bearing to see how well they perform under a load.

Now, we wanted to keep this test about synthetic versus conventional. So we covered up the labels on all the conventional spray loop cans. Each two pound weight that's added to the lever arm adds 75 pounds of force to the bearing.

And even with the bearing spinning in the conventional lube oil bath,

that force is all it takes to bring that motor to a screeching halt.

The amp meter shows how hard the motor has to work to keep the bearing spinning

and it's pretty easy to tell when the lubricant fails.

Now, with each new test a brand new stationary bearing is used

and so far, it's only taken three weeks to find the film strength failure point of the conventional spray loops.

After four conventional lubricant tests, Patrick cleans and fills the machine with max film synthetic spray lube.

Now, just like the other tests after the third weight is applied, the amp draw increases a bit. But following that, the amp draw is reduced and the bearing continues to rotate.

And to really prove the point, Patrick completely removes the oil bath and lets it run dry.

He even adds two more weight.

Now, that is impressive.

So tell me in terms that I can understand what the difference is.

Max film leaves a dry film lubricant behind.

That's why the machine continued to run even though we had taken the oil away from the bearing surface. So even when the oil is gone, the dry film lubricant stays on the contact area. That is correct. Well, there you go. One more good reason to choose a synthetic lubricant over conventional.

How long will the ski don't?

How long do you want it to run?

You wanna go have lunch?

Yeah, the thing go.

Hey, guys, welcome back to the shop. Now, one of the last big pieces we've got to install on our 66 here is a radiator. Now, even with today's modern efficient engines, about one third of the energy produced is wasted heat, energy heat, your radiators gotta get rid of the more fuel you burn, the more horsepower you make

more heat the engine produces and the bigger the radiator you're going to need to keep it running cool.

And even though we made a pretty good improvement over the stock engine's horsepower rating with a 280 plus horse

dyno Pole, while we're still within a safe range to go with a stock type radiator. Plus we're going to save a few bucks over the more costly aluminum version.

Now, when filling your cooling system, keep in mind that where you live, or more importantly, the climate you live in is going to dictate the percentage of antifreeze in water. And actually 100% water is the most efficient way to enable heat transfer.

But adding the antifreeze does a couple of things. First, it'll prevent any corrosion from occurring on all the metal surfaces and it'll keep your block from splitting in half on extremely cold nights.

Now, as far as fans go, well, we had thoughts about keeping the stock mechanical fan

but it doesn't have a clutch on it, which means it's going to be spinning as fast as the engine spins no matter what, even in 20 degree weather,

which would definitely keep the engine cool. But it would also put off that annoying worrying sound cruising down the road. Not to

the fact it's going to cost us 10 to 15 horsepower to spin the fan. I don't know about you, but I'm not trading horsepower in favor of some irritating noise. So we're going to be going with an electric fan, something we can control in the cab with a temperature switch installed in the cylinder head that will activate the electric fan at a predetermined end of temperature.

Now, you've seen us use and talk about monster transmissions before. Well, their product line also offers transfer cases. Now, these transfer cases are completely remanufactured and thoroughly tested. They feature new bearings, seals, fork pads, even a heavy duty Morse chain and they're rated up to 650 foot pounds.

And this heavy duty NP 271 will work with Chevy Dodge Ford and Jeep trucks with the help of an adapter.

And on top of all of that, they offer a 12 month unlimited mileage warranty. Monster transmission stands behind their products for more information. Go to monster transmission.com.

All right. Well, our two tone interior has really come together, especially with our painted door panels, our freshly covered bench seat

and our ultra snazzy white rim steering wheel. Now, if you got any questions about anything we use on today's show, go to power block tv.com. Thanks for watching trucks. See you next week.

It was pretty cool.
Show Full Transcript