More '66 Chevy C-10 Episodes

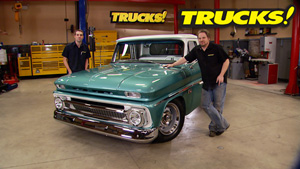
More One-Half A C-10 Episodes

Trucks! Builds

Parts Used In This Episode

Air-Ride Technologies
Front strong arm system, comes complete with upper and lower strong arms with cool ride system, cross shafts, bushings, air springs, shocks and mounting hardware, rear strong arm system, comes complete with tubular arms, frame C-notches, panhard bar and mounting bracket, upper crossmember, lower crossmember, air springs, shocks and mounting hardware.
Fulgham Machine And Tool
Complete kit with taps, drill bushing, tap wrench, fixture washers, and drill fixture.
O'Reilly Auto Parts
Front brake rotors, inner and outer wheel bearings and seals, caliper rebuild kit, dust caps.
Powder-X
Powder coating of Chevy C-10 frame.
Strip Masters of Nashville
Media blasting of Chevy C-10 frame.
Summit Racing
17X8 Silver rally wheel with trim rings and plain centers.
Tire Rack
275/60R17 Firestone Firehawk GTA.

Video Transcript

Today, we're transforming the frame of our shortened 1966 Chevy C 10 by first having it media blasted

and then powder coated. After that, we're back in the shop to put on an airbag suspension

so we can get it rolling in the weeds. That's all today here on trucks.

Hey, welcome to trucks. Well, today we're gonna take you guys to two really cool places while we have the frame of our 66 Chevy C 10 prepped and coated. And I'm here at Strip Masters in Nashville while I'm here at Powder X and we're gonna give you guys an inside look at both of these shops. And as soon as Kevin is done having the frame media blasted, he's gonna send it right here for us to have it powder coated for a great looking and durable finish.

Well, here's our C 10 frame and it's obvious that we've done a prior surgery right here. And if you remember there's been a total of 20 inches of length removed from it.

Our C 10 Project Daily Driver Truck started out life as a long bed version which was easy to find in better condition for less money, but we still wanted the short wheel base for its sportier looks. So we blew the truck apart

section 12 inches under the cat using a staggered Z cut for better welds

and a fish plate for added rigidity.

After lobbing off another eight inches off the back, we focused on the body, but instead of sectioning from the center like the frame, we took 12 inches at the leading edge and eight inches at the end of the outer panel

and they welded everything back up to make a factory looking short wheel base bed. There you go. So with the help of Ed Gale, president of Strip masters, we got the frame unloaded and into the media booth,

we had the chance to catch up with Ed and talk to him a little bit about the different approach that Strip Masters has for taking parts down to the bare steel.

We use three different methods. We use dry ice,

we use soda,

the regular baking soda, both of which are you can eat the soda.

And we also use plastic media which is recyclable and uh and,

and, and very environmentally friendly.

Ed's son Matt first grounds the frame and then starts blasting the surface with urea formaldehyde or plastic media which strips off the paint but doesn't disturb the basement.

The surface does not get roughened up or I guess they call it industry profiled.

We don't profile the surface, we leave it pretty much as it was originally. And whatever you see there is what happened before us. Last thing like this makes for a lot less work after you get your parts back, since strip masters carefully chooses which media works best.

Each of them has, has a unique requirement. And so unlike uh

the, the carpenter that's got just a hammer in his toolbox, we have several different tools and we can select the one we think is best for the application

and also showed us their soda blasting capabilities on this soda can. It's abrasive enough to remove the anodized label without getting into the soft aluminum base metal.

Now, they blasted their way literally through this frame in about an hour and their average turnaround time is surprisingly short.

Well, generally within a day or two.

Well, there it is, this frame is perfectly clean and now it's ready for powder. So let's get this thing over to Ryan.

Now, obviously, they did a great job media blasting this frame

after we get it unloaded, a quick steam cleaning and final inspection.

This thing ought to be ready for powder.

What the steam does is remove any grease or oily contamination from the surface,

but it's not just hot water powder. X uses an iron phosphate solution that acts as a conversion coating, transforming any surface rust into something that can be powder coating.

We talked with Joey Golliver, the operations manager here who gave us a little history on powder X Joey also shared with us the importance of proper surface prep prep wart with powder coating is tenfold more important than it is with liquid.

The heat does not forgive for any contaminants that are on it.

After the frame was blown dry,

we moved it into the application booth for powder.

The first step in powder coat application is always proper grounding of the part. Since an electrostatic connection is what makes powder transfer possible. The coating will be a total of about three mils thick and will take on a velvety appearance. Now, we've got powder X equipment at our shop, but this frame is just too large for our oven,

but that's not an issue at Powder X's facility.

The biggest object we can handle here is up to about 8 ft wide, 8 ft tall and 25 ft long.

Um And we have systems throughout the United States that we put in that can do parts up to maybe 80 ft

powder technology is growing about as fast as the rest of the coatings industry. And today almost anything can be coded.

The weirdest thing we actually powder coated was a steer skull

that one of our students brought from Arkansas

actually coated horns and all after powder is applied, our frame gets rolled into the heated oven and brought up to 400 degrees over about 10 to 50

minutes, cure it for probably about 20 minutes. Metal temperature which is very important. Most people forget that it's metal temp.

You actually have to get the metal to temperature. So this will probably take about 40 45 minutes cure time

in order to get it up because we do not wanna under CRE the powders

after heating and curing the frame is carefully rolled out of the booth and allowed to cool.

Well, there you go. This thing's just about ready to load onto the trailer once it's cool enough to touch. That is, and that's the neat thing about powder coating. You don't have to wait for days for everything to cure once it's cool enough to handle, you're ready to go. Nothing else to wait for. I'll get this thing loaded up. See you guys back at the shop.

When we come back, we'll start our install by bagging the front half of our newly prepped chassis. Stay tuned.

Hey, welcome back to the shop. If you're just joining us, we had the frame of our 66 Chevy C 10 media blasted and then powder coated in this great looking semi gloss finish,

that'll be chip resistant and it'll stay looking this good for years and years.

Now, if you're wondering what it's gonna take to get your frame done like this. Well, between the media blast

in the powder coat or you could have about 5 to 600 bucks wrapped up in it. Now, powder is not the only way to go. You can have your frame media blasted and then come back with a paint system, but

even the most expensive urethane paint system is still not gonna match the durability of powder.

Obviously, this is the old suspension, we ripped off the frame before we had it blasted.

It's time to start putting the chassis back together to create a foundation for the rest of the truck.

We're sticking with the retro style theme throughout this entire project with some modern technology thrown in the mix. Something you car guys know is resto mod.

So we're going with the suspension system that will give us the ride height we want, we handle well and won't beat us up as we cruise down the road.

So we looked around to see what would work for us with the goals we set and we found this strong arm system from air ride technologies that completely replaces the oe set up comes with new upper and lower control arms, air bags,

2.5 inch drop spindles, a front sway bar with solid end links that replaces the less than ideal factory setup and front shocks that are adjustable for both rebound and compression. So you can dial in the ride. You're after

now for you guys that don't want to go with air, you can still upgrade to a little bit more modern setup and we picked up this front clip out of a 72 C 10 from a junk yard along with our 12 volt rear end

and most of this is a direct swap with very little modification.

It'll give you a disc brake set up complete with power steering. But one of the best upgrades is going from the old six lug to the much more common five lug pattern. It'll give us an almost unlimited choice when it comes to picking out a set of custom wheels.

The back half of the system features these beefy two inch dom trailing arms with an adjusted rear axle pin angle to allow for a lowered ride height. The system comes with air springs, adjustable shocks, front and rear cross members and pan art bar and this bill of aluminum pan

bar bracket that bolts to the axle housing.

We also have sea notches that are gonna allow us another couple inches of drop from stock. This system is well engineered bolts right in. So right now, we're gonna focus on building up that front end.

Now, since our frame is pretty much stripped down, this install will be easy, but we still need to remove the stock shock tats

using the new shock mounts. That air ride provides as a template

mark and drill the four holes into the frame rails, then bolt them in

the upper bag mount gets bolted into the existing cross member

again using it as its own template for bolt locations.

Now, you need to drill a hole here with a 9 32nd bit to route your airline later

next, you mount the air spring to the mounting plate before bolting the plate in

for

the lower arms get mounted using the factory U bolts that we cleaned up and painted black.

Now, you're going to want to install the shocks before the upper arms and spindles and then connect them to the lower arms.

This will make it easier to put the knuckle assemblies where they belong.

Now is the time to bolt. The lower a arm to the air spring using the provided hardware,

the upper arms bolt into place right where the factory arms used to sit.

Now, if your truck had a decent alignment before you tore it down, you can reinstall the factory alignment shins to get you in the ballpark, but we're starting completely fresh. So we'll align everything later on

the drop spindles get set onto the ball joints and the castle nuts are loosely installed,

get used to grinding factory rivets with this system.

And here's a good way to remove them,

cut grooves into the round head,

then hit it with an air hammer and chisel bit. They come out like butter.

The strap of the sway bar uses the hole for the factory rivet. We just removed as a locator

and the other hole gets drilled out just like the rest with a 18 inch pilot hole followed by a 38 inch drill bit

and then the new sway bar gets mounted using new Urethane, pushing

finally the solid end links connect the lower arms to the sway bar and that just about wraps up the front part of the strong arm system

up next, we'll finish the back half of our chassis and then later it's a wheel and tire upgrade, but with a classic look.

Hey, welcome back to trucks. Well, sometimes you gotta take a step back in order to make some progress. So we're cleaning up the frame of our 66 Chevy C 10 pickup, getting rid of some cross members and mounts in order to make room for a new suspension system out back,

we're using air ride technology, strong arms

system, front and rear up front. We've got everything but the brakes installed. But the good news here is that these 2.5 inch drop spindles except all the stock hardware. So we can roll with the brakes, tire rods and power steering box off our junkyard 72 front frame clip.

Now, we've had to drill out about 30 of the factory rivets and we've also drilled out the corners of our sea notch relief. Once we've got this cut out the sea notch,

just saddles the rail and it'll bolt right in

using a four inch cut off wheel, makes easy work of notching the frame

and the pilot holes in the corners, not only look better but make the frame a tad stronger since there's no sharp corner that could potentially crack under chassis flex

with the frame notched.

The strong arm c notches get nudged into place with a soft faced hammer.

All the new mounting bolts are provided in the kit and get finger tightened before anything is tightened up for good.

You're not done drilling yet.

The airline relief is cut using a half inch hole saw drilled into the bottom plate of the sea notch, which also serves as the lower bag mount

before we had our frame blasted. We went ahead and removed the factory center cross member. Since we knew this one came with the kit,

the upper shock mount tube gets placed between the sea notches

and the new round tube trailing arms gets bolted into the cross member.

Now, we can set a 12 volt five lug rear axle out of the trailing arm mounts

and bolted in using new grade eight U bolts.

Now we're using our crane since it's here, but a floor jack will lift the rear axle up into the sea notch so the bags can be bolted in.

First, you can mount your shocks in place, followed by the pan

ar bar mount on the back of the axle housing

in the

pard bar.

And finally the rear air springs get mounted between the lower arms and the sea.

Notes,

that looks great

after the break. We'll let the air out of the bag or bags stick around.

Hey, welcome back to trucks. Well, the chassis of our 66 C 10 is looking great with fresh powder coat. And this strong arm suspension system we picked up from air ride technologies and know your eyes are not deceiving you. The last time you saw this rear axle, it was still in bare steel, fresh from the media blasters.

And the reason we didn't powder coat it at the same time as the frame is the 400 degrees that it takes to flow out. The powder would have melted the seals and heated up the oil and cause contamination that would fall back into the powder, ruining the powder job. So we just brushed on a coat of por 15 that we also picked up at strip masters.

Now, we told you before that the drop spindles from air ride will accept all the stock brake hardware.

So we picked up a new set of five on five lug rotors that our local o'reilly's had in stock along with a fresh set of bearings and some new seals and that gets us ready for new wheels and tires.

Now, we talked about the direction we want to take this truck, classic styling with a modern twist. And after looking around for the right set of wheels, we decided on these made by wheel antiques that we picked up through summit racing.

They're 17 by eight inch painted steel rallies

with a 4.5 inch back spacing.

The tires are from Ty

rack and they're 2 65 55 17,

we've got a great looking tread pattern, black wall styling and a tall enough side wall. That'll give us a great balance in between ride and handling.

This is one good looking role in chassis, but we can't show you the complete system because the compressor tanks, valves and controller will all come later on in this project. But what we can show you is this 72 C 10 that has the exact same strong arm set up.

The controller is easy to read and easier to use. They've got theirs mounted right here on a bracket below the heater controls. It gives you independent control over all four corners, several different presets if you want a cruising hide or a laid out hide for shows. But the best thing about this system is how much drop it gives you for a bolt in system with a mild sea notch

and those tires and wheels tuck right up in there.

I can't wait to see our truck like this. This thing looks sweet

if you've turned wrenches long enough or worked on vehicles old enough. Well, chances are you've run across a couple of broken bolts from time to time. There's a couple of different ways to deal with that left hand drills, ease out kits, but there's no guarantees that you're not gonna mess up the original threads trying to get that bolt out.

Well, broken bolt.com has come up with this patented fixture that guarantees you a straight shot right to the center of the bolt and the ability to remove any broken bolt quickly without damaging threads.

And even though they provide a tap with the kit, about 75% of the time, all you gotta do to clean the threads out is blow them out with compressed air.

This is the commercial kit similar to the ones used by the US military and comes with a great instruction manual and standard and metric sizes ranging from quarter inch to 7, 16

and six millimeter to 10 millimeter, both coarse and fine threads.

These sets are 100% American made and you can pick one up from broken bolt.com for about 650 bucks. So a failure is not an option. Take a cue from our boys overseas and check one of these systems out.

Now, you probably noticed we didn't install brake calibers when we threw rotors on the front end of our C 10. That's because we wanted to show you how to rebuild one.

Now GM calibers, they're readily available, new or remand. But if you drive a truck, that's not so common. A rebuild might be your only option. So if you've got 15 minutes and a few dollars for a kit, well, rebuilding your calipers might be easier than you think.

Use a little compressed air to release the piston,

wipe the piston and the inside of the caliber to get rid of any excess fluid.

You also want to clean out any debris or dirt. If you see it,

using a scuffing pad, clean the piston

and the piston bore.

A rebuild kit comes from o'reilly auto parts and includes a new O ring that gets dropped in

and lubed with a little fresh brake fluid.

Now, using AC clamp, you can press the piston back in the board

and finally install the new dust booth with a dull flat screwdriver or a drift.

Well, that's about all there is to it. Now, all this thing needs is some paint. Thanks for watching trucks. See you guys next week.
Show Full Transcript