MuscleCar Builds

Parts Used In This Episode

Advanced Plating
Brushed Nickel Fnishing on Chrome Pieces
ARP
Head Bolts
Chase Bays
LS-Coil Pack Harness
Driven Racing Oil
Break-In Oil
Dupli-Color
Ceramic engine paint
Edelbrock
E-Street EFI and Aluminum Intake
Holley
Oil Pan
Summit Racing
LS 408" ATK short block and rotating assembly
Trick Flow Specialties
Top End Kit (Aluminum Heads, Camshaft, Steam Lines)
Video Transcript

Today on muscle car search and restore edition, we set the gears in motion and get busy building a gine beauty that's destined to land in one lucky viewer's garage. First step, tear it down, second step, building a power plant worthy of the power block.

We know you guys love V8 American performance but often time that big old price tag that comes along with your popular muscle cars. Sometimes a person has to think outside of the box, there are some great and more affordable choices out there from the sixties and seventies that aren't quite yet as popular.

Today, we're kicking off a special search and restore edition of muscle car, transforming his plain Jane 70 Monte Carlo into a ground pounding G machine of 500 horsepower

and everybody from the power block team and I mean all four shops are coming to help make this thing over from stem to stern. Now, our game plan at the end is gonna be to make this thing run better, drive harder and stop faster

once we're done transforming this thing with trick suspension and brakes and engine transplant and new paint. One of you lucky viewers are gonna get to own this thing by entering our G machine giveaway before we start tearing this thing down. Here's a little more info for you about these cars.

Chevy debuted the 70 Monte Carlo in September of 1969 as a personal two door luxury coup.

Styling imitated the Cadillac Eldorado

though much of the body and structure were shared with Chevelle.

It had the longest hood of any Chevy but was well proportioned for a 205 inch length. A body

weight was just under 3500 pounds

for power. A 250 horse 350 was standard

and it incorporated G M's first cross flow cooling system.

While the base digger was about 3500 bucks, you could spend up to 5000 with all the options

like the SS 454 package with it. You got a 360 horsepower 454 big block

turbo hydrotic trend and heavy duty suspension.

Awesome for the time. But wait till you see what we have in store for our G machine.

Anyway, in the Monte Carlo's debut year, 1970 dealers sold 100 30,657 models beating Ford's Thunderbird by a mile.

In addition to new looks and lots of power,

the engine was set back on the chassis making the new Monte Carlo one of the best driving machines of the time

and an immediate success when it joined NASCAR in 1971.

However, NASCAR soon forced Chevy to move the engines forward in race cars,

whether in race or cruise mode. The Monte Carlo proved to be a GM favorite

with a 37 year production run

of the six total design generations. There's none like the original

a muscle car late Bloomer. That's perfect for a modern day resto ride.

This is what they were talking about when they referred to the engine being set back. The number one spark plug is actually so far back that it lines up with the front spindle

with the G machine theme. Keeping the engine in that rear road location is gonna be a big benefit to us. It's gonna give us that same front to rear weight by us that these cars were so popular for

and with a 500 horsepower modern V8 going into this Monte Carlo, it's gonna be a great ingredient for the recipe. That's right. When in doubt, rip it out, start over with the new Ls. That's exactly what we're doing going with an eight

K, 6 L short block from Summit racing.com. Now, factory one of these is set up with a caste

crank shaft powder, metal rods and Hyper Eutectic coated skirt pistons with a metric ring pack. They're gonna help us make big power.

The major top end components came to us from trick flow. Now, the cam shaft has 595 lift on the intake and the exhaust and it has 100 and 12 degree lobe separation.

Now, the cylinder heads are their 225 LS heads that are CNC machine and have a 64 CC combustion chamber. Now mixed with the piston in that short block, that's gonna give us a 10 to 1 compression ratio.

So basically, no matter who wins this car or where it goes in the country, you're gonna be able to pull into the gas station and pump regular fuel and to top it all off, we're gonna run an Edelbrock LS one style carbureted intake manifold that actually comes with its own MS D box to run our coal packs on the motor.

Now, what we're gonna use to feed the whole thing is an Edelbrock self learning

ere set up. Now, this thing is actually literally designed from the ground up to be plug and play, which is gonna give us the fuel efficiency. We need to get over 500 horsepower. Now that combined with all the other parts we've got for this car is gonna make it one hell of a street machine as well as tear up the road course,

which is our goal. Take this big old heavy muscle car, make it start, stop and turn a whole lot better. The end result are Monte Carlo G machines.

Yeah. Well, John B dives into that. L si guess we can finish pulling the 350 out of this old Chevy. What do you think

it

sounds like a plan

coming up. We dive in head first and start turning the short block into a bona fide fire breather. First. Check out a cool trick that lets you paint your engine without any taping.

We're blazing through this Monte Carlo tear down

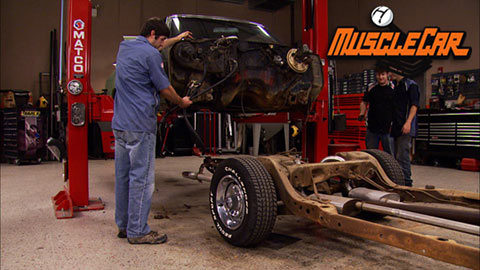
and we've already gotten far enough that the body can come off the chassis. I the only one pushing. Don't be mad. Don't be mad.

Yeah. Thanks a lot for the help. Mike.

Hey, guys, a few of us have been kind of busy separating the body from the chassis, not poking the bear. Nothing there, Mr John.

But then this guy, well, he starts looking for a few of these old pieces. I don't know exactly why he needs them because I would have figured he'd ordered some new ones,

but I guess he's got a trick up his sleeve

for each one of these pieces. I'm gonna go ahead and add in a couple of bolts and just snug them down and I'm gonna show you how these are gonna help us paint this engine.

Most of us guys nowadays are what we call balling on a budget.

So there's no need to put money into that high dollar tape, taking a few old tins that most people are just gonna throw away. I can show you how to get a professional paint job without spending a dime.

Now to cover up the deck. We'll just use a piece of cardboard. So we'll have to use a whole bunch of tape.

Then we'll just concentrate on this front area with bare steel. So it doesn't rust later.

And what we're using to coat this short block is VHTS high heat engine enamel. It's good for up to 550 degrees. Since we're not building this motor to be really serviceable. We want it to look good for a long time.

Well, we've pretty much got the car

just about stripped down where we need it while John's finishing up the engine,

I'm gonna take all this stuff over to advanced plating that way they can get started on it so we can stay on track

some roll. Purple max tough assembly lube is gonna go on our camshaft as it gets installed in the engine

while also using on the rocker arms, valve tips time and chain dampener

and a few other things that are gonna get pre led before this engine gets fired up

with this trick flow timing set up. We use our dampener adapter plate

and then the dampener bracket

which gets torn down to 20 ft pounds.

Now, what we need to do next is go ahead and get our timing set together. But what I wanna go over real quick is what kind of set up we're gonna be running

instead of a single row time and set like what comes from the factory, we're gonna be running a double row. Now, trick flow offers this and it comes with a set of spacers for your old pump. The problem is it's gonna be a pretty tight fit between the pump and the time and Shane cover housing. So we're gonna get it mocked up, find out a little bit of area that we're gonna have to relieve, to get it to fit.

We're pairing up a pretty decent size cam with some heavy duty vow springs. So this double road timing chain is a good piece of insurance. What will help us avoid is change stretch and or breakage, which is a can of worms that nobody likes to deal with.

Now, the first thing we need to check is between our pump housing and the time and chain itself

like most pieces that are made to fit multiple applications.

There may be some slight modifications in order to make her fit.

Our clearance is pretty good from the time and chain to the back of the housing. So now all we gotta do is check from the housing to the cover.

Now it's gonna be pretty hard to get in here and see where we're gonna need the clearance for room. So all we're gonna do is take some machinist style,

spray it down

and when we put it on the motor, we'll shake it

and anywhere that's touching, we'll get rid of that di we'll know where to clearance

looks like we got pretty lucky. We only need to work on this area, this area a little bit right there.

Now, we don't wanna take too much out of the time and chain cover because it's only so thick. So I've got a couple spots here on the pump that was interfering with the spots on the time and chain cover. We'll take half out of the pump and we'll take the other half out of the cover

and don't forget to wash out the metal shavings when you're done,

stick around. And we'll show you a few reasons why putting together an Ls the same way as your old timey small block can be a big mistake. Then it's

dyno

time.

Hey guys. Well, we've advanced just a little bit. We went ahead and finished up the backside clearance and on the time and chain cover as well as what we needed to on the oil pump. Then we went ahead and exploded. It cleaned everything out, lock, tighted, everything went ahead and torqued it down.

I painted the time and chain cover, put the gasket on and loosely put it in place.

But we actually fully seated the bouncer because I want to show you guys something

now, an LS time and chain cover doesn't have dow pins like an old small block Chevy. So by installing the bouncer first, it actually gives us a place to register off of that way. We've got a small adjustment to get a flat pan rail and a leak free install.

Be sure to follow the proper torch sequence on these bolts.

And I always give the engine a good spin as well to make sure nothing's bound up.

Now, one of the problems that you run into whenever you're doing an LS swap into an old car is finding an oil pan to fit. Holly. Well, they fixed that problem for us. This full aluminum setup is perfect for what we're doing and it just simply bolts right on.

Now, these things are a direct bolt on, but there's something we need to go over real quick depending on what transmission you're gonna use. There's actually locating holes in the back of the old pan to help cinch it to the motor.

Now, if we get this thing off line, we can actually break the housing of the pan or the transmission. So we're gonna show you guys how to line it up.

So we just take a ruler or a straight edge and put it up against the machine service of the bell housing

and then line up the machine surface of the oil pan, then we can send it down and make sure we don't move it. Now on an LS, we can't put the heads on until we put the lifters in the block. So what I like to do is go ahead and soak it in some oil for only about five minutes. I'm not trying to get all the air out of the plungers, just make sure they're good and wet. And what we're gonna be running is Joe Gibbs break in oil. Now, it's got that zinc and phosphorus additive for that critical time during the initial break in.

Now, the life on this kind of break in oil is not that long. You either get to run it on one

dyno session or one night at the track. Then we gotta switch it out for the street oil. We'll be running. Now as for lifters, the LS is set up from the factory were rollers. Now, that's one of the most expensive kind of upgrades you can do on an engine because the lifters can actually cost anywhere from 350 to $500.

Now, the cool thing about this is Summit racing offers the lifters, guides and bolts to hold them together for under 100 and 50 bucks.

Now, I've got the heads on here and I'm working on getting them cinched down. But I wanna go over with you guys, the type of head bolt that one of these LSS come with from the factory.

It's what we call a torque to yield bolt, which simply means once you torque it, you can't use it again. And that's because all metals have some elastic properties, which means they can be compressed or more importantly stretched.

Now, when a typical bolt or stud is stretched,

it has a natural tendency to return to its original length.

Now, a torque to yield bolt is different in the fact that once it's been stretched to its maximum clamping force, it will not return to its original coal. Now, to make this thing just a little bit more serviceable, we are gonna upgrade to the A RP bolts. Now, there's gonna benefit us in two ways. One, we're gonna get a better load on our deck surface to our block and two, we're gonna get better clamping out of that bolt. Now, it's also gonna help us save some money if we ever got to take the head off because we can reuse them.

Still ahead. Our six leader gets to stretch out its legs to the tune of 6500 RPM.

Hey guys, we're back and we've advanced just a little bit more. If I go ahead and putting in our push rods and rocker arms and locking them down, then we've got our valve covers, coal packs and brackets mounted and our intake painted with some more VHT coating. Now, all we gotta do is get it locked down, swing it over to the dyno Cart and we're ready to see what kind of power this thing makes.

Ok.

Go down a little bit more.

All right now real quick. There's another thing I wanna go over with you guys. A lot of guys doing LS swaps are having issues getting their coal packs to talk to the ignition box, whether it's factory or aftermarket,

what most guys are having to do is go to the junk yard to get the wiring harness to talk to each other or they gotta go to the dealership and pay a lot of money for a harness that still just don't look that good.

So what Chase Bays offers now is a whole wiring harness to go from your factory connector

to your harnesses. And it's a lot cheaper. Looks a lot better. We're gonna use it.

Hook up is easy as pie on this thing.

You just need to connect a tax signal between the ECM and the ignition, a

12 volt switch

and power to your battery. The saddle rock system comes with a seven inch Android tablet that you simply use to plug in a few parameters like displacement

cam specs

and ignition type.

And once those are locked in, it puts in a base fuel map and learns on its own from there.

We'll start by doing some low RPM pools to let the system tune itself in

as well as seating the rings

while we're at it, we'll be looking for any issues like leaks too.

453 coming up on power

just as smooth

to

climbing. It's amazing to learn rate on these systems. How fast it actually samples, reads and hits that target for that air fuel and actually, you know, turns it into a fuel table usable graph. Now let's step it up 3000.

It's a 5500

step by step will increase the RPM on our pools

and this Chevy power plant will begin to show us what she's capable of.

Finally, we get in a real pool all the way up to 6500 RPM.

The torque numbers we hit ain't bad 465 ft pounds. Now, as for horsepower, well, we surpassed our goal. We were able to hit almost 518.

Well, all right guys, I definitely wanna say thank you. I'm sure whoever wins this thing is definitely gonna love 500 horsepower because that should move that money just fine.

I'd say so. Yeah.

If you've got any questions about what you've seen on the show today, head on over to Power Block tv.com.
Show Full Transcript