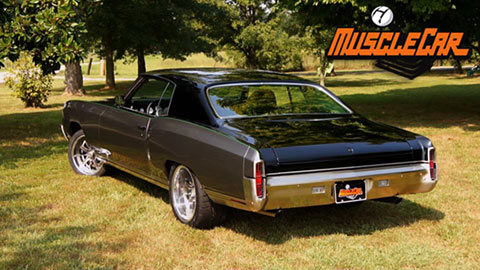
MuscleCar Builds

Parts Used In This Episode

[none]
Brushed Aluminum Serpentine drive system
Aeromotive Inc.
Stealth 340 In-Tank fuel pump
Dans Driveline
Aluminum Driveshaft
Original Parts Group
Weatherstrip, clips, trim, carpet
Summit Racing
Aluminum Retro-Fit Radiator
Summit Racing
Classic Thunder Road Instrument Panel with Phantom Gauges
Summit Racing
Derale Performance High Output Single Fan & Shroud Kit
Summit Racing
Sport Bucket Seats
The Industrial Depot
The Industrial Depot - Fasteners, Hardware, and Shop Supplies
TreadSource
Falken Azenis RT615K Tires
True Forged
Two-Piece Ravel Custom Aluminum Wheels

Video Transcript

Today on a special muscle car search and restore edition. It's the final countdown to our Monte Carlo giveaway G machines. Finishing touches on this car that will belong to one lucky viewer. We show you how an upholstery Pro does a custom headliner,

Kevin and Ryan from trucks lend a hand with the fuel and exhaust and the Monte gets to see the sun.

Our 1970 Monte Carlo started its big time makeover with a 500 horsepower LS stiffened frame, rebuilt rear and some powder coat to make the frame nice and shiny.

Then we plugged in some upgraded suspension components, tore off that gnarly old vinyl top and wheeled the body into the prep booth for some good old sanding

and she got a great looking two tone paint job which gave this old money a much more aggressive look.

Hey, guys, we're on our last run of working on the old Monte Carlo and before long, this thing's gonna be hitting the road

now while you guys were gone, we took care of a few things here on the car. Y'all check them out.

The front assembly components on this car are part of a kit from VIP S visual impact performance systems.

You'll find the AC compressor, power steering pump alternator and the pulleys that you need to run a serpentine system.

We opted for the brush finish, which looks great with this car, but they offer Polish components as well.

Now, for the brakes on our Monte Carlo, we decided to go with a set up from will wood. We've got a six piston caliper on the front And if you remember back on that conversion that we did to convert our rear to a full float, we went with a six piston caliper on it as well. There's something I want to show you guys, they offer a master cylinder that is compatible with a factory style brake booster. So not only this car gonna stop on a dime and give you nine cents back,

but it's gonna feel comfortable doing it.

Another little touch that we did for this car is we took the red calipers and painted on the same color green as our body stripe. Now we're leaving no stone unturned. So we knew we needed to do something with the interior on the Monte Carlo. So we gave Ace a call with Ace custom upholstery and rot shop. Ace has already taken our factory backseat and recovered them in this shamrock colored suede. He also did the same with the front seat,

but they aren't the stock seats.

We wanted to upgrade to a pair of summit racing sport buckets

which featured bolstering and better support for a performance application like this. Now, we've all seen that bad of poster work that sticks out like a sore thumb with all the wrinkles and folds and such in it.

That's why O Ace is here. He's gonna show us the proper way to make and install a headliner.

You start from the front windshield and measure

to the center bow to the first bow

And from this point to this point, you add about six inches from that point on. You're measuring from the center of each bow to the center of each bow.

It's just, for example, if this is 10 inches

measured from center of the bow to center bow, everything in upholstery is set up off of a half inch seam. So you have to add a half inch where you sew here

and a half inch where you sew here. So this 10 inches actually becomes an 11 inch wide piece of cloth, mark 11 inches and just continue transferring each panel at the proper distance from center bow to center bow, adding the inch to account for the half inch of sewing on each side of it. The other dimension that, that you gotta follow is what the total width of the car is and just like we added six inches to the front, you're gonna want to add about six inches to each side.

That way you have plenty of room to adjust and account for the curvatures of the bow. Accounting for the width of the straight part of the roof is pretty easy to deal with.

But the part where the bows curve down on the outside edge are another matter entirely. And this is where it hooks into the car on both sides, there was 10 inches on the curvature.

So we put our line at 10 inches.

One thing that makes the outside edges tricky is that they will ruffle up unless you take out material where the headliner will bend down.

This is the end of the flat section on our bow. From this point

to the outside of the radius, we have to remove a half inch of material and that's what creates the cup when we sew

and the same process gets repeated on the other side of every scene.

Almost everything in upholstery boils down to small details.

That little strip

of removed material is what creates

the curvature in the sides of the headliner.

The headliner panels is what you see, but what actually holds the headliner to the bows itself is a material called listing. What listing is, is just a thin piece of material folded in half.

And this is where the bow slides in through

and it attaches to the headliner panels, it's on the front of the seam where panel one and panel one goes the other that has to be on the front of the seam where panel two and panel two go together. If you get them on opposite sides, your uh headliner will have bumps that go opposite ways.

No one wants a bumpy headliner.

Anytime you're working with a cloth headliner, especially something fine like a suede. Whenever you come into it, you definitely wanna make sure you lock your stitch, locking the stitch is tying the threads together so they won't unravel

if you don't reverse the machine where the thread piles up,

it will come apart.

Now, they're getting towards the end.

You want to cut your listing at the same mark that you started out on the other side so that your, your center line stays balanced in the car,

any extra material that we don't have to have removing it now gets it out of the way we're in the car. It's just much easier to trim sitting at the machine.

So when this part glues down,

you can glue down flat without having

a big lump underneath of it.

Nobody likes a lumpy headliner.

And here we have a finished product sewn together and marked and ready to go in the car.

Most cars will have three mounting holes for where the headliner bows attach.

It's always a good idea to reach in and mark which hole it came out of.

If you put these in alternating holes, if your front one's in top and second one's below and now

you can make a dumpy headliner

and no one likes a Dumpy Headliner.

Ace is using the bows from the original headliner to hold up the new one.

It's a simple matter of cutting them out of the old one and then after some sanding, sliding them into the new,

then he can begin installing the bows one by one, including making a hole for the dome light.

The edges are held in place with some spray on adhesive and trim for a nice neat fit.

Lastly, a little glue on the edges, we'll keep it in place

and we've got one killer looking headliner

still ahead. Kevin from trucks shows you how to do a factory style fuel pump upgrade

and get a load of the awesome wheels that are going on the Chevy.

Hey guys. Now, if you're considering doing a late model fuel injection swap, there is one issue that you're gonna have to address and that is fuel supply.

Now, Kevin from the truck show, he's got a trick up his sleeve that he wants to let you guys in on. Now, regardless of the type of VF I system that you're swapping to. Whether it's a throttle body or a dedicated fuel injection system, you have to ditch the mechanical pump. It just doesn't keep up with the demands of a modern fuel injected engine.

The good news is there, there's a ton of aftermarket support for these types of swaps, especially the LS engines. You can go with a full on dedicated fuel cell that's internally baffled with the fuel system of your choice, either internal or external or you can do what we're doing. Use an original tank, save some money and install your own fuel system. We're gonna use this a

Moive system. This is their Phantom fuel pump kit. It'll support both returnless or return style systems with the different options that you've got with inlets and vents and it's universal in that it can be made to fit just about any fuel tank. It comes with a pump that's good for about 800 horsepower, naturally aspirated and up to 600 horsepower with some kind of a power adder or forced induction. So, needless to say it'll keep up with the demands of that naturally aspirated LS, even though it's pretty pumped up, the installation very straightforward.

Now, always with your fuel pump placement, you want it in the deepest and lowest part of the tank for this tank. It's right in here

as far as the pump assembly placement, while we got to take a look at the real estate here and here are where the tank straps go that hold it into the car. So being at the lowest part of the tank, we're sort of restricted and kind of pitch and hoed into right here. But it's good news because this is also the flatt part of the top of the tank. So

right here

it is

using the foam gasket that supports the pop assembly as a template will mark the hole.

Now, before I start drilling, I wanna show you a tip place a magnet down in right below where you're gonna drill. It may not pick up all of the shavings, but it's gonna create less clean up for you when you have to clean the tank out. Now, speaking of tanks,

this is a brand new tank. Fuel has never been in it. So there's not a chance of any fuel vapor being ignited. Be very aware if you're using an old tank to take the proper precautions and make sure that you don't blow yourself or your buddies up. So it's always best to just use a brand new tank. These are accessible and they're very affordable, probably less than 100 and 50 bucks. That's a good investment.

Cleaning out these shavings is a must. So make sure you take the time to do it

throwing sorry ninja.

This kit comes with a cool aluminum installation ring that acts as a drilling jig to help you locate the mounting holes for your unit.

A couple of machine screws held down with nuts on the back side will keep the ring in place so that we can go ahead and drill out the rest of the holes. Then our foam baffle gets trimmed down

so we'll measure the depth of the tank and then add an inch or so so that it will sit there nice and tight.

Right.

Coming up. Why choose either a 2.5 inch or three inch exhaust. We'll tell you.

Hey, welcome back. We got a foam trim down to the right height and there's a really easy way to

get the bath ho down in the tank, use the retaining ring that they give you with the kit

and just fold the foam as you feed it down into the tank.

All right. So we've trimmed down and assembled our fuel pump assembly so that it's in the right orientation and the pick up in the fuel pump is at the very bottom part of the tank.

All that's left now is to install the pump assembly itself, which is a simple matter of dropping it down into place and tightening the nut in an even pattern.

The best thing about using this Phantom system is that we could still use our oe fuel center, which is gonna give us an accurate reading on how much fuel is in the tank.

We're ready to install our transmission dipstick. And we decided to go with a unit from low car. They've came up with a pretty trick, little set up here a lot like what you see on an air hose. This thing's got a plug that's designed to be put in there to keep fluid from coming out, whether you're installing the transmission or if you're removing it.

And once this thing is installed into the transmission, the tube itself simply snaps right in also,

first thing you wanna do during the install is lubricate, this rubber grommet with some transmission fluid so that it to slide in a little easier

and then just push it in from the top,

then start the nut on it.

Our

old Monte Carlo is gonna be a car of its own and we decided to go with a custom set of wheels that we got from True Forge.

These are two piece wheels from the Ravel line with centers that are CNC out of a solid piece of billet aluminum.

They have a brush finish covered with a double tinted clear powder coat.

That means the clear powder is tinted with black, giving it a distinct look, which is different than what you would achieve with a typical tinted powder.

Essentially, it's like a candy finish in a powder coat form for tires. We went to treads source.com and picked out some Falcon a

Zeus Rt 615 Ks front and rear.

We opted for 2 75 30 fives in the front

and 295 forties on the tail.

Now, after 40 something years of abuse, there's gonna be a few things we have to change out like the tail light gaskets, weather stripping and then the fender wells. So we called up original parts group and had them send us a whole new set.

Oh, Tommy didn't see that

to add a little jewelry under the fenders. We'll zip these in with some a RP, stainless steel bolts,

all that's going on. Ace has been working on, finishing up the interior pieces. He's working up some great looking C panels and a speaker deck to go with the rest of the interior he made for us.

We're just about there.

A few more components along with some sweating and grunting and she'll be done.

Still ahead. It's time to take the old money out and stretch your legs a little.

This is it home stretch on our G machine, Monte Carlo build that one of you. Lucky guys are gonna get to take home.

We've got our aluminum radiator from Summit racing installed along with the derail shroud and fan kit that also came from Summit

next on deck. The exhaust

for starters, we're gonna use these oval magna flow mufflers that are made of stainless

with lap joint welds and a free flowing core. We've got a tough, good looking set of mufflers that's gonna give us a nice deep tone. The exhaust pipes are a Magna flow universal hot rod kit and it's gonna have all the stuff we need to let this car excel.

Well, all right, we're ready to move on to the exhaust. You guys know Ryan from over here at the truck studio, he's here to help us out. Let's get this knock. That one

sounds like a plan.

The Chevy's getting a 2.5 inch exhaust kick since we're in the 500 horsepower range.

That should be plenty. And with the muffler temporarily clamped in place, we can start building up the tubing to connect the muffler to the collector.

You may be tempted in some cases to opt for the three inch set up

while this can provide more flow. In the case of this car, that's unnecessary because even at high RPM s, we won't be pushing enough air to require that large of an exhaust.

Now, before building up the exhaust, we wanted to make sure the drive shaft was in place, so we didn't have any interference issues. Now, the drive shaft comes from Dan's drive line and it's a four inch aluminum drive shaft which ought to be plenty strong enough to put the power to the ground, but reduce rotating mass at the same time

with the exhaust tagged in place. We're almost to the finish line.

Just a few more little details.

Now, one of the last things we're gonna upgrade on our Monte Carlo is the gauge cluster and the gauges. Now, originally that old car had those idiot lights so it definitely could use something. So we decided to go to a set of these auto meter phantom gauges. That's gonna look trick inside this cluster as for the cluster itself. Well, it's a classic thunder road and all this set up came from summit racing.

Now, with this car out in the sunlight, you can see the job that advanced plating did on our chrome recoating it with brushed nickel gives this car a really aggressive look.

We've got a comfortable and functional interior to go along with it

and thanks to Ace custom upholstery and rod shop, it looks good too.

Not much left to do other than drop it.

This is by no means a race car, but we achieved our goal.

It's reliable and it runs turns and stops.

Great

mission accomplishment.
Show Full Transcript