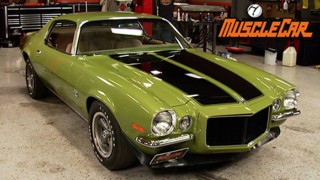
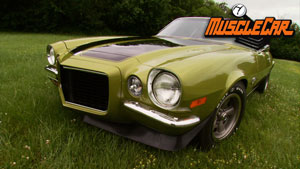
More '70 Chevy Camaro RS "Limelight" Episodes

MuscleCar Builds

Parts Used In This Episode

[none]
Max-Tuff Assembly Lube
ARP
Main Bolt Kit
ARP
Rod Bolt Kit
ARP
Ultra-Torque Assembly Lubricant
Comp Cams
Factory Muscle Solid Lifter Camshaft
Comp Cams
Magnum Double Roller Timing Set
Comp Cams
Magnum Pushrods
Comp Cams
Magnum Steel Roller Tip Rocker Arms
Comp Cams
Solid Lifters
Eagle Specialty Products
Forged 4340 Steel Crankshaft
Loctite
587 RTV Blue Silicone Gasket Maker
Powerhouse Products
Outside Micrometer: 2-3""
Summit Racing
Cast Iron Cylinder Heads
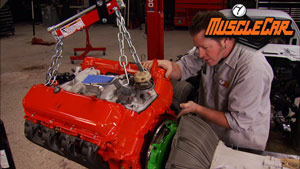
United Engine and Machine Company/Icon Pistons
ICON FHR Series Piston and Hastings Ring Kit
American Powertrain Systems
Brake Pedal and Clutch Pedal Kit with Mechanical Linkage
American Powertrain Systems
OE Spec 621 GM Bellhousing
American Powertrain Systems
Science Friction Billet Steel Flywheel
American Powertrain Systems
Science Friction Clutch Kit
Huntsville Engine and Performance
Machine Work on Block included Sleeve Cylinder Wall, Line Hone and Decking Block
Loctite
2760 Primerless Thread Locking Compound
Matco Tools
Magnetic Base with Dial Indicator

Video Transcript

Today on Muscle car project. Limelight's power plant comes together, learn how a block is sleeve and Tommy gives some assembly tips that apply to almost any engine. Plus Rick shows how to convert from an automatic to a four speed.

Hey guys, welcome to muscle car. This super clean second Gen Camaro that we call. Project Limelight is coming right along and quick. We've already straightened out a few dings and rust spots and laid down the first coat of primer. Then we got busy on the front suspension and rear end. We upgraded the big block style springs and sway bars and strapped in a 12 volt,

but we didn't do all that just to put in that puny little 307. This car came with,

we're going with the biggest baddest engine you could get in these cars. The 375 horse L 78

we picked up a 1972 GMC 402 because it's basically the same block you'd find in any Chevy badge as a 396 in the early seventies.

Unfortunately, our dream of finding a block as clean as our Camaro body fell apart when we tore the engine down.

We've got two giant cooling holes inside the cylinder wall.

Whoa, dude.

Yeah, we probably need to give the machine shop a call and see what they have to say.

And that's exactly what we did. The experts at Huntsville engine and performance gave the green light for sleeping and had some good info to share.

Well, I wanna thank you for helping us out with our 3 96 402, Bill, man. But when we tore this thing down, we weren't even sure if this block is repairable.

Well, in this instance, right here, it may look bad but it's not as bad as it seems this crack and this hole actually doesn't go all the way to the deck surface or to the main webbing so we can put a sleeve this at any time.

Does this type of repair devalue the block in any way?

Well, obviously it's a repair block, but in this circumstance where you guys are gonna be using this block, it beats, throw it in the garbage

and a lot of guys have to do this kind of stuff on something that's got personal meaning or a

collector's item or matching numbers.

That makes sense because otherwise it would just be a piece of scrap

boat anchor. That's right

before any metal is carved out. The boring machine is set within 1/1000 of an inch of what's needed for the sleeve to fit,

boring it out. Takes several passes, shaving a tiny amount of metal each time

any single part of the process can make or break your engine. So be sure to deal with somebody that's got a good track record.

The wall isn't bored all the way into the crank case. Instead, there's a little bit of a lip left for the sleeve to rest on

the sleeve itself fits very tightly. So it's gotta be sweet, talked into the hole with a little gentle persuasion.

Once the sleeve is seated, the top is taken down near the deck height.

We're done knocking metal out of the cylinder for now. So we're moving on to the line board machine. The idea behind this is to return the crane journals to the proper alignment which could have been thrown off during the installation of the sleeve.

We're also having our block deck to give in an even surface which ensures a good head gasket seal.

After a couple of passes, you can start to see the high and low spots,

a

couple more passes and there you go. No more holes,

man. That looks pretty good. What else do you like? You just need to cut your vibe release in it and bore

on the rest of the cylinders and

you can come get her? Well, I guess I'm gonna see you in a couple of weeks. Better work for you. That'll be wonderful. Appreciate it, man. Thank you. See you then. All right.

Well, our block is all done. The valve relief in the cylinder that's been sleeved has been ground out to match all the others. Most blocks don't require this relief, but the valve train design of a big block Chevy is kind of unusual and needed that extra clearance. Sweet, man. It looks like you're ready for some reassembly there. Huh?

Yeah, cool. Well, that's my cue to stay out of your way and go finish some prime in a block. And so if you need a hand,

yo. All right, dude, I'll do it

up next. How to get your bottom end in top shape. Plus Rick makes a fashion statement.

Hey, welcome back. There are hundreds of different block designs but when doing an assembly, most of the process is pretty much the same no matter what kind of engine you're building

today. When I'm putting together our 402, I'm gonna give some in depth info on a few steps that can apply to any engine.

If you decided not to have the machine shop, assemble the bottom end or if you're just planning a re ring and swapping out the bearings, you need to measure for main bearing clearance to do this. You need a micrometer and a dial board gauge.

First, I'm measuring the diameter of the journals using my micrometer from Powerhouse products

to get the correct measurement slide, the tool back and forth until it tightly fits across the journal.

Now, we're using a 2 to 3 inch micrometer. So we know we're at two inches, each one of these little marks equals 25,000. So that's 700

almost 50. So since we're one shy that's 2.749

repeat the process for all five journals with a quality crank, the number should be the same except for the rearmost journal, which will be slightly smaller to compensate for crank shaft thrust.

Next drop in the main bears and install the caps. I'm not using any lube yet because it's all gotta come back apart again. Once it's measured,

we're using a RP bolts throughout this build along with their ultra torque assembly loop, it prevents seizing and maintains a more consistent preload on your bolt.

I'm following the same torque sequence. I'll be using later for the actual installation

to calibrate my dial board gauge. I'll set it to the diameter of the first journal using the measurement I took earlier.

Then I can use my gauge to check the clearances, making a note of the variance of each one. Each engine has its own range of acceptable tolerances for bearing clearance. So make sure you research what your application calls for.

Well, our bearing clearance is checked out the fronts right about 24. The middle three is 2526 and the rear is at 29. Perfect for what we're doing. So I'm gonna go ahead and remove the main cap so I can install the crank shaft,

never assemble an engine with plain motor oil or you'll burn up the bearings royal purple max tough assembly lube is designed to break in an engine without damage. Once you've hit all the main bearings, don't forget about the thrust bearing surface.

Now, we can drop in our eagle crank, making sure not to damage the bearings by bumping them or sitting the crank in at an angle. The main captor next with plenty of lube. They gotta go on in the correct order, which should have been marked on this assembly.

I've offset the ceiling joint of the rear main to prevent leaks. A few dabs of lock tight silicone will provide some extra insurance

following the recommended torque sequence. I'll tighten the main boats down in three stages for proper Kan.

Now with the front four mains torque, the next step is to true the thrust bank, which is a pretty simple procedure.

All you've got to do is hold the crank in one direction,

drive it that way,

hold it in the opposite,

drive it back

and then torque the man up.

That's it.

One last tolerance I need to check is thrust clearance first, I'll zero out our Matco

magnetic dial gauge. Then check to make sure the forward to rear movement of the crank shaft is within spec.

Now, our thrust clearance checks out. But if yours is a little bit too tight, it's not that big of an issue. To fix all you need is a piece of glass like this picture frame I found in Rick's office, a piece of sandpaper

and simply take the bearing, lay it on top of it,

send it a few times,

flip it over,

then reinstall the bearing, torque it down the specs and recheck it. It's that simple.

Coming up more engine assembly tips than you can shake a stick at and later, a marriage that's made to last.

Hey, welcome back today. We're assembling a Chevy 402 and with the crank in place, it's time to install the pistons, we could have ordered a standard set of 30 over rings. But since this is more of a performance build, we decided to go with a five fit ring for a better seal.

The formula for figuring out gaps for a street engine is easy, just plug your board diameter into these equations. And that will tell you what your ring gap should be.

Insert a ring into the cylinder, then use a squaring tool to make sure it's properly aligned.

Check the gap with a feeler gauge that matches the clearance you need. It probably won't fit at this point

for the ring out and make a couple passes with the ring gap

valve only take off a little bit each time because you can't put it back on.

Check it again with the feeler gauge. The fit is right when there's just a slight drag on the gauge.

Once you get the ring set at the gap that you're looking for, you need to debar

the ring to keep it from gouging into the cylinder or the piston.

It's pretty easy. All you need is a little honing stone or a file and carefully smooth out all the rough edges.

So once you get it the bird, I'd like to put the ring back into the same cylinder that it came out of to keep up with which ring fits what cylinder

I went ahead and gap the rest of our rings and installed most of the pistons. This is a long process. So make sure to stay organized because you wanna install the correct ring in the cylinder. There were gap for and on to the piston in the right order.

When installing rings always work from the bottom of the piston to the top, starting with the oil rings

for compression rings. An installation tool reduces the risk of gouging a piston or breaking a ring.

Use plenty of regular motor oil, not assembly lobe here or you could cause ring failure. Get it in every ring group and don't forget the wrist pin,

switch back to the royal purple lube for the rod banks then drop on a ring compression tool and the pistons are ready to install

with our set up of eagle cranking rods. A RP bolts, icon, pistons and Hastings rings. We'll have a rock solid bottom end that will allow us to push our L 78 to red line with confidence.

A few gentle taps with the soft hammer should be enough to ease it into the cylinder. Take your time and be careful not to make the crank with the rod in.

I'm running the rod boats down just until they're snug. Then I'll torque them down to specs.

Another thing to check is the clearance between the two rods. Eagle recommends 15 to 25 on the steel rods

and we're at 16. So we're all good

since this is a stock L 78 build, we gotta go with the cast iron head Summit's got exactly what we need with their big block Chevy replacement heads. They'll have the stock look with the added performance and aftermarket it offers

these fell pro head gaskets came with a kit that includes all the gaskets needed for an entire build. A R P's thread sealer will prevent any leaks from the water jacket and with a dab of a RP ultra torque on the boat heads, they're ready to tighten.

Comp. Cams offers a factory grind we need for the L 78. All we need to do is loop it up and slip it in.

Comp also set us up with a complete timing set. The cranks bracket is pressed on first, followed by the

C's bracket and chain.

After the bolts are tightened, bend the tabs on the retainer to keep them from backing out

our

comp lifters got a dip in motor

oil before being dropped into place, followed by the push rod.

Now we've showed you how to adjust the lifters on a hydraulic camshaft, like on blue collar buick. But our L 78 is a little different. It's got a solid lift cam,

set a rocker on its stud. Give it a few squirts of motor oil and tighten down the nut.

Adjust the lash until the correct filler gauge fits tightly.

All right, man, I got all the panels ready for paint. Thought I'd come out here and give you a hand, but it looks like you got it covered. Yeah, I just about got it done. This thing will be ready for that four speed real soon. Cool. I'll go get some parts together. Sounds good.

You're watching muscle car for a DVD copy of this episode. Just go to Power Block tv.com and order your copy for just 595 plus shipping and handling. Start your own muscle car collection delivered right to your door from the power block.

Hey guys, welcome back and converted a 1970 Camaro from an automatic to a four speed. Well, we did have a couple of challenges. One of which was finding an original ma gearbox. It took a little searching around but we did come up with a good rebuilt unit.

Next is finding a stock appearing bell housing clutch linkage and pedal assembly. Well, American power train is your one stop shop for all this stuff. Their bell housing is an exact replica of the original GM part right down to the casting numbers. The difference is where you can't see it. These are made out of a high titanium alloy that resists cracking from high torque. We're stuffing American power train science, friction billet, steel, flywheel

and triple grip clutch inside. We chose this clutch for its unique design. These separate rings of Kevlar and Ferrai

mean it can handle all the torque we'll throw at it. These guys also supply everything else needed to make this conversion work including 1970 replica pedals.

There's two ways of doing this. You can bolt the bell house into the motor first then bolt up the transmission

or you can do it this way and bolt the bell house into the transmission and install it as a unit.

A dab of grease on the pilot shaft will help to throw up Barry, move easy. Then you can snap in the clutch fork.

The rubber boot will help keep dust and grease away from the clutch.

Hey, fella, I got the big block all put together. Are you ready to bolt on that four speed? Nice. I got everything ready to rock. Good deal, man. I'm gonna take a short break.

The pilot bearing needs to be pressed into the back of the crank. Its job is to support the input shaft and the transmission

next up comes the flywheel after lining up the bolt holes, some gentle persuasion will see it onto the crank.

Be sure to use a red lock tight thread locker on all these bolts because you do not want these things coming loose.

After torquing down the flywheel bolts, the clutch goes on using the alignment tool included in the kit,

top it off with the pressure plate, using more lock tight thread locker on the bolts.

Now, once it's all torn down, you can pull the alignment tool out and bolt up the transmission.

How are we looking up there?

Yeah, I think we're looking pretty good.

Make sure the spines on the input shaft slide into the spines on the clutch disc before you run any bolts into the block. Or you could damage the transmission

clutch disk or both

with the engine and transmission married. We can drop the newlyweds into the Subra,

oh,

since we're using all factory parts, it goes together with no problems.

Well, guys, we are well on our way and converting our 1970 Rs Camaro into a ground pounding RSS. S all the major components are in place. An L 78 spec 396

Munie transmission, upgraded front suspension and 12 volt rear end. If you have any questions about anything we've used on the show today, check it out at power block tv.com.

The body work is all done and it's sitting in final primer so it's ready for some paint, but we're all out of time for this week. So until next week y'all keep it between the ditches.
Show Full Transcript