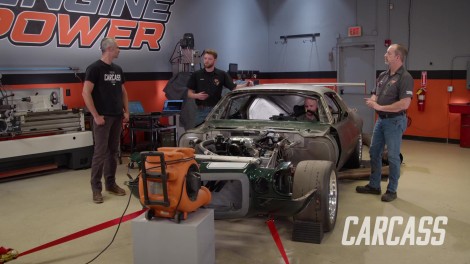
Carcass Featured Projects

Carcass Builds

Parts Used In This Episode

Summit Racing
QA1 Custom REV Series Carbon Fiber Driveshaft
Summit Racing
Summit Racing Insulated Clamps
3030 AUTOSPORT
MOD3 Series Wheels
MISHIMOTO
Aluminum Radiator
MISHIMOTO
Fan Shroud Kit

Episode Transcript

(Jimmy)>> You're watching Powernation!

(Jeremy)>> Hey guys, welcome to Carcass. Well we're down in Engine Power and we've got all of our systems buttoned up.

(Jimmy)>> You guys want to stick around when we strap it to the dyno because it's about to get rowdy. [ Music ] [ engine revving ] [ Music ]

(Jeremy)>> Well no surprise, we are working on the '72 Road Course Camaro one more time but we do have some really big plans. By the end of the day we are gonna have this thing down in Engine Power strapped down to the chassis dyno and we're gonna see what kind of numbers we can pull. Some of the stuff that we've gotten done most recently is we did mount up the coil overs up front here, and some shocks in the rear. We have the engine and transmission sitting in its final resting place. Plus we worked on the brakes. We mounted up the stainless steel lines here. Then we finished everything off by plumbing in the hard lines.

(Jimmy)>> We've also continued work in the driver compartment, finishing up the pedal box with the master cylinders, brake lines, and the reservoir getting them tucked away nice and neat whenever we're ready to beat on this thing on the track and the dyno. We also started working on our aero package. We had the wing in house. So we needed to design some pylons to mount it to the car. So we started with some cardboard. Then transitioned into cad, and then we sent our files off to Send-Cut-Send where they laser cut them for us. Very painless process working with them, quick turnaround time, and of course the parts are super accurate. So I've got some base plates tacked in here. We're gonna go ahead and get the wing mocked up on in here and make sure everything's good, and then we can do the final welding and add some lateral bracing.

Alright, looks pretty good to me. Gonna have to fix this right here with some bracing. Otherwise, yeah, I think we got it on the car pretty straight. We did take some measurements beforehand. We'll get this off and get started on the fuel system.

(Jeremy)>> Since we're back here might as well start that. I'll go grab everything I need to get started back here.

(Jimmy)>> I'll get this out of the way. [ Music ]

(Jeremy)>> Now to get started on the fuel system we have to run two lines up to the engine. There is a feed side and a return side, and to get those two lines out of the trunk area we're gonna have to install two of these bulkhead connectors up here on the front panel of the trunk. [ Music ] [ drill humming ] [ Music ]

(Jeremy)>> Now that we have the bulkhead fittings installed in the trunk let's talk about how we're gonna plumb this thing up. We're gonna be using something called AN Line, or other people refer to it as Dash Line with a number in front of it. So you can have Dash-Four, Dash-Six, and Dash-Eight, but this is what we are gonna be using. You have to use some special connections with this. The plus side to it is the connections screw on and screw off to all of the fittings kinda like our bulkhead fittings that we put in the Camaro. So you can access stuff or service stuff quite quick. These are a little tricky to put together. It's not too complicated but it's a little tricky. So we're gonna go ahead and put one of these together, and just kinda show you guys how we do it. Like I said, this stuff is a little tricky to work with. Why I am putting tape around it is because I do have to make one cut on this. So the way that AN line is put together inside you have this rubber casing, or hose. The outside layer of that is some stainless steel mesh, and then even one more layer of this nylon protective coating. That's what makes it really strong, but in order for me to get the big nut on for our connection I have to have a nice, clean cut. No frays like this. So that's why we put the tape on here. I'm gonna cut half way through the center of the tape. That'll keep it from fraying and give us a nice, clean spot so we can connect the AN connection. Use the vice here to hold this real loosely. Then we'll put a little bit of assembly lube on the fitting end. Then we'll go ahead and thread it in. When we tighten this down the trick here is you don't bottom this out. You want to leave about an eighth of an inch gap between these two parts. I went ahead and repeated the same process on the other side, and one thing to note here. When you build these lines make sure when you're done you blow through them with compressed air or some type of a solvent. You don't want to get any of that debris thrown up into your filter, or worse yet all the way up into your injectors. So this line fits. I'm just gonna go ahead and repeat the same process for the return side. [ Music ]

(Jeremy)>> We'll attach this side to the bulkhead connector, and then we'll go underneath. So the plan of attack to get towards the front is we're gonna come off of our bulkhead connectors here. We'll come up over the axle, and then we're gonna catch this frame rail down the driver's side of the car, cross over here on the floor, come up the trans tunnel area, over the trans, cross member, and then we'll come up here in between the trans and the new trans tunnel. Then we'll go up to the firewall and catch the fuel pressure regulator. [ Music ] Okay, with our line made we'll get started underneath the car here. We are gonna run this towards the front. We're gonna use these stainless steel little clamps that we got from Summit Racing and the riv-nuts to hold everything into place. So I've got a good idea where it's all got to be routed. Now I've just got to install the riv-nuts and the clamps. [ drill buzzing ]

(Jeremy)>> Do this in a couple of stages. Make sure it's bottomed out all the way. Now we're good. [ Music ]

I've got the line from the bulkhead connector. So we can get it somewhat up here with this first clamp and start traveling forward. [ drill humming ] [ Music ]

(Jeremy)>> So up top here I've got to make one more connection that's up here to the fuel pressure regulator, and that is exactly what it sounds like. That regulates pressure to our injectors. So we have the line that comes in. It'll go through the regulator over here to the driver's side fuel rail, loop around the back of the engine, then go to the passenger side. Do have another connection beyond that. Off the bottom here is a return side or return line. That just has to go down, follow the same path, and then go back to the fuel cell as well. All I have to do up top here is finish making this feed side, finish up the rest of the lines, and that'll button up the fuel system.

(Jimmy)>> Up next, we fabricate a fan shroud for our radiator to keep our engine cool.

(Jimmy)>> It's time to start working on the cooling system for our Camaro. Get this radiator mounted, and I'm taking a few measurements so we can start building out the fan shroud. We've got this nice three row all aluminum radiator from Mishimoto and they also sent us two fans. So the idea here I'm gonna make the shroud cover the entire core, and I'll make the top and bottom flanges a little bit longer so we can go ahead and put rivet nuts in these rails and then bolt the whole assembly on here. So I'm just gonna get these measurements into cad, go over to the plasma and cut it out, and then we'll go ahead and break it and get this thing assembled. [ Music ] I've got the fan shroud all designed in cad up to this point, and something that's really cool with these programs is that with sheet metal parts you can do what's called a flat pattern. What that does is it'll lay out exactly where the bend lines are supposed to go so that when you take your part to the brake there's no guessing what so ever and your part will come out perfect, versus when I've done it by hand before sometimes I'm not really sure how much material will be taken up in that bend and then I might have to make things a few times just in case I screw it up. I'm gonna go ahead and get this over to the plasma table, get it cut out, and then head to the brake. [ torch hissing ] [ Music ]

(Jimmy)>> I'll use a deburring tool to break all the sharp edges. [ Music ] [ sander buzzing ]

(Jimmy)>> Then I'll use a DA sander to give it a finished look. [ sander buzzing ] [ Music ]

[ Music ]

[ Music ]

(Jimmy)>> I have a fan shroud test fit on the radiator. So I went ahead and marked the holes out. I'll get a pilot hole drilled, and then the rivet nut sized hole. Get the rivets in and we'll final install our shroud. [ Music ]

Now I'm just gonna throw the fans on here, get this thing finally installed onto the radiator. Then it can go in the car. [ Music ] [ ratchet clicking ] [ Music ] [ ratchet clicking quickly ]

(Jimmy)>> This Mishimoto radiator and the fans are gonna work awesome in this car. And of course it's great that this is a direct drop in. So we're not gonna have to modify the core support at all. I'm gonna get Jeremy's help, get this up on here. We'll get some hoses and that'll complete our cooling system. Up next, we install our carbon fiber driveshaft and our wheels and tires. Then we get our Camaro strapped to the dyno.

(Jimmy)>> Something that you guys have seen quite a bit but we haven't talked about yet are our wheels and tires. We got a set of three piece wheels from 3030 Autosport and these guys really know how to make a high quality product. They're USA made with 60-61 T-6 aluminum forged centers that they cut in many different styles depending on what you like, and they have precision spun rim halves, and you can get a custom set made for any application depending on what offset and what look that you're going for. For tires we're going with a set of Hoosier A-7 d-o-t approved slicks in a 315/30-18. These are just gonna provide a whole lot more grip than any high performance street tire that we could buy due to the softer rubber compound. If you guys have ever been to a track and seen a car pulling off after a session you may notice how many pebbles and rubber marbles they get stuck in their tires just due to how sticky and gummy these tires get once they're hot. And that's something to consider too when you're building a car that you might take to the track, what kind of tires are you gonna need. With our Camaro it's strictly a track vehicle and will never see any street driving. So going with a full slick makes a lot of sense, but if you have a car that's pulling double duty or if you're someone that drives their vehicle to an event then you're gonna need a street tire. Something in the 200 to 300 treadwear range, and these tires are usually categorized as an ultra high performance summer tire. As far as price goes tires of this size tend to be in a similar price range depending on the manufacturer. Usually in the $400 to $600 per tire range. I'm really excited to get these on the car and see how they perform but I have just a couple of other things to do. One of the last pieces to go into our Camaro is the driveshaft. We got this pretty trick piece from QA-1 through Summit Racing. This is one of QA-1's custom carbon fiber driveshafts that was made specifically for our Camaro. They have quite a few benefits over your normal aluminum or steel driveshaft in that they are a lot lighter, a lot stronger, and because they are so light it will allow your car to accelerate much faster. They feature these c-n-c machined forged yokes that are installed using their proprietary bonding process and 13-50 U-joints, making this driveshaft capable of 1,500 plus horsepower, which I think will do just fine in our Camaro. One thing that was challenging getting this driveshaft done was actually finding the correct yoke. If you guys remember, we have a Mid Valley four speed, which is a Nascar specific transmission, and just the same the yoke itself is also specific to Nascar. The one that was sent with our transmission was cracked, which we knew about, and it was just there solely for the purpose of sealing the tail shaft housing so it wouldn't leak during the shipping process. So we were actually able to reach out to the original manufacturer and they had two left on the shelf and they were able to send us one. And the reason why this is so unique is because inside the tail shaft housing there are two roller bearings that are spaced quite a ways apart, which is why this yoke has to be so long. Also because it rides on roller bearings the yoke has to be made out of a hardened steel versus in a normal transmission you usually have a bushing inside the tail shaft housing, which is a much softer material and therefore your yoke can be made out of a normal steel. So I'm gonna get this thing installed and we'll be one step closer to getting our Camaro fired up. [ Music ] Once I get this installed I'll throw the wheels and tires on it, and the next time you guys see this car we'll be on the dyno. [ Music ]

(Jeremy)>> Coming up, we've got the Camaro strapped down, Jimmy's in the hot seat, and we're gonna see if we can't peg the needle on the dyno.

(Jeremy)>> The time has come between Jimmy and myself, Pat and Frankie. We have the Camaro down here set up on the dyno. Everything's strapped down. We have made a couple little runs here just to kinda square everything up, but Pat we're not solely checking the engine as far as horsepower anymore. There's so much more involved in this now, right?

(Pat)>> Now the engine ran great on the dyno. We know what it made. This gives us a chance to make sure that everything in the driveline is right. The rear end, the transmission, everything that's affected. Now what we can figure out is how much driveline loss we have because we know exactly what the engine makes. So whatever prints to the tire we know how efficient the chassis is.

(Jeremy)>> We've talked about this before as we were figuring stuff out. We're not gonna pull in fourth gear. That's the one to one ratio that you're always looking for. We're gonna do it a little different?

(Frankie)>> Normally we would go for that one to one, whatever gear that is. With this combo with the rear gear that you guys have and the talking about the gearing if we did it in one to one we'd be at 180 mile an hour wheel speed. You could do it but probably not a good idea on the dyno. We're gonna do it in third gear. It's a little bit safer. We'll get the same readings, same numbers. We can still tune all the partial throttle stuff. That's no problem, but third gear probably a bit safer.

(Jeremy)>> Jimmy you've had like one run at this and you're gonna have to get used to the clutch again. I guess fire this thing up and let's see what happens. [ engine starting ]

(Jeremy)>> This run, if you can hear me, we're going from 4,000 to 7,500 r-p-m. [ engine rumbling ] [ engine revving ]

[ engine revving ]

(Pat)>> Nice!

(Jeremy)>> Frankie how we looking?

(Frankie)>> I've got 18 computers it feels like.

(Pat)>> He's got like 8 computers over there.

(Frankie)>> That is right on the money, 562 horse. So there's a couple of variables that go into that with driveline loss and stuff. You guys will have an intake tube on it that gets some fresh air, but that's pretty much where it should be. Like you said, this is really about testing the car and the driveline.

(Jeremy)>> There's so many different aspects to this car that we've never dealt with as far as all the oiling system, the fuel system is so far away, and there's so much going on. Really all we're trying to do here is to figure out is a-b-c-and-d working together.

(Pat)>> It has a little bit of pressure there on the wheels. Not like a conventional clutch vehicle. So nice job on that.

(Frankie)>> Good job driving that clutch.

(Jimmy)>> I will tell you it's over in like a split second and my heart is pounding right now.

(Frankie)>> With this much power it flies through the pull.

(Jimmy)>> That's intense!

(Jeremy)>> Do you want your heart to pound one more time. We can do another one right?

(Pat)>> Why wouldn't you. We're here and we've got to do a little bit of work on it anyway. I feel that number's gonna go up.

(Frankie)>> We'll check the data log, and then we'll make another hit. [ engine starting ] [ engine rumbling ] [ engine revving ]

(Pat)>> Nice!

(Jeremy)>> It gets better every time, I swear! That's a good looking graph right there.

(Frankie)>> Yeah, 631.7, 522-pound feet. I'm not a math magician but that's really good. Squeezed a little bit out of her.

(Pat)>> That's just a little bit of tuneage.

(Jimmy)>> I think that'll be enough.

(Frankie)>> I don't know, it's a light car.

(Pat)>> How'd that feel going through the pull?

(Jimmy)>> Adrenaline every time! Okay, we're right there, let's get off.

(Frankie)>> Got pretty loud when this pipe blew off but that's okay.

(Jeremy)>> It's gonna be straight scary. So we've got everything working now. We just have to figure out how to drive the car. That is gonna be a challenge in itself.

(Pat)>> That sounds like a "you" problem.

(Frankie)>> It'll be good!

(Pat)>> Very good! That was a very good job there young man. Nothing's leaking, everything looks great, temperatures are great, oil pressure is great, everything sounds good, rear end's not leaking. Everything is doing what it's supposed to.

(Frankie)>> This thing's ready to rock and roll.

(Jimmy)>> I think we've got our work cut out for us. We're gonna try to make the learning curve as shallow as possible, but it's still gonna be almost vertical.

(Jeremy)>> As far as work cut out for us we've got lot more to do. That's gonna wrap it up for us today. We're gonna get this thing unstrapped, head back down to our studio. What do you think man?

(Frankie)>> This is mean!

(Jimmy)>> Something I've never experienced!
Show Full Transcript