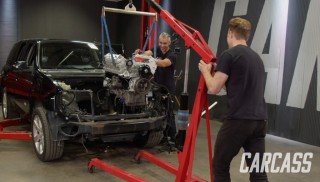
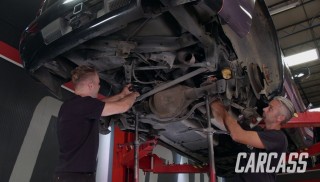
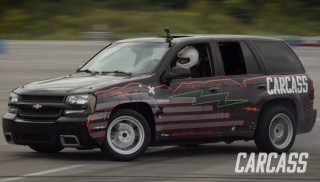
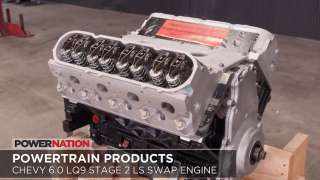
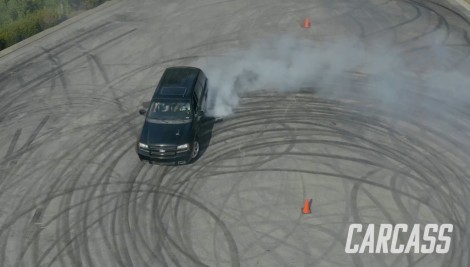
Parts Used In This Episode

Summit Racing
OMP Racing TRS-E Racing Seats
Edwards Ironworkers
55 Ton Ironworker
Matco Tools
MATCO Tools are the Official Tool Supplier to PowerNation
The Industrial Depot
Tools, Hardware, Shop Supplies

Episode Transcript

(Jimmy)>> You're watching Powernation!

(Jimmy)>> Today on Carcass we wear out a set of tires with our bone stock project vehicle. [ engine revving ]

(Narrator)>> When you want to build something different you turn to these guys, Jeremy Weckman and Jimmy King. Jeremy was raised in Minnesota building street rods. He's a builder, fabricator, and welder. Jimmy grew up in Nevada working in his dad's garage building cars. He's a mechanical engineer, builder, and fabricator. They take left for dead rides and transform them into one of a kind builds. If you can dream it they can build it. This is Carcass, a non-traditional speed shop. [ MUSIC ] [ tires squealing ] [ MUSIC ]

(Jimmy)>> This is our 2006 Trailblazer SS. It's the super sport s-u-v from the bow tie brigade sporting some serious boost and performance.

(Jeremy)>> That's right, this mid-size s-u-v was an exciting new variation of a proven platform that GM had from 2001 to about 2009, but was later replaced by the Traverse. The SS however was produced in 2006. So we ran out and grabbed the first production year of this truck we could find with this trim package.

(Jimmy)>> And in the first year it saw all kinds of upgrades like the 6 liter V-8 derived from the LS-2 C-6 Corvette engine. It pumps out 395 horsepower and 400 pound feet of torque from under the hood of this black beauty.

(Jeremy)>> In addition we saw lower suspension and stiffer springs to give this thing better handling from the factory. Plus 4.10 gears for better off the line acceleration. And all that wouldn't be possible without some low profile tires and some 20 inch polished wheels to give this thing that aggressive look.

(Jimmy)>> Speaking of looks the Trailblazer SS screams sporty with its monochrome grille on its pavement hugging front end along with its body color trim, tinted windows, and SS badging, but the exterior isn't the only thing that got some changes in the looks department.

(Jeremy)>> That's right, the interior had a makeover as well with some tight fitting sports seats featuring the SS embroidered logo. Then there's the steering wheel, which is leather wrapped and also sports the SS center emblem, and you can't forget the signature instrument cluster with the silver face tachometer so you can see yourself bounce off the red line.

(Jimmy)>> The Trailblazer SS is a mid-size family s-u-v seating five adults comfortably. It weighs just over 4,500 pounds, gets 14 miles to the gallon in the city, 17 on the highway, and can tow a max of 6,700 pounds with its four speed automatic transmission. With its burley exterior it's sometimes hard to remember that this thing is still a truck.

(Jeremy)>> You know it's 14 years old. The interior's in pretty decent shape. We're gonna pull most of that out and throw it right in the trash.

(Jimmy)>> And before we do that we have two tires to kill.

(Jeremy)>> I like your style. Let's leave them all on the pavement. [ MUSIC ] [ engine revving ] [ MUSIC ] [ tires squealing ] [ MUSIC ] [ engine revving ] [ tires squealing ] [ MUSIC ]

(Jeremy)>> Yes! [ MUSIC ] [ engine revving ] [ MUSIC ]

(Jeremy)>> I love my job.

(Jimmy)>> Up next we tear out the interior of our 2006 Trailblazer SS and construct a jungle gym in its place cause what else to do you do on a playground. You're watching Carcass!

[ MUSIC ]

(Jimmy)>> I think this is going to be my favorite build this year and this thing is already pretty capable as is.

(Jeremy)>> Totally and we are going to have a blast making this thing literally drive sideways.

(Jimmy)>> And you know what's better than drifting with just one friend? Drifting with the whole family.

(Jeremy)>> Yep you heard right. We're gonna take this already capable two wheel drive Trailblazer SS and make it even more sporty turning it into a four door drift truck. We're gonna tear out the interior, cage the inside, and put in some proper racing seats and harnesses. Then we're gonna throw in a whole new powertrain converting this thing from an automatic to a manual transmission, and finally we'll address our steering and our suspension making this thing a capable drift machine.

(Jimmy)>> That's a pretty big plan for one day but I think we should just focus on the interior items today. We'll have to get rid of everything to get the roll cage installed, and it'll be nice to get rid of some of that extra weight.

(Jeremy)>> That's a good idea but I've got an even better one. How about we weigh this thing and see how many pounds we shed when we nix all of these non-essentials?

(Jimmy)>> Let's do it! [ MUSIC ]

(Jeremy)>> What does this thing weigh?

(Jimmy)>> 4,509.

(Jeremy)>> Holy cow this thing's a behemoth.

(Jimmy)>> This thing weighs over two tons and we would like to save somewhere in the ballpark of about 500 pounds. So to do that we're gonna have to rip out everything we can get our hands on inside the cab.

(Jeremy)>> Look at that, rebate. Ooh there's two, 20 cents!

(Jimmy)>> One of the heaviest things in the cab are the seats, and since we're bringing some friends along these seats just aren't suitable anymore for this application.

(Jeremy)>> Dude that's got to weigh well over 100 pounds. Holy Martha that's heavy! These seats will easily remove a couple of hundred pounds from our vehicle, and getting them out of the way will make a ton of room for Jimmy and I to work in. Last seat, that's heavy too. [ MUSIC ] Brackets! I'll go through.

(Jimmy)>> We aren't going to leave much behind in the cab. We're gonna remove the center console, all the door seal plates, and any of the plastic trim. [ MUSIC ]

(Jeremy)>> Well look at that. Wait, holy cow, this thing's got on board air. I didn't even know that was a thing in these trucks.

(Jimmy)>> Panel after panel we're removing anything and everything we can get our hands on to lighten up the load.

(Jeremy)>> You guys remember Simon says, like boop, boop, boop, beep? Boop, boop, boop, beep!

(Jimmy)>> Even the headliner has to go. We're gonna yank out everything until we're left with a clean metal shell.

(Jeremy)>> That's right, the only thing we really want to keep is the dash. So we'll take a little bit of extra time removing it, making sure we can re-install it later.

(Jimmy)>> Lastly we're gonna tear up the carpet so we have access to bare metal for all of our modifications.

(Jeremy)>> Look at this Wilson. That's jackpot! Think of how many people out there. Holy cow man! Go buy a case of soda or other liquid.

(Jimmy)>> With our Trailblazer's interior finally stripped down we took one more weight reading. How much did we lose? We found that we dropped 487 pounds. With the truck in this state we now have a clean canvas to start our work.

(Jeremy)>> You know dude since I've been doing a lot of the heavy lifting I'm gonna go get a little snack.

(Jimmy)>> Reese cup please.

(Jeremy)>> Yeah right. What am I gonna get here. Oh I know.

(Jimmy)>> Before I even get started on the roll cage I need to figure out where the main hoop is gonna land, and to do that I'm gonna use these blocks, set one of our racing seats on top at the farthest point back from the pedals in case we have a tall driver, and what this is gonna do is push the main hoop as far back as it needs to go so I can get started building.

(Jeremy)>> There's a couple different ways we could build the base of our roll cage. The way we chose was to use a plinth in the form of a box. That way we can build our cage like normal, and when we're ready we'll just slide it back off the box, lower it down, and that way we can weld completely around all of our tubes.

(Jimmy)>> We'll kick this build off with a couple of measurements at the base of the b-pillar. With the measurements in hand we'll cut out the pieces at the Edwards Iron Worker, making a slight bend in one of the pieces to match the profile of our cab.

(Jeremy)>> All we need to do from here is weld up a simple but strong box to support our main hoops.

(Jimmy)>> This method for building out the plinth box works the same as just welding a base plate to the floor. It helps spread the load over a large area to prevent failure of our roll cage, and it has the advantage of giving us access to all the weld seams.

(Jeremy)>> With that in mind we can now construct our cage starting with our main hoops. We'll position one behind the front seat utilizing a 75 and 15 degree bend, and then we'll place a secondary hoop behind the passenger seats cause we want our friends in back to be just as safe as we are up front.

(Jimmy)>> Next we need to install the side hoops. Each of these is set on the plinth box and the other end is notched to be married to the main hoop. We'll work our way back and tack these into place.

(Jeremy)>> The last pieces to be installed on this jungle gym are the diagonal brace and the door bars. That will help provide some triangulated strength and protect the passengers from any lateral impacts.

(Jimmy)>> We're now ready to finish weld all of our joints, and we have very little room between the top of the cage and the roof. So it'll be impossible to get a tig torch up in that tiny space. This is where our plinth box design comes into play. All we have to do is slide the cage back a few inches, allowing it to drop almost four inches, and that'll give us the ability to weld around each joint.

(Jeremy)>> With the front portion of our cage welded solid all we have to do is set it back on the plinth boxes, add a bar connecting the rear hoop to the front hoop, and make this a permanent part of our Trailblazer. [ MUSIC ]

(Jimmy)>> The cage went in like a piece of cake and we know throughout this build there's going to be some fabrication and need for some specialty parts, but we're also gonna be replacing stock parts to get this truck drifting.

(Jeremy)>> And Rock Auto is where we can find all the parts we need for this job. Things like power steering pump and hoses, headlights, and even brake pad and rotor combos are easily found on their website, and it's easy to navigate breaking everything down by year, make, and model, opening the door to thousands of stock parts.

(Jimmy)>> Let's go over this list and get these parts ordered. Coming up we put humpty dumpty back together again but first we have to make a few mods to make sure this all fits. This is Carcass.

(Jeremy)>> Our 2006 Trailblazer SS hasn't made any changes in the looks department on the exterior but the interior, well that's a whole other story.

(Jimmy)>> We attacked this thing head on, gutting it head to toe removing all the seats, paneling, and pretty much every trim piece inside.

(Jeremy)>> We followed that up with a hefty roll cage that will not only protect the driver and passenger, but protect our friends in the back.

(Jimmy)>> Now that the inside is safer it's time to put this thing all back together, and that starts with the dash.

(Jeremy)>> We need to modify the dash so it can fit around the roll cage we just installed. With an idea of how much room we need those measurements will be transferred to the top of our dash and then we'll just start cutting.

(Jimmy)>> The air saw makes quick work slicing through all the plastic and foam that makes up the dash. It's a nice tool to have around when you have to make a few of these cuts.

(Jeremy)>> With our cuts made we'll check to see if it fits. We'll keep an eye out for clearances around the down bars and to see if the dash lines up with the original bolt holes.

(Jimmy)>> Fortunately we only had to make one cut here with everything fitting like a glove, and with a half a dozen bolts holding it in place we can add some creature comforts like a/c controls, and even the radio just for looks.

(Jeremy)>> One thing that we are re-installing that's for more than just looks is the dash cluster. We'll be needing that to sneak up on that red line.

(Jimmy)>> And we'll finish it off with the glove compartment because there's no better place to keep that owner's manual.

(Jeremy)>> Now that we have the front of our truck put back together it's time to make this a four passenger capable drift truck. We picked up some bucket seats from Summit Racing dot com and some brackets to match. The floor of our Trailblazer is an uneven mess. So we need to build some standoffs so we can safely attach our seats.

(Jimmy)>> We'll start by cutting inch and three quarter tubing at the chop saw. Then we'll add a tube flange and weld the two together. Before we can install the standoff in the cab we need to add a base plate.

(Jeremy)>> With that in place we can slip in our standoffs and then just tack those to the base plates. When we feel like everything is hunky dory we'll mark the holes in the back of the seats and then just drill them out.

(Jimmy)>> We'll finish weld our base plates and our standoffs, and finally throw in the seat one last time to bolt it down. [ MUSIC ]

(Jeremy)>> With our front seats we're fighting a similar problem with our trans tunnel being uneven. So we have to be a little more creative with our approach. With a diagonal measurement of seven inches in the front and four inches in the rear we'll cut down an inch and a half strap on our Edwards Iron Worker making sure we leave about an inch and a half to the four inch end of our measurement. Then we'll make a 45 degree bend 7 inches from one end and about 5.5 inches from the other. With the strapping flipped over we'll add a second 45 degree bend about an inch and a half from the end.

(Jimmy)>> A quick sanity check to make sure we made all the right bends at all the right lengths. Then we'll trace out our shape on some eighth inch plate and cut it out at the Iron Worker before moving to the welding table to put our tig to work.

(Jeremy)>> With the riser constructed all there is left to do is bolt it to the seat bracket. Add a simple tube and tab bracket to the other side, and then just set the seat in place.

(Jimmy)>> And we'll need to carefully weld it into place making sure not to put too much heat in one area.

(Jeremy)>> Let's get in here and see if it works. Oh man that's like butter.

(Jimmy)>> Let's talk performance. We've got our stock 6 liter V-8 under the hood and it's already a really powerful engine but I think the stock tune is preventing it from reaching its full potential.

(Jeremy)>> I see where you're coming from and it kinda looks like you have a solution.

(Jimmy)>> Yeah this is the X-4 performance programmer from SCT. It's an aftermarket tuner that comes pre-loaded with dyno proven tune files that are accessed through an easy to use interface, and the display shows more real time data than we'll know what to do with.

(Jeremy)>> Well that sounds good if we have a stock motor but what if we're running something like a turbo or a supercharger?

(Jimmy)>> That's the kicker. This thing can hold up to 20 custom tunes. So if we add a supercharger we'll reach out to our local SCT dealer and they'll custom tune it for us.

(Jeremy)>> Well that sounds good but let's not put the cart ahead of the horse because we're still got a lot of stuff to do inside the cab.

(Jimmy)>> Next on Carcass we polish off the interior with a custom center console and a proper drifting hand brake. You're watching Carcass!

(Jimmy)>> We're extremely excited now that we have four racing seats and a proper roll cage installed in our Trailblazer. The interior is nearly complete but there's something missing that just doesn't feel quite right. We've got wiring strewn across the floor and we need a place to mount the hand brake for this drift truck. So we're gonna quickly fab up a center console and finish off the cab.

(Jeremy)>> We need to grab a measurement from the bottom of our dash to the rear cross bar of our roll cage. Then at the chop saw we'll cut a section of inch and five-eighths tubing and give it a 45 degree bend on our Edwards 10 ton bender.

(Jimmy)>> A notch needs to be cut at one end so that it can be attached to the cross bar of our roll cage, but before we can do that we need to install two mounting plates to the factory studs under the dash.

(Jeremy)>> Then we'll raise the tubing into place and tack that in front and at the rear of the cross bar. We'll bring in a second piece of bent tubing and tack that in place as well.

(Jimmy)>> Now we're ready to make a template for the sheet metal we'll use to cover the console. We'll crudely punch the shift through the cardboard and roughly trace out where the e-brake will be.

(Jeremy)>> With those lines marked out we'll make quick work of them with the cutoff wheel. Then with some careful bending and maneuvering around the shifter we'll slide one piece of sheet metal on top making sure to tack it into place, and adding the remaining sections towards the rear.

(Jimmy)>> The last sections to go on are the side panels. We cut those out using a similar template. They get tacked on with a healthy number of tacks.

(Jeremy)>> We can now mount our hand brake since we have a center console to support it, and that all starts with finding a good location for the drive to have easy access to it.

(Jimmy)>> We want our hand brake to have a rigid base. So we're gonna trace out our mounting bracket on some eighth inch steel. We'll cut it out on the Iron Worker before taking it over to the belt sander to give it its final shape.

(Jeremy)>> In the cab we can tack it in the location where we want our hand brake to live. Then just drill out a couple of holes. [ drill humming ]

(Jeremy)>> And bolt it into place.

(Jimmy)>> Okay so side bar. Let me explain how this works. Entering here you have the main line coming from your master cylinder, or in our case the a-b-s module. This port is the outlet sending braking power through the left and right rear brake lines. When you pull back on the brake handle it shuts off the port coming from the a-b-s module and with the reservoir of fluid in here you are able to send braking power only to the rear brakes. Now how do we plumb that? All the brake lines merge at the a-b-s module. We have two brake lines that are coming from the brake booster and four lines that are going to each individual caliper. We're detaching only the rear brake lines, and with a pipe cutter we'll shorten them up just a bit adding a new brake line fitting. Then using a hydraulic flaring tool we'll add a flare at the end of each line.

(Jeremy)>> In the cab we'll cut a one inch hole using the hole saw to feed our new hand brake lines through. Then at the hand brake we'll screw on a piece of flexible brake hose and feed the other end through the hole that we just cut out, and at the work bench we'll make a 90 degree bend on a short piece of solid brake line.

(Jimmy)>> With that bend nearby we can make our first connections. Two short jumpers coming from the a-b-s module are joined at a "T" fitting, and this attaches to our short 90 degree bend at one end and to the flex hose at the other. We'll then run one more new brake line in the cab. This time it's a hard line which will bend to suit our needs. The other end will connect to a "T" fitting providing stopping power to the two rear calipers.

(Jeremy)>> Hey Jimmy you know the 6 liter that's in that truck has got over 200,000 miles on it?

(Jimmy)>> That could be a problem with the amount of abuse we're gonna throw at it.

(Jeremy)>> Exactly, so I was scrounging around the internet looking for a replacement engine that had performance in mind and this is what I found. Last year Powertrain Products introduced their 5.3 engine geared toward the LS swap market. Well this is their stage two LQ-9 six liter that produces about 450 horse and will fit any popular LS swap.

(Jimmy)>> Like our Trailblazer.

(Jeremy)>> This thing comes with an upgraded cam shaft and an improved valvetrain.

(Jimmy)>> Let's look at this cam card. The cam lift on the intake side is 591 thousandths, 601 on the exhaust side, and the duration is 230 degrees on the intake side and 236 degrees on the exhaust side at 50 thousandths lift. That's a healthy cam.

(Jeremy)>> That's where all those extra ponies are coming from, plus the guys over at Powertrain Products do precision work taking care of all known factory issues, and this guy has got a two year performance warranty.

(Jimmy)>> Next time on Carcass we send out our stock ponies to pasture and saddle up some fresh muscle for our four seat drifting machine. This is Carcass.
Show Full Transcript