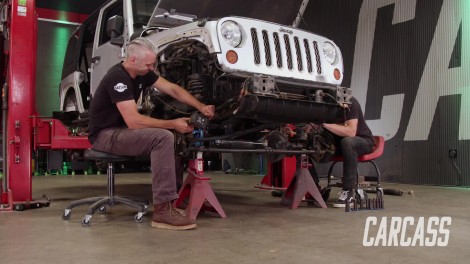
Carcass Featured Projects

Carcass Builds

Parts Used In This Episode

Summit Racing
Rock Krawler X-Factor Mid Arm Suspension Lift Kit
Summit Racing
Rugged Ridge Differential Cover

Episode Transcript

(Jeremy)>> You're watching Powernation!

(Jeremy)>> Today on Carcass we bought a Jeep JK at an auction, and we have it in the shop for some upgrades that will turn this four by four machine into a dual purpose rig.

(Jimmy)>> We install a new suspension system to clear the terrain and replace the worn out braking system. [ Music ] [ engine revving ] [ Music ]

(Jeremy)>> Hey everybody, welcome to Carcass. Now the rig you see sitting behind me on the hoist is a 2012 Jeep Wrangler JKU. This is the four door version of the Wrangler, and this is the next project Jimmy and I are gonna get our hands dirty with. Now we picked this up from a state auction in the condition that you do see it in. It did have some wheels and tires on it. They were all mismatched and undersized. Somebody has stolen all of the fender flares. The front bumper was missing along with all the brackets. There is a slew of wires underneath the hood that we are just assuming went to some off road lights, and in the back here the top at one point was painted white and now somebody has painted it black. Now we're not too concerned with the overall appearance of the Jeep. We're more concerned with the bare bones of the Jeep. It's got 136,000 miles on it, and we have heard it run and it does run really well. So this gives us a very good platform to start with. The idea behind this Jeep is more of a dual purpose rig. We're gonna want to drive it out to the trails, have a good day of wheeling, and make sure it gets us back nice and safely.

(Jimmy)>> And what's nice about our Jeep is it already puts us a few steps in the right direction. This is a special edition Jeep. It's a Modern Warfare 3 version, which also means it's a Rubicon, and Rubicons from the factory had a few parts that make it quite a bit more offroad capable. Front and rear it's got a Dana 44 with lockers in it, and it also has a four to one transfer case. This being a 2012 model it has the better version of V-6, which has a little bit more horsepower. Now we don't know the history of this. We do think it's been wheeled pretty hard. So we just want a clean slate. So we're gonna take some of the old components off and put some new stuff back under it.

(Jeremy)>> Now from our best guess this does have a suspension lift kit in it. We have no idea what brand it is or even how tall it is, and we're definitely gonna want to get that out of the way because we're gonna want to install something that we feel a little bit more comfortable with, and the fact that we're gonna be running oversized wheels and tires. So the idea is to get this one ripped up out of the truck. Let me show you what we're gonna be installing. This is the RockCrawler X-factor Mid-Arm system that we got from Summit Racing. Some advantages to this kit is the fact that it has adjustable upper and lower control arms for both the front and the rear of our Jeep, and it even comes with adjustable sway bar links. Now as far as the springs go these are a triple rate coil spring, and the cool thing that RockCrawler does is they build in the extra weight that you're gonna be hanging off of your Jeep into these springs. So if you guys are running a custom front bumper with a winch or a custom rear bumper with an oversized spare tire all of that weight is already factored into these springs. Once you set it on the ground it will sit nice and level. It does come with a rear track bar relocation bracket, and you also have extended brake lines. So we won't have any issues with our brakes. This is a complete 100 percent bolt in kit. So there's no welding required. So to get this kit installed into our Jeep first we've got to go take our Jeep apart. [ drill humming ] [ Music ]

(Jeremy)>> The brakes and the shocks are the first to go. [ Music ]

[ drill humming ]

(Jeremy)>> We'll follow that up with the steering. [ hammer banging ] Then we'll loosen the upper and control arms to get the springs out. [ drill humming ] [ Music ]

(Jimmy)>> Alright! [ Music ]

(Jeremy)>> And then completely remove the front axle, leaving it sit on a set of jack stands. [ drill humming ] [ Music ]

(Jeremy)>> Alright Jimmy, we're gonna go up. [ mechanical humming ]

(Jeremy)>> Perfect, that should work. When out on the trails you want as much flex as possible. So we'll upgrade the suspension for plenty of articulation.

(Michael)>> We've got our suspension out. We went ahead and took our axle out and pressure washed it, gave it a fresh coat of paint. So now it's time to install our RockCrawler suspension.

(Jeremy)>> So we're gonna be installing the upper and lower control arms first. We're gonna do that on the chassis side of things, and per the instructions they do give you the starting length for both of these. We've already got that preset. So we're gonna go ahead and put them up here in the truck using all the stock hardware. [ Music ]

So we have both of the control arms in. It was pretty easy. The next step here is to install these bumper stops. Now they come with a half inch bolt. So we need to drill out the spring pad perch here a little bit. So we'll go ahead and take care of that right now. [ drill humming ] [ Music ] [ drill humming ] [ Music ]

(Michael)>> Are you ready to drop it down?

(Jeremy)>> Go ahead! These things are absolutely huge. This thing's gonna be tall. Try to line it up here.

(Michael)>> The good thing is we don't have far to go. [ Music ]

[ Music ] [ hammer tapping ] [ Music ]

(Jeremy)>> Up next is the front track bar, and this is supposed to be preset to 32 and five-eighths. We already have it there. One thing to note is this little kick out that's in the bar that actually goes around the differential cover. That way when the suspension cycles, or goes through its travel, it won't hit anything. So get this slid up and in there and we'll keep moving on. [ Music ]

Now it's time to install the shocks. These are two and a quarter inch RRD emulsion shocks, and they go right into the factory location. So it's a pretty simple install. One thing you guys may have noticed is the fact that we haven't tightened any bolts down, and we're doing that for a reason. Once we get all of the suspension installed we're gonna set it down on the ground under its full weight. We'll cycle the suspension a little bit, make sure nothing binds, and then we'll go ahead and tighten everything down from there. [ hammer tapping ]

(Michael)>> Up next is our sway bar end links. These are fully adjustable, and they come with this pin here that you can pull to disconnect your links from the sway bar so you can really flex on the trails.

(Jeremy)>> The last thing to do on the front suspension of the JK actually still involves the sway bar end links. Now when you guys disconnect these when you're out on the trails you don't want to just leave them swinging around. They may contact something and get wrecked. So the cool thing is RockCrawler actually sends you these cool little straps. We install these up onto the front body mount here. That way when you disconnect your sway bar end link you can just swing it up out of the way, use a strap to hold it position, and when you're done for the day unstrap everything and you can head home. [ drill humming ]

(Jeremy)>> That wraps up everything on the front suspension of the Jeep. So from here we'll move out to the back and tackle all that as well.

(Jimmy)>> Coming up, we'll tackle the rear suspension next, making room for bigger wheels and tires.

(Jimmy)>> So we're about halfway through with our Jeep suspension install. We have everything in on the front, and we still need to torque everything down once the Jeep is back on the ground, but as for the rear it's basically the same parts. It's four link front and rear. So it's pretty similar. We'll just get all this old stuff out and get the new stuff back in it. [ ratchet clicking ]

(Jimmy)>> Just like on the front, we'll start with the brakes and then go ahead and loosen the bolts for the link bars. Once we set the axle on some jackstands we can start to replace each link one by one. [ drill humming ] [ Music ] [ drill humming ] [ ratchet clicking ] [ Music ]

(Jimmy)>> We will disconnect the driveshaft as well. [ Music ]

Once we get the axle set on a stand we can unbolt the shocks and track bar and lift the Jeep away from the axle. [ Music ] [ metal clanging ]

(Jeremy)>> I got it! [ mechanical humming ] [ Music ]

(Jimmy)>> So we have the rear axle drooped down. So we can start replacing some of these arms. We're gonna do it one at a time just so we don't have to worry about the axle rotating. Jeremy's got the new arms adjusted to the recommended setting to get them in there. So I'm just gonna start getting this lower one off and put the new ones in. [ Music ] [ drill humming ] [ Music ]

[ drill humming ] [ Music ]

(Jimmy)>> The RockCrawler kit is easy to install when you have everything pre-adjusted, and it uses the stock hardware. [ Music ]

[ Music ]

(Jeremy)>> For the bump stop in the back the kit comes with this little riser. Plus to match our lift we also have to add one of these pucks, and that way we won't bottom out when we're on the trails. [ drill humming ]

(Jeremy)>> So one thing that the kit comes with is this little misalignment spacer. It goes down here on the axle. It's kind of a little wedge, and that's gonna help us with pinion angle as we get this all set up and in here. Go ahead Jimmy. Keep going, and we'll put some tension on them. That'll work! [ Music ] [ drill humming ] [ Music ] [ drills humming ] [ Music ]

(Jeremy)>> So for the rear track bar it comes with this relocation bracket in the kit here. It slides right over the stock location, and what that does is actually moves the mounting point up a little bit higher. So we'll go ahead and install this with the hardware that they sent. We should be able to button this thing up. [ Music ] [ drill humming ] [ Music ]

[ drill humming ]

(Jeremy)>> A little bit! Little too much, let off. [ hammer tapping ]

(Jeremy)>> Off a little bit. There it is. [ drill humming ] [ Music ] So the last thing here are the sway bar end links. Now these do have a pre-set length. They're 12 inches. So we've got them adjusted to that, and from here that pretty much buttons everything up as far as the lift kit goes. Again, we're not tightening anything down until we get this thing on the ground. Up next, we'll check out a leaky rear diff. Plus upgrade our brake system for better control on the trails.

(Jeremy)>> We have the complete suspension installed in our JK, and again we're gonna leave everything loose as far as the hardware goes until we get this thing set on the ground, but when we were under here we noticed a couple of things. First thing is the rear diff cover is actually leaking a little bit. There's a little seepage from the gear oil. So we're gonna go ahead and address that. We'll take the cover off, drop the fluid out, and take a really good look at what's going on inside. The other thing is when we took the calipers off to do the lift we noticed that the brake pads were completely shot. There is nothing left of these pads. So we're gonna go ahead and do a four corner upgrade on the brake system, but to get started we'll start right here with the diff cover. We'll pop this thing off, see what's inside, and get it all cleaned up, and we might even add something special on the back here later. [ drill humming ]

(Jeremy)>> There we go! [ Music ] We're pretty sure somebody has been in here for a couple of reasons. One, there's r-t-v, or silicone on the face of this gasket surface. Usually they have an actual paper gasket in here. The other thing is if you look at the actual carrier part here on this side we see one kind of peen mark from a punch, and this side has two. Now that's not factory. Normally what you do when you take a rear differential apart is you always have to decipher which side the bearing caps go on to, and when you do that you put a peen mark on one side and two peen marks on the other. So that pretty much tells me somebody's been in here, but we'll clean it up really good, take a good look at it, and then we'll just put it all back together. [ aerosol can hissing ]

(Jeremy)>> One thing to note here, the pattern on the ring gear is absolutely perfect. It's right where it needs to be. So whoever was in here before did a great job. So all we're gonna do is finish cleaning this thing up and we'll slap a new diff cover on it. [ Music ]

So we have the gasket here on the differential, and it's time to put the diff cover on, but we did opt to go with something a little more heavy duty. This is a Rugged Ridge differential cover that we picked up from Summit Racing. It's made out of thick aluminum. So you're gonna need different hardware, but the plus side to that is it does come with the kit. Plus a little addition here is they actually have this little dip stick or fluid checker here on the side. So if you guys are ever curious on how much gear oil's in your differential you can just check it right there. [ Music ] [ drill humming ] [ Music ]

(Jimmy)>> Like Jeremy mentioned, our Jeep's brakes have seen better days. So we're going to do an upgrade, and we're going with the Z-36 Truck and Tow upgrade brake kit from Powerstop. This is a very well engineered kit. It has a higher coefficient of friction than the o-e application, which gives up better stopping power, and this kit is designed for hauling, towing, or an off road application like our Jeep. Especially out on the trails we're gonna have bigger tires, and we're gonna be trying to hammer it up some trails over rocks and things like that. So we're definitely gonna need it. [ ratchet clicking ]

(Jimmy)>> It's not very tight! [ Music ] [ drill humming ] [ Music ]

(Jimmy)>> The Powerstop rotors are drill, slotted, and zinc coated for maximum cooling and corrosion protection. So the kit comes with these new little boots here. It also comes with these clips. So we'll go ahead and replace everything, put some new lubricant on everything. Make sure it's nice and free to move around. [ Music ]

[ Music ]

[ Music ] The pads are Powerstop's Z-36 carbon fiber ceramic pads designed for severe duty applications. [ Music ] [ ratchet clicking ]

(Jimmy)>> Last thing here for the front brakes is to replace the hose. Since we have a lift in this thing the axle sits a little bit farther below the chassis, and we have more suspension travel. So we have to have some kind of a solution to make sure this brake line is no longer stressed. Jeremy's gonna tell you about it.

(Jeremy)>> One of the most commonly overlooked things in your braking system are your brake hoses. Now on a stock or o-e brake hose all it is is rubber, and over time this can actually start breaking down on the inside, and u/v can start penetrating these causing them to crack, and that gives you a real soft or spongy feel in your brake pedal. Now a simple solution to that is to go with a set of stainless steel brake hoses. Now it's exactly what the name implies. Inside here is a tube, but on the outside it's covered up with a stainless steel sheathing, or casing. Think of it this way. If you have a balloon and you're trying to blow this balloon up you can do it pretty easily to the point where it might burst, but if you take that same balloon, stick it inside of a cylinder, or in our case a stainless steel sheathing, and you try to blow that balloon up that outward expansion against that casing is gonna stop that from happening, and in that case it's also gonna give you a very firm brake pedal feel, and that's what we're going for on our Jeep. If we pair these up with our Powerstop brakes that Jimmy just installed we should be able to stop on a dime. Now these came in the lift kit that we just installed in the Jeep. So we're gonna go and ahead, get these bad boys on there, and we're gonna button this thing up. [ Music ]

[ Music ] I got the rear buttoned up.

(Jimmy)>> I've got the front rotors and pads on. So we can kinda flip flop, and then we'll have the brakes completed.

(Jeremy)>> We'll be one stop closer to hitting the trails. [ Music ]
Show Full Transcript